It’s like everyone gets it now. No one wants to host their assets on insecure email servers that crawl. Definitely not your business email accounts.
More savvy business people like you are looking for safer and faster solutions to their web hosting needs. Solutions that only a VPS hosting solution can solve.
Look at the trend. While fewer and fewer people seek “web hosting,” more and more are searching for “cloud VPS.”

If you’re wondering how to get a business or personalized email in VPS, this will be your guide.
Why Create a Business Email in VPS?
Instead of having your email carry gmail.com, yahoo.com, zoho.com, icloud.com, or outlook.com, you can have a personalized email address in yourcompany.com.
Welcome to business email.
Serious businesses send their messages in emails carrying their domain name. Business people raise their defenses when they see an email from a generic source like Outlook, Gmail, or Yahoo.
Your domain name in your email is synonymous with being professional and taking your business seriously. And I bet you want to take a communication channel like email seriously.
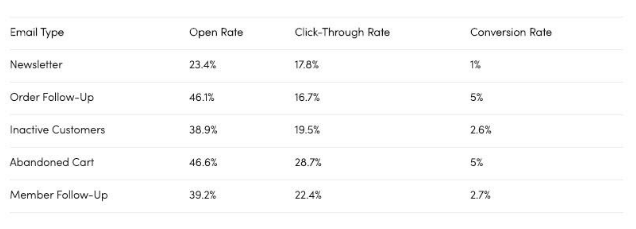
Email stands as one of the best business communication channels. With open rates ranging from 15 percent to more than 28 percent and conversion rates ranging from one percent to five percent, you definitely want to up your email game.
Having your email in your domain name helps you establish that you’re authentic.
But there’s more.
Other benefits of using a VPS email hosting package for your business email includes:
Brand awareness. When you send cold pitches or initiate contact with potential clients or business partners, you also get the opportunity to share your brand with them.
Avoid spam. It’s easier managing spam email on VPS. In fact, your message is less likely to land spam if you’re sending your message from your domain’s email address.
More so, sending messages from a VPS hosted email account is more likely to give you 100 percent deliverability.
Better privacy. Having your email hosted by you gives you more privacy. You have more control over your files and information.
If you don’t have a VPS email hosting account, let me show you, a step-by-step guide for creating accounts for different needs.
Requirements for Setting Up Your Email On VPS
First, you must buy a domain name and web hosting account to initiate the process of setting up your business email in VPS. An added benefit is you can start building your business’s online presence if you haven’t done so already.
If you’re seeking for the perfect choice to move your business forward, consider using Scala Hosting to solve your domain name and hosting package needs. However, you can bring your domain name to Scala if you already have your domain name registered elsewhere.
Here’s how to get them done.
Steps to Set Up a Business Email in VPS
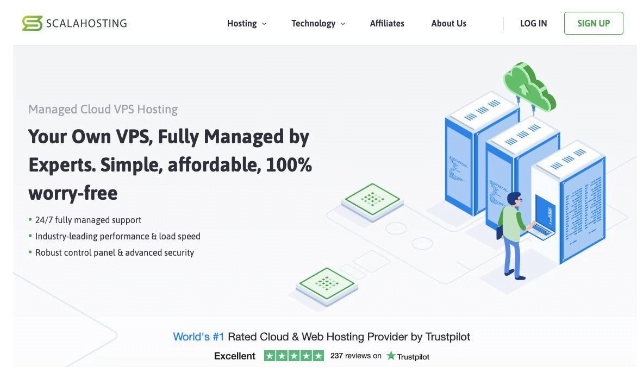
Head over to the Managed VPS Cloud Hosting page, scroll down to see the pricing plans.
Compare the plans against your needs and see what suits your situation. Scroll further down the page to see all the possibilities a plan offers.
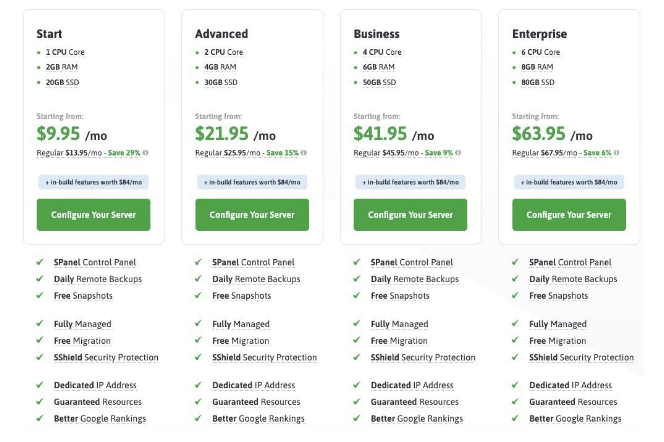
Click on ‘Configure Your Server’ on any of the plans you choose to use. On the configuration page that follows next, you’d choose your
- Billing Cycle: One month, three months, six months, 12 months, 24, or 36 months.
- Select management: Choose managed.
- Decide on your control panel: Choose cPanel or SPanel.
- Customize your server: You may downgrade or upgrade your server anytime. Customizations include Data centers, CPU cores, backup, SSD disk space, RAM size, and proactive monitoring.
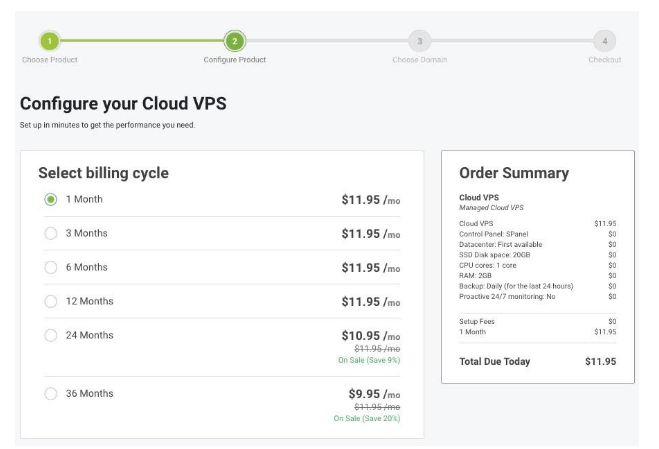
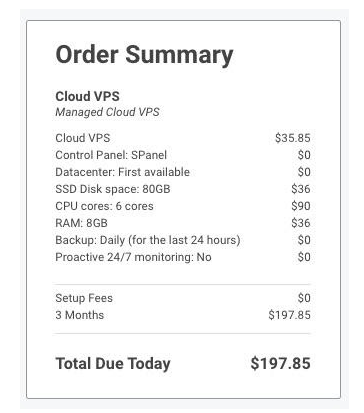
You’ll confirm your order summary before paying. Scroll down that page to make changes to your order summary.
At the bottom of the page, click ‘Continue.’
On the page that follows, choose a domain name. You can choose to buy a new domain name or transfer an old domain name to Scala.
You’ll need a domain name to set up your business email in VPS.
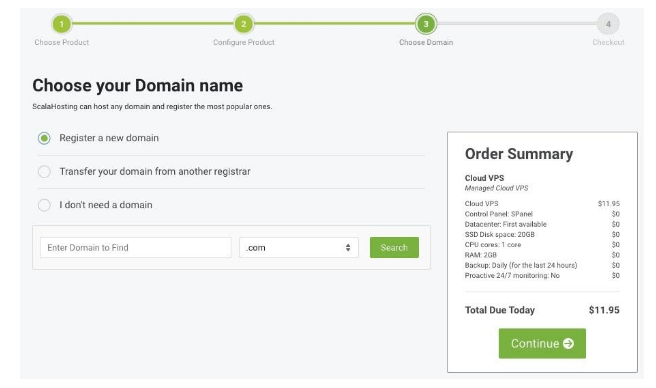
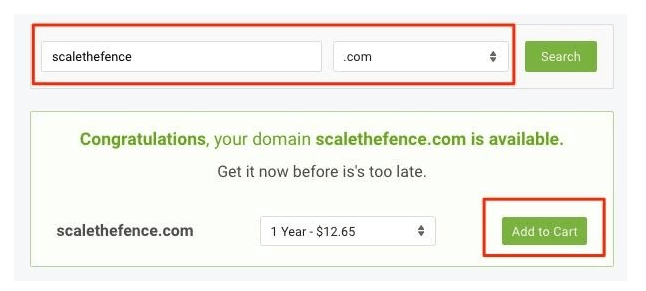
Search for the domain name you want and add it to your cart.
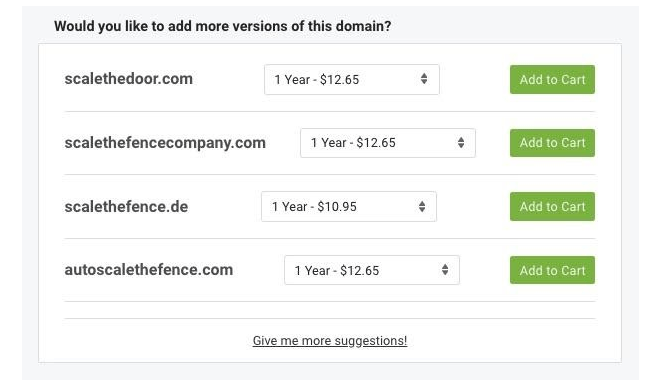
To secure your brand, you can register other domain names with other extensions.
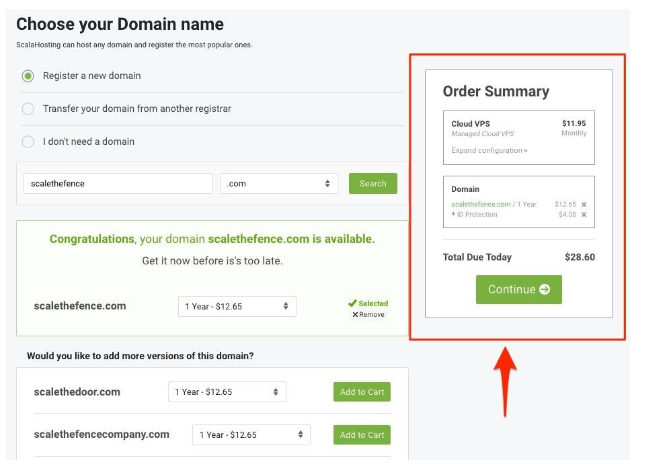
After selecting the domain names you want to use, click ‘Continue’ inside of the order box. This leads you to the ‘Checkout’ area.
Step by Step Creation of a Business Email in VPS
Here’s how you’ll create a business email in your SPanel. Head to your client area and enter your credentials—password and email.
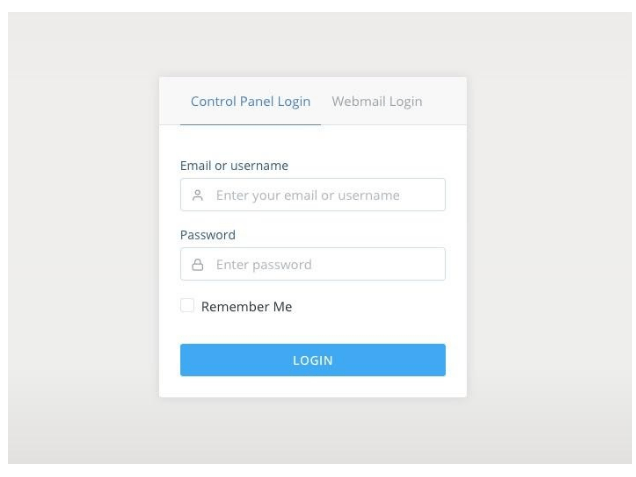
You’ll be ushered into the dashboard where you can initiate your VPS email setup. Here’s what the dashboard looks like:
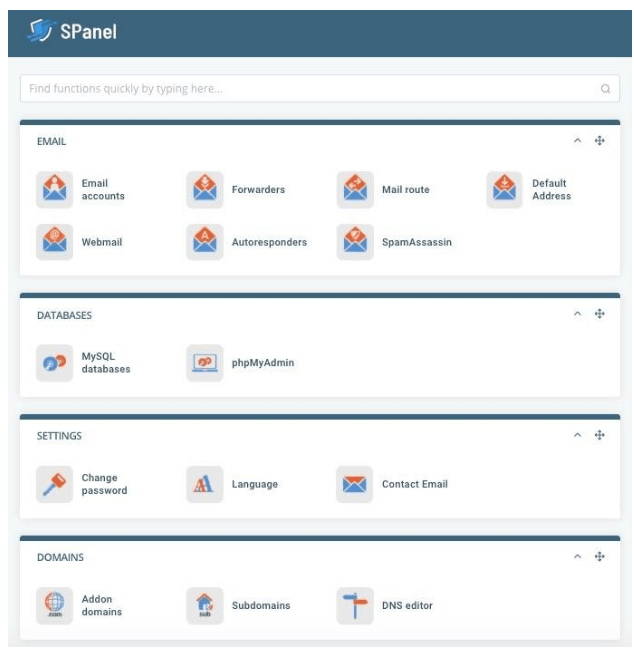
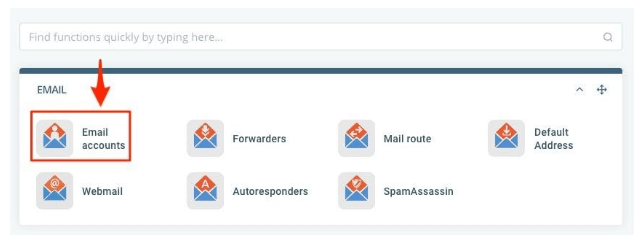
Now, click Email Accounts in the first row under Emails.
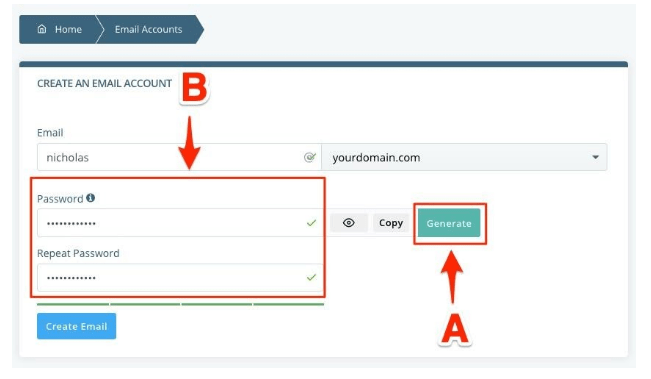
You’ll access the VPS email accounts dashboard. Enter the email account name you’d want to use for your email in the box right in front of your domain name drop-down menu.
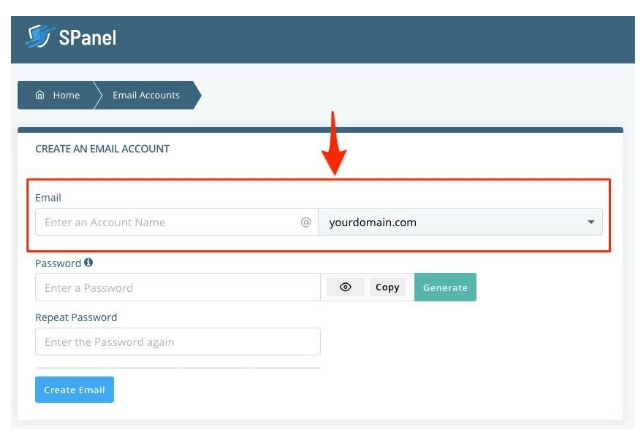
Under Password, click the green button to generate a password. It automatically fills the ‘Password’ and ‘Repeat Password’ boxes.
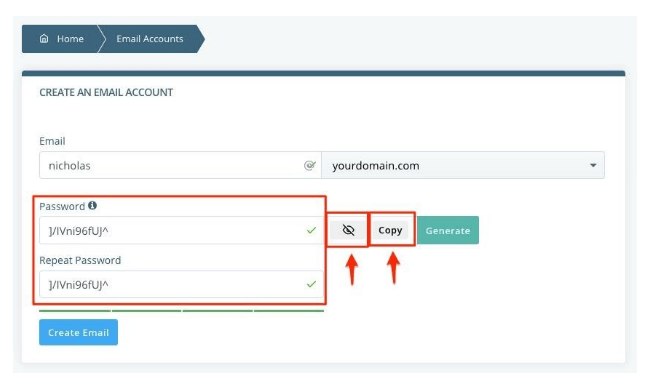
Reveal the generated password by clicking on the eye icon. Click on Copy to copy the password, and you can keep it in a safe place, like a password manager.
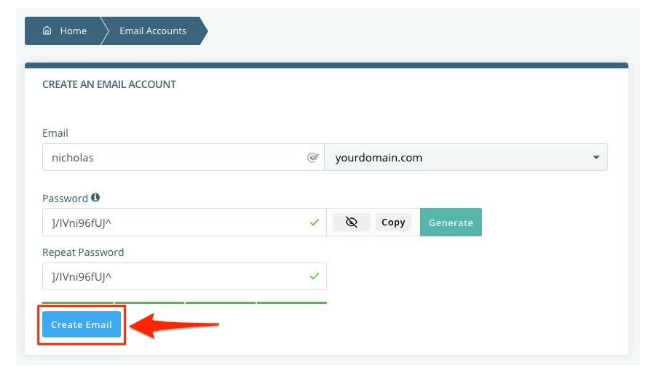
Click on Create Email to complete the creation of your VPS email in the SPanel. You can create more emails by following this thread.
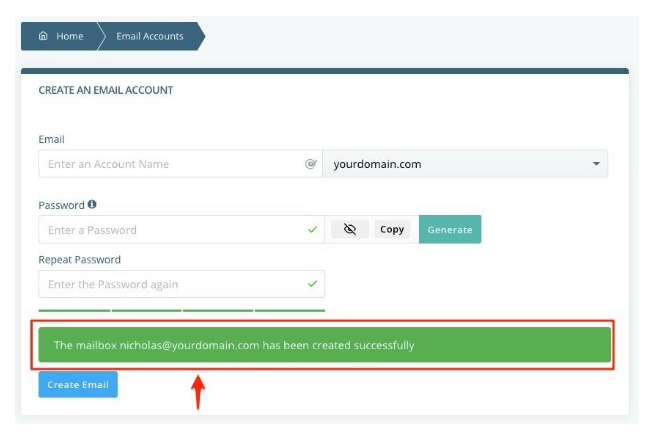
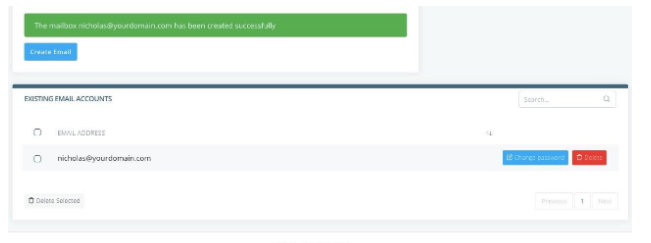
You’ll see a confirmation message that you’ve created your domain name.
Scroll down to see the email accounts you’ve created. You can also manage these email accounts from the menu there—change passwords, delete an email account, or bulk-delete email addresses.
Setup Your Favorite Mail Application
You can set up your mailbox in your favorite mail application using POP3, IMAP, or SMTP server for your mail.domain.com. Use the standard SSL ports for each service. Set the user to the VPS business email you had set up. For example, nicholas@yourdomain.com.
Note that your SMTP requires authentication to enable it.
- Webmail
- Apple Mail
- Windows Outlook
- Gmail
- Thunderbird
Webmail
You can use webmail to manage your business mail in VPS. Here’s how. Go to the webmail login page and enter your email and password. This would be the email and password you created in the steps above.
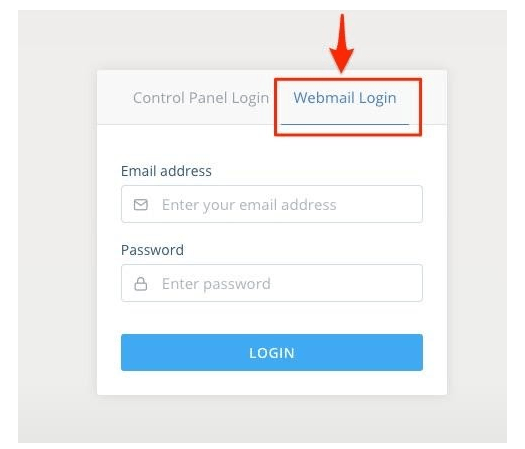
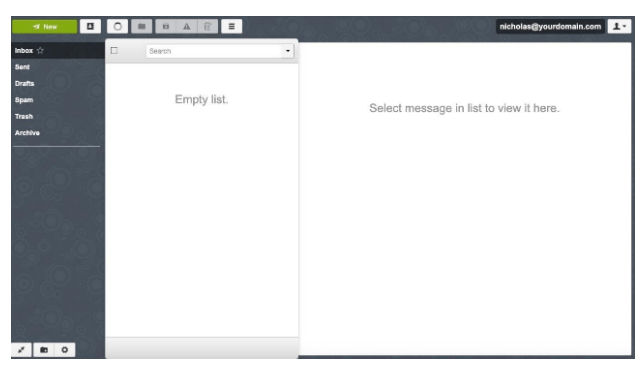
You’ll be ushered into the webmail dashboard. Click on Login To Webmail.

There you can access your inbox, send messages, manage drafts, trash, spam, and others.
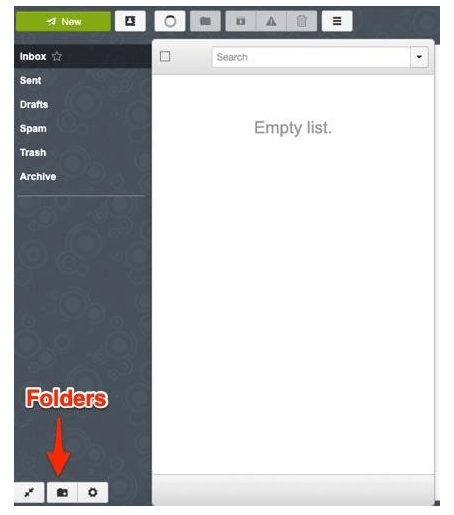
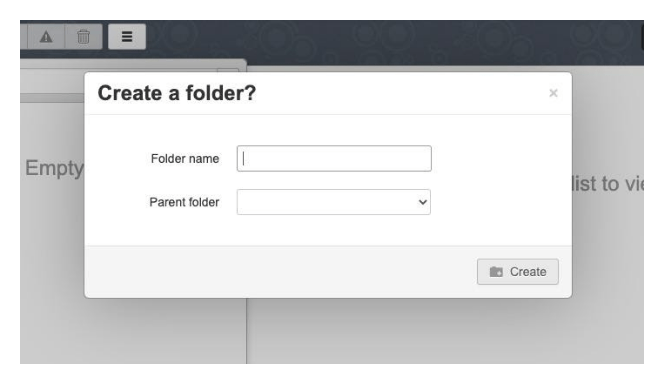
You can create more folders. You’ll click on the folder icon at the bottom left-hand side of your screen.
From there you can create a folder and choose a parent folder if you need one.
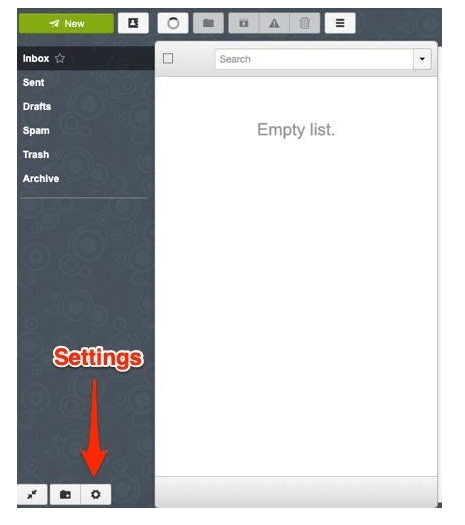
To access your webmail settings, click on the cog icon at the bottom left-hand side of your screen.
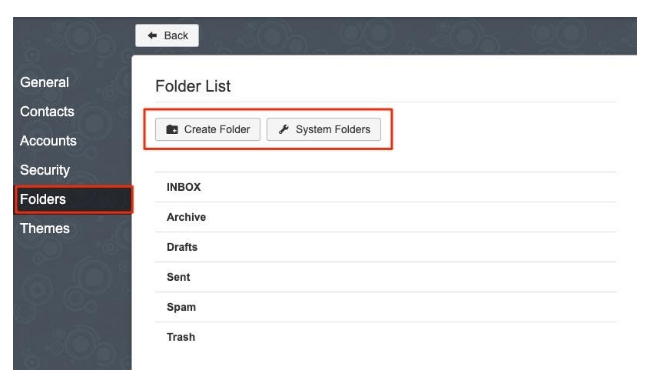
In the settings area you’ll have more control options for your folders.
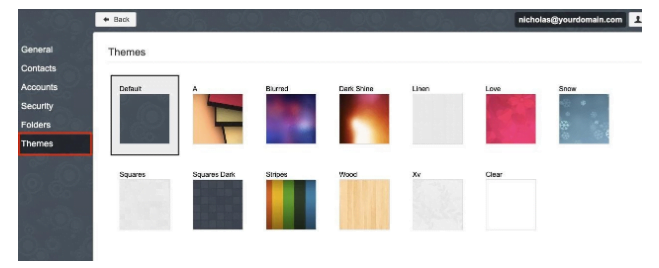
There you can also choose a theme.
The settings area also helps you take care of security, contacts, accounts management, and other general settings. In general settings you can choose a text editor, change layout, manage notifications and more.
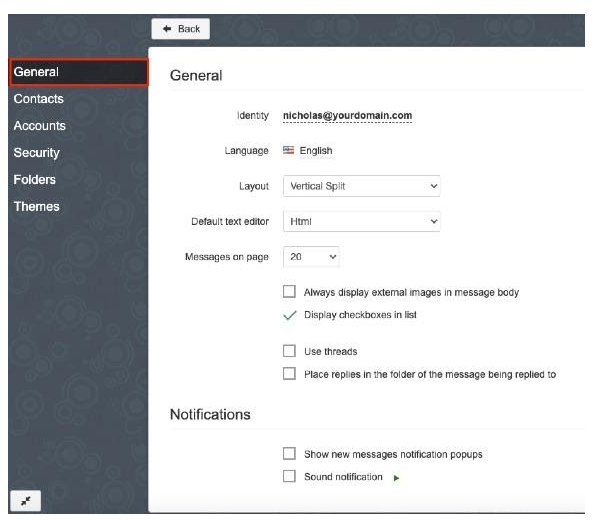
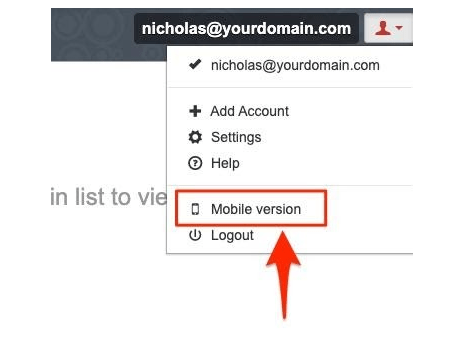
Webmail has a mobile version, and you can switch to the mobile version from the dropdown menu on the top-right hand corner of the dashboard.
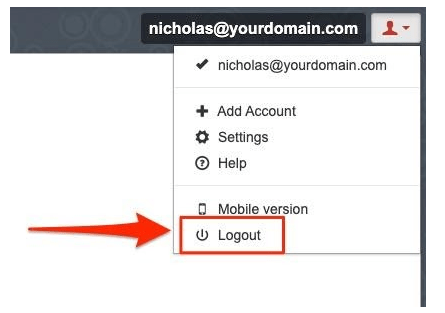
If you’re done using the webmail, click on Logout to leave.
Apple Mail

Image Credit: Apple Mail
Here’s how to set up your Apple Mail client and manage your business email from your Apple devices. Access Mail from your system preferences. Here’s how to do it: click on System Preferences.
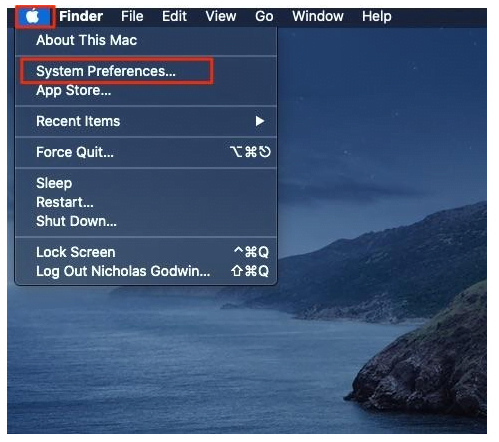
Go to Internet Accounts.
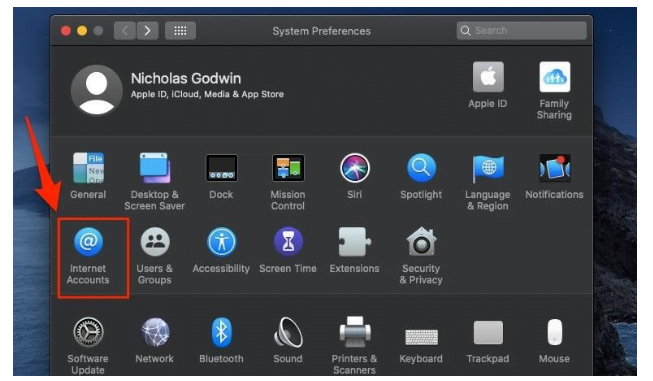
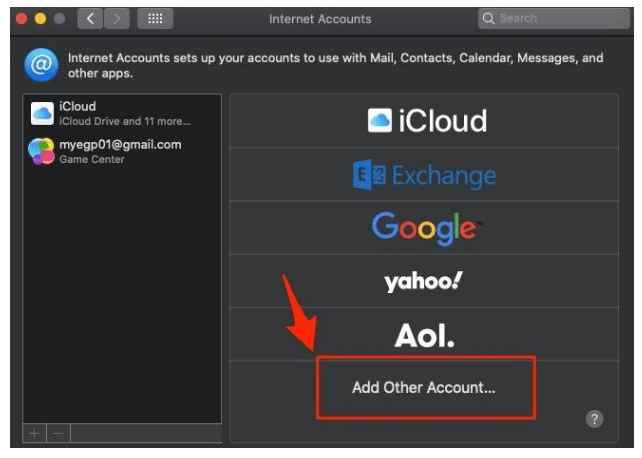
Select Add Other Accounts.
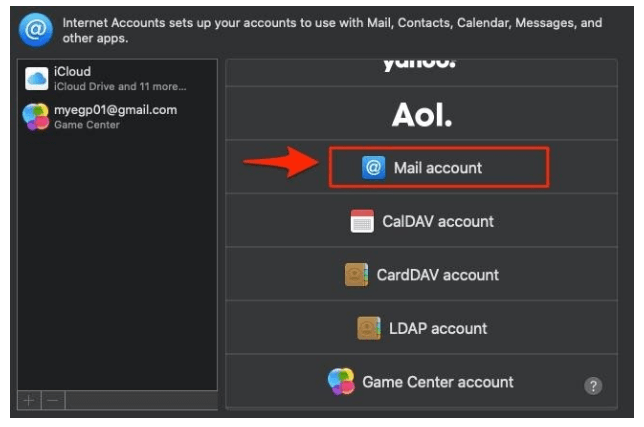
The select Mail Account.
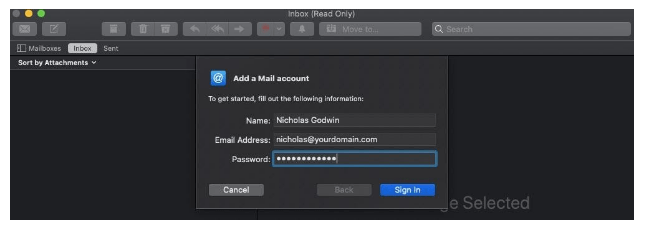
Add the credentials of the account you want to add to your Apple Mail client. These credentials include your name, the business email address you’d created in SPanel, and a password.
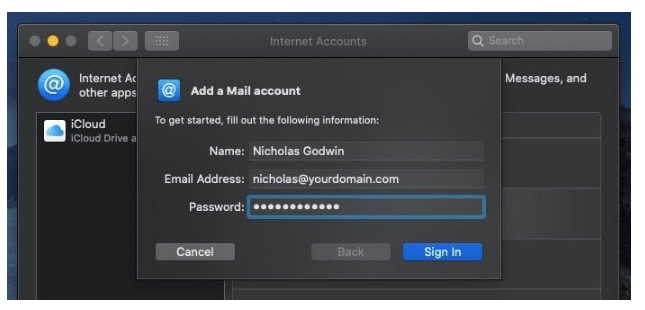
You’ll be prompted to verify the details. At this point, you’ll set up the details of the mail account. Enter your existing email or create an email address you’d want to use.
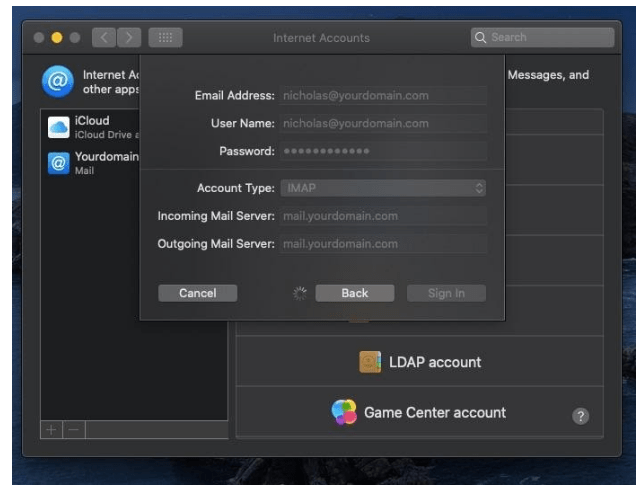
Enter mail.yourdomain.com in the Incoming Mail Server and Outgoing Mail Server boxes. Make sure to change yourdomain.com to your Incoming Mail Server and Outgoing Mail Server according to your Scala Hosting account.
Use your email as your User Name. Choose IMAP or POP in the Account Type dropdown menu.
Click the Sign In button.
You may see a warning and a button, Show Certificate. Look at the certificate to make sure it reflects your hosting information.
Click the Continue button and then enter your Mac password. Next, you’ll select the apps you want to use with that account; this should include your Mail app.
Whenever you want to log in, go to your Mail app, and enter your credentials there.
Windows Outlook
We have covered how to use your Gmail as your email client elsewhere. Please access it here:
Click here to learn how to configure your email on Microsoft Outlook.
Gmail
We’ve covered how to use your Microsoft Outlook email elsewhere. Please access it here:
Go here to find how to point your email to Gmail.
Thunderbird
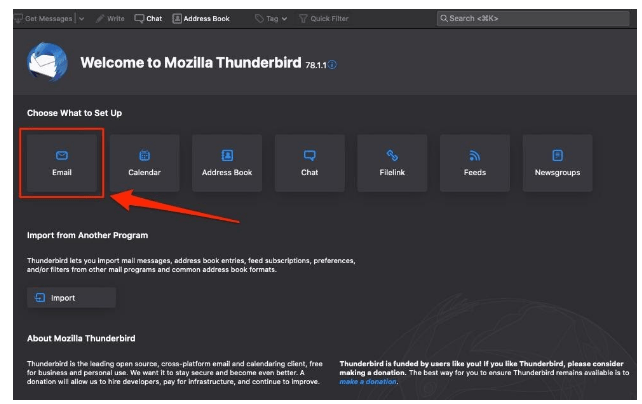
On your Thunderbird application, go to Email.
Enter your credentials:
- Name
- password.
And click continue. In the screenshot below I’d used “nicholas@yourdomain.com,” please replace “yourdomain.com” with the domain name you use in your SPanel. Create an email address with whatever name feels right to you; don’t use “nicholas” except you’re Nicholas.
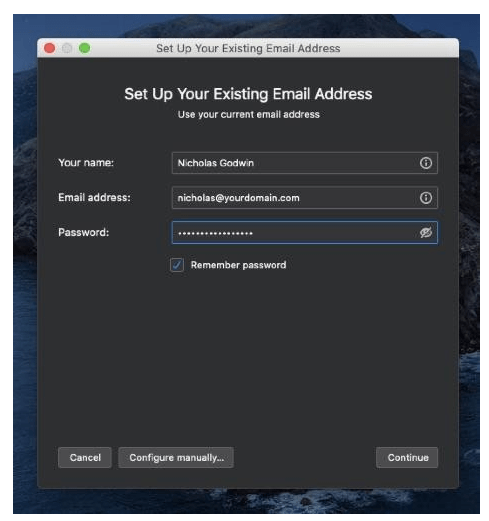
You can choose to configure this manually as well.
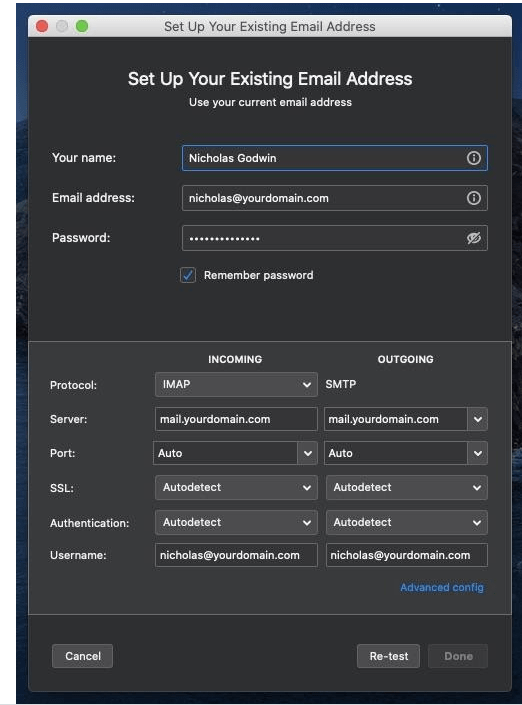
But Thunderbird does the heavy lifting. It automatically generates your IMAP or POP3 and outgoing and incoming email server, and your Username.
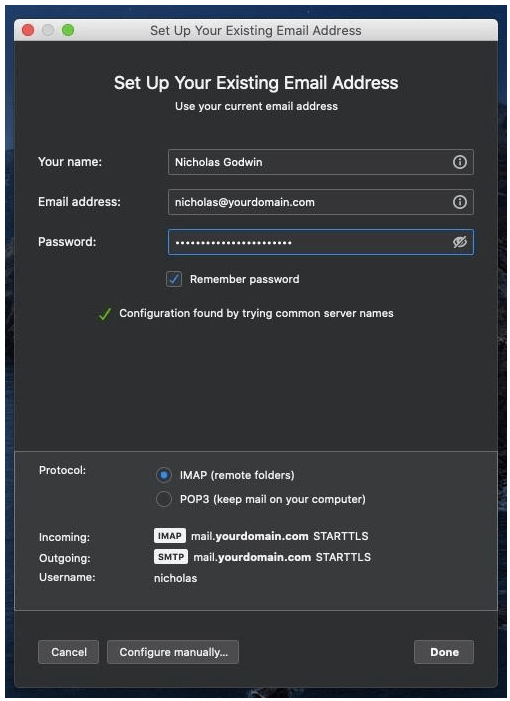
If Thunderbird doesn’t automatically generate your email as the Username, click the manual configuration button to change your username to your email. You can click on the Retest button to be sure that everything is correct before you click the Done button.
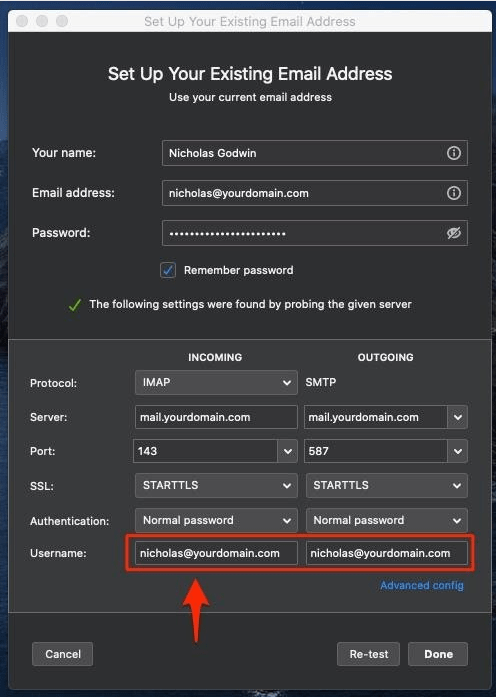
However, if you enter the wrong credentials, Thunderbird will not call up any data, and you see something like this:
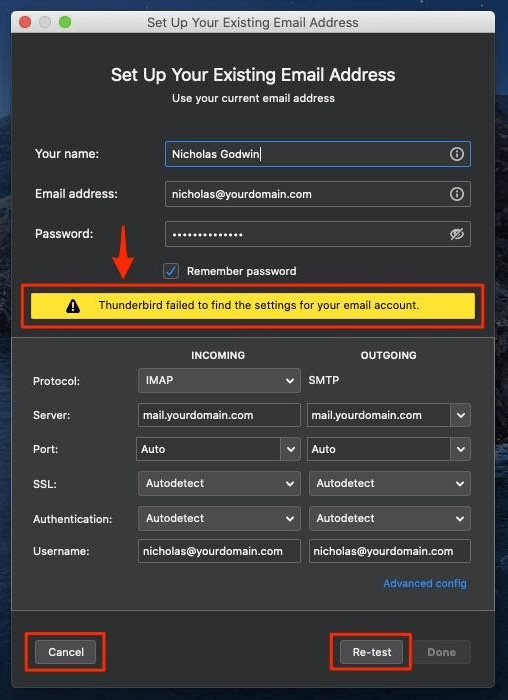
If you get an error message like the one above, you can retest or cancel the operation using the buttons.
If your email is correct, but you put in the wrong password or Thunderbird couldn’t verify any other information, you’ll get an error message like the one below. Note that your email password on the application must be the same as the original password you had set up on your SPanel.
You might get the error message, “Unable to log in at server. Probably wrong configuration, username, or password.”
In that case, switch to the manual configuration option. I would set the password authentication type to Auto-authenticate if I’m not sure of the password type. You want to set your SSL to SSL/TLS.
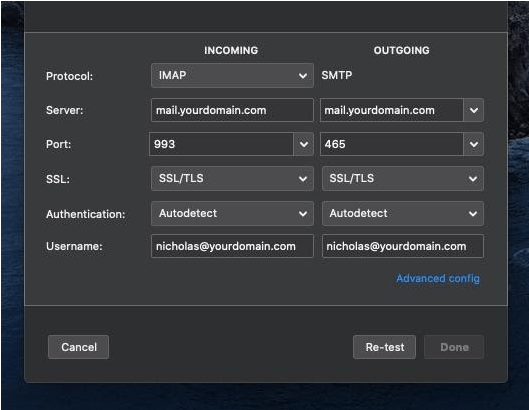
You can now manually fill the fields and then retest.
You should receive a confirmation message when you retest. And you can click done to activate your email client. If you keep getting an authentication error message even after you’ve done everything right, click on the advanced config link.
Select the OK button.
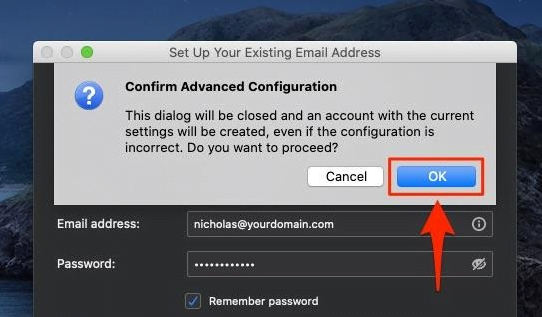
Follow the prompts, set up your Thunderbird account, and start using it.
How to Set Up Email Forwarding and Why?
If you need to manage messages to multiple email addresses using a forwarder, this is going to help. Email forwarding can help you manage your email addresses without changing your mx records.
Yes, you do email forwarding inside of SPanel. But why would you want to do it?
Why Forward Email Messages?
Email forwarding can come handy if any of these situations apply to you:
- Instantly notify the appropriate persons of the need to act: If you have a team and need them all notified of a situation, email forwarding can help you automate this process.
- Switch email providers while keeping your email address: If you have changed your brand name but have been known with a previous brand, forwarders can help.
When business contacts send email messages to the old email, they will still reach you. But you don’t have to continue using the old email provider actively.
- Keep an email account you’re used to: If you’re happy with your Gmail, iCloud, Outlook, or other third-party email services, forwarding can be handy.
- Use a single account to manage multiple email addresses: Forwarding can help you keep one email box so that you can direct all your email addresses to one mailbox. So you don’t have to buy multiple mailboxes.
- Simplify email management: You don’t have to manage multiple email accounts or create new mx records. All your messages can come to one email box.
- Broadcast messages: This helps you if you send messages to a group regularly or need to send a memo. You don’t have to worry about missing an email address anytime you broadcast messages to a group.
So how do you forward your messages in Spanel? It’s simple.
How to Forward Your Messages in Spanel
In your Spanel, you can access Forwarders under the Email section.
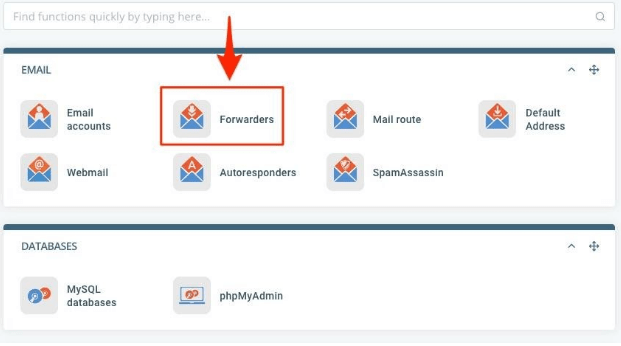
You can also access Forwarders in your webmail dashboard.

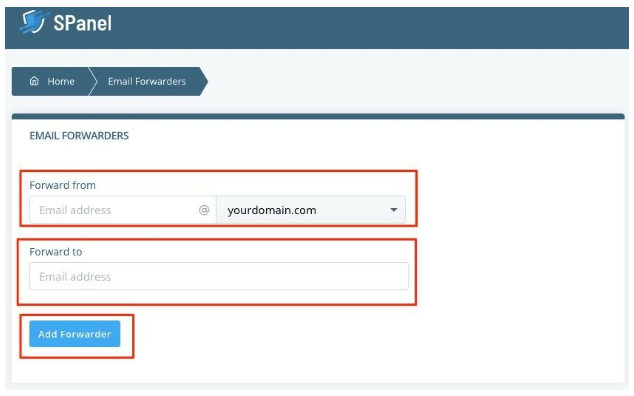
Enter the email address you wish to forward messages coming to your VPS email address in SPanel. And select the email you wish to forward the message from.
And then click the Add Forwarder button.
You’ll get a confirmation message.
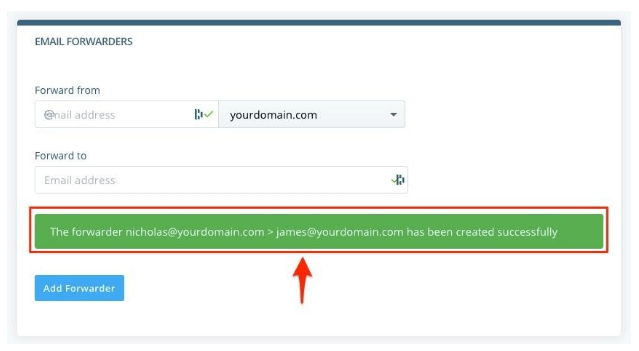
Scroll down that page to manage the email forwarder.

How to Set Up Autoresponders and Why
Why would you want to set up autoresponders and how do you do it? Well, let’s find out.
Why Set Up Autoresponders?
You can benefit from setting up autoresponders for your business email in many ways.
- Let critical contacts know you’re away from the office or work and let them know how to reach you.
- Share important information when someone tries to reach you. If you changed your brand or company name or need them to know something about your business, an autoresponder can help.
- Inform employees of an important update
- Save time and automate repetitive messages
- Send your contacts to the right person who’d take care of their needs
Let’s explore how you’d set up an autoresponder.
How to Set Up Autoresponders
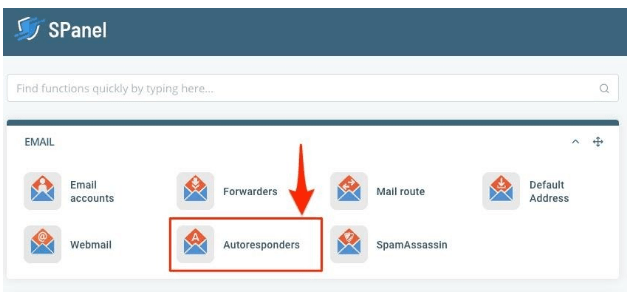
Sign in to your SPanel. Select Autoresponders from the menu under Email.
If you have multiple emails, select the appropriate email from the dropdown. And then enter your autoresponder message in the message box.
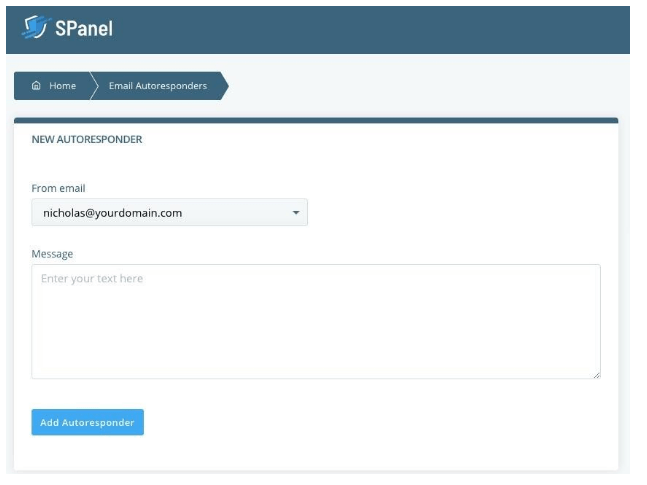
Click on the button, ‘Add Autoresponder,’ and you’ll receive a confirmation message. See the image below.
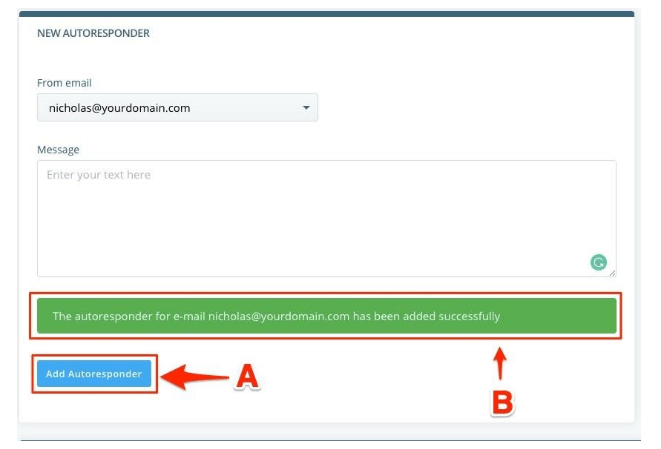
You can manage your autoresponders by scrolling down that page. Delete or edit it as you deem fit.

Business Email FAQs
Let’s answer the frequently asked questions you might have about business emails.
Q: What is SMTP?
A: Simple Mail Transfer Protocol, SMTP, is the standard protocol for sending messages across the internet.
Q: What is POP3?
A: POP stands for Post Office Protocol. The ‘3’ signifies the version of the protocol, and it’s the most in use. POP3 is an email protocol for receiving your email files from a remote location to a local mail client.
If you want to download your emails to your device and access them offline, POP makes that possible.
Q: What is IMAP?
A: IMAP is an email protocol that email clients use for retrieving your messages from a remote email server different from the device you use in accessing the email. The acronym stands for Internet Message Access Protocol, IMAP.
Q: What are the Default SMTP Ports?
A: SMTP, unlike IMAP and POP, has three ports. Port 25 is the unencrypted port. Port 2525 is available for backup, in case port 25 is filtered. Sometimes ISPs might filter ports. Port 465 is the secure or encrypted SMTP port.
Q: What are the Default POP3 Ports?
A: The default ports of POP are ports 110 and 995. Port 110 is the non-encrypted port for POP3. If you need encryption for your POP3, then use port 995.
Q: What are the Default IMAP Ports?
A: You can use port 143 for unsecured access to your IMAP account or port 993 for encrypted access.
Q: When Do I Use POP3?
A: If you plan to access your email from only one location, then a POP3 is the best option. It downloads your email to your device so you can access it locally on the device.
Q: When Do I Use IMAP?
A: Use IMAP if you have plans to access your email from multiple email clients. So if you plan to access your email on Apple Mail, Outlook, and Thunderbird at the same time, then IMAP is the best option.
Where to Go from Here?
Get your Scala account, whether a business email or website hosting service, and launch your VPS business email. Follow the guide here to set up your account and attach an email client to your address.
If following this guide all by yourself is all-new, and you need someone to talk to, please reach out. We’re always eager to help. You can reach us 24/7, and we respond in seconds, not hours.
What is a VPS – Everything you need to know!

