Mastering cPanel File Manager: Tips for Efficient File and Folder Management
cPanel’s file manager is a useful web-based tool that provides a user-friendly interface for seamlessly managing files and directories associated with your website. This option is a cornerstone feature for the hosting control panel, as it streamlines the complexities of file manipulation and offers a comprehensive solution for both beginners and experienced website owners and developers.
This intuitive file management tool allows you to navigate, upload, download, and organize your website files with a few clicks, eliminating the need for third-party FTP clients or confusing command-line interfaces. It makes it easy to traverse through your directory structure, edit file content, and perform essential tasks without any previous technical knowledge. So, whether you’re updating content, modifying configurations, or troubleshooting issues – this tool is an indispensable helper.
In this article, we’ll show you everything you need to know about the cPanel file manager, including how to access it, how to upload files, create and manage folders, edit files, and more.


Your Website with Entry Cloud
Accessing the File Manager in cPanel
Now, let’s start at the beginning – getting into our cPanel and navigating to the File Manager.
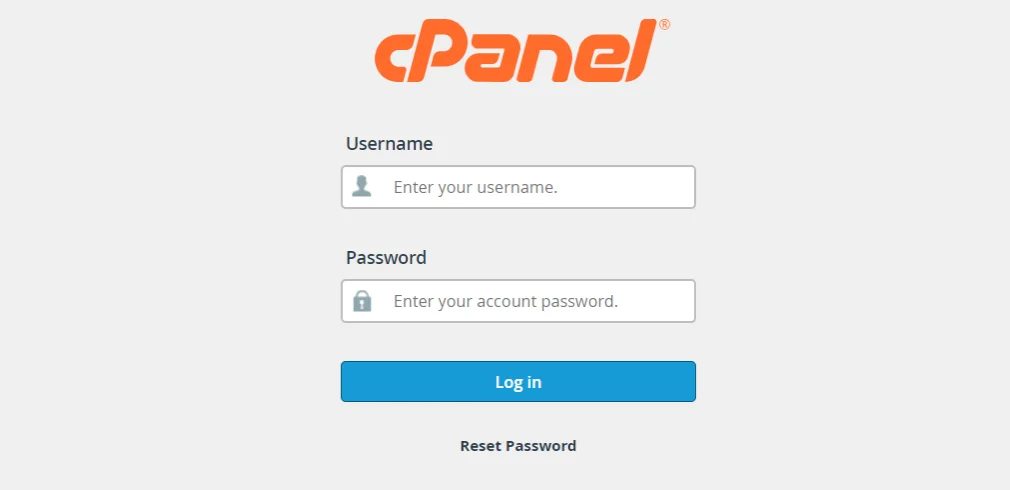
- Step 1: Log in to cPanel – Open your web browser and enter your website’s domain followed by “/cpanel” in the address bar – ex. yourwebsite.com/cpanel. You can also log in via your IP address using the following URL: https://yourIPaddress:2083. Then, simply enter your username and password.
- Step 2: Scroll to the Files Section – You’ll be redirected to the cPanel dashboard, where you’ll need to scroll down to the “Files” section.
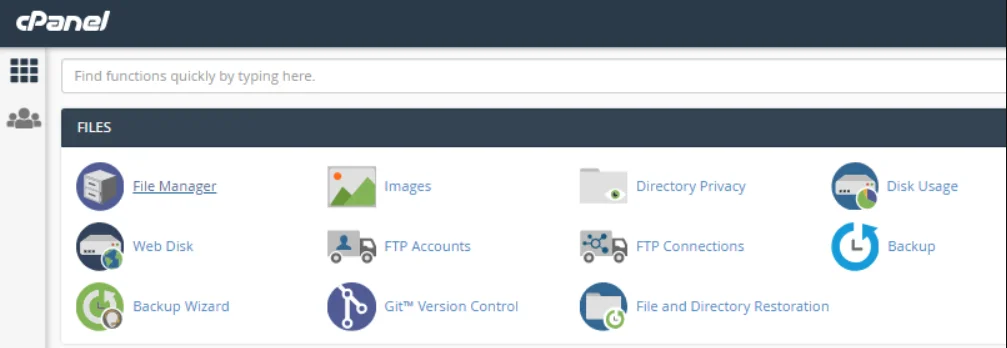
- Step 3: Click on File Manager – The “File Manager” icon is usually the first one you’ll see in the “Files” section. Click on it to continue.
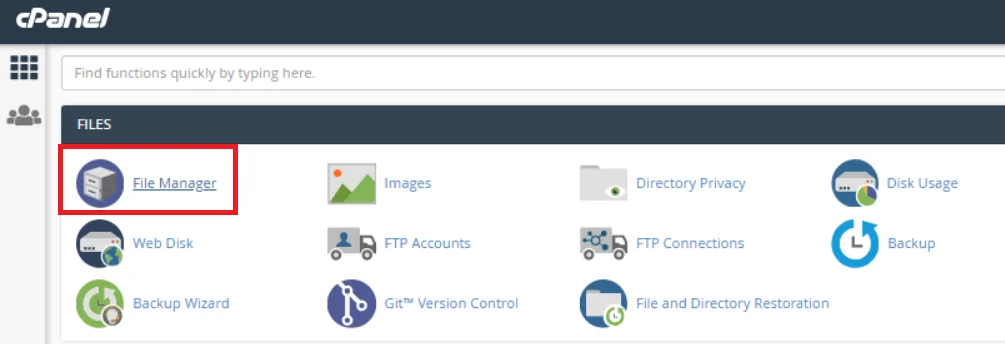
- Step 4: Choose a Directory (Optional) – You’ll be redirected to the “File Manager,” where you can view all your folders. You can choose to navigate to a specific directory within your website and click on its folder to explore the file structure.

- Step 5: View and Manage Files – The file manager provides a graphical interface similar to that of a desktop file explorer. You can view, upload, download, edit, and delete files from this interface. You can also add a new file or folder, copy or move it to a new location, restore, rename, edit HTML, change permissions, and many more.
- Step 6: Logout (Optional) – We recommend that you log out of your cPanel account once you’ve completed all management tasks and saved them so your account isn’t vulnerable to unauthorized access.
Navigating Files and Folders
The file manager interface in cPanel offers a visual and user-friendly way to manage your website files and directories.
Here is a detailed overview of the interface and navigation controls you’ll be met with:
- Directory Tree: The directory tree is located on the left side when you enter the File Manager. This hierarchical structure displays the folders and subfolders within your website file system. You can click on the arrows or the plus signs next to each folder to expand or collapse the directory structure.
- Main File Area: The main area of the File Manager displays the contents of the selected directory. Files and folders are listed there, and you can click on them to perform different actions.
- Toolbar: The toolbar at the top contains a set of icons and buttons that represent different file management actions. Common options include New Folder, Upload, Download, Delete, Copy, Move, and more. You can perform all kinds of actions with a few clicks via the toolbar.
- Path Bar: The path bar is typically located above the directory tree. It shows the current directory path. You can click on any part of the path to quickly navigate to a higher-level directory.
- File Actions: Right-clicking on a folder or file opens a context menu with various actions you can perform. This menu includes options like Edit, Rename, Change Permissions, Compress, and Delete.
- File Information: Selecting a file or folder in the main area of the File Manager provides additional information at the bottom of the interface. This includes details like file size, permissions, and modification dates.
- Preview Pane (Optional): Some versions of cPanel include a preview panel that allows you to preview the contents of certain file types without having to open them.
Uploading Files With the cPanel File Manager
Uploading files to your hosting account via cPanel is a pretty straightforward process. You can upload single and multiple files simultaneously and use the File Manager’s drag-and-drop functionality for even more efficient uploads.
Uploading Single Files
- Login to cPanel: Оpen your web browser and enter your domain name followed by /cpanel in the address bar – yourwebsite.com/cpanel, or use the following URL: https://yourIPaddress:2083. Then, enter your username and password to log in.
- Navigate to the Files Section: Scroll down to the Files section. This can also be labeled as File Management. Click on the File Manager icon.
- Choose a Directory: Navigate to the directory where you want to upload files.
- Upload: Click on the Upload button in the toolbar and then the Select File button. Choose a file from your computer and press Open.
Uploading Multiple Files
- Login to cPanel
- Open the File Manager
- Choose a Directory
- Upload: Press the Upload button in the toolbar. Hold down the Ctrl key (Windows) or Command key (Mac) to select multiple files and click Open.
Using the File Manager’s Drag-And-Drop Functionality
- Login to cPanel
- Open the File Manager
- Choose a Directory
- Enable Drag-And-Drop: Some versions of cPanel allow you to use the drag-and-drop functionality directly. Locate the files on your computer, select them, and drag them to the File Manager window to do that.
- Complete the Upload: Drop the selected files into the desired directory. They will be automatically uploaded to the dropped location.
Creating and Managing Folders
In this section, we’ll show you how to create new folders via the File Manager. We’ll also give you insights on how to manage them and perform actions like renaming, deleting, and moving.
Creating New Folders
- Login to cPanel
- Open the File Manager
- Choose a Directory
- Create a New Folder: Click on the New Folder button in the toolbar once you open the desired directory. Enter a name for the folder in the window that will pop up on your screen, and choose the option Create New Folder.
Renaming Folders
- Login to cPanel
- Access File Manage
- Navigate to the Folder: Locate the folder you want to rename.
- Rename the Folder: Right-click on the folder and choose Rename from the context menu. Enter the new name and press Enter or click outside the field to apply the changes.
Moving Folders
- Login to cPanel
- Access File Manager
- Navigate to the Folder: Locate the folder you want to move.
- Move the Folder: Right-click on the folder and select Move from the context menu. Navigate to the destination directory in the popup window and click Move File(s).
Deleting Folders
- Login to cPanel
- Access File Manager
- Navigate to the Folder: Locate the folder you want to delete.
- Delete the Folder: Right-click on the folder and choose Delete from the context menu. Confirm the deletion in the popup window.
IMPORTANT: Keep in mind that you can’t get back the content in the folders you delete, so be careful when you perform that action.
As you can see, creating and managing folders is super easy with cPanel. All actions involve just a few straightforward steps and take less than a minute to be completed.
Editing Files Directly in the cPanel File Manager
The cPanel File Manager has a built-in editor that allows you to modify text-based files, HTML, CSS, and other code without any external tools. It is a very convenient feature that comes with a user-friendly environment for quick edits and updates.
Some of the key functionalities of the built-in editor include:
- Accessibility: You can access the editor directly from the cPanel interface. This is super convenient as it doesn’t require you to install or configure external text editors.
- User-Friendly Interface: The built-in editor has a clean and intuitive interface that resembles a basic text editor. It includes familiar functionalities like syntax highlighting, line numbers, and basic formatting options.
- Supported File Types: The editor supports a wide range of text-based file types that are commonly used in web development. This includes HTML, CSS, PHP, JavaScript, and plain text.
- Syntax Highlighting: This improves code readability as it colorizes different code elements. It helps you identify and understand the structure of your code more easily.
- Basic Formatting Options: The toolbar comes with basic formatting options like text alignment, font style, and size. It’s not as feature-rich as dedicated code editors, but it’s useful for quick and easy adjustments.
- Save and Confirm: You can save the changes you’ve made directly within the built-in editor. It may prompt you to confirm overwriting the existing file to ensure that the changes are intentional, which is useful for preventing mistakes.
- Code Validation: Some versions of cPanel come with limited code validation. It highlights syntax errors but isn’t very reliable for thorough code validation and debugging.
- Compatibility: The editor is compatible with many web browsers. This allows you to edit files from different devices and platforms without any issues.
Editing Text-Based Files
To edit text-based files in the File Manager editor, you need to do the following:
- Login to cPanel
- Open File Manager
- Select a Directory:
- Select the File: Locate the file you want to edit.
- Open the Built-In Editor: Right-click on the file and select Edit from the context menu.
- Edit the File: The built-in editor will open and display the content of the file. Make the needed changes to the text directly within the tool.
- Save Changes: Use the toolbar options to format the text if needed, and click on the Save Changes button to save your edits.
- Confirm Changes (if prompted): You might need to confirm that you want to overwrite the existing file.
- Close the Editor: Close the editor window once you’ve saved your changes.
Modifying Code Files
- Login to cPanel
- Open File Manager
- Pick a Directory: Navigate to the directory where the code file is located.
- Locate the Code File: Find the code file you want to edit.
- Open the Editor: Right-click on the file and select Edit from the context menu.
- Make Code Modifications: The built-in editor will display the content of the code file and make the necessary modifications. You can add, delete, or edit text, tags, and styles as needed.
- Save the Changes: Click on the Save Changes button to save your edits.
- Confirm the Changes: Sometimes, you’ll need to confirm overwriting the existing file.
- Close the Editor: Close the built-in editor windows once your changes are saved.
- Verify the Changes: You can open the webpage associated with the modified code to ensure the changes have taken effect.
Tips for Editing and Modifying Files With the File Manager
- Create Backup Copies: It’s highly recommended you create a backup copy of the file you want to change before you edit it. This ensures you can restore it in case anything goes wrong.
- Use Syntax Highlights: Take advantage of the syntax highlighting in the editor, as it helps you a lot when organizing and identifying different elements of your code.
- Test the Changes: Always test the changes when you’re modifying code files to ensure they appear as expected.
File Permissions and Security
File permissions determine who can read, write, or execute a file on a computer system. They control access to files and directories on your website(s), so configuring them properly is essential for security and preventing unauthorized access.
Understanding File Permissions
File permissions are usually represented by a three-digit number and are organized into three groups:
- Owner (User): This includes the user who owns the file. Permissions for this group include Read (4), Write (2), and Execute (1). A common example is 6 – read and write permissions for the owner.
- Group: This includes the group associated with the file. Permissions for this include Read (4), Write (2), and Execute (1). A common example is 4 – read-only permission for the group.
- Others (Public): This includes all other users who are not the owner or in the group. Permissions for this include Read (4), Write (2), and Execute (1). A common example is 4 – read-only permission for others.
So, if we combine the permissions to get a three-digit number, we can get something like 644, which means that the owner has read and write permissions, while the group and others have read-only permissions.
Adjusting File Permissions Using the cPanel File Manager
- Login to cPanel
- Open File Manager
- Choose a File or Directory: Find the directory or file for which you want to adjust permissions.
- Select the File or Directory: Right-click on it and choose Change Permissions from the context menu.
- Adjust Permissions: You’ll see checkboxes for Read, Write, and Execute for the owner, group, and others. You can check or uncheck the appropriate boxes to adjust permissions or enter the numeric value (three-digit code) directly.
- Apply Changes: Click the Change Permissions button to apply the changes.
Most Used File Permission Settings
- 644 (rw-r—r–): The owner of the file has read and write, while the group and others have read-only permissions. This setting is common for files like HTML and CSS that don’t need execution.
- 755 (rwxr-xr-x): The owner has read, write, and execute, while the group and others have read and execute permissions. This is common for directories and executable files.
- 600 (rw——-): The owner has read and write, while the group and others have no permissions. This is used for configuring sensitive system files.
Common Mistakes to Avoid
You should always be cautious while using the cPanel File Manager to avoid common mistakes and errors that can lead to potential issues with your website(s). You’ll find some common mistakes below:
| Mistake | How to Avoid |
|---|---|
| Accidental Deletions | Be careful when you’re deleting files or directories, and ensure you are selecting the correct items. Consider creating backups before making significant changes. |
| Incorrect File Permissions | Verify and double-check permissions before making changes and follow best practices for different file types. |
| Editing Critical System Files | Avoid editing or modifying critical system files unless you’re confident in your changes. |
| Lack of Backups | Always create data ackups, especially when making changes to important files or configurations. |
| Ignoring File Ownership | Understand file ownership and avoid changing related settings without proper knowledge. |
| Not Checking File Sizes | Make sure you have enough space for files and images before you upload them. |
| Not Using Secure Connections | Use secure connections (HTTPS) to prevent unauthorized access. |
If you want to use cPanel’s in-built File Manager for your hosting account, you must get a web hosting provider that offers cPanel. One such provider is ScalaHosting, where we also offer our own control panel called SPanel.
SPanel is an all-in-one management platform where you can do all the things we mentioned in this article and so much more. Drop a line to our Support Team and see which control panel option can benefit you most.
Conclusion
Understanding how the cPanel File Manager works allows you to manage all your files and folders efficiently. The tool comes with a built-in editor that enables you to edit text and code without needing any external resources, which is quite useful. Anyone can learn how to use the File Manager, no matter their technical abilities and skill levels.
You can get that and more by using ScalaHosting’s managed VPS solutions. In addition to reliable website performance and top-notch security, you’ll also gain access to one of the best control panels on the market – SPanel.
FAQ
Q: Are file deletions permanent in cPanel?
A: Yes, deletions are permanent in cPanel, which is why you should always be careful when doing them or create backups just in case. Once you confirm the deletion of a file or folder, its contents go into the Trash folder, and when you delete them from there – they will be permanently gone.
Q: How are backups created in cPanel?
A: Log into your cPanel account, click on the Backup Wizard in the Files section, and then click Backup. From here, you can choose to make full or partial backups of your files.
Q: Does cPanel’s File Manager support bulk file operations?
A: Yes, cPanel’s file manager allows you to perform bulk operations on files and folders. However, you’ll need a newer version of cPanel to do so. You can select multiple checkboxes and complete tasks, such as deleting, removing, moving, renaming, changing permissions, and more.

