How to Build a Product Page in Magento
In the online world, you can’t always have an aesthetically pleasing interior decor and a friendly salesperson to greet your clients.
You can, however, have a well-designed product that will get people talking.
And that’s where Magento swipes in to help. The robust ecommerce platform enables you to create comprehensive, feature-rich pages. You can customize them to match your brand identity and offer a seamless browsing experience.
Our guide will explain exactly how to build a profitable product page in Magento. From configuring product attributes and managing inventory to adding multimedia elements and implementing SEO strategies, we’ll cover all the bases.
Let’s dive in:
How to Build a Product Page in Magento
The job of a product page is to convince people to make a purchase, so it needs to be well-designed and as detailed as possible. Your items should feature images, variations, shipping options, and more.
Product Information and Attributes
Let’s start by adding and configuring basic product information and attributes. This will ensure that your products are accurately represented and easily searchable within your Magento store.
Open the Admin panel and click on Catalog > Products. In the right corner of the page, you’ll see Add Product.

The dropdown menu will display your options:
- Simple – a product with no variations
- Configurable – one item with several variations, such as size, color, material, etc.
- Grouped – a collection of related simple products within the same category or with a similar purpose (like a dining table and the chairs that come with it).
- Virtual – a digital item that can vary in terms of purpose (membership, gift card, etc).
- Bundle – complementary products, such as pencils and sketchbooks, which you can combine yourself.
- Downloadable – items you can get on your device (online organizers, guides, books, etc).
Choose the one you need. It will open a new window, in which you’ll have to add the necessary details.
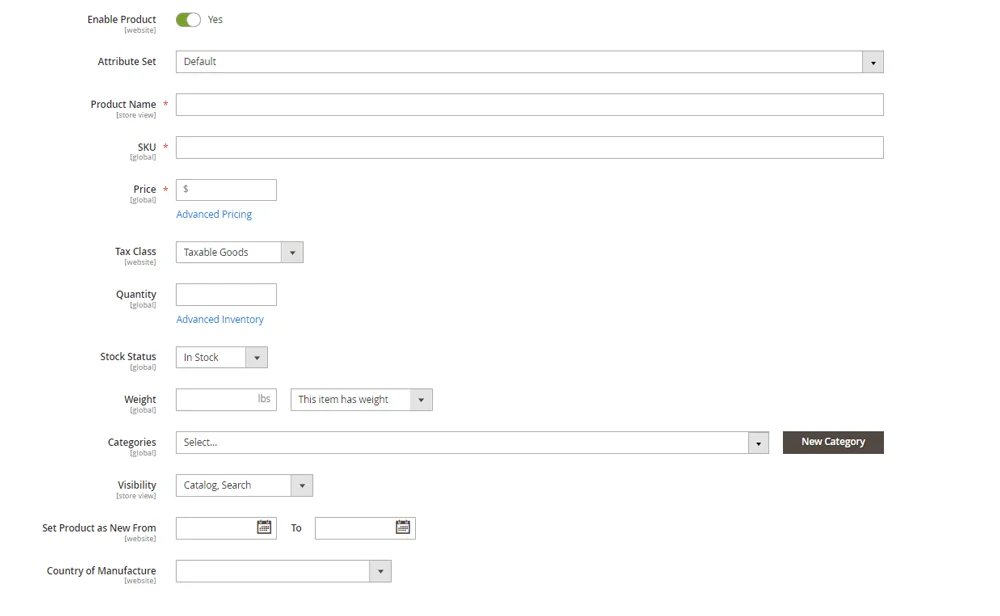
Most are self-explanatory, sans SKU (Stock Keeping Unit).
SKUs are unique identifiers for items and their variations within your inventory system. They help you track, manage, and identify your products.
SKUs are made of:
- Product Identifiers – those are names, model numbers, or part numbers.
- Attributes or Variants – information that enables you to distinguish between item variations, such as color, size, and material.
- Unique Codes – alphanumeric codes or identifiers used to tag different items.
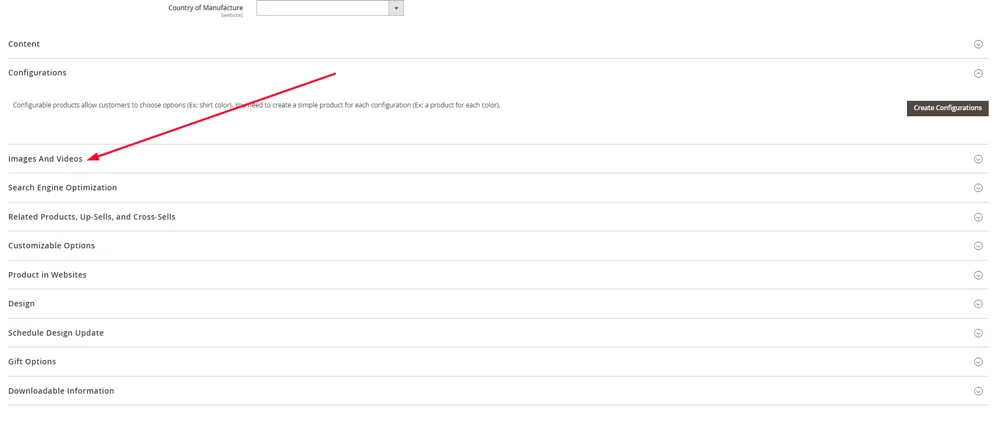
For example, a white T-shirt, size M, could have something like TSH-WTH-M as an SKU. Once you’ve done that, you can scroll down to add Images and Videos. That’s your next step.
Product Images and Multimedia
Uploading product images and videos in Magento is a fairly straightforward process. Once you select Images and Videos, you’ll see Browse to find or drag images here. Clicking on it will allow you to upload a file from a folder on your device. You can also use the drag-and-drop function to customize product image gallery layout accordingly.

Add only high-quality images. Use a compression tool such as Image Optimizer, TinyPNG, or RIOT. These tools will help improve page loading speeds and the user experience without sacrificing the quality of the photos.
Now, the next step: adding a video.
It requires a bit more effort.
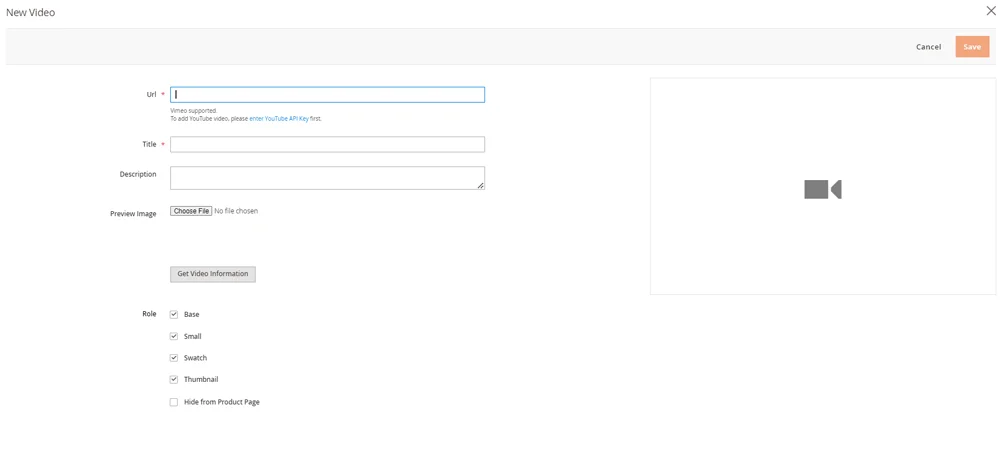
You’ll need to upload it to a cloud or a platform, such as YouTube. However, if you choose to use the latter, you’ll need to obtain an API.
You can then add a title, description, and preview image. You’ll need to set how the preview image will appear in your Magento store. It includes options such as
- Base
- Small
- Swatch
- Thumbnail
- Hide from Product Page
As with images, you better use a video compressing tool to ensure optimal page loading speeds. Good examples are Clipchamp, Online UniConverter, and VEED.io.
Product Variations and Customizable Options
In most cases, your product will have variations. The most popular options include:
- Size
- Color
- Material
To add variations, navigate to Catalog > Products > Add New Product and choose Configurable Product. Add the necessary info and scroll down to Configurations. Click on Create Configuration.

This will open a new window that will let you choose attributes. If the one you need is not visible, click on Add Attribute and fill in the desired properties. Then, click on Save Attribute.
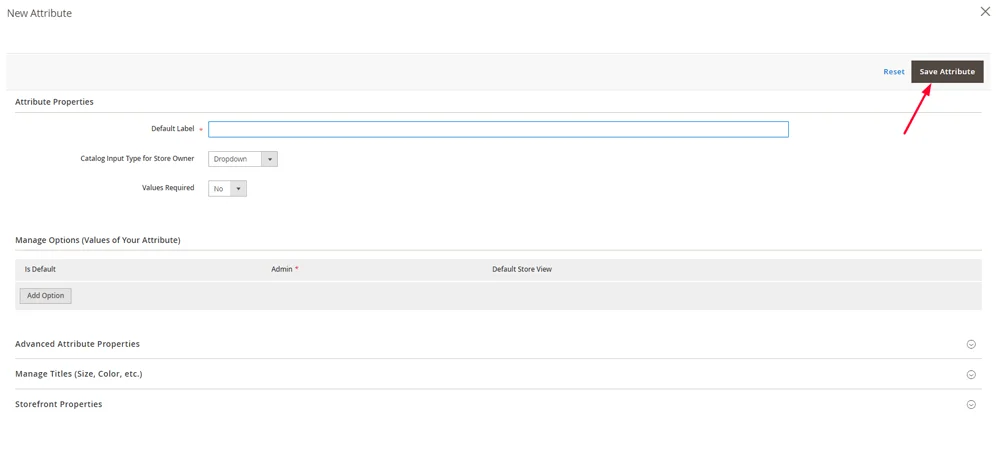
When creating a Simple product, you can scroll down to Customizable Options. Click on Add Option in the right corner. This will enable customers to add their own touch, such as requesting a monogram. It can also be used as a way to add color, size, and material options if your inventory is smaller.
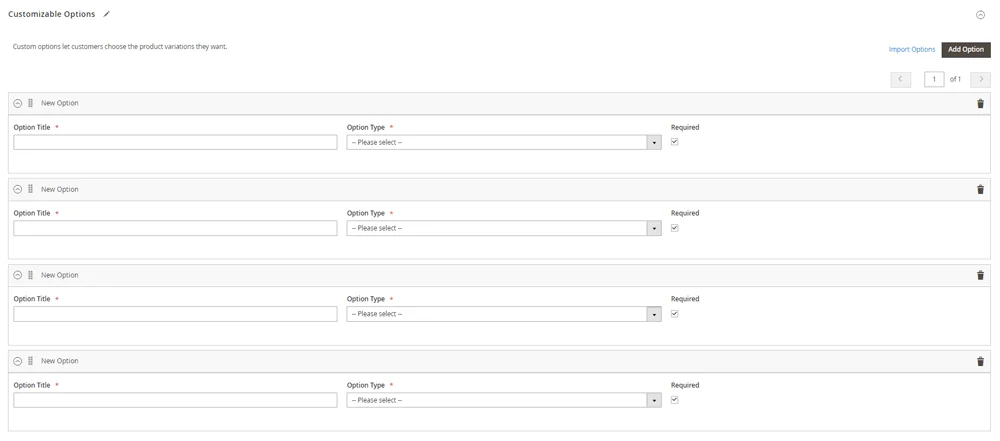
You can show options as dropdowns, checkboxes, and text input fields. Remove the tick from Required if customizing the item is not a must. This is important for products that can be monogrammed or such. However, you should definitely make choosing sizes and colors a requirement.
Product Categories and Organization
The easiest way to ensure efficient inventory management in Magento is to assign products to specific categories and configure their hierarchies. For example, your main group could be Clothes, and you can separate them into Tops, Dresses, Jeans, etc. The first step is to create classifications. Open the admin panel, click on Catalog, and choose Categories.
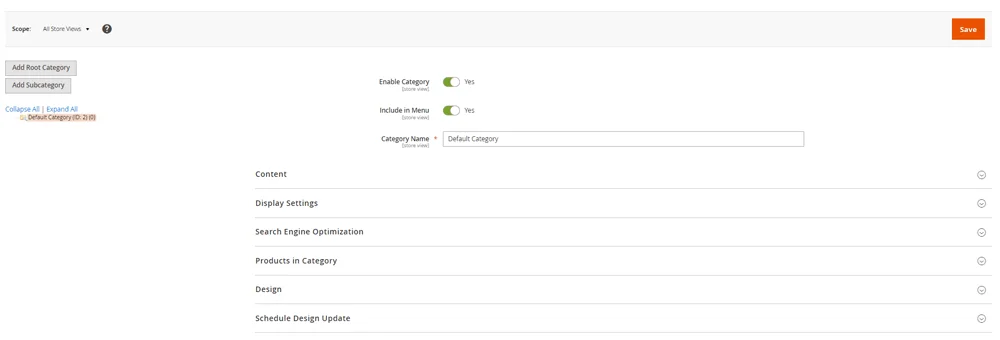
Choose Add Root Category to create a new top-level category or Add Subcategory for anything related to it. Then, you’ll need to:
- Enter the name of the category and description, if needed.
- Set it as active to make it visible on the storefront.
- Upload an image to make it visually appealing for customers.
- Set the category to appear in the main navigation menu.
- Optimize for SEO by adding suitable URLs, meta titles, and meta descriptions.
You can also tweak the design to fit your overall store aesthetic.To assign a category to a product, navigate to Catalog > Products. Click on Add Product or Edit for existing ones. Then, go to Categories and choose a suitable one from the drop-down menu.
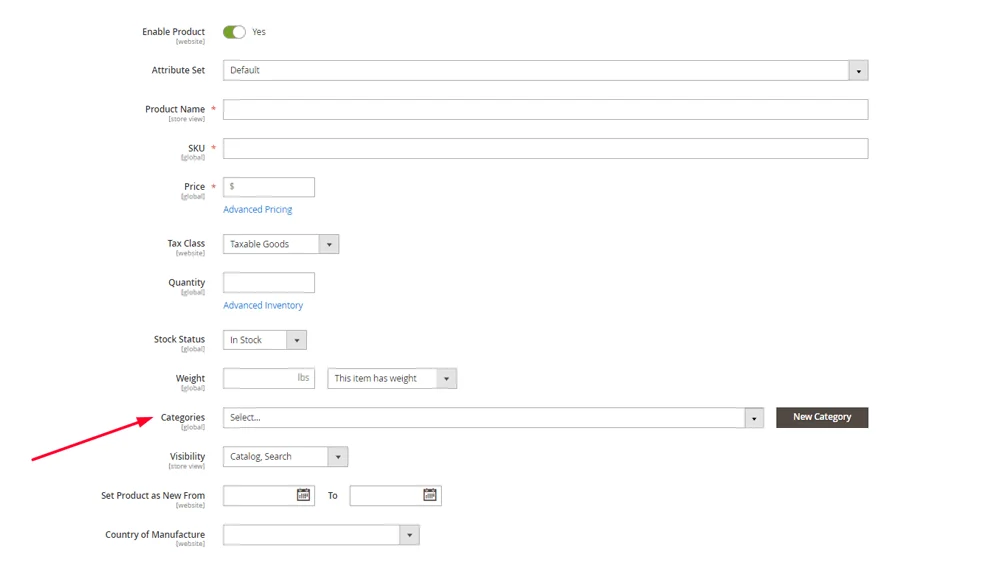
When you’re done, click Save.
Product Page Layout and Design
Having a visually appealing product page is crucial and can influence potential customers. So, you need a suitable ecommerce website theme. You can find one in the Magento Marketplace or order a custom one from a developer.
Either way, you can then customize the layout. To do so, navigate to Content > Design > Configuration.
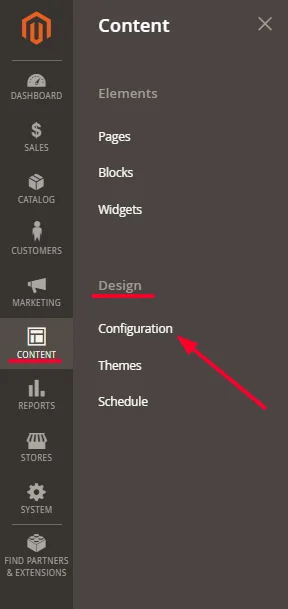
Select the store view you wish to customize and click Edit. Scroll down to Other Settings, and you’ll see options to edit headers, footers, etc. You can add images, logos, welcome texts, etc.

You can also navigate to Catalog > Products > Add Product or click Edit on an existing one. Then, scroll to Design. It will give you options to modify the Layout and the Display Product Options.
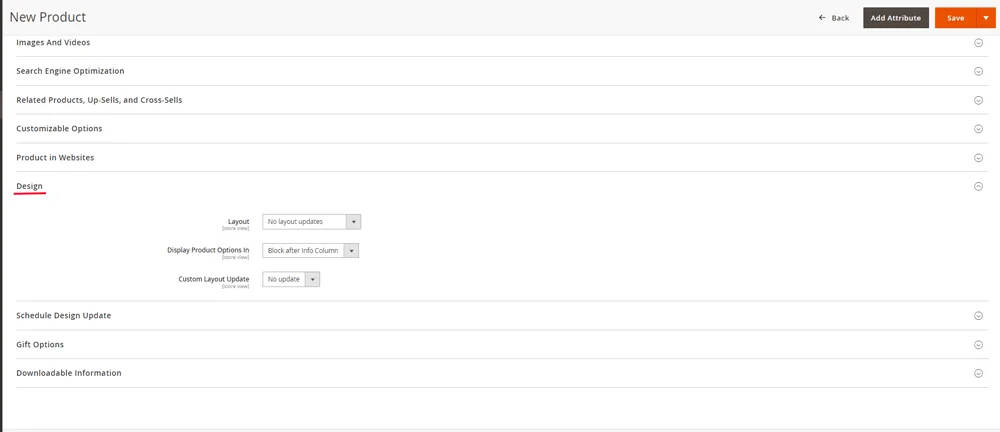
Don’t forget to add high-quality images and other multimedia related to your products. Not only does it make the whole page more attractive, but it also helps tremendously with conversion rates.
IMPORTANT: Ensure the theme you’ve chosen is mobile-responsive. It’s also a good idea to implement mobile-friendly design elements, such as simple menus, clear Call-to-Action, pinch-to-zoom options, swipe gestures, and more.
Product Availability and Alerts
In order to keep your customers happy, you need to learn to effectively communicate product availability. In Magento 2, you can display real-time product availability and configure custom messages for in- and out-of-stock products.
To enable real-time inventory updates, go to the admin panel. Navigate to Stores > Configuration, click on Catalog, and select Inventory. Set Manage Stock to Yes to enable inventory management. Then, you’ll need to tweak Stock Options:
- Decrease Stock When Order is Placed – must be set to Yes
- Display Out of Stock Products – if you plan on restocking for sure, then you can set it to Yes
- Display Products Availability in Stock on Storefront – choose Yes
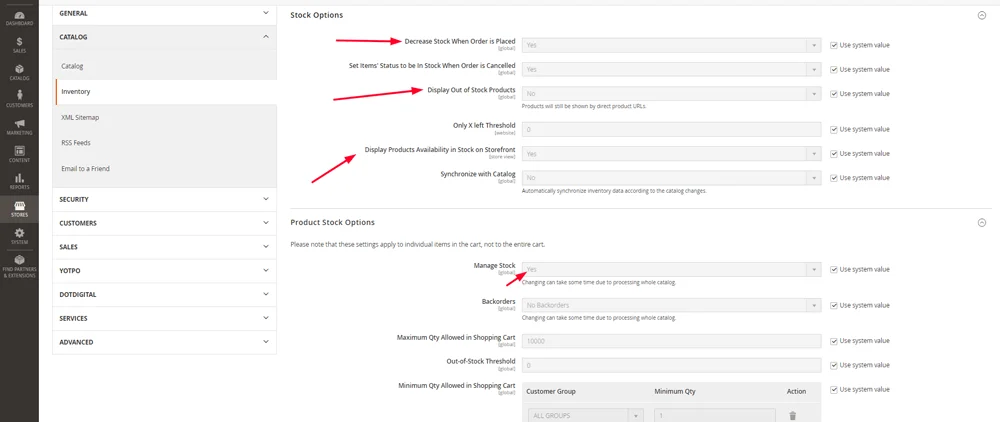
You can allow Backorders for products that are not available currently, but will be restocked within a short time frame. That way, customers can pre-order items. All you have to do is remove the tick from Use system values and enable the option.
As for stock levels:
Magento 2 uses cron jobs to update the information. Ensure they are properly configured and running. Navigate to System > Cron Schedule to verify and make changes, if necessary. The stock status updates dynamically based on product sales and inventory changes. This ensures customers always see the most current availability.
You’ll also need to set alerts:
Above Inventory, you’ll see Catalog. Click on it and choose Product Alerts.
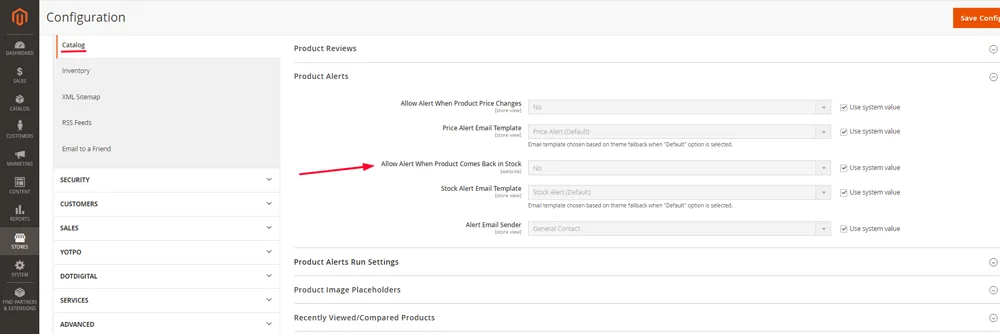
Remove the tick from Use system value and set it to Yes. You can use the System Default Stock Alert Email Template as a way of notifying your customers. If you wish to customize the message, go to Marketing > Email Templates.
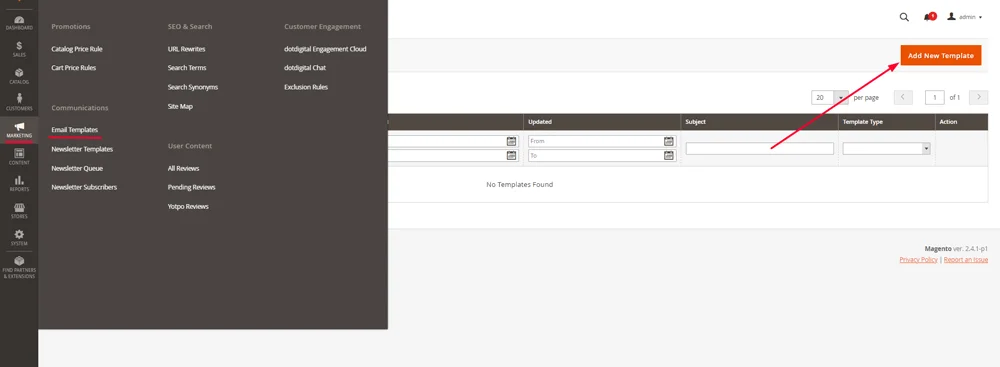
Click on Add New Template, create a suitable one, and save it. Your customized version will now appear in the drop-down menu next to Stock Alert Email Template, and you can activate it.
Product Pricing and Special Offers
Magento offers all its users robust tools to set different pricing options and configure special offers, discounts, etc. By effectively using these features, you can attract customers, increase sales, and stay competitive. You now have to set base prices. Navigate to Catalog > Products and select an item to edit or click on Add Product. In the Product Details section, locate the Price field and enter the base price for the product. Save the information.
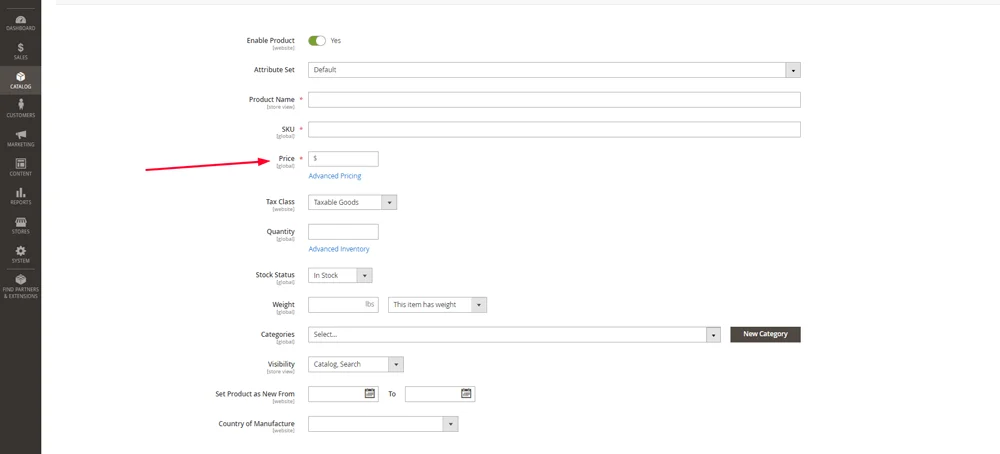
Right underneath it, you’ll see Advanced Pricing. This is where you set the special prices. You can set a timeline for a discount, such as a week.
You can also set dynamic pricing, flash sales, and limited-time offers via Magento’s Price Rules.Navigate to Marketing > Promotions > Catalog Price Rule. Click Add New Rule and fill in details, such as name, description, and status. Define the Conditions under which the rule applies. Those can include specific products, categories, or attributes. Set the Actions to specify the discount amount and type, like percentage discount. Set it to Active and save.
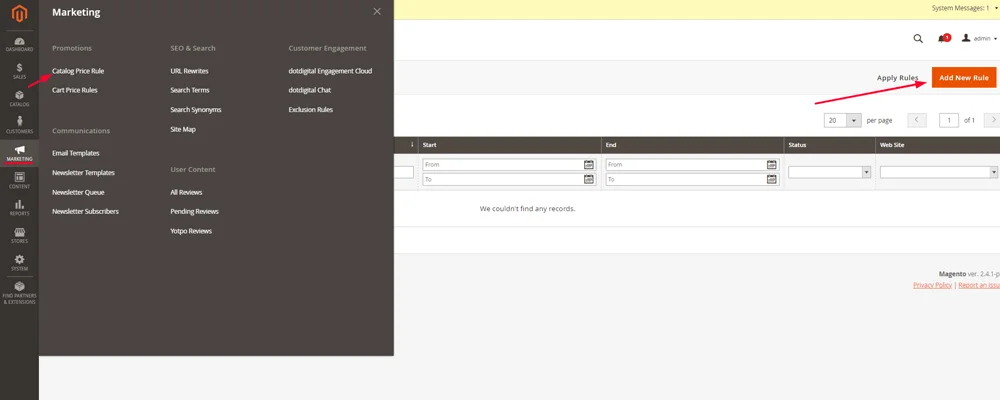
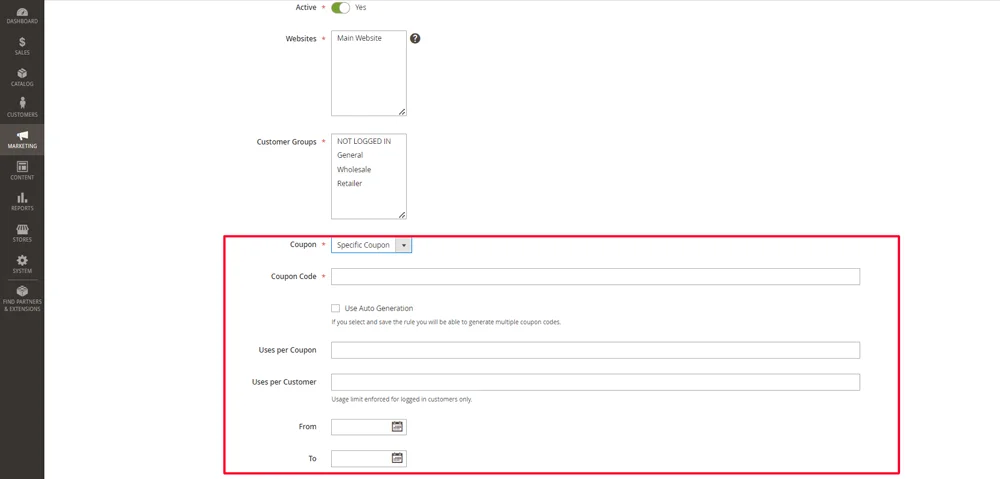
In addition, you can create Coupons. They are a great way to incentivize purchases and can be used with cart price rules.
Go to Marketing > Promotions > Cart Price Rules and click on Add New Rule. Navigate to Coupons, set it to Specific Coupon, and write down a code or use the autogenerator. You can set conditions, such as Uses per Coupon or Uses per Customer.
Product Reviews and Ratings
Product reviews and ratings build trust with potential customers and can significantly impact purchasing decisions.
To enable people to leave feedback, you’ll need to navigate to Stores > Configuration in the Magento admin panel. Go to Catalog and scroll down to the Product Reviews section. Set Enable Product Reviews to Yes to allow customers to submit reviews. Save the configuration.

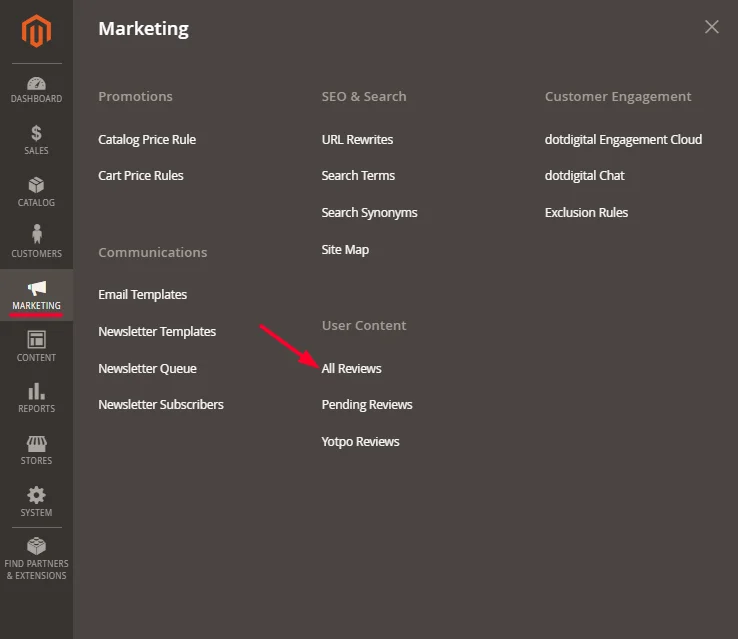
You can approve, edit, or delete reviews as necessary. Go to Marketing > User Content > All Reviews. You will see a list of all submitted reviews. You can filter and sort reviews based on various criteria, such as:
- Status
- Date
- Rating
To approve a review, click on it and set the Status to Approved. You can also edit the content if necessary. Don’t forget to save the changes.
Shipping Information
There’s one thing people care about almost as much as they do for pricing.
Shipping.
It can affect the overall cost, and let’s not even mention the disappointment that follows when the product you like can’t be delivered to your country.
Thankfully, Magento 2 provides various shipping methods that can be configured to suit your business needs. Here’s how to set up and manage these options:
Navigate to Stores > Configuration. In the Sales section, select Delivery Methods. You will see various options, such as:
- Free Shipping
- Flat Rate
- Table Rates
- Carriers like UPS, FedEx, USPS, and DHL.
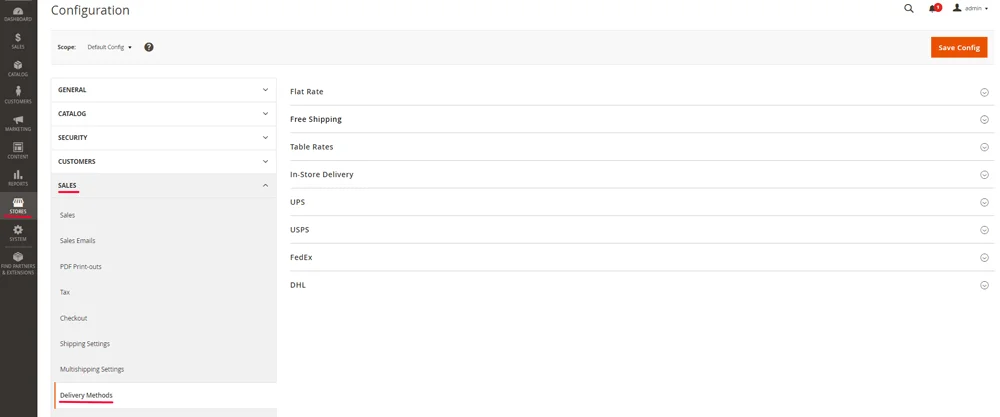
Clicking on any of the arrows on the right will enable you to configure the necessary settings.
Once you’ve done that, you can navigate to Shipping Settings and set up a custom shipping policy. Another option is to use the custom one. To allow shipping to multiple addresses, click on the section right underneath Shipping Settings. Set the option to Yes.
Quantity Selector and Add to Cart Button
You want your Add to Cart button to be as visible as possible.
Same for the quantity selector – the more people buy, the better. You can change the amount of items people can buy by navigating to Catalog > Inventory in the Magento admin panel. Go to Inventory and navigate to the Product Stock Options section.
Configure the Default Quantity and Minimum/Maximum Quantity Allowed in Cart settings based on your online store requirements.
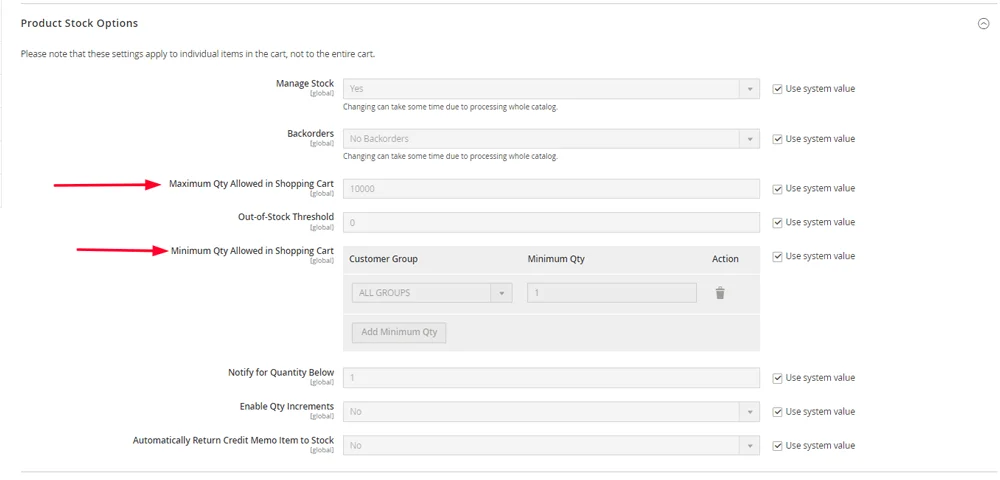
To change the system default setting, remove the tick from Use system value.
Now.
On to the Add to Cart button.
The design will depend on the Magento theme you’ve chosen. If you have HTML knowledge, you can tweak it by going to Content > Design > Configuration, selecting the store view, and clicking Edit. You can add custom CSS for styling the Add to Cart button in the Use the HTML Head section. Some themes allow you to customize the button from the main settings. You can also check with your web developer to discuss any changes.
IMPORTANT: After fixing the Add to Cart button, enable one-page checkout and allow guest checkout. Go to Stores > Settings > Configuration > Sales > Checkout and set both to Yes. This will improve your conversion rates and also make it easier for people shopping on mobile.
Creating Virtual and Downloadable Products
Let’s tackle them one by one:
Virtual products in Magento are intangible items that do not require shipping. Examples include services, memberships, or subscriptions. To create one, go to Catalog > Products > Add New Product and choose Virtual Product from the drop-down menu. It’ll open up a new page, and you can add all the necessary information, such as Name, SKU, Price, Visibility, etc.
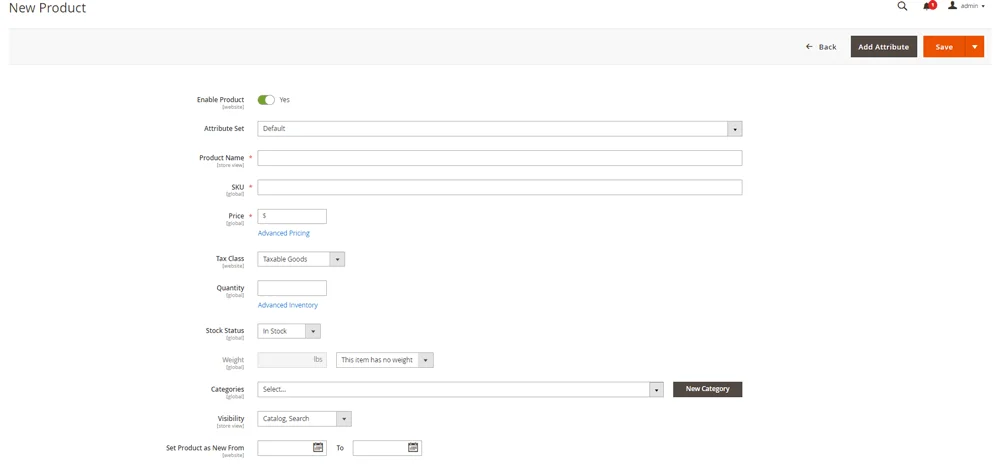
Unlike physical products, virtual ones may require specific attributes. To create or modify them, navigate to Stores > Attributes > Product. You can tweak or add things such as service duration, access level, or subscription terms.
The process for creating a downloadable product in Magento is pretty similar. You’ll need to go to Catalog > Products > Add New Product and choose Downloadable Product. Once you’ve entered the info, scroll down to Downloadable Information.
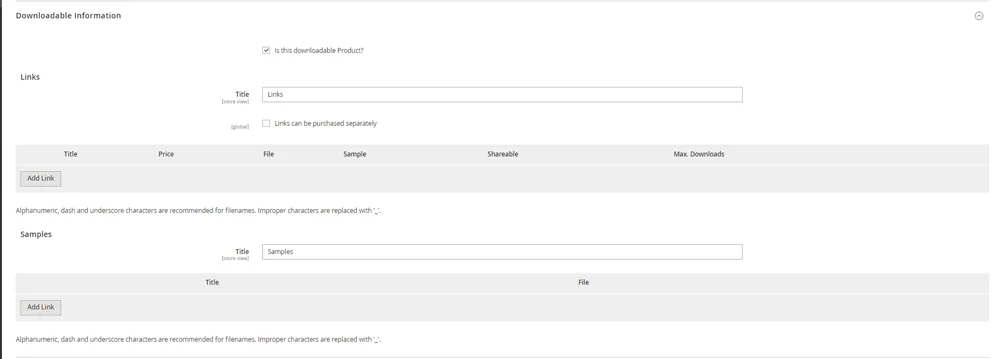
Click on Add Link to upload the digital file. Fill in the link title and set the price. If you have multiple files, you can group them into samples. When all is done, save your product.
Creating Grouped Products
Grouped products in Magento are several individual items bundled together on a single product page. This enables customers to purchase related items simultaneously, which is particularly useful for purchasing product kits, collections, etc.
You create grouped products by navigating to Catalog > Products > Add New Product and choosing Grouped Product from the drop-down menu. After you add the necessary info, scroll down to Grouped Products and click on Add Products to Group.

It will open up another tab with a list featuring all the items in your store. Tick the ones you want to group, click on Add Selected Products, and then save the group.
Product Page Security Measures
When operating a Magento store, you’ll be drowning in sensitive customer data. That’s why you need to implement the best security strategies to protect your user base.
One of the easiest things you can do is keep your Magento 2 platform, its themes, and extensions up-to-date. Check for updates and security patches released by the developers regularly and keep up with any news regarding the plugins.
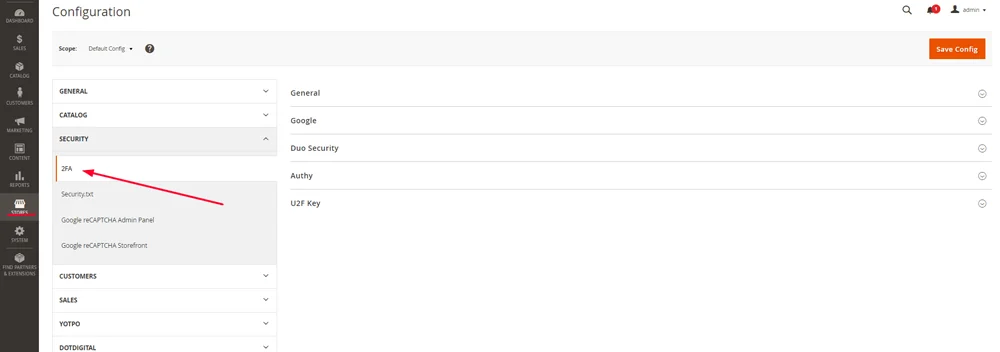
Implementing two-factor authentication (2FA) is also a must. Navigate to Stores > Configuration > Security > 2FA. Choose an authentication app like Google Authenticator or Duo Security to generate secure login codes.
Download themes and add-ons only from reputable developers. Double-check reviews to ensure there are no security vulnerabilities.
Another critical step is choosing a reliable and secure hosting provider with robust security features. Ensure the host offers regular security audits, firewalls, malware scanning, and DDoS protection.
We at ScalaHosting have it all. In addition to rock-solid security, our VPS plans include free SSL and daily offsite backups. Our hosting management platform, SPanel, comes as part of all our packages. It’s integrated with SSHield – an AI-powered security tool that blocks 99.998% of attacks aiming to harm your website.
To simplify, we can create a safe and scalable environment for your Magento store. Contact us today, and let’s discuss your options!
Product Page SEO Optimization
Search Engine Optimization (SEO) is critical for driving organic traffic to your online store.
The first step is ensuring your content is both user- and search engine-friendly. This involves creating high-quality, relevant, and unique content that effectively communicates the value of your products while incorporating SEO best practices.
You’ll need to do thorough keyword research. Identify relevant phrases that potential customers use to search for products like yours. Tools like Google Keyword Planner, SEMrush, and Ahrefs will greatly help you in that direction. Make sure to integrate chosen keyphrases naturally into your product titles, descriptions, headers, and URLs. Avoid keyword stuffing, as it can lead to penalties from search engines.
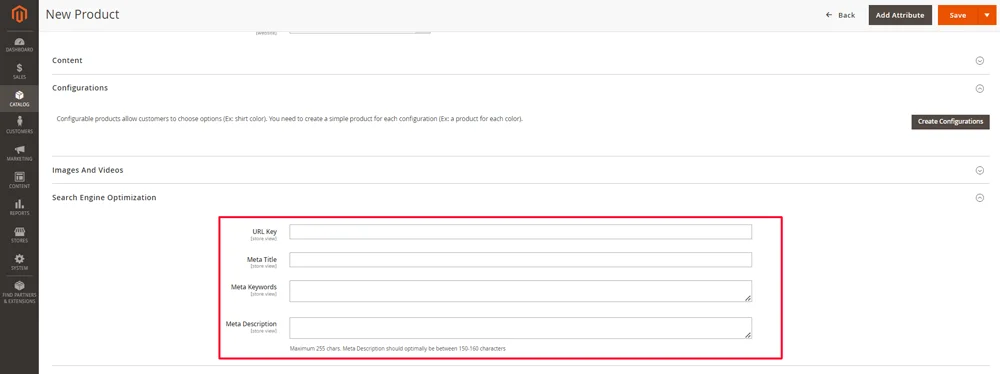
Pay special attention to meta titles and meta descriptions. They should be concise, informative, and include primary keywords. The optimal length for meta titles is between 50-60 characters. Meta descriptions should be between 150-160 characters.
To configure them, go to Catalog > Products and either click Edit on an item or choose Add New Product. Scroll down to the Search Engine Optimization section. Add the necessary info and click Save.
Other useful SEO strategies include:
- Optimizing images – Compress images to reduce their file size without compromising quality. Use descriptive file names and alt text for all product images, incorporating relevant keywords.
- Implementing mobile-responsive designs – ensure your product pages are fully responsive and optimized for mobile devices. Google prioritizes mobile-friendly websites in search rankings, so this is an essential step.
- Improving page loading speeds – Fast page load times are crucial for user experience and SEO. Optimize server performance, leverage browser caching, and minimize JavaScript and CSS to enhance load speeds.
All of this will help your product pages rank better. And better rankings equal more visitors.
Conclusion
Optimized product pages are the heart of your Magento store. It needs to be aesthetically pleasing, easy to navigate, and showcasing the best of your inventory.
Some details, such as name, SKU, and descriptions, might seem basic. However, that doesn’t mean you shouldn’t pay attention to them. After all, they are your foundation, as are the photos of your products. They all need to be optimized to allow customers to navigate your store effortlessly.
Inventory management is crucial. You need to efficiently track stock levels and handle out-of-stock scenarios without losing customer interest. And to make it easier for viewers to find you, you need to master those product page SEO techniques.
Shipping options are a crucial part of the buying decision, so outline all the necessary details. Don’t forget to enable guest checkout – your customers will appreciate you!
Last but not least, tighten up your security. After all, you’ll be dealing with a lot of sensitive data, and the last thing you want is for it to fall into the wrong hands.
And there you go – you’re now equipped to build an outstanding product page in Magento and make your store shine!
FAQ
Q: What is a product page?
A: A product page is a key element of ecommerce stores. It’s where you showcase detailed information about a specific product – description, price, images. It enables customers to interact with your inventory and eventually make purchases.
Q: What to include on a Magento product page?
A: It’s important to include as many details as possible on a Magento product page. Add a title and a detailed description, and, if possible, include relevant keywords. Include high-quality images and enable customers to zoom in. Add options such as size, color, material, etc. If relevant, outline technical details like dimensions, weight, and materials used. Make sure to have a prominent CTA, such as a big Add to Cart button. Include reviews and shipping details, too.
Q: What is simple product in Magento 2?
A: A Simple Product in Magento 2 has no variations or configurable options. For example, a coffee mug is only available in one size and color. It is the most basic product type offered by Magento. Simple Products are best used for items that don’t require customization or customer selection of attributes.

