cPanel DNS Management: Beginner’s Guide
In the complex workings of the Internet, the Domain Name System (DNS) serves as the backbone, ensuring that users seamlessly access their desired destinations. To put it in layman’s terms, it helps you open the websites and pages you’re looking for.
DNS translates human-readable domain names into machine-readable IP addresses, enabling the efficient functioning of the Internet. Without it, we would have to memorize long IP addresses to find the websites we need.
In this article, we will dive into the critical role of DNS in website accessibility and guide you through the ins and outs of managing nameservers using one of the most popular web hosting control panels on the market – cPanel. So, without further delays, let’s find out more about DNS and cPanel DNS management!


Your Website with Entry Cloud
The Significance of DNS for Website Accessibility
To truly understand the importance of DNS, we’ll give you a metaphor. Picture the Internet as a big city and each website as a unique building with its own address. DNS acts as the city’s address book, ensuring that when you type a domain name into your browser (or look up a building in the book), it directs you to the correct IP address (address of the building).
For example, when you type “YouTube.com” in Google, the DNS records will find the corresponding IP address and the homepage of the multimedia platform.
You can include an image here that shows DNS records.
Accessing DNS Management in cPanel
Now that you know why DNS is so important and its fundamental role, let’s explore how you can handle your nameservers using cPanel – a widely utilized hosting control panel known for its beginner-friendly interface and powerful features.
Step-By-Step Guide to Accessing DNS Management in cPanel
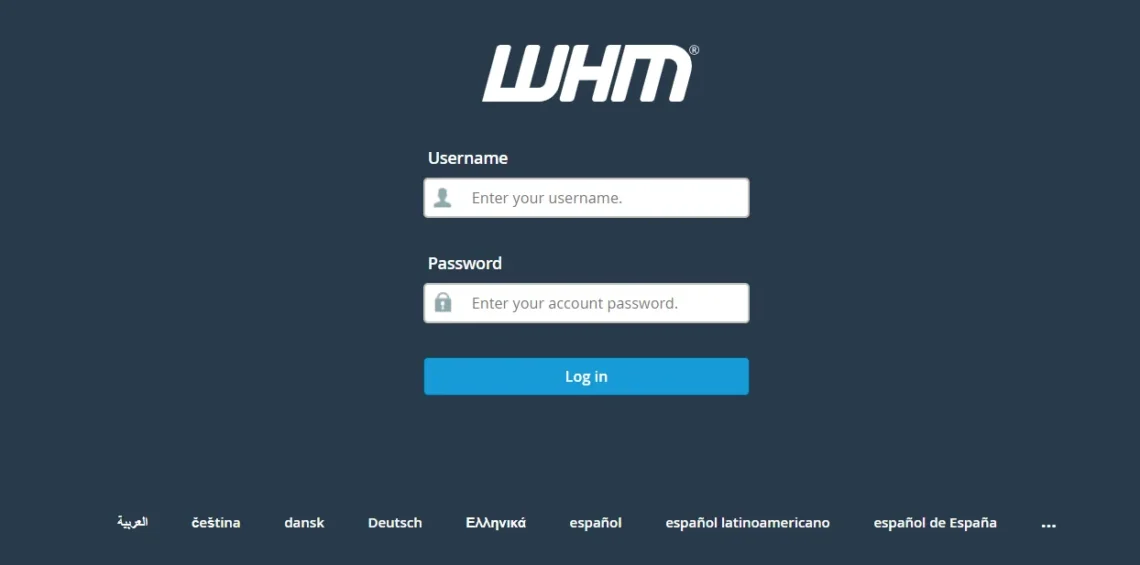
- Login to cPanel: Open your web browser and enter the URL to access cPanel. The URL usually looks like this – https://yourdomain.com/cpanel or https://yourIPaddress:2083. Enter your cPanel username and password to log in.
- Navigate to the Domain Section: Inside the control panel dashboard, you’ll find all of the features, tools, and functionalities it offers. Scroll down until you find the section labeled “Domains.” The exact placement of this section might vary depending on your cPanel theme, but it’s commonly found near the top or in a section titled “Domains” or “Domain Management.”

- Find and Click on Zone Editor or DNS Manager: You should find an option called “Zone Editor” or”DNS Manager” in the “Domains” section. Click on it.

- Select the Domain: If you manage multiple domains, you need to choose the specific domain for which you want to manage DNS settings.
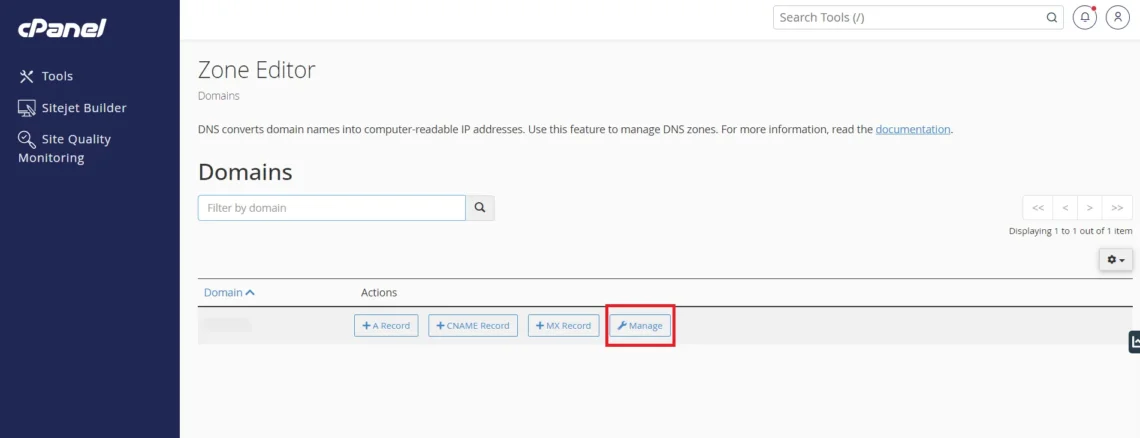
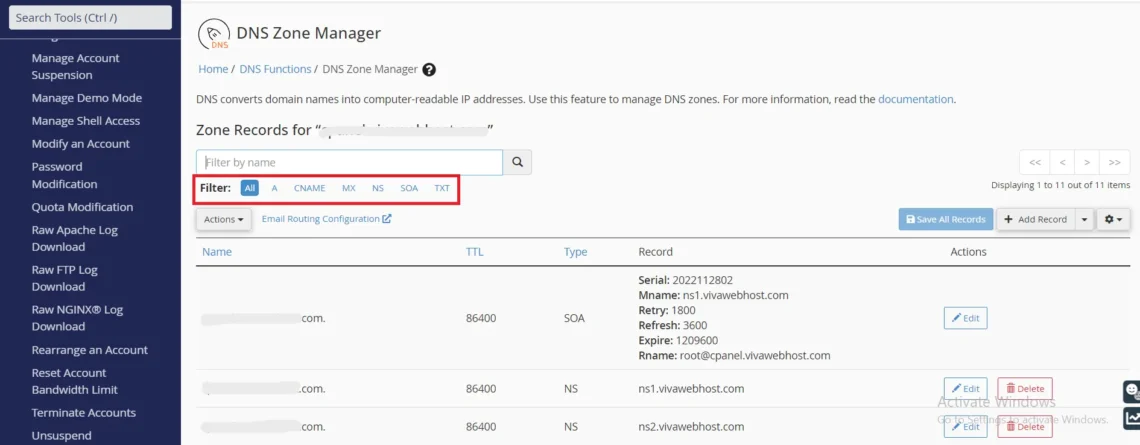
- Access the DNS Management Interface: Once selected, you will be redirected to the DNS management interface. This is where you can view and edit various DNS records associated with your domain.
- View or Modify DNS Records: In the DNS Management interface, you’ll typically see a list of existing DNS records such as A, CNAME, MX, etc., which we’ll cover below. Here, you can view, edit, or add new records based on your requirements.
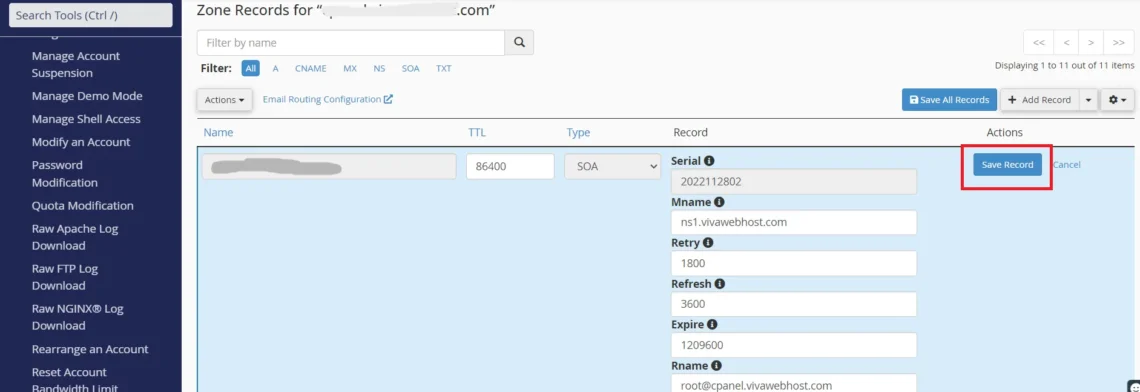
- Make Changes and Save: To make changes to existing nameservers, click on the corresponding record, modify the necessary information, and save the changes. Look for an option called “Add Record” or “Add Zone Record” to add a new record. Select the record type, enter the required data, and save.
- Verify Changes: You must verify your changes so they’re applied site-wide. You can use online DNS lookup tools or wait for the changes to propagate, which may take a little time.
Keep in mind that changing DNS settings can affect your website’s accessibility and email delivery. Make DNS edits cautiously and ensure you have the correct information before applying.
cPanel Tools for DNS Configuration
cPanel offers numerous tools for DNS configuration. The specific options and features might vary slightly depending on the cPanel version of your hosting provider. Some of the most common tools for DNS configuration you’ll find in cPanel include the following:
Simple DNS Zone Editor
This tool allows you to add, edit, and delete DNS records for your domain(s). Some of the most common records include A (IPv4 address), CNAME (canonical name), MX (mail exchange), and TXT (text). Log in to cPanel, navigate to the “Domain” section, and click on “Simple DNS Zone Editor” to use this tool.
Advanced DNS Zone Editor
The Advanced DNS Zone Editor provides a more detailed view of your DNS records. It allows you to manage individual entries with great control. It’s suitable for users familiar with DNS technology. You can access this tool through the “Domains” section in cPanel by clicking on the “Advanced DNS Zone Editor” menu.
MX Entry
This feature is specifically developed for managing your Mail Exchanger (MX) records. Here, you can set the priority and destination mail server for your domain’s email accounts. You need to go to the “Mail” section in cPanel and click on MX Entry to access the MX Entry tool.
Zone Editor (WHM)
The Zone Editor is only available to those who have access to WebHost Manager (WHM). It provides additional features for managing DNS zones at a server-wide level and is typically used by server administrators. You need to open WHM, DNS Functions, and Edit DNS Zone to find and use this tool.
Nameserver Configuration (WHM)
The Nameserver Configuration tool is also only available to those who have WHM access. It allows server admins to configure and manage nameservers, which are essential for translating domain names into IP addresses. To access this tool, open WHM, look for the “Server Configuration” section and click on Basic WebHost Manager Setup.
Resolver Configuration (WHM)
This is yet another tool that’s only available to those with WHM access. It allows admins to configure the DNS resolver used by the server and affects how the server resolves domain names. You can find it by opening WHM, navigating to the Server Configuration section, and clicking on Resolver Configuration.
If you are looking for a cPanel alternative for your DNS configuration, we strongly recommend SPanel. SPanel is ScalaHosting’s proprietary all-in-one management platform that allows you to manage your server safely and doesn’t require any prior technical knowledge.
Understanding DNS Records
Now that you know how to configure DNS records, let’s explore the different types you can use. But before we do that, you must understand what DNS records are.
DNS records serve as the building blocks of the DNS system. Each plays a unique role in directing Internet traffic, and every record has a different function and purpose.
A Record (Address Record)
The A record links a domain to its corresponding IPv4 address. It is the most common type of DNS record and is vital for directing web traffic to the appropriate server.
AAAA Record (IPv6 Address Record)
This type of DNS record is similar to the A record. The difference between the two is that AAAA associates a domain with its IPv6 address instead of an IPv4 one. As the Internet transitions to IPv6 to accommodate the growing number of connected devices, this type of record becomes increasingly important and more popular.
CNAME Record (Canonical Name Record)
The CNAME record serves as an alias for a domain. It allows you to associate a domain with another domain and provides flexibility in managing website resources.
MX Record (Mail Exchange Record)
MX records handle email routing. They specify which email servers are responsible for receiving emails on behalf of a domain and ensure proper email delivery.
TXT Record (Text Record)
TXT records store text-based information and data. They are widely used for verification purposes, such as SPF (Sender Policy Framework) records for email authentication.
PTR Record (Pointer Record)
PTR records perform the opposite of an A or an AAAA record. They map an IP address to a domain name and assist in network troubleshooting and verification. In other words, a PTR record is a normal DNS lookup record, but in reverse.
SOA Record (Start of Authority Record)
The SOA record contains essential information about the domain, such as the primary DNS server, the domain’s serial number, and the email of the administrator. It also tells you when the name was last updated and how long a certain server should wait before refreshing.
Editing and Creating DNS Records
Now, let’s learn how you can edit existing DNS records, create new ones, and specify record types, TTL values, and data.
How to Edit DNS Records
You need to open the DNS Management interface in cPanel and do the following:
- Locate the Record to Edit: Scroll through the list of DNS records and find the one you want to edit.
- Select the Record for Editing: Click on the record you want to edit. This action may vary depending on the cPanel theme, but there is usually an “Edit” or “Pencil” icon next to each record.
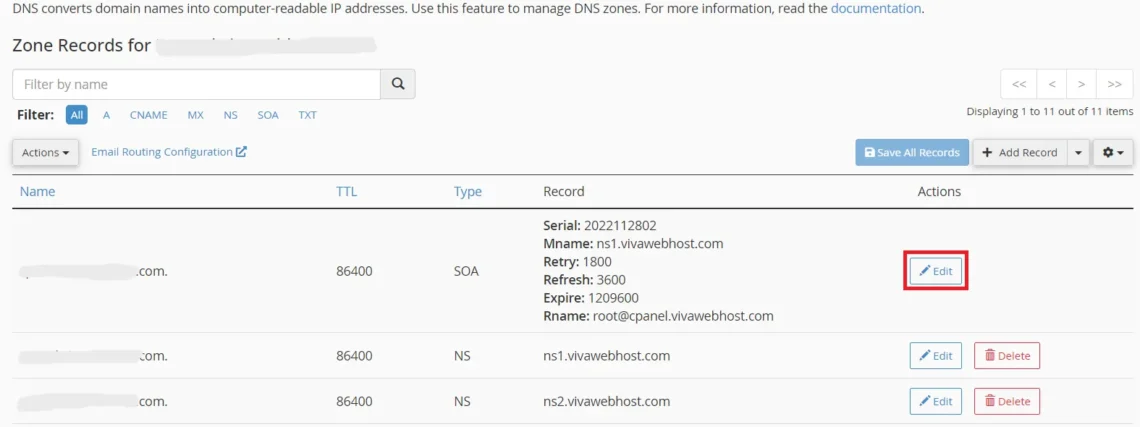
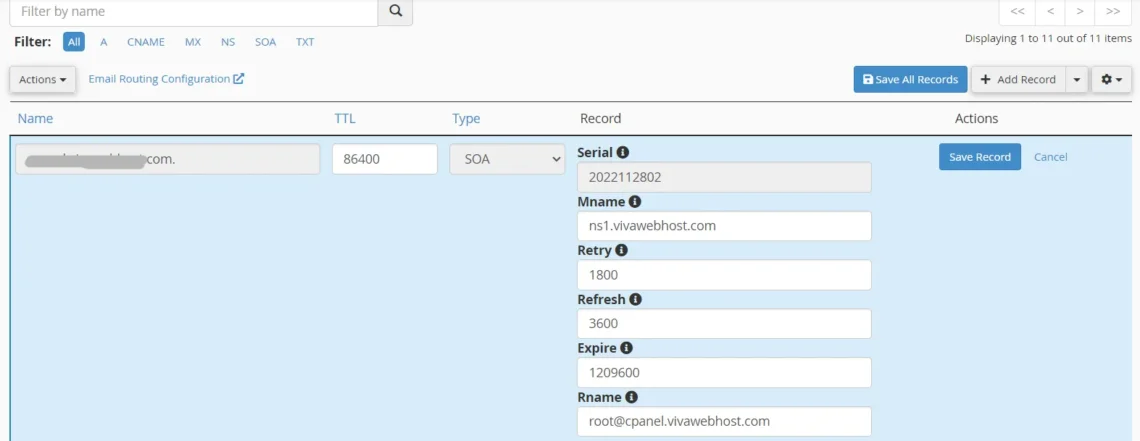
- Modify the Record Information: You’ll see fields containing the current information for the DNS record (e.g., IP address for A records or destination for CNAME records) once you click on the “Edit” or “Pencil” icon. You can modify the information according to your requirements here.
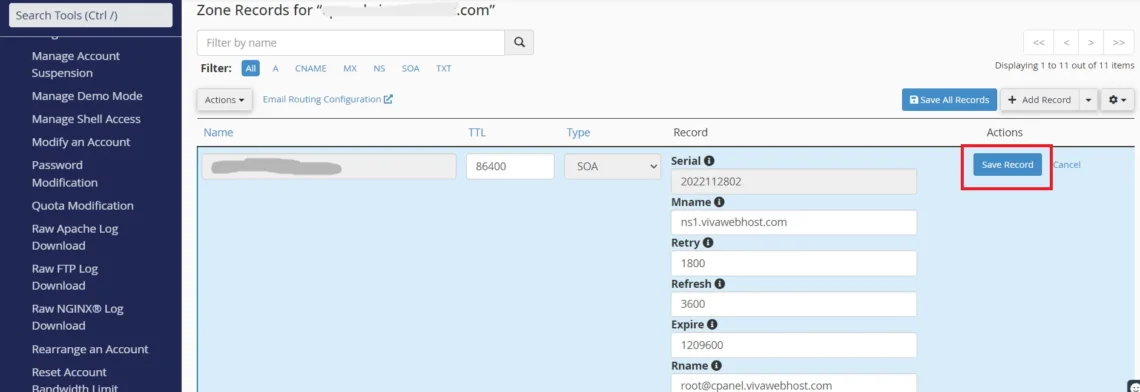
- Save the Changes: Look for a “Save” or “Save Changes” button once you’re done. It’s usually located at the bottom of your screen, and you need to click on it to apply the changes.
- Verify Changes: As mentioned above, verifying changes made to DNS records is essential. You can do it with an online DNS lookup tool after waiting a bit for the changes to propagate.
- Check Website Functionality: After DNS propagation is done, check the functionality of your website to ensure the changes do not negatively affect its performance or availability.
How to Create New DNS Records
In the DNS Management section:
- Look for Add Record or Add Zone Record: You can find the “Add Record” or “Add Zone Record” option within your DNS management interface. Click on it to create a new record.

- Choose the Record Type: Select the type of DNS record you want to create. You can find what each type does above.
- Enter Record Information: The information you’ll need to enter depends on the type of record you want to create. For example:
- Enter the destination IP address for an A record.
- Enter the alias or canonical name for CNAME.
- Enter the mail server details for an MX record.

- Save the New Entry: Look for a “Save” or “Add Record” button to save your new DNS entry.

- Verify Changes: You can do this with an online DNS lookup tool after waiting for the changes to propagate.
- Check Service Functionality: Check the functionality of the service or server associated with the new DNS record.
How to Specify Record Types, TTL Values, and Data
To avoid repeating the same steps again, you need to log in to cPanel, open the “Zone Editor” or “DNS Manager,” and select the domain you want to alter.
Do the following after that:
- Find or Add the Desired DNS Record: If you want to specify an existing record, select it from the list. If you’re going to establish a new one – click on “Add New Record” or “Add Zone Record.”
- Select the Record Type: Choose what kind of record you want to create by clicking on it.
- Specify TTL (Time to Live): TTL represents the time a DNS record is considered valid by DNS resolvers. Enter the desired TTL value in the text box. Common values are expressed in seconds, such as 3600 for one hour.

- Enter Record Data: The data you enter depends on the record type.
- Save or Update the DNS Record by clicking “Save” or “Update,” verify the changes, and check service functionality.
Security Considerations
Incorrect DNS configurations can lead to significant security risks for websites and online services.
Some of the vulnerabilities that stem from misconfigurations include the following:
| Security Risk | Outcome |
|---|---|
| DNS Hijacking (also DNS poisoning or DNS redirection) | A DNS hijacking attack allows hijackers to manipulate how DNS queries are resolved. It redirects users who click on a specific link to malicious websites, where they’re subject to phishing attacks and unauthorized access to sensitive information. |
| Subdomain Takeover | This happens when you leave unused or unmonitored subdomains vulnerable. It allows attackers to take control of the subdomains, conduct phishing campaigns, distribute malware, and tarnish your reputation, branding you as an untrustworthy business. |
| DDoS Attacks | DDoS attacks involve overloading your DNS server and causing your website or service to shut down and become unavailable. They can lead to loss of sales and data. |
| Email Security Risks | Incorrect DNS configurations can lead to spam, phishing, and email spoofing, which will damage your communication and give unauthorized people access to sensitive data. |
| Man-in-the-Middle Attacks | These attacks involve intercepting communication between users and services. They enable eavesdropping, data interception, and access to private information. |
| Data Exfiltration | Attackers can use DNS tunnels to exfiltrate sensitive data from your network. |
You need to check your DNS configurations regularly to mitigate these security risks. You must also implement best practices and stay informed about new types of threats. The former includes ensuring the use of secure and validated DNSSEC (Domain Name System Security Extensions) protocols, monitoring for suspicious activities, and addressing any misconfigurations immediately.
Regular security assessments and audits can help you identify and mend potential vulnerabilities before attackers can exploit them. This enables you to stop attacks before they even happen.
Conclusion
Knowing how to manage your DNS settings in cPanel or any other web hosting control panel is essential if you want to optimize your website performance, enhance its structure, and ensure reliable communication. DNS misconfigurations can also lead to huge security risks, which is why understanding DNS management is so important.
If you want to boost your overall security and make your DNS records safer, you must use a secure and reliable web hosting provider. At ScalaHosting, we offer air-tight managed VPS hosting that comes with SPanel, an all-in-one web hosting control panel that’s easy to use and provides multiple layers of protection.
FAQ
Q: How Do MX Records Impact Email Delivery?
A: MX records play a pivotal role in email delivery as they specify the mail servers responsible for receiving email on behalf of a domain. Without MX records, emails won’t be able to reach their intended recipient’s inbox, meaning that your emails won’t be delivered correctly.
Q: What Is DNS Propagation?
A: DNS propagation is the time it takes for changes and updates to DNS records, like IP address or name server modifications, to be in full effect across the entire Internet. DNS information gradually updates across global networks during the propagation period and affects how users reach a website. It typically takes between a few and up to 48 hours to complete.
Q: What Is DNS Troubleshooting?
A: DNS troubleshooting involves identifying and resolving issues related to the Domain Name System. It includes diagnosing problems like server issues, incorrect DNS configurations, domain resolution failures, and more. Common troubleshooting techniques include checking DNS records, verifying server settings, and using diagnostic tools.


