How to Configure Emails in PrestaShop
Ecommerce websites and email communication are like two peas in a pod. Apart from essential system messages (like order confirmations), there are more than a few occasions where emails bring store owners and clients closer together. Think about things like special promotions, newsletters, abandoned cart reminders, current discounts, and upsell/cross-sell items.
Emails help you not just to attract attention – it’s a valuable tool for building loyalty and trust.
Today, we are taking a deep dive into online communication as a PrestaShop store owner – what options do we have, what do we need to set up additionally, and what are the best tools to connect with our audience?
Let’s get right into it.
Accessing PrestaShop Emails Settings
Inside the PrestaShop backend, there are a plethora of options on the left, which aim to cover all possible aspects of managing an online shop. When it comes to Email settings, the majority of options can be found in:
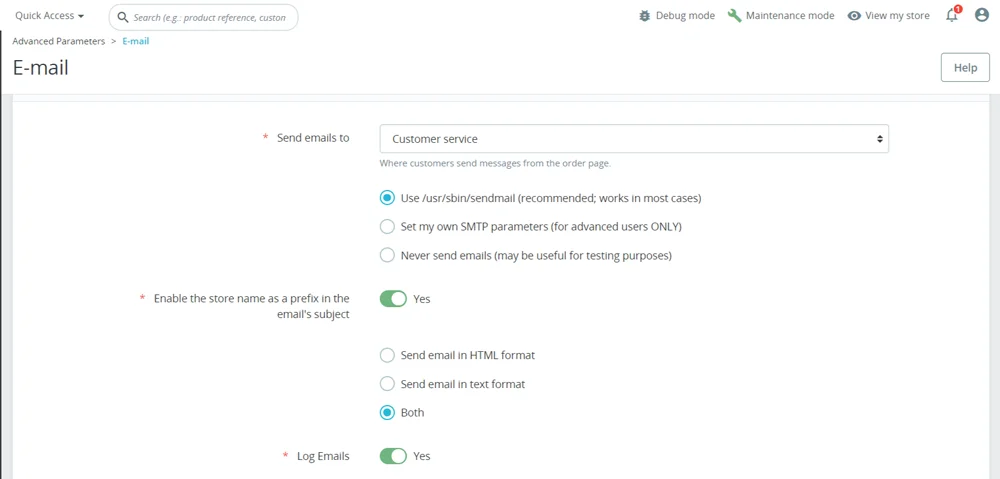
Dashboard -> Advanced Parameters -> Email
Inside, you can do things like sending test emails, setting SMTP parameters, turning DKIM signing (DomainKeys Identified Mail) on and off, and others.
But before we go on with fine-tuning our email inboxes, we need to set them up in PrestaShop first. By default, the system recognizes any account you might have created through your control panel. Still, you can also include additional ones for anyone collaborating with you. To access your usable inboxes, you can go to:
Dashboard -> Shop Parameters -> Contact
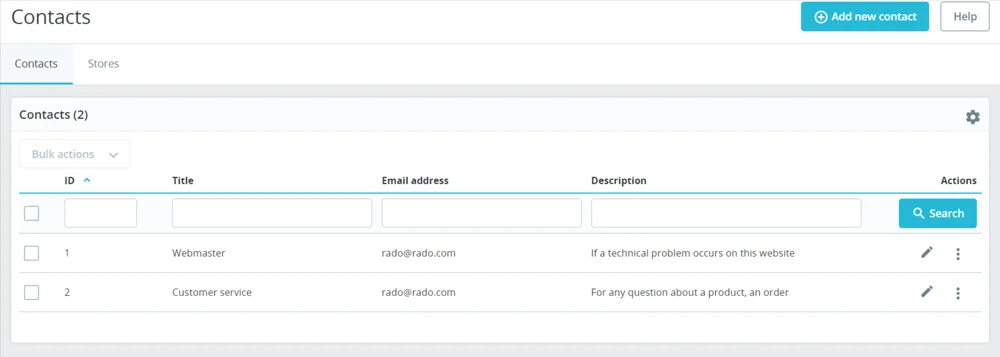
As you can see, this section is straightforward and contains only the most essential information you would need to keep your contacts organized.
Configuring SMTP Settings in PrestaShop
SMTP (or Simple Mail Transfer Protocol) is the protocol you utilize to successfully send email messages over the web. It is absolutely essential for sending emails, just like POP3/IMAP are needed to receive such.
Luckily, PrestaShop has an easy way to configure SMTP settings straight from the dashboard. Once you navigate to Advanced Parameters -> Email, you should go ahead and click on the option Set My Own SMTP Parameters.
This will open up a bunch of fields you need to fill in:
- Email domain name: fill in the primary domain for your website (ex. yourdomain.com).
- SMTP server: this is for the host of your email server (you can get it from your hosting provider).
- SMTP username: the full email address of your mailbox (ex. sales@yourdomain.com). You may need to create an account if you don’t already have one.
- SMTP password: the password you have chosen for this particular account (make sure to make it strong).
- Encryption: choose between SSL and TLS encryption.
- Port: this is the port used to connect to your SMTP.
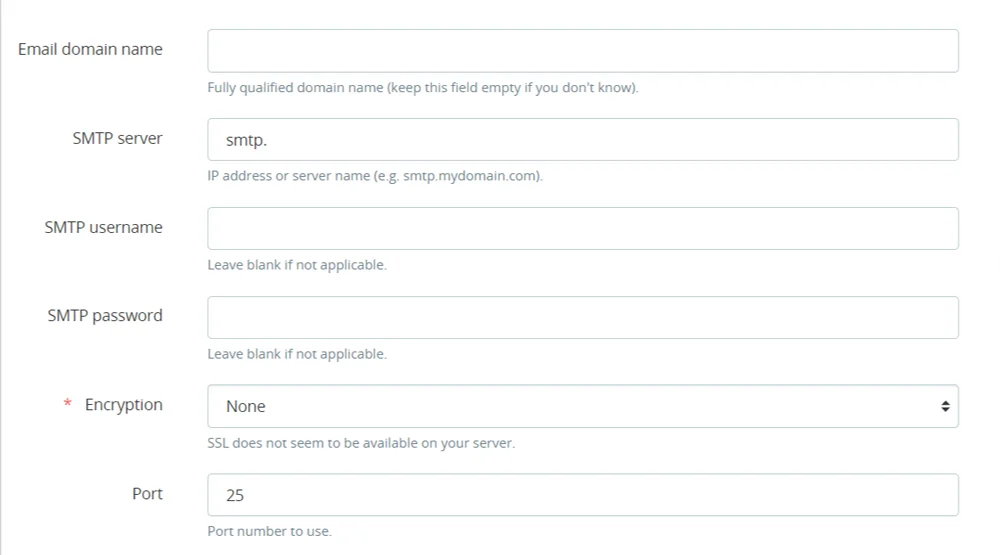
IMPORTANT: Make sure to click Save after you’ve filled out all fields, or the changes will be wiped clean when you navigate away from the page. You should also use the Send Test Email option to ensure the settings are working correctly.
Customizing Email Templates in PrestaShop
Email templates are a great way to personalize your message content while still saving you time from manually typing your text. It’s a great way to engage your audience and keep them informed of promotions, discounts, service changes, and more.
To get to the customization section from your admin panel, go to:
International -> Translations
Now, turn your attention to the block Modify Translations. There are several drop-down menus here:
- Type of translation: there are five options here for Back office, Front office, Installed Modules, Email, and Other. Naturally, you need the one for Email.
- Select the type of email content: you can choose Subject or Body.
- Select your theme: choose your PrestaShop template from here.
- Select your language: for our needs, we will be choosing English, but it also works with many other languages.
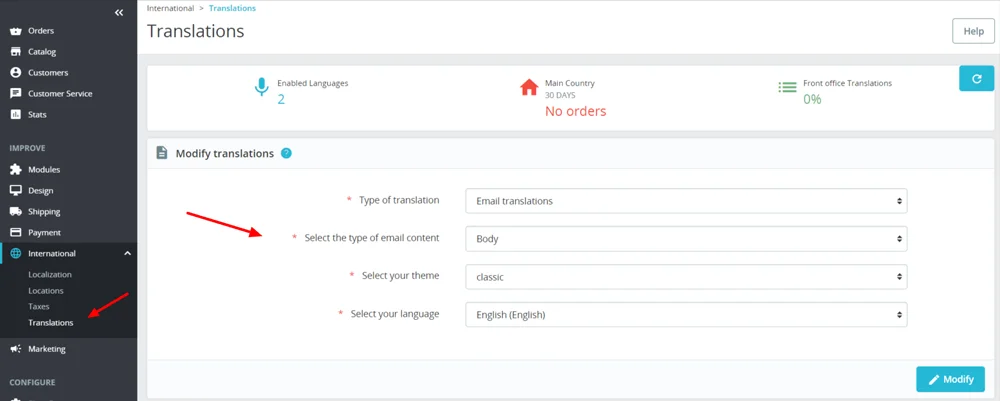
Click the Modify button once done. This will take you to a new page, where your emails are separated into categories. By default, you have:
- Core emails – include essential templates for orders, payments, refunds, accounts, newsletters, and more.
- Module emails – include reminders, follow-ups, mail alerts, subscriptions, and referrals.
Clicking on each template will open it on your screen, allowing you to see both its TXT and HTML versions. The Edit HTML Version is the one you need to start editing the content. When done, click on either Save or Save or Stay to confirm the changes.
IMPORTANT: Be careful not to delete the template layout while editing its content. If you are familiar with HTML, it’s best to edit the code directly.
Setting Up Email Notifications in PrestaShop
As a shop owner, you want to ensure you get all important email notifications for clients and their orders. That’s actually pretty straightforward in PrestaShop, and most options are active by default. In order to double-check and confirm you will receive key notifications, you simply need to:
- Go to the PrestaShop dashboard.
- On the left, choose Advanced Parameters and then Administration.
- On the next screen, scroll down to the Notifications tab. You will see the various email notification options, which you can turn on and off with a click of a button.
- Click Save to confirm the changes.

That’s all there is to it. Still, it’s best to make a couple of test orders and messages to ensure the notifications work as intended.
Compliance with Email Regulations
Legal compliance, especially in Europe, is mandatory for all kinds of websites that work with client data. With regulations like GDPR, you cannot afford to just create some random content – legal text is very specific and should be represented in a way that is both understandable and according to the law.
Failing to comply with GDPR standards can have devastating effects on your business. We are talking about fines of up to $20 million or up to 4% of the global annual turnover. For many companies, that just means going out of business.
Here are some modules for PrestaShop that can help you avoid legal troubles in your ecommerce shop:
- GDPR Compliance Pro + Google Consent Mode v2 – dealing with GDPR has never been easier. This module will not only help you better understand the requirements but also pinpoint any other module that does not comply with them. Your clients will also be able to see that and willingly opt-in or opt-out of them. Should they miss something, there will be a link in the footer where the user needs to go back and change any preferences.
- EU Cookie Law GDPR + Google Consent Mode v2 – Similar to GDPR Compliance Pro, this module ensures you follow the needed cookie policies to present to users from the EU. As a visitor, you will be able to customize your cookies instead of just accepting/rejecting them. As a store owner, you can tweak your alerts, consent duration, personalization, and many more.
- Age Verification Popup – some ecommerce websites need more than just the visitor’s consent. If you are selling tobacco, alcohol, or other similar products, you would also have to ensure the user is above a certain age. This simple popup will allow you to ask for age confirmation and avoid any legal troubles connected with such goods.
Integrating Third-Party Email Services with PrestaShop
If you have dabbled in email marketing before, you are more than likely to know about Mailchimp. The top solution for ecommerce campaigns, personalized product recommendations, and client data tracking is available for PrestaShop 1.6 and higher, only requiring PHP between 5.6 and 7.2.
Mailchimp is so much more than an email marketing solution, though.
This multifunctional platform can act as a CRM tool (customer relationship management), as a web builder for landing pages, even as a configuration solution for online forms.
But how do we integrate Mailchimp with PrestaShop? Quite simple, really – there is a module for everything in the Presta environment. To start using it:
- Log in to the PrestaShop backend.
- Go to Modules -> Module Manager.
- Search for the Mailchimp module and then hit Install.
- Once installed, click on the blue Configure button.

- Click on Log In To Mailchimp under the tab with the same name.

- Enter your Mailchimp credentials.
- Choose an audience or import an existing one. Click the Next button.
- Configure order notifications for the chosen audience. Hit Next again.
- Do the same for the other factors – shop, products, clients, promo codes.
Once done, you will have ecommerce tracking activated in your PrestaShop and be able to take advantage of personalized product recommendations.
Best Practices for Email Configuration
Optimizing your emails for uninterrupted deliverability is not something you do in PrestaShop per se; it is more like actions that stem from your hosting account. We have written a wonderful article on how to avoid the spam folder, where you can find neat tips and tricks so your messages can always reach their intended recipient.
ScalaHosting and PrestaShop – Ultimate Email Deliverability
It’s important to understand that apps like PrestaShop might give you easy access to email settings and configurations, but what really matters for proper email performance and deliverability is the web hosting service you choose. You are utilizing your host’s mail servers and rely on their IP address to “communicate” with the recipient’s service.
So, before you jump into your PrestaShop journey, make sure you have the right partner.
Here is why ScalaHosting should be a top consideration.
For starters, Scala is a web host with almost two decades of experience in the industry, withstanding all dynamic changes and stiff competition that come with the niche. We managed to do that with a strong, client-centric approach where most innovations were proposed and voted by our most important asset – the customer.
To help us stand out, we have developed a few unique solutions. One of them is SPanel – a web hosting management alternative where performance and user experience take a front seat. It allows quick access to all essential aspects of the service – domain names, emails, site files and databases, PHP settings, and security configurations.
Speaking of security, all PrestaShop clients are well-protected under ScalaHosting’s wing. First, you have SShield – our advanced security monitoring system with AI-powered algorithms that protect your web server from known vulnerabilities and promptly notify the client. Then, there is the comprehensive backup system, which makes creating and restoring archives an effortless task.
No online shop nowadays can do without an SSL certificate, though. Scala understands that very well, so we throw the option to add free ones to your online project. Our partners from Let’s Encrypt are always there to ensure you achieve HTTPS status without paying a dime.
For PrestaShop hosting users specifically, we made sure you have easy access to Softaculous so you can install the ecommerce app (and 400+ more) without any technical experience or time-wasting.
Should any issues arise during your time with ScalaHosting, you have plenty of solutions. Simply share your case with your technical support operators, and they will gladly help you out. The team is here for you 24/7, and you can reach them via live chat or support ticket.
Not sure if it will work for you? A free trial is also available for any of our hosting plans. As this is an ecommerce project – we strongly recommend you check out the cloud VPS packages, as they come with unmatched speeds, security, and email deliverability.
Apart from all the benefits of virtual private servers, the free dedicated IP that comes with the deal is a sure way to avoid the inconveniences of getting a shared IP blacklisted without doing anything wrong.
Conclusion
Running a successful ecommerce store with PrestaShop requires more than just setting up your storefront. Email notifications are a crucial part of every business, and you want to be 100% sure both incoming and outgoing emails reach their intended recipient at all times.
Finding the right hosting provider is the first step in establishing flawless email communication, and PrestaShop will help you with the rest. All message functionalities can easily be reached through the ecommerce CMS, and you don’t have to be a technical genius to configure them according to your goals.
If you have ANY PrestaShop questions or are ready to start – check out ScalaHosting, and our experienced operators will make sure you feel right at home.
FAQ
Q: How do I change my email in PrestaShop?
A: When you need to change the administrative contact emails in PrestaShop, you simply have to log in to the backend. From there, choose Shop Parameters in the left-side menu and then Contact. Inside are the current administrative mailboxes associated with your shop, along with the option to add new or edit existing ones.
Q: How do I change client addresses in PrestaShop?
A: When you access the PrestaShop dashboard, you can find your stored customer data in Customers -> Addresses. Inside, you will find a list of your contacts along with an ID, first and last name, address, ZIP code, city, and country. Next to each line, there is a pencil icon. Clicking on it will allow you to edit their entire information.
Q: How do I access PrestaShop as an administrator?
A: By default, the admin URL for PrestaShop can be accessed by putting /admin after your domain name, for example, yourdomain.com/admin. If you have installed the ecommerce app in a subfolder instead of the root folder, you need to include that as well. Using the above example, if you have your online shop in a subfolder called /store, your full admin URL would be yourdomain.com/store/admin.

