Configuring a new Joomla template can be a bit tricky. Thankfully, most options come with quickstart packages that will allow you to make all the mistakes without any consequences.
Don’t know what those are?
That’s what we’re here for. In this article, you’ll learn all about quickstart packages for Joomla – how to download, install, and configure them.
Let’s go!
What Is a Joomla Quickstart Package?
Simply put, a Joomla quickstart package is a demo website, that includes:
- Core CMS
- Components
- Modules
- Template
- Configurations
- extensions
- images
Once installed successfully, you can start working on it.
IMPORTANT: The quickstart package is only good when you’re building a website from scratch. If you use it with an existing website, your data will be replaced with the demo template.
Installing the Quickstart Package
Okay, let’s get down to business. First things first:
Downloading the Quickstart Package
Each Joomla template has a quickstart package.
Yes, even the free ones. When you go to the download page of a template, you will see “quickstart” listed under Type. That’s the file you need.
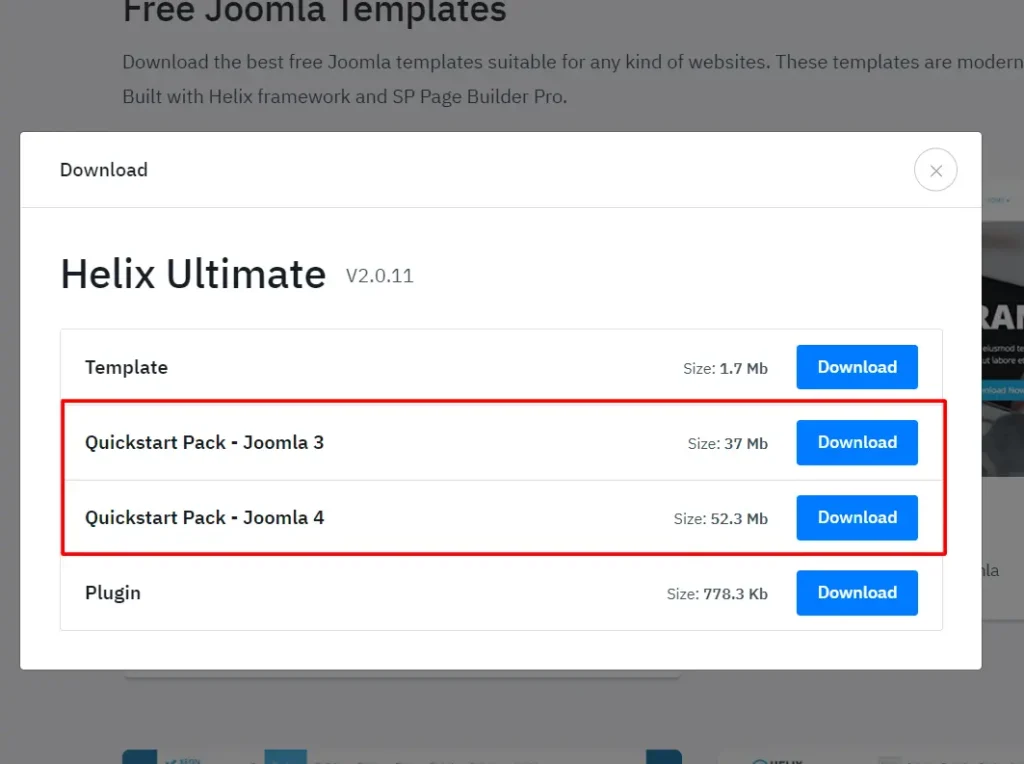
Once you get it, it is time to upload it on your server.
Upload on Your Server
Your first option is to use SPanel. Scala’s very own hosting management platform allows you to upload your Joomla quickstart package with just a few mouse clicks.
To do so, go to your Dashboard and click on File Manager. Once it opens, click on New, then Upload and choose quickstart .ZIP. You can now extract the archive.
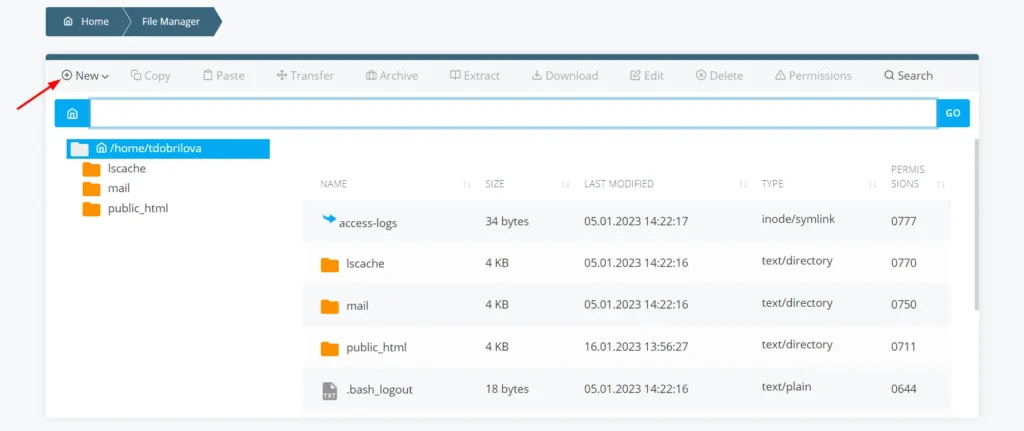
Alternatively, you can install your quickstart package via an FTP client like Filezilla. However, you might encounter some permission issues. If you decide to go that route, you will need to upload all the files from the quickstart package folder to your website directory.
Creating New Database and User
When you start configuring the Joomla quickstart package, you will notice a Database Configuration page. It will require some information, for which you’ll need to have MySQL database and a user on your web server.
Let’s see how to quickly create those:
On SPanel, click MySQL Databases. It will open a page that will enable you to set a database and a user.
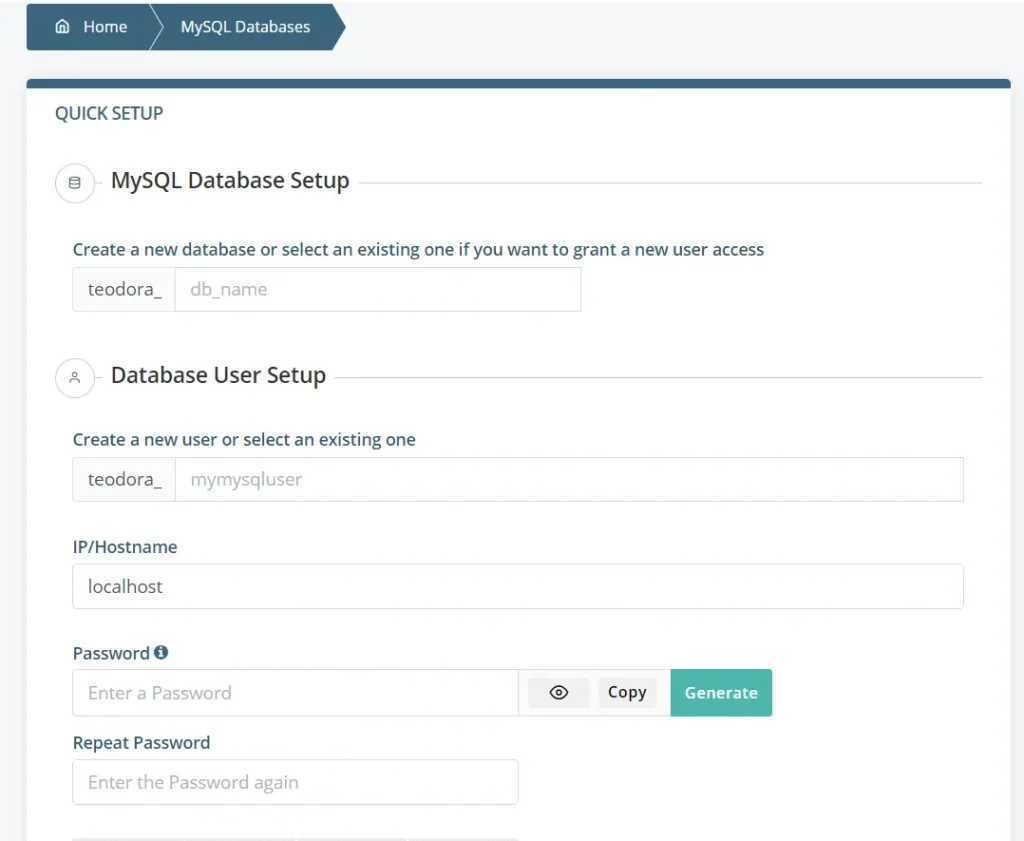
Fill in the required fields, such as username and password. Check the Grant the user access to the database field, hit Submit and voila, you’re done.
IMPORTANT: The best passwords include uppercase and lowercase characters, numbers, symbols, and are at least 8 characters long.
Launching the Installer
In order to install the quickstart package, you need to enter the URL for your site in the browser. This will open the install wizard. All that you need to do is fill in the required fields.
Start by choosing a language and a site name. You will then need to set the super admin user account. This one is easy – enter name, username, password, and email.
The next step is configuring the database.
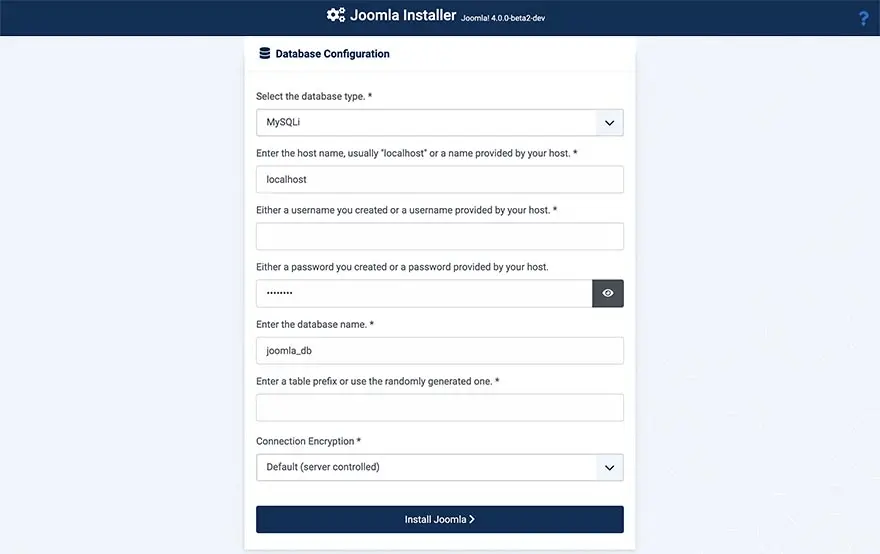
Select your database type – MySQLi or MySQL. Enter a hostname, which will usually be provided by your hosting provider. Fill in the username and password, choose the database name, enter the table prefix from the database name and click on Install Joomla.
As you can imagine, choosing the right Joomla hosting partner can make the difference between your project quickly taking off or remaining in obscurity forever.
ScalaHosting and Joomla
To start off your Joomla journey right, you need VPS hosting – managed, if you’re a complete beginner.
Needless to say, you’ve come to the right place. ScalaHosting is among the certified Joomla Managed VPS providers. We first became a Joomla Platinum Global Sponsor back in 2020 and then renewed the partnership in 2022.
Our SPanel management platform features a one-click installer, CMS management, and professional support.
If you already own a Joomla site, we can help you out with a free, no-downtime migration. The domain name and SSL certificates also come for free.
Check out our VPS options today – you’ve got nothing to lose!
Wrap Up
Following the steps above, you should have absolutely no troubles installing your Joomla quickstart package. Whether you choose a manual or automatic installation – the process is straightforward and just takes a few steps.
For more questions about Joomla and our hosting deals – you can contact the ScalaHosting support anytime via live chat and email.


FAQ
What’s the difference between Joomla 3 and Joomla 4?
The main difference between Joomla 3 and Joomla 4 is their Bootstrap versions. Joomla 4 is integrated with the latest Bootstrap 4, making it more reliable and responsive, easier to maintain, and richer in features.
How to install Joomla template sample data?
If you want to install Joomla template sample data, go to Template style settings. Then, click on Data > Sample data. Tap Install and choose whether to install everything or layout and style.
How do I find Joomla plugins?
To find the Joomla plugins, go to the backend of your site and click Extensions. You’ll see Plugin Manager, which will show you a list of all the available options on your website.
In addition, you can get plugins from the Joomla! Extensions Directory.

