How to Install PrestaShop Step-by-Step
So, you’ve got a brilliant idea for an online store, and you’re ready to dive into the world of ecommerce. Well, buckle up, because you’re about to embark on an exciting journey! But before you start counting your profits, you need a solid foundation for your online store.
Enter PrestaShop – a powerful and user-friendly ecommerce platform that can turn your dream into a reality.
In this guide, we’re going to walk you through the step-by-step process of installing PrestaShop in three different scenarios. Whether you’re a seasoned web developer or a total newbie, don’t worry – we’ve got you covered. By the end of this article, you’ll have a fully functional PrestaShop store up and running, ready to take the online world by storm.
But before we dive into the nitty-gritty of installation, let’s take a moment to understand what exactly PrestaShop is and why it’s a fantastic choice for your ecommerce venture.
Introduction to PrestaShop Installation
PrestaShop stands tall in the realm of ecommerce platforms as a robust, open-source solution empowering businesses of all sizes to establish and manage their online stores efficiently. Founded in 2007, PrestaShop has evolved into a feature-rich platform with a global community of developers and users contributing to its growth.
At its core, PrestaShop offers a comprehensive suite of tools and functionalities tailored to streamline the process of setting up and running an online store. From customizable themes and responsive designs to powerful marketing and analytics tools – PrestaShop equips merchants with the resources needed to create captivating storefronts and drive sales.
Being open-source means that PrestaShop provides access to its source code, allowing developers to modify and extend the platform according to specific business requirements. This flexibility enables unparalleled customization, making PrestaShop an ideal choice for businesses seeking tailored ecommerce solutions.
Moreover, PrestaShop boasts a vibrant ecosystem of modules and integrations, enabling seamless pairing with third-party services such as payment gateways, shipping providers, and marketing tools. This extensibility empowers merchants to enhance their store’s functionality and scalability as their business grows.
Whether you’re a small startup or an established enterprise, PrestaShop provides the framework to transform your online business aspirations into reality.
System Requirements
To ensure smooth installation and optimal performance, PrestaShop has specific system requirements. Here’s a breakdown of the essentials:
- Web Server: PrestaShop is compatible with Apache 1.3, Apache 2.x, Nginx 1.0 or later, and Microsoft IIS 7 or later.
- PHP Version: PrestaShop requires PHP version 7.1 or later. It’s recommended to use the latest stable version of PHP for better security and performance.
- Database: PrestaShop supports several database management systems, including MySQL 5.6 or later, MariaDB 10.0 or later, or PostgreSQL 9.1 or later.
- Extensions: Ensure that PHP extensions such as PDO_MySQL, PDO, cURL, SimpleXML, SOAP, and ZipArchive are enabled on your server.
- SSL Certificate: While not mandatory, it’s highly recommended to have an SSL certificate installed on your server to secure data transmission and build trust with customers.
- Server Resources: PrestaShop recommends a minimum of 64 MB of RAM for PHP, although 128 MB or more is recommended for better performance. Additionally, ensure sufficient disk space for storing your website files, images, and database backups.
- Browser Compatibility: PrestaShop is compatible with modern web browsers such as Google Chrome, Mozilla Firefox, Safari, and Microsoft Edge.
By meeting these system requirements, you can ensure a smooth installation and optimal performance of your PrestaShop store. Always refer to the official app documentation for the most up-to-date information on system requirements and compatibility.
But let’s now turn our focus to the task at hand – the initial configuration of our PrestaShop store.
How to Install PrestaShop via Softaculous
The easiest way to install PrestaShop is via your hosting provider. Many hosts offer shared and VPS solutions with a control panel, which is responsible for many of your online operations – domain names, website files, databases, and emails, to name a few. Within this panel, you will often find a one-click application installer to save you the effort of manually configuring your app.
For the purpose of our needs, we will show you how to install PrestaShop with the most popular tool – Softaculous.
-> Log into your control panel dashboard.
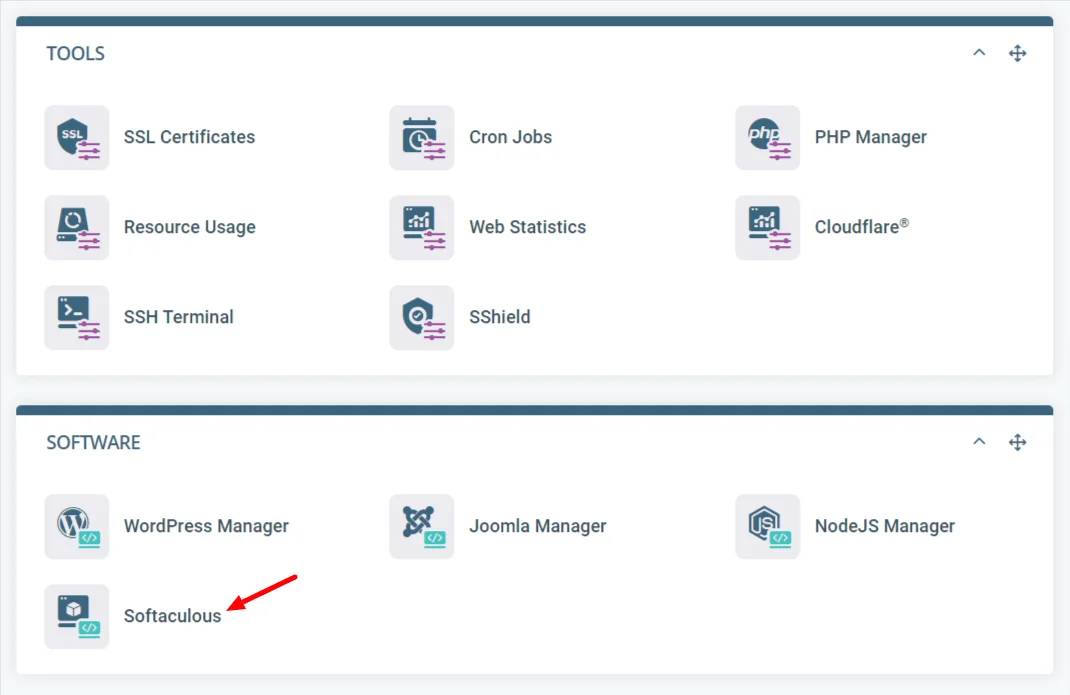
-> Under the Software section, find the option Softaculous Apps Installer (works the same for cPanel and SPanel).
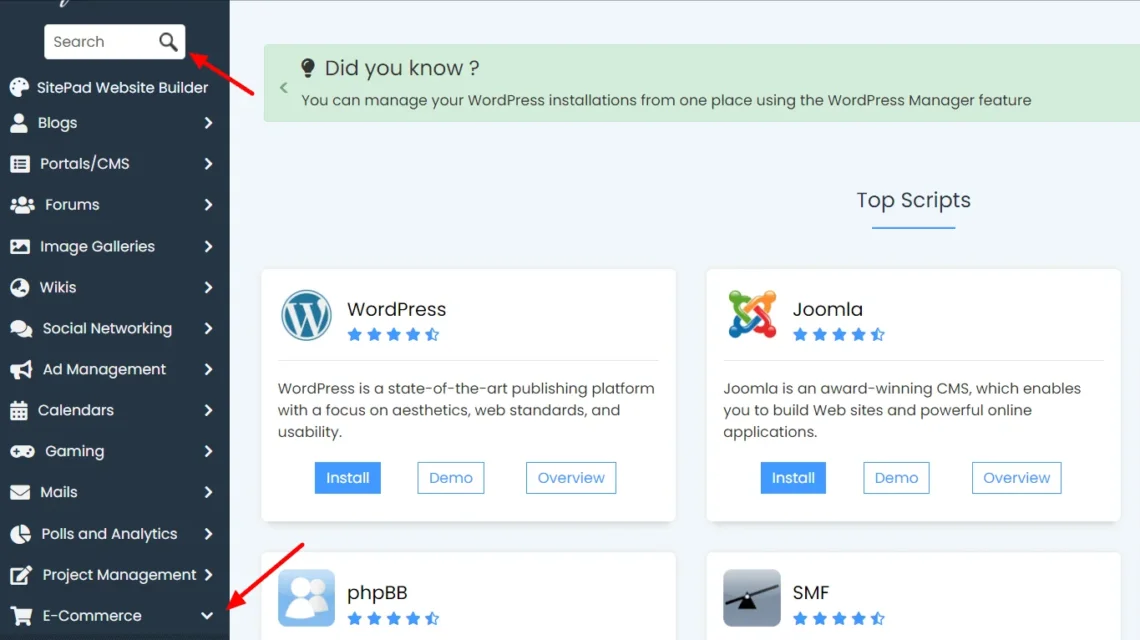
-> Once inside, either type PrestaShop in the search bar on the left or select the option from the Ecommerce category.
-> You’re almost there. On the next screen, simply click the blue Install Now button.
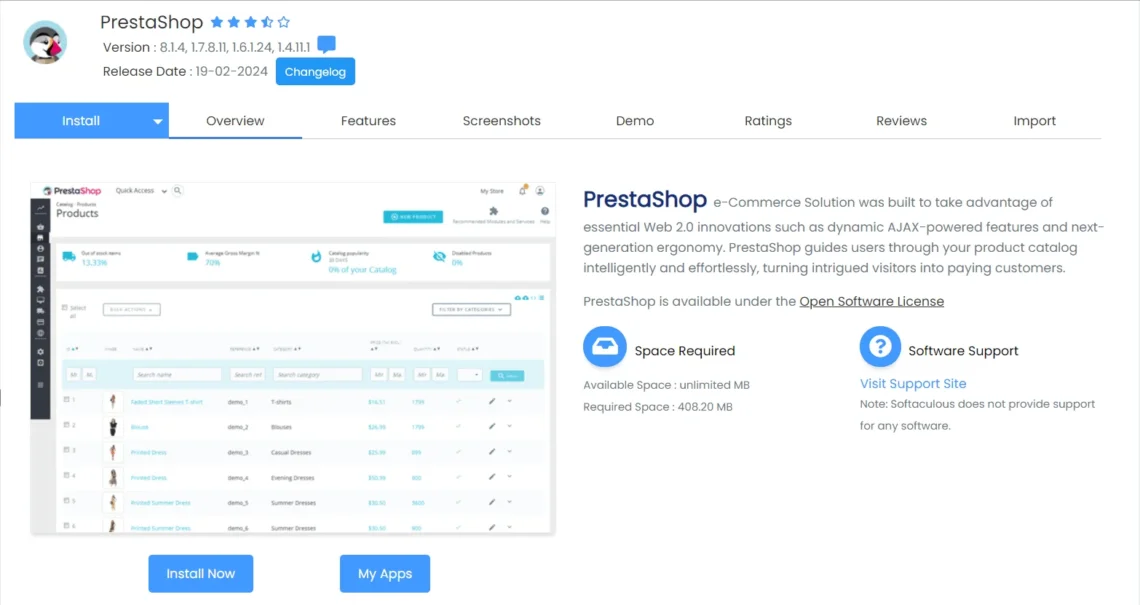
-> You are now on the page with the installation and basic site settings. Go through the options here, and once ready – hit the Install button at the bottom.
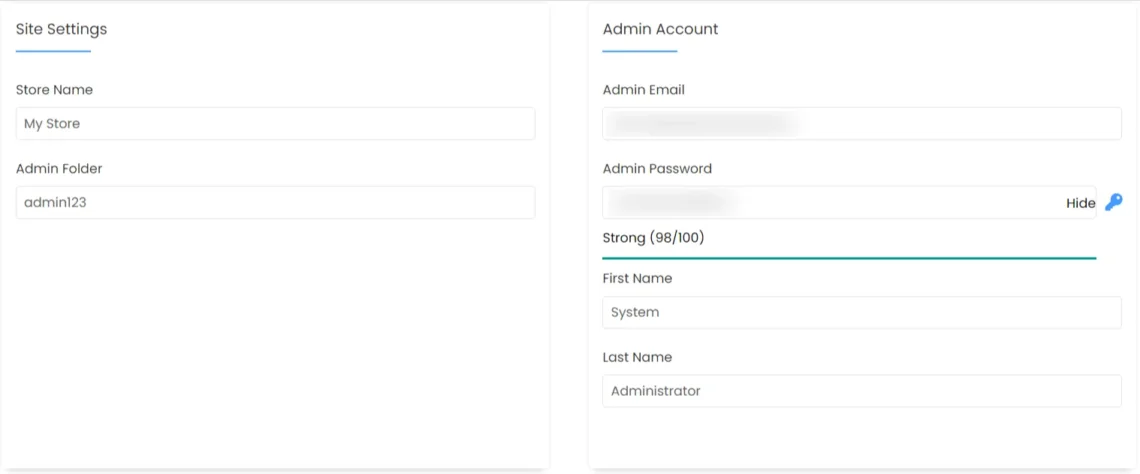
IMPORTANT: If you plan to host your website on your main domain – leave the In Directory field empty so PrestaShop is installed in your root folder. If you want the online shop to be created on a subdomain, like yourdomain.com/shop, simply type Shop in this empty field.
-> Wait for a minute or so, and your new Presta store will be ready for action.
The best thing about going for this approach is you can directly ask your hosting support to help you out with the PrestaShop installation. Many hosts are happy to do this absolutely free of charge and you simply need to specify the basic info and login credentials to your support operator.
How to Install PrestaShop on a Localhost
Configuring PrestaShop on a localhost simply means that instead of using a web hosting server, you want to install the ecommerce app on a personal device and work on it offline. Some developers use Presta for testing purposes and a local environment is an excellent option in their case.
Utilizing localhost for your store is pretty much a manual installation of the CMS, which we will get into detail in the next chapter. We recommend carefully considering the different AMP packages (Apache, MySQL, and PHP) and choosing the one that you find most convenient and user-friendly. Popular client choices include:
- LAMP (Linux + AMP)
- WAMP (Windows + AMP)
- XAMPP (X OS + AMP + Perl)
- Wamp Server
- EasyPHP
- Laragon
The latter three installation packages are available only for the Windows operating system.
Let’s now go through the steps to set up our PrestaShop store with a manual installation.
How to Install PrestaShop Manually
At the time of writing this article, PrestaShop 8.1.4 is the latest stable version of the ecommerce CMS. But even if you are using any other version of Presta – the installation process is practically the same.
Here is what you need to do step-by-step:
- Downloading PrestaShop
You can find any of the PrestaShop versions on the official website. If you go to the Versions page, you will see your options neatly stacked by release date and with a Download button next to each. Clicking it will take you to a quick form to fill out your Email Address and the Type of Business you are in. There are only four predefined options, so just choose the one closest to your occupational type.
Once you trigger the PrestaShop Installation, you will see a pop-up box asking you for the location where you want to send your download file. The platform is compressed in a ZIP archive, nothing different than how you get similar apps. Inside are all the needed files to lay the groundwork for your shiny new ecommerce shop.
- Uploading PrestaShop Files
Time to move the PrestaShop files from our own computer to the hosted server where we will build the website. To do so, you can choose between:
- File Manager – available in most control panels like cPanel and SPanel. It allows you to transfer files from one location to another with a few button clicks. Still, some File Manager tools might have hidden limitations, preventing you from easily moving larger files.
- FTP client – FTP stands for File Transfer Protocol, and such tools possess pretty much the same functionalities as the File Manager. The difference is that using an FTP client (like FileZilla or CuteFTP) comes with more advanced options and applies no limitations to the number or size of files you are moving.
Whichever you choose, the steps are very similar. You need to transfer the ZIP archive with PrestaShop to the server folder of your choice (public_html for the root or any other subfolder name) and unzip it there.
IMPORTANT: You can also unpack the archive on your computer and then transfer all files to the associated folder on your server. Doing so directly on your account simply removes the effort of transferring multiple files instead of a single one.
Your files are now in place, but we still need a database to store your site information.
- Database Configuration
To create a database:
-> Log into your control panel dashboard
-> Look for the Databases section and the option MySQL Databases.

-> You will now see the DB creation wizard. The only thing you need to do here is name your new database. You can call it prestashop, presta, shop, or whatever you like. In this step, you can also grant certain users access to the table.
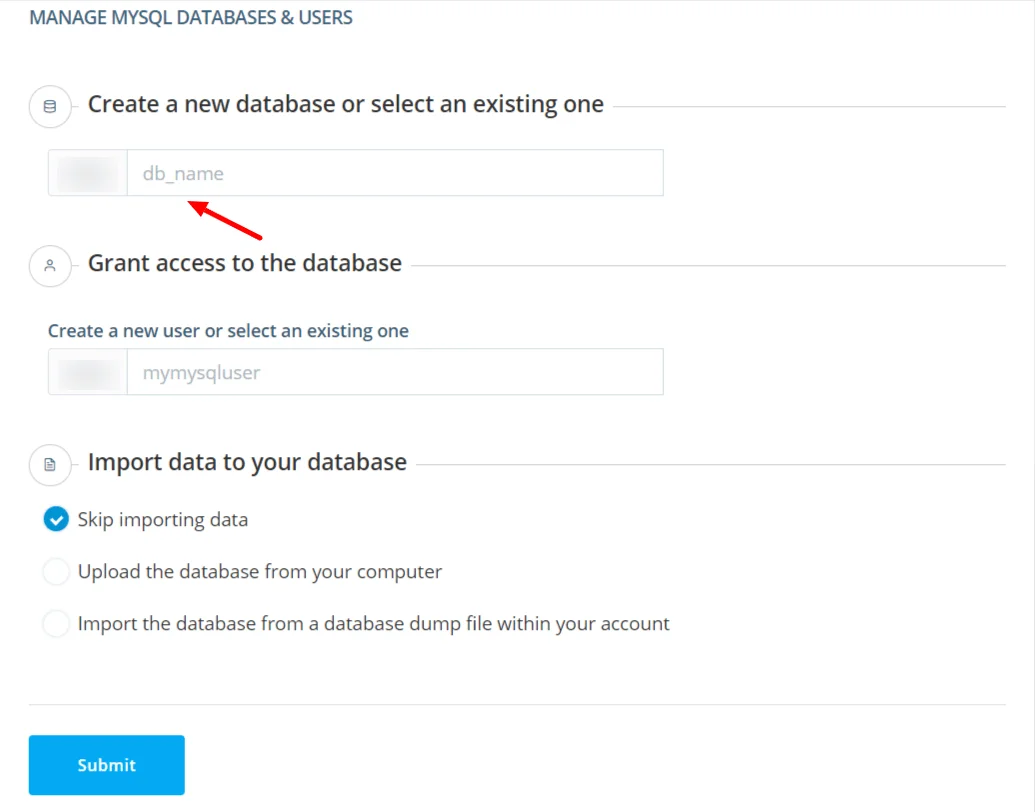
-> After you click on the Submit button and the creation is complete, verify that the database is working and connecting properly.
If you have your own MySQL server and want to create a database via the command line, you can do so with the following commands:
$ mysql -u adminusername -p
to log into your server as administrator with root access.
> CREATE DATABASE prestashop COLLATE utf8mb4_general_ci;
to create your database. In the above example, we have named it prestashop.
> CREATE USER “prestashopuser”@”hostname” IDENTIFIED BY “somepassword”;
> GRANT ALL PRIVILEGES ON prestashop.* TO “prestashopuser”@”hostname”;
to grant certain users access to the database.
- Running the Installation Wizard
Now that we have our files and database in place, let’s launch the installation menu.
-> If you have uploaded your files to the root folder, simply type your domain name in your web browser. This should bring up the Installation Wizard menus. The page should look something like this:
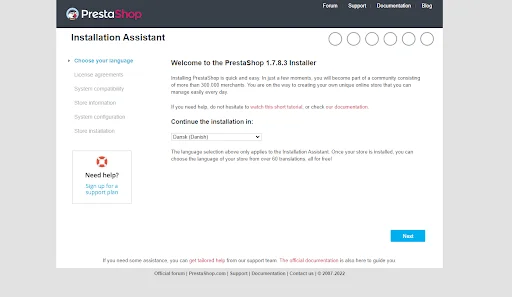
-> Select your desired Language and keep in mind this is only the language for your PrestaShop installation, not the store itself.
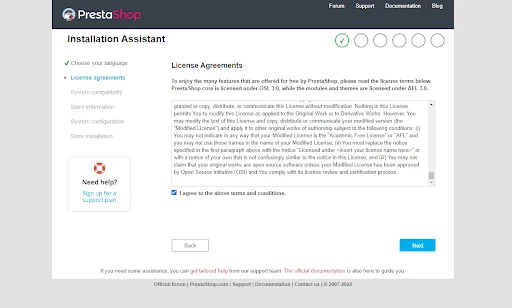
-> On the next page, you will see PrestaShop’s Licensing Agreement, which you need to confirm before moving on.
-> You are now on the step where you input your basic store settings. The options here include:
- Shop Name – this is the name of your store. You can change that at any point from your PrestaShop dashboard once you start working with the app.
- Main Activity – a drop-down menu where you can choose your main business niche. This helps PrestaShop keep statistics and offer more relevant information.
- Install Demonstration Data – If you don’t already have a pre-made shopping catalog, you can use demo data from PrestaShop to see how it all looks with the chosen template.
- Country – this is the main country of your online shop.
- Enable SSL – this tells the system whether you have an SSL certificate tied to your domain name. As this is a must-have for ecommerce projects, you better purchase or activate one with your hosting support beforehand.
The rest of the information on the page concerns your admin credentials, make sure to create a memorable username and impenetrable password to avoid any future headaches.
-> The next step is your database configuration. As we have already created our DB, here we need to input its name and your user credentials.
-> Hit the button Test Your Database Connection Now and see if everything connects properly. If all is good, click on the Next button.
-> You are now waiting for the installation to take effect. This should not take more than a couple of minutes, depending on your connection speed.
-> If the setup has gone through correctly, you should get a screen with your back office information and useful links.
-> Clicking on Manage Your Store will take you to the admin dashboard but will require you to remove the PrestaShop installation folder first.
- First Look at Your New PrestaShop Store
Your new PrestaShop online store is now ready for action. Once the installation is complete, you can log into the Presta dashboard and make all the changes you want. You can consider starting with the following:
- Add new pages: You can easily configure new store pages by going to Design->Page->Add New Page. The screen will give you options to set up the desired URL, page category, metadata, page content, and more. Don’t forget to click the Save button after applying new settings.
- Add new products: Once your pages are ready, you can fill them up with your products. To do so, go to Catalog->Products and input the important characteristics of each of your items – product descriptions, features, and categorization.
- Install a theme: We will get to the PrestaShop theme installation in a minute, but you still need to know that there are more than 3,200 free and paid templates out there, so the visual prowess of your website should not be a problem.
- Set up a payment gateway: A critical feature for every online shop, make sure to set up a gateway that will give your clients enough choices for paying for their purchase. You can go to Payment->Payment Methods and install the options you can support.
- Set up an SSL certificate: Another must-have for PrestaShop store owners, the SSL certificate encrypts all processed data between you and your clients, making it impossible to easily decipher. Plus, SSL solutions have a positive effect on your SEO rankings.
Naturally, those are essential operations to start you off. Once you delve deeper into the PrestaShop options, you will find many more things to consider if you want your online shop to really stand out.
How to Install PrestaShop Themes
Our ecommerce theme is the first impression a new visitor gets when landing on one of our pages. As such, we want to make it unforgettable. You are not only considering how to inspire a pleasing and aesthetic feeling but also how to make your pages load lightning-fast.
Luckily, the PrestaShop community is huge, and many web developers are happy to create stylish themes that cover a plethora of industries and niches you might want to dip your toes into.
But is it easy to install a new theme on a Presta ecommerce store?
More than you can imagine, actually! You simply need to:
-> Log in to the PrestaShop dashboard.
-> Navigate to Design and then Theme&Logo.
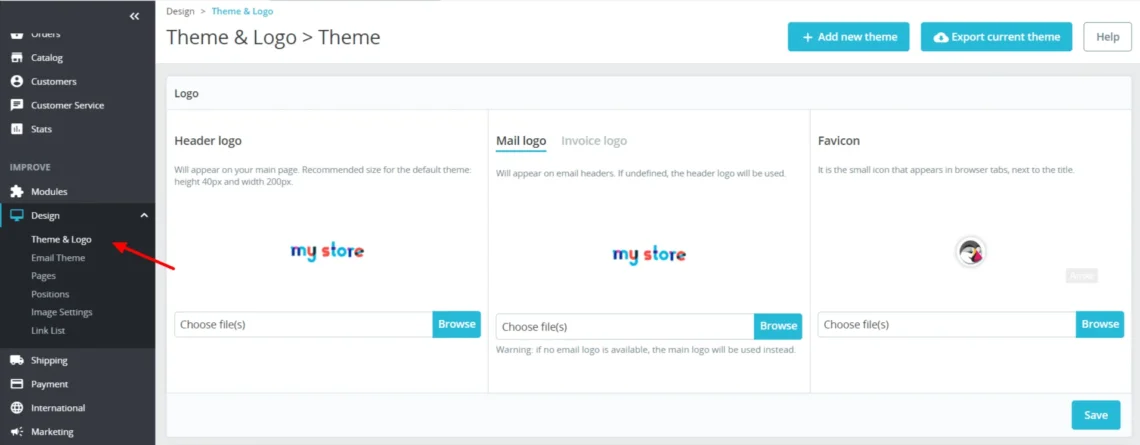
-> You can upload your own template via the Add New Theme button. You can import your theme archive from a location, URL, or via FTP.
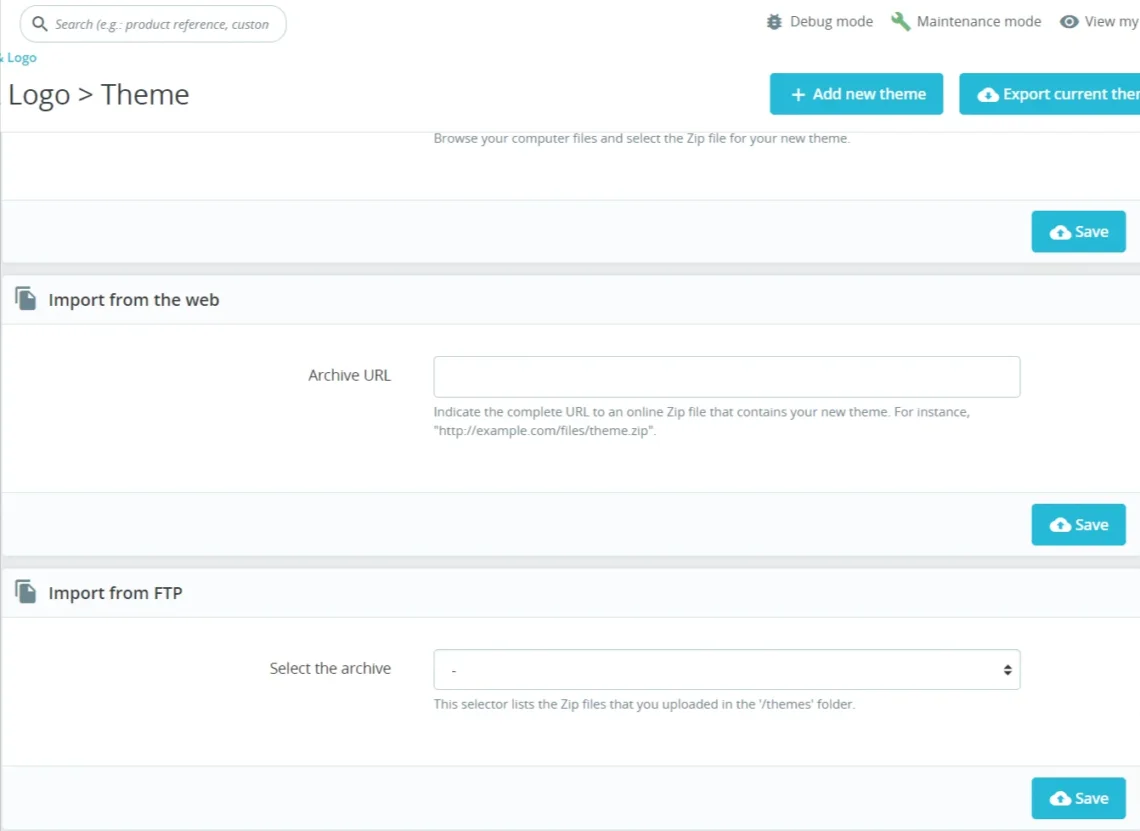
IMPORTANT: In the Theme&Logo section, you can also upload your own logos for the website headers, emails, and favicons.
-> Make sure to select your newly uploaded theme as Current.
How to Install PrestaShop Modules
PrestaShop Modules will take care of the functionalities on your website, i.e., how your pages behave when interacted with. As a fairly popular ecommerce application, PrestaShop gives its users plenty of choices on how to enrich their site.
Just as with your themes, adding a new module is pretty straightforward:
-> Get to the app dashboard.
-> From the left-side menus, choose Modules and then Module Manager.
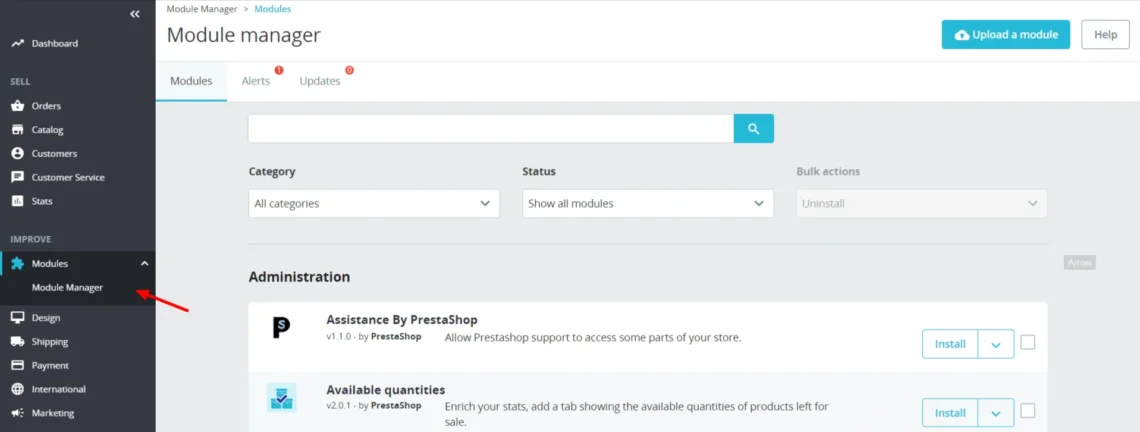
-> Inside, you will see a curated list of available modules neatly organized into categories.
-> If you don’t see your desired PrestaShop module in the list, you can easily upload your own by clicking the blue button on the top right corner.
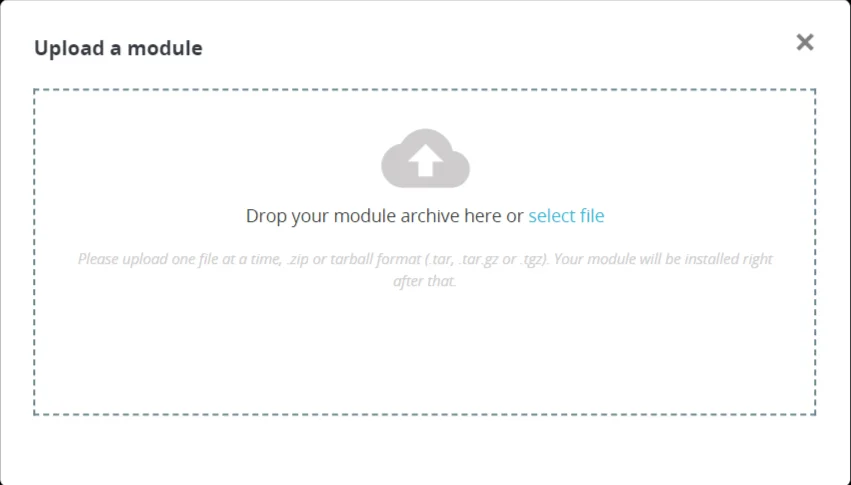
IMPORTANT: You can upload both PrestaShop themes and plugins manually as well. To do so, you can use an FTP client to upload your file in either the /themes or /modules folder. You can then return to your Presta dashboard and find your add-on in the corresponding menu.
ScalaHosting: Your Trusted PrestaShop Partner
ScalaHosting is well aware of the dynamic needs of today’s ecommerce projects, so we have made sure our servers are placed in top-tier data centers, ensuring the uninterrupted connectivity of your website.
While it is possible to start off with a shared hosting package, our experts highly recommend considering a VPS plan for optimal performance and security. And we are well-prepared to back our claims!
Ecommerce stores need their fair share of resources, especially as the project gets off the ground and starts gathering more visitors. You cannot afford to compromise on page loading speeds, and every second of downtime can have devastating results. A virtual private server guarantees you always have enough system resources to accommodate a growing number of visitors, all while giving you a scalable platform to add more as needed.
To lend you a hand with the VPS management, ScalaHosting gives you our very own SPanel. This innovative control panel will let you operate your domains, emails, files, databases, and server security without any previous experience or much effort.
This unique Scala solution also contains a few in-house developed extras, with SShield being the pick of the bunch. It is a security monitoring tool that watches over your server at all times, blocking any incoming threats. In case of any suspicious activity, SShield notifies you so you can take precautions before it turns into a real issue.
By recognizing the specific needs of online shop owners, we know that features like SSL certificates and CDN solutions are highly essential. That’s why we throw them in the VPS mix absolutely free of charge. Other bonuses include daily backups, a dedicated IP address, and white-labeling options for better branding.
To make the switch to a cloud VPS a no-brainer, we have put amazingly low price tags on all our packages. You can get the Entry Cloud plan for just $14.95/mo and enjoy the power of virtual servers without breaking the bank.


Final Takes
In conclusion, installing PrestaShop is a straightforward process that empowers individuals and businesses to create their online shop with ease. Throughout this guide, we’ve outlined the step-by-step instructions, from preparing your hosting environment to configuring your Presta store.
As you embark on your PrestaShop journey, remember that you’re not alone. The Presta community is vibrant and supportive, offering resources, forums, and assistance to help you succeed. Don’t hesitate to explore the vast array of modules, themes, and extensions available to tailor your store to your unique vision.
So, take the plunge with confidence and start building your dream online store with PrestaShop and ScalaHosting today. Contact our support team to tell us about your project and get an expert recommendation on how to achieve your ecommerce goals.
FAQ
Q: Is it necessary to have technical expertise to install PrestaShop?
A: No, PrestaShop offers a user-friendly configuration process that doesn’t require advanced technical knowledge. The installation wizard guides you through each step, and there are extensive resources available online, including tutorials and forums, to assist you if needed.
Q: Can I customize the appearance of my PrestaShop store after installation?
A: Absolutely! PrestaShop provides a wide range of themes and modules that allow you to customize the appearance and functionality of your store. Whether you want to change colors, fonts, or layout or add new features like payment gateways and social media integration, PrestaShop offers flexibility to tailor your store to your specific needs.
Q: What kind of support is available for PrestaShop users?
A: PrestaShop has a robust community of users, developers, and experts who provide assistance through forums, documentation, and online resources. Additionally, PrestaShop offers support plans and services for those who require more personalized assistance.
Whether you have technical questions, need troubleshooting help, or want advice on growing your online business, there are resources available to support you every step of the way.
As long-time supporters of the PrestaShop project, the ScalaHosting support team is also 24/7 available to help with any questions related to the app.

