There are more than a few reasons to choose WordPress for your new project. It’s the world’s most popular content management system (CMS), powering over 40% of all active websites. The platform can help you build pretty much anything you can imagine, and getting used to it shouldn’t be a problem, even for a complete novice.
Working with WordPress is easy, but what about installing it? Can an inexperienced user set up the CMS without any extra help?
The answer is yes.
Today, we’ll show you the steps you need to take to start working on your WP website. We’ll cover all major web hosting management platforms and show you how to set up the CMS in a local server environment.
So, without further ado, let’s get to it.
What is WordPress?
WordPress can trace its roots to another site-building platform called b2/cafelog. WP is widely recognized as b2’s successor, and a single statistic will show you how much it has grown.
When the first app version came out in 2003, b2 powered approximately 2,000 blogs. Currently, WordPress is at the core of over 800 million projects.
Let’s take a closer look at some factors contributing to its soaring popularity:
- It’s open-source and free: WordPress has always been an open-source project. You’re free to download, install, and distribute it without paying a cent. You can set it up on as many hosting accounts as you want and use it for both commercial purposes and for testing or learning.
- It’s incredibly versatile and flexible: Out of the box, WordPress is, and always has been, a blogging platform. However, in May 2004, just four months after the launch of version 1.0, plugin support was added, which later turned out to be a pivotal moment in the app’s development. As WP’s popularity grew, developers started creating add-ons that introduced new features and functionality to the platform. Thanks to WordPress plugins, you can build anything from an ecommerce store to a social networking site with the popular CMS.
- It has a global community supporting it: There’s an online community behind every open-source website-building application. However, none even come close to the hordes of companies and individuals worldwide who work on WP-related projects. Thanks to them, the resources you need to complete specific tasks are usually a couple of clicks away, and professional help is always readily available.
- It offers incredible scalability: Deployed in the right environment, WordPress scales incredibly well. It works just as well for a personal blog as it does for the White House’s official website.
- It works on most web hosting platforms: WordPress was written in PHP and works with MySQL databases. These are among the most widely supported technologies in the web hosting industry, so finding a platform to deploy your site shouldn’t be a problem.
- It’s easy to use: Ease of use is a subjective concept, but WordPress wouldn’t be the world’s most popular CMS if it wasn’t user-friendly. This has been a desired effect from the very start.
For example, in the blog post announcing the rollout of WordPress 1.0, Matt Mullenweg, WP’s creator, announced that what had been hailed as a pretty straightforward installation procedure was now even simpler thanks to a few tweaks.
Two decades later, the steps for manually setting up WordPress haven’t really changed, and they’re still very easy to follow. However, when Mullenweg wrote that blog post, server management platforms weren’t nearly as advanced as they are today.
Nowadays, setting up WordPress is even easier in most cases.
One-Click Install: The Fastest Way to Set Up WordPress
It doesn’t matter if you’re a novice blogger or a seasoned developer with decades of experience – you want to get started on your new website with as little hassle as possible.
This has prompted web hosting providers to look for, develop, and integrate tools to help you set up your CMS of choice quickly and efficiently. These tools are often called auto-installers or one-click installers, which, as we’ll find out in a minute, are pretty apt names.
Some of them are WordPress-specific, and some can install other applications as well. The exact steps depend on the installer and how it is integrated into your control panel.
Let’s see a couple of examples in action.
How to Install WordPress Using SPanel
SPanel is ScalaHosting’s all-in-one server management platform. It’s designed to provide a user-friendly environment for every task related to your project’s launch and development.
Many of the websites that SPanel supports are built with WordPress, so we’ve ensured you can get going with as few clicks as possible.
There are a couple of options:
- Installing WordPress upon account creation: Your first job after you sign up for a ScalaHosting managed WordPress hosting is to log in to the SPanel Admin Interface, the part of our management system where you initiate new projects.
You start by creating a new SPanel user account. The Create a New Account button is situated on the Admin Interface homepage.
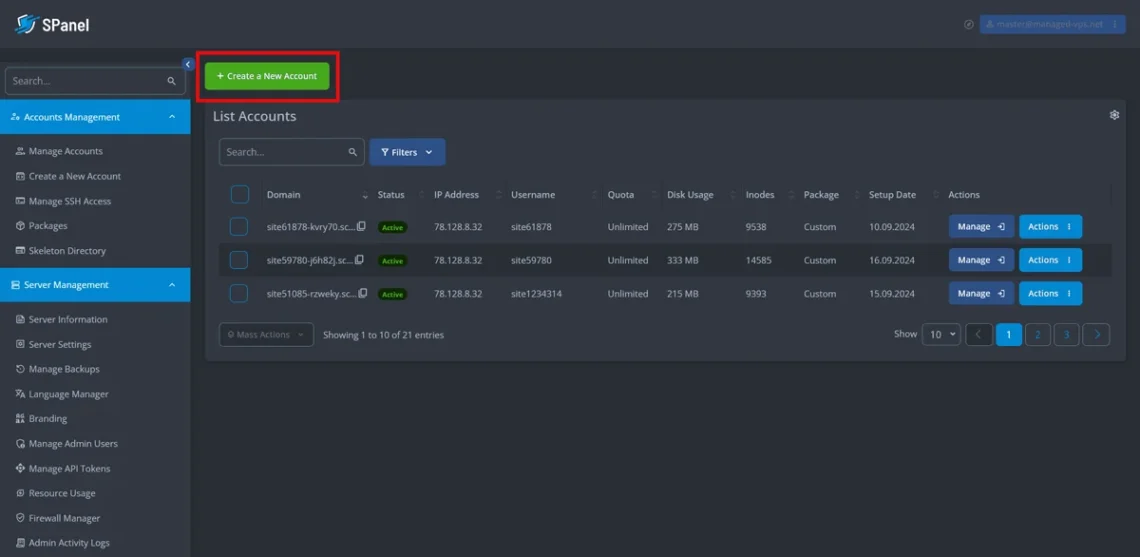
During the next step, SPanel allows you to set up an account with WordPress pre-installed so you can start working on your site immediately.
There are three main options at the top of the page:
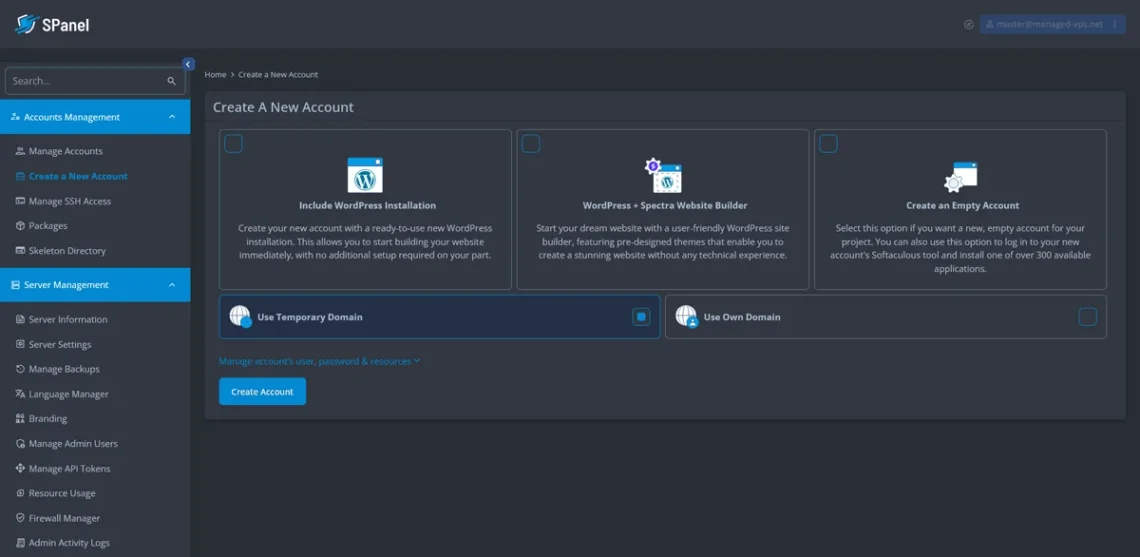
– Include WordPress installation
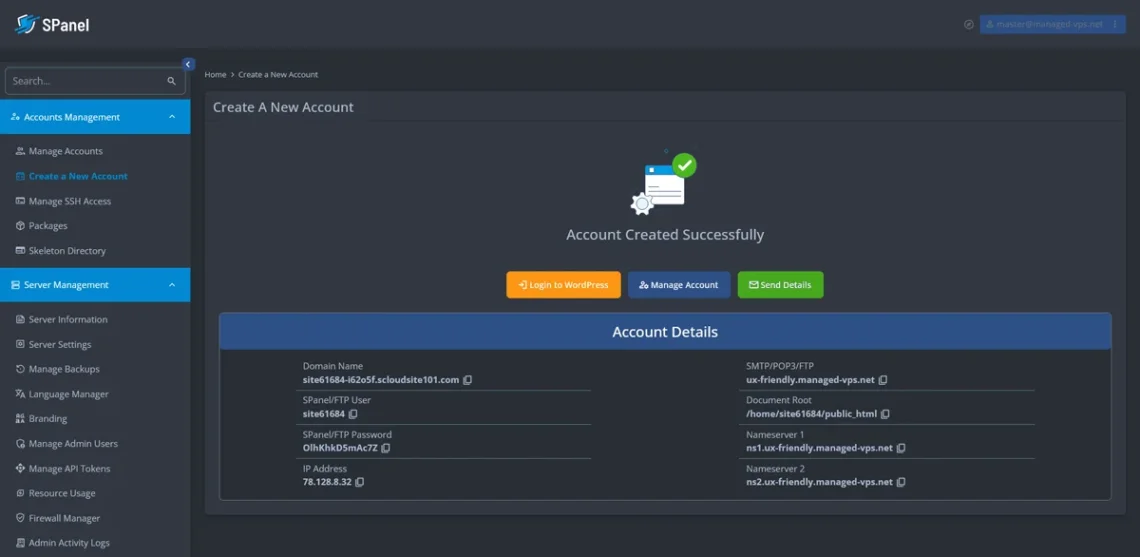
In addition to setting up the new account, SPanel will install WordPress for you. When done, it will display all account-related details, including the IP address and domain name, the nameservers, and the login credentials for the SPanel User Interface. The same username and password give you access to the WP dashboard.
WordPress will be installed in the new account’s document root directory. If you want to put it in a subfolder, you need to create an empty account and set up WP from the User Interface.
The next page has buttons for accessing the WP dashboard or SPanel’s User Interface. You can also email all the details to the person administering the new account.
– WordPress + Spectra Website Builder
For some of you, this could be an even quicker way of getting started. In addition to WP, SPanel will also set up Spectra – a plugin that integrates with the block editor and offers a host of customization options. If you choose this option, SPanel will ask you what sort of website you want to build so it can include the relevant Spectra layouts.
After you’ve made your choice, the procedure is identical to the one where you have a clean WordPress installation.
– Create an Empty Account
You can choose this option if you don’t want to work with WordPress or prefer to install it later. The new account’s document root will be empty, and you’ll be free to put whatever you want in it.
- Installing WordPress through the SPanel User Interface
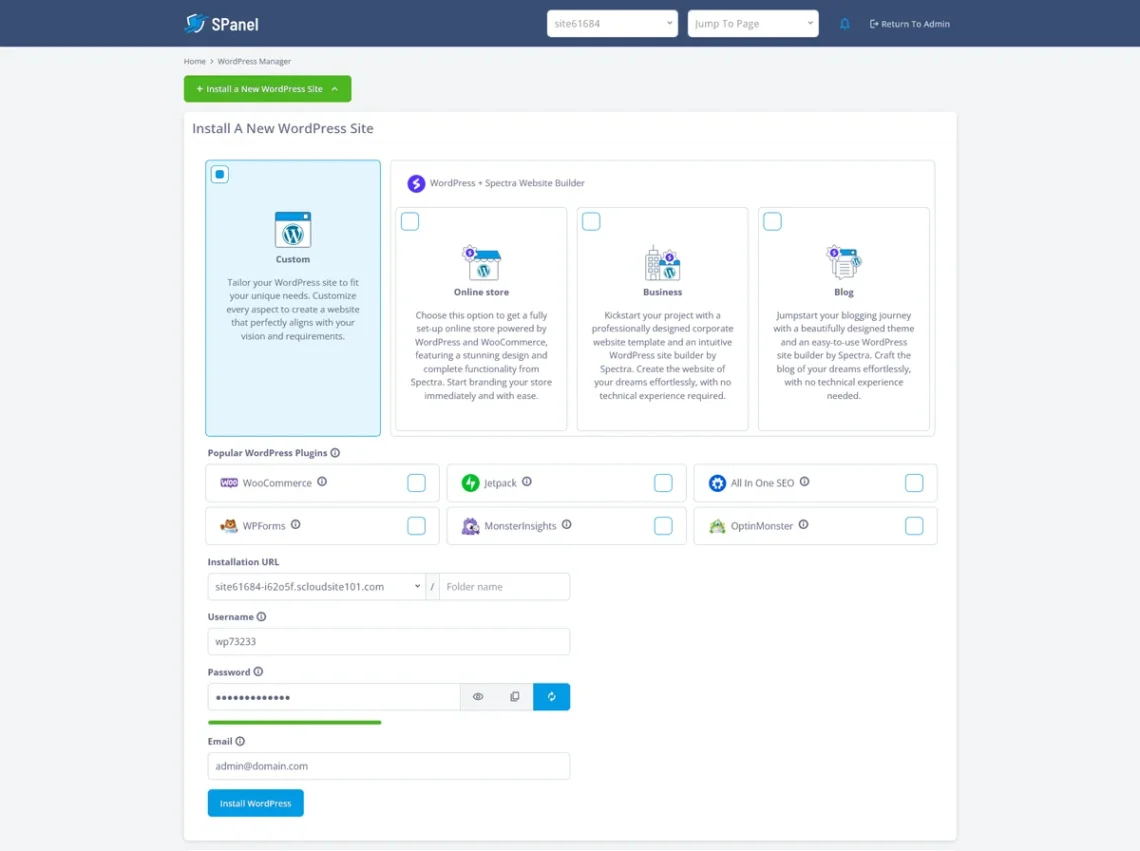
You can also install WordPress after you’ve created the account. SPanel has a unique tool designed specifically for starting and running a WordPress website. It’s called WordPress Manager, and it’s available under the Software section on SPanel’s User Interface homepage.

If WordPress is already installed on your account, you’ll see it in the Existing WordPress Installations list.
Clicking the Install a New WordPress Site will open the installation interface. Yet again, you can choose whether or not to use the Spectra website builder. If you decide not to, you can pick from a selection of other plugins that could prove useful.
They are the following ones:
- WooCommerce: The biggest and most powerful ecommerce plugin for WordPress.
- WPForms: An easy-to-use contact form builder.
- Jetpack: A plugin that helps you implement a range of performance-enhancing and security features.
- MonsterInsights: One of the easiest ways of integrating Google Analytics into your WordPress admin dashboard.
- All In One SEO: A comprehensive SEO toolkit.
- OptinMonster: An add-on for creating opt-in forms and mailing lists with a high conversion rate.
Of course, once WordPress is installed, you can add or remove these and many more plugins without any limitations.
Below the add-on options, you can enter the actual installation details.
In the Installation URL section, you specify where WordPress will be installed. If you want it under your primary domain, select it from the drop-down menu and leave the Folder name field empty.
Further down, you pick your WordPress dashboard login credentials. For your convenience, the integrated generator has already created a strong password for you. If you want to use one of your own, it must be at least eight characters long. Be sure to copy and store it safely.
Finally, make sure you enter a valid address in the Email field, as it will be used for things like password resets.
When ready, click the Install WordPress button to initiate the installation. Soon, you will receive an email with all the details, and you’ll be able to start work on your new site.
How to Install WordPress Using cPanel?
The cPanel/WHM server management platform has been around for much longer than WordPress, and for some, it’s still the best web hosting control panel out there. For others, it’s starting to lag behind the competition, and quite a few website owners and hosting companies have been less than happy with a few pricing changes implemented over the years.
Nevertheless, there’s no denying the fact that it’s still one of the most popular solutions of its kind, offered by almost any hosting provider.
To start a new website with it, you open WHM (which is short for Web Host Manager) and create a new cPanel account. This time, you can’t have WordPress pre-installed. That said, setting it up is not exactly tricky.
After you’ve created the new account, you can log in to the cPanel interface straight from WHM. From the homepage, click List Accounts, and then the cPanel icon will appear next to the one you’d like to work on.

Once inside cPanel, scroll to the Software section and click WordPress Manager by Softaculous. Softaculous is an auto-installer that supports over 300 applications and is also available in SPanel. In this case, the WordPress Manager is just a shortcut that saves you a few clicks.
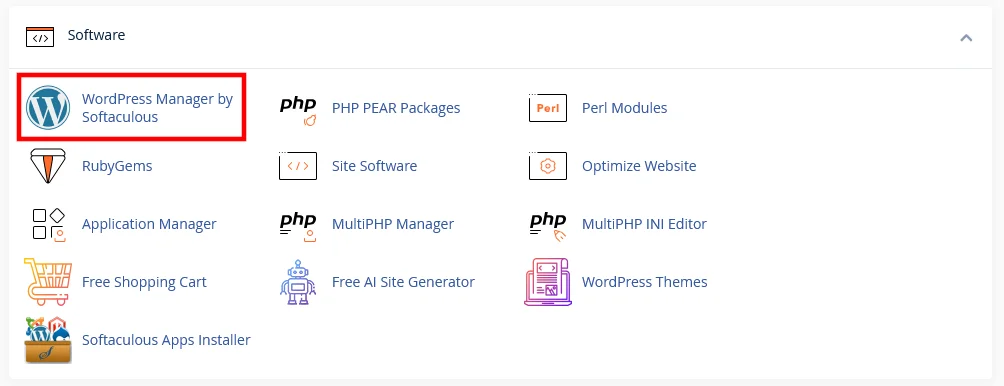
The interface isn’t quite as straightforward as SPanel’s, but finding your bearings shouldn’t be too much of a challenge, even if your site-building experience is limited.
Yet again, you’ll see a list of all active WP installations. To create a new one, you click the Install button.
The Software Setup section lets you pick the installation URL and the WP version you want to set up. It’s recommended that you always use the latest stable release, but you can also work with an earlier one.

The Site Settings section is next. You choose the Site Name and Site Description and have a couple of checkboxes for enabling WordPress Multisite and turning off the WP cron service.
On the right, you set up your admin account. cPanel doesn’t have minimum requirements for the strength of your password, but it’s fair to say you need something much more robust than the default value. The key icon can generate a strong password for you.

Further down, you get to the Choose Language and Select Plugin(s) section. The former is pretty much self-explanatory – you choose the language of the WordPress backend.
With the latter, you can pre-install one or more plugins that could help you with various aspects of your site’s operations.
By default, Softaculous recommends the following:
- Backuply: A backup management add-on.
- SpeedyCache: A caching plugin.
- Loginizer: A security solution that protects you against brute-force attacks.
- GoSMTP: An add-on that allows you to send emails using an SMTP provider of your choice.
- FileOrganizer: A plugin promising easier file management.
You can select a set of plugins and themes that can automatically be installed on your WordPress sites through the Manage Plugin Sets button. This is convenient if you plan to build multiple sites on one cPanel account and want to use the same add-ons on all of them.

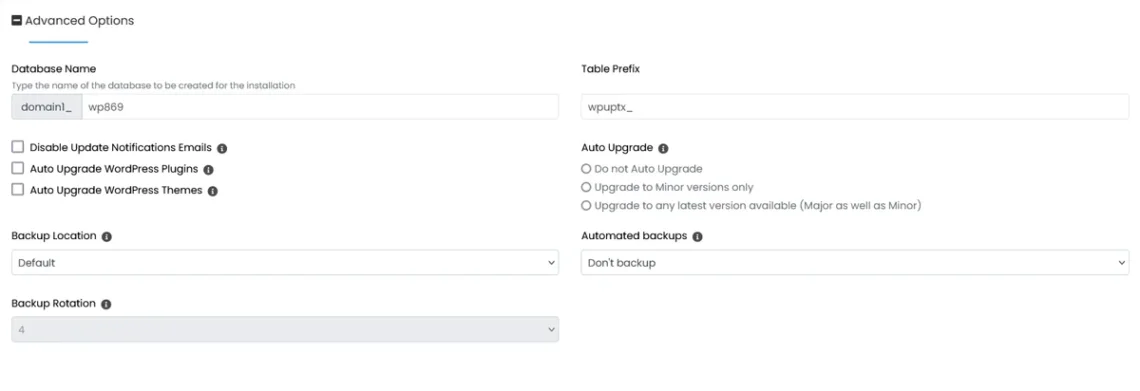
Next, in the Advanced Options section, you can edit the database name and table prefix and modify various settings related to automatic updates and backups. By default, backups are disabled, which shouldn’t be too much of an issue if your hosting account features another solution for keeping a safe copy of your data.
Auto-updates are also off as standard, though, which isn’t ideal. Updates can cause issues occasionally, which is why many website owners ignore them. However, in doing so, they’re exposing their projects to severe security risks. It’s ultimately up to you to decide if you’ll use the auto-update function in Softaculous, but even if you don’t, try to ensure you utilize the latest versions of the WP core and its plugins at all times.
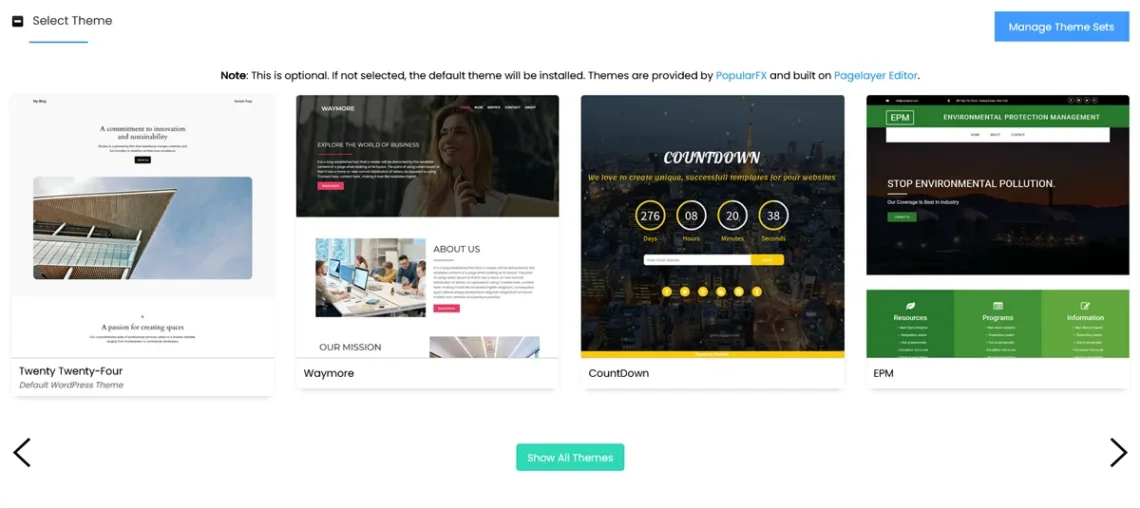
Finally, from the Select Theme section, you can choose from a few designs and change the default look of your new site. If you select nothing, Softaculous will install WordPress with its default theme.
After the installation, details about it will be sent to the admin email. From the Email installation details to: field, you can specify additional recipients – useful if multiple people work on the site.
After you configure everything, click Install and wait for the configuration to complete.
Manual WordPress Installation
It pays to appreciate the complexity of an auto-installer’s job. It downloads the WordPress files from the official repository and extracts them in the folder you’ve specified. Then, it sets up a database and a MySQL user associated with it. Finally, it configures WordPress to work with the database, creates an admin account, and sets up any additional add-ons you’ve specified.
Without an auto-installer, you’d have to do all of this on your own.
Sounds scary, doesn’t it?
Well, it’s not. We’ll get to that in a moment, but before we do, let’s see why you might need (or want) to install WordPress manually.
Manual Installation: When and Why You Might Need It
You can see how far hosting providers and software companies have gone to ensure website owners’ lives are as easy as possible. If you’re an experienced developer, automatic installers and control panels save you tons of time. If you’re a novice, they give you the confidence that whatever you’re facing next won’t be as challenging as you may have thought initially.
They’re often a critical part of the launch of the entire project, but as with everything, you can’t expect them to be 100% effective 100% of the time. Sometimes, a manual installation is either the better or the only choice.
Let’s explore some of these scenarios:
- An auto-installer isn’t available: Not all web hosting accounts are equipped with an automatic installer. Sometimes, you don’t even have a control panel. Many self-managed solutions give you no other access to the server apart from the command line and FTP. There’s no graphical user interface for setting up databases, editing files, or configuring components like the web server or database management system, and there’s certainly no automatic tool for setting up a CMS.
- An older WordPress version is required: Nevertheless, sometimes, you need to use an older release for testing or educational purposes. That older version won’t necessarily be available for automatic installation. For example, SPanel’s auto-installer can only set up the latest stable release, and while Softaculous does give you a range of available versions, it’s far from unlimited.
- You want to avoid bloatware: Softaculous and SPanel recommend a few plugins and themes you might be interested in. However, they are not installed by default, and it’s up to you to decide whether to add them. If you set up WordPress manually, you can be sure you’re starting with a clean installation.
- You want a custom, security-minded installation: An automatic installer uses default settings for things like user roles and database prefixes. If you follow well-known security best practices, this shouldn’t be a problem. Still, if you think your project could be subjected to more sophisticated attacks, you may want to implement additional precautions that aren’t necessarily available in the automated tools.
- You want to understand how WordPress works and be a part of the process: The more hands-on you are with the software that powers your website, the more you’ll know about how it works and what it does. And where better to start than with the installation?
On the one hand, you’ll familiarize yourself with the components powering your website and see first-hand how they communicate. On the other, you’ll see that manually installing WordPress is nowhere near as complicated as you may have thought.
Let’s go through the steps.
How to Install WordPress Manually?
Manually setting up WordPress isn’t quite as easy as using an automatic installer.
However, if you take the time to follow the steps carefully, you will have no problems.
Step 1: Downloading and Uploading WordPress Files via FTP
The WordPress files are available at https://wordpress.org/download/releases/. The latest stable version is at the top of the page, though all older releases are also available.
You can download WordPress as a ZIP file or a Gzip archive. The difference between the two is mainly in how well-supported they are on different platforms. For example, ZIP files can be opened with Windows Explorer, while .tar.gz archives are natively used in Unix-based systems.
The next step of the WordPress setup involves uploading the content management system files to your hosting account. To host the new website under your primary domain, you need to place them in the public_html folder.
The File Manager in your web hosting control panel likely supports archive extraction, so you can theoretically upload the ZIP or Gzip file and unzip its contents straight on the server.
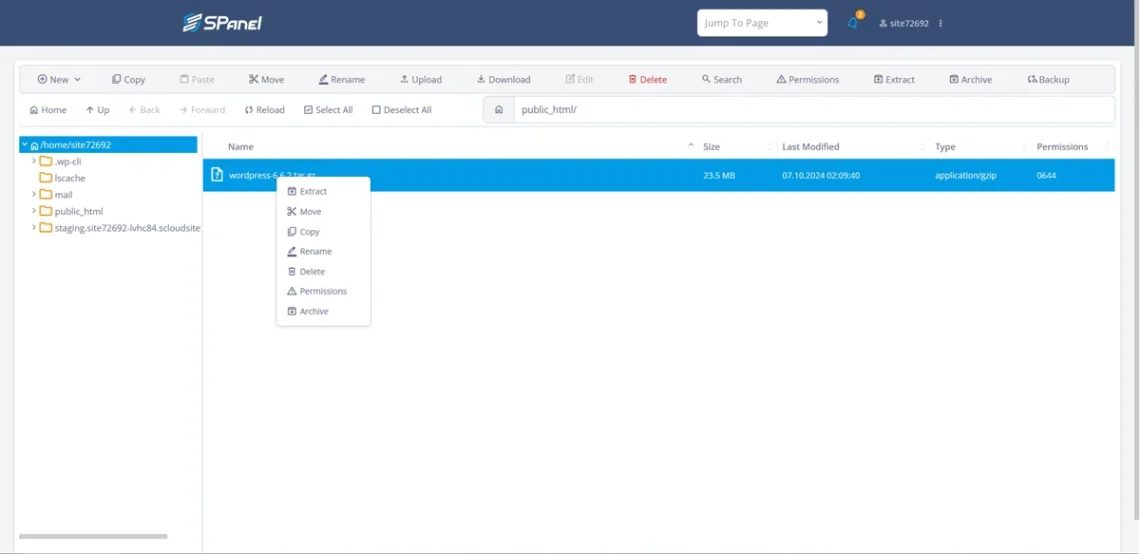
There is a small catch, though. If you open the archive you downloaded from https://wordpress.org, you’ll see that the actual WP files are situated in a subdirectory called “wordpress.” So, for example, if you tell your file manager to extract the archive inside the public_html folder, it’ll end up in public_html/wordpress. You’ll then have to move them to public_html yourself.
Alternatively, you can extract the archive on your computer and use an FTP client to upload all the files to the correct folder. FileZilla is the most popular application of this kind. If your hosting service is powered by SPanel, you can connect to your server using your user account login credentials.
After you log in, use the panels on the left to navigate to the WordPress files on your local computer and the panels on the right – to open the public_html folder on your server. Select all the WordPress files and either right-click and hit Upload from the context menu or simply drag and drop them to the server pane.
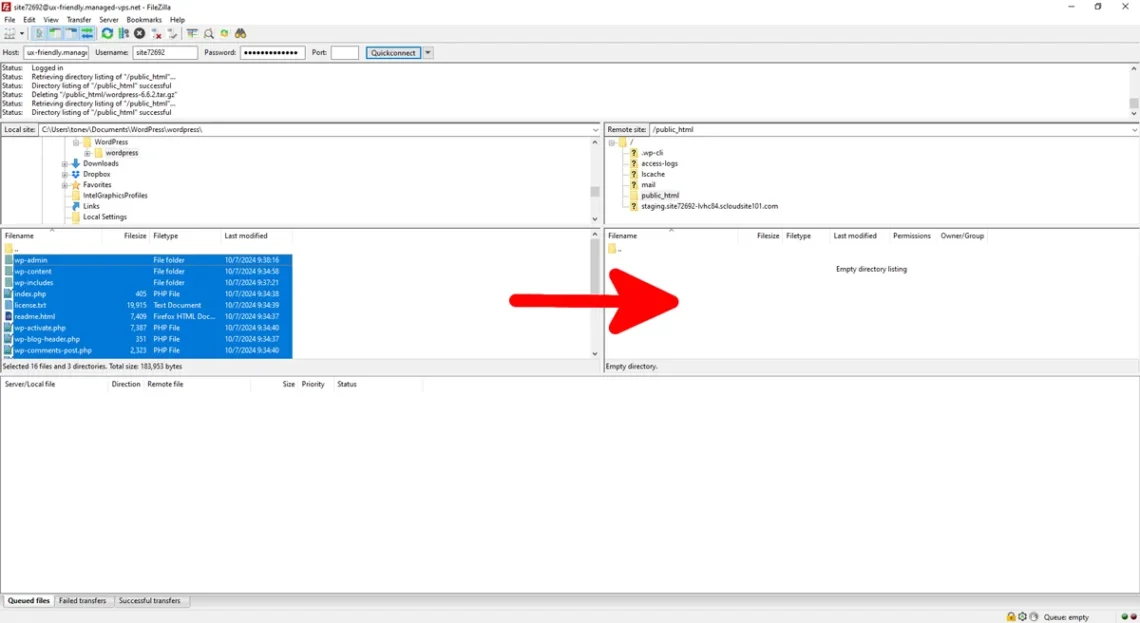
You’ll need to upload about 3,000 files in total. Your upload speed will determine how long it takes, but it should be done in no more than several minutes.
Step 2: Setting Up a MySQL Database
One way to set up a new database is to connect to the server via SSH, open a MySQL shell, and use the CREATE DATABASE statement. A second option is to use phpMyAdmin. It has a graphical user interface, so it’s a much more novice-friendly method.
However, it’s not as intuitive as the database management utility built into your web hosting control panel. For example, here’s what the MySQL database wizard looks like in SPanel.
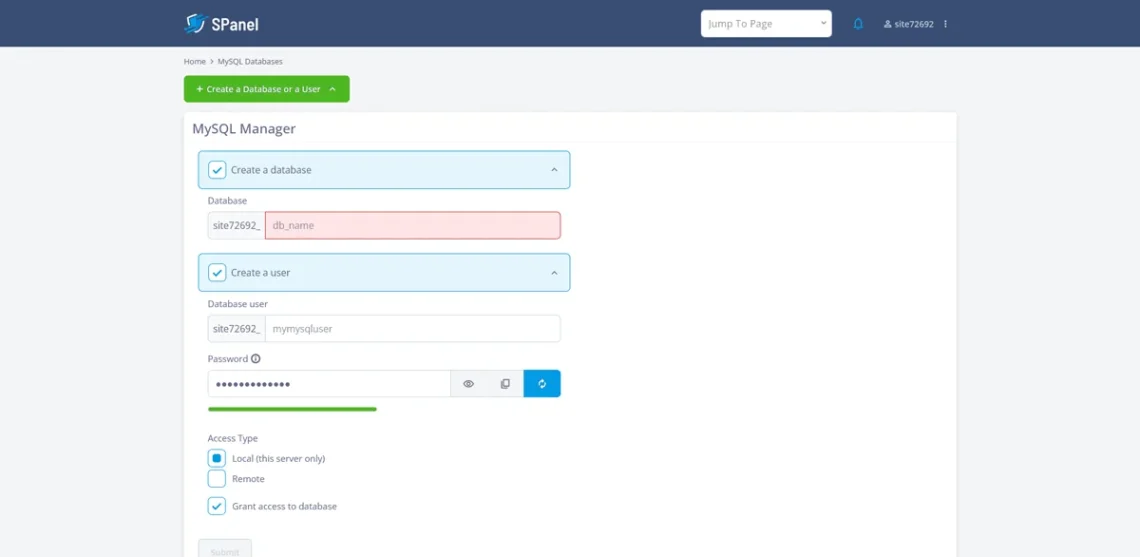
To access it, log in to SPanel User Interface and go to MySQL Databases.
All you need to do to set up a database is think of a name for it. However, it alone isn’t enough for a working WordPress project.
The CMS needs a MySQL user to access the database and read and write information. For your convenience, if you use SPanel, you can set up the database and the user from the same interface.
You just need to ensure both the Create a database and Create a user checkboxes are selected. The prefixes for the database and user are preselected and coincide with your SPanel user account. SPanel has pre-generated a password for the user. You can change it, but make sure you use a suitably strong password, as it will protect your site’s data.
Copy all the details from this page and store them safely before you click the Submit button.
Step 3: Configuring the wp-config.php file
Technically, what we’re about to do can be completed through the graphical interface of the WordPress installation script, which we’ll open in a minute. The advantage of going through with it is that it will give you a better insight into how WordPress works and could help you at a later stage.
In basic terms, we’ll now tell WordPress which database it will work with and show it how to communicate with it. To do this, we’ll need to edit one of its main configuration files.
You can make the changes on your local computer, but an easier option for many would be to use the control panel’s File Manager. It most likely has a built-in editor, meaning you can modify the contents of text-based files and save the changes straight on the server.
Log in to your web hosting control panel account, open the File Manager, and navigate to the site’s document root. You need to locate a file called wp-config-sample.php. Right-click on it and hit Edit. With some hosting dashboards, a double-click may work as well.
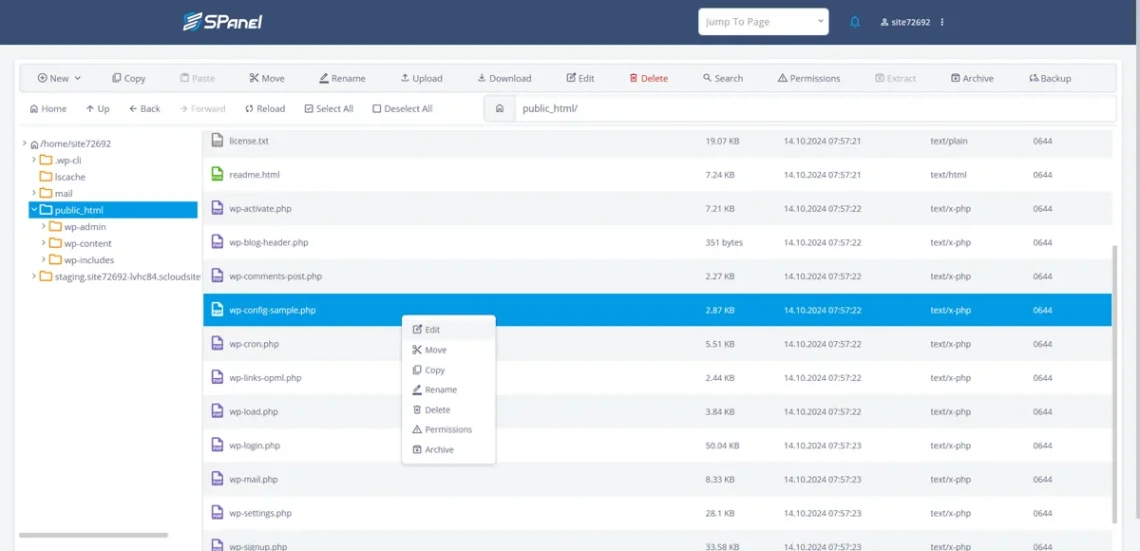
The section you need to modify is labeled “// ** Database settings – You can get this info from your web host ** //“. The file is well documented, with clear instructions of what goes where.
The lines you’ll need to edit are:
- define( ‘DB_NAME’, ‘database_name_here’ );
The name of the database you created during the previous step should go between the second pair of quotation marks.
- define( ‘DB_USER’, ‘username_here’ );
This one is for the username of the MySQL user that has access to the database.
- define( ‘DB_PASSWORD’, ‘password_here’ );
This is the password for the said database user.
If you use a separate database host, you’ll have to edit the DB_HOST variable. In our case, it remains set as “localhost.” Here’s what the file looks like in our test installation.
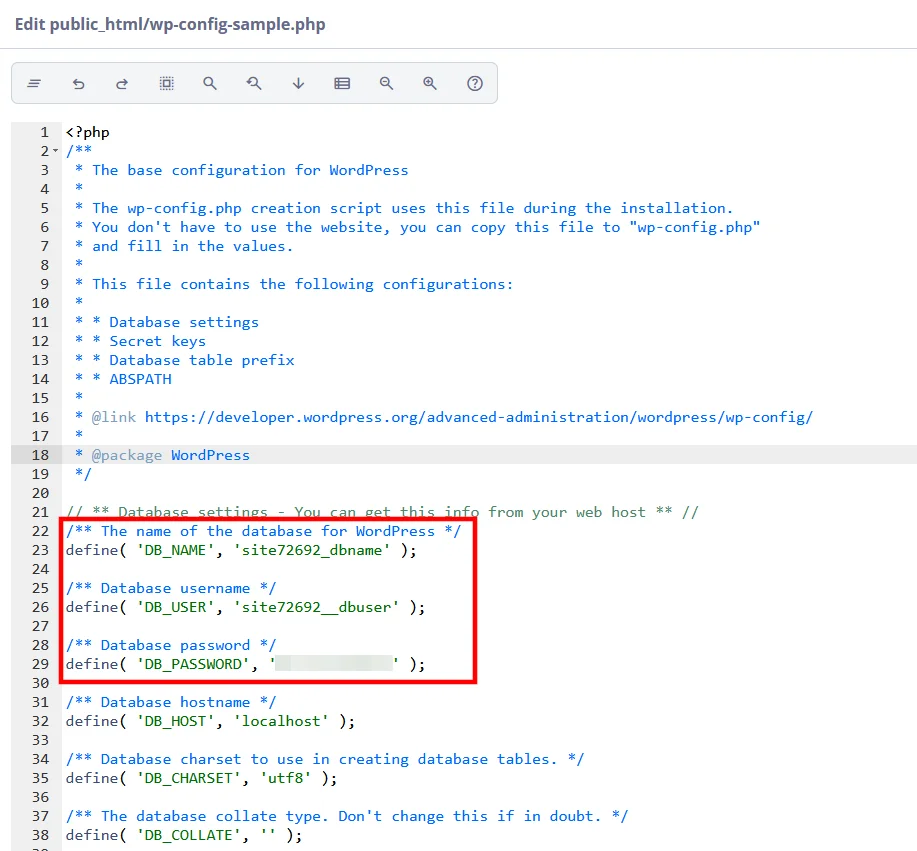
We’ve pixelated the password so it doesn’t get reused. It will be written in the file in plain text, but if the permissions are set correctly, this won’t be a problem, as no outside people will have access to it.
Finally, save the changes to your file and close the editor.
You should be back in your site’s document root. Right-click on the wp-config-sample.php file and rename it to wp-config.php. With that, the main WordPress configuration file should be ready to go. All you need to do is finalize the installation.
Step 4: Running the WordPress Installation Script
We’re nearly there. The files are already in place, the database is up and running, and WordPress knows how to communicate with it.
All that is now needed is to create an admin account for the WP dashboard and set up a few details about your site. Luckily, there’s a handy installation wizard that will help you out.
To access it, open a new browser tab and load your website URL. You may need to use your computer’s hosts file if your domain is not yet pointed to the correct nameservers.
WordPress will automatically redirect you to https://[yourdomain.com]/wp-admin/setup-config.php and check if a working wp-config.php file is available.
If you have followed the steps above, you’ll see a link that lets you proceed with the installation. If you haven’t, the installer will let you choose a language before asking you for the database name and user details.
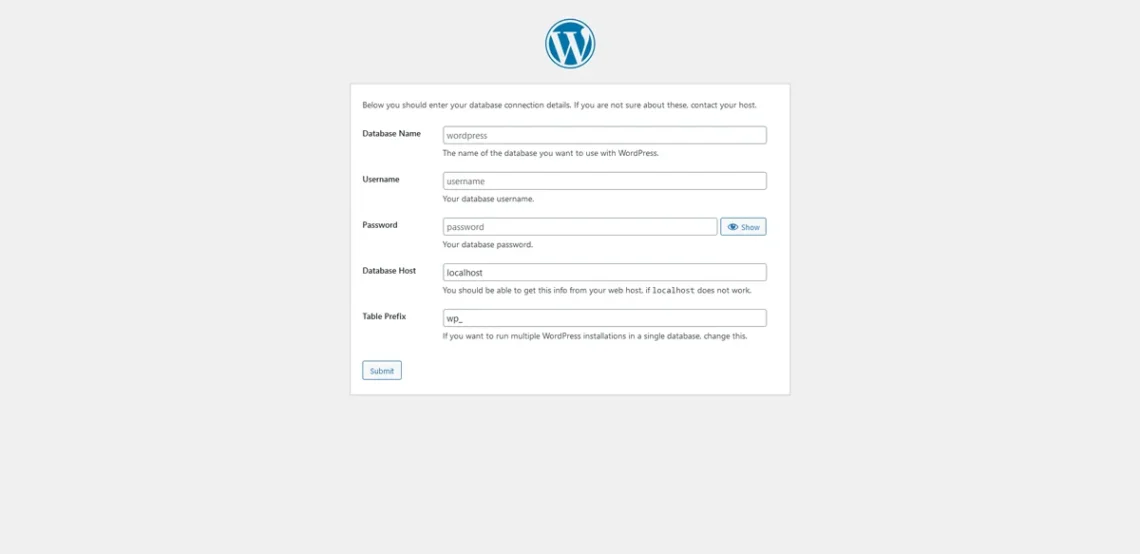
Now that we’re sure the database connection is established, all you have to do is specify the site title and your WordPress login credentials. You shouldn’t have any problems figuring out the purpose of each field.
The checkbox at the bottom tells search engines not to index your site, which could be useful while you’re still building it.
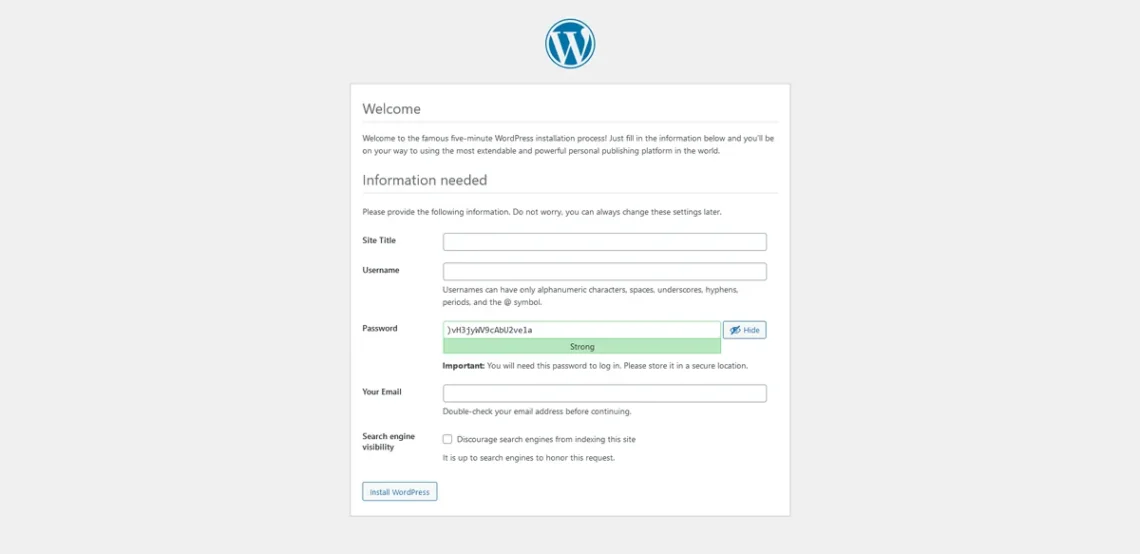
Finally, select Install WordPress to complete the process. After you have successfully installed WordPress, the details will be sent to the admin email address, and you will be able to start work on your site.
Installing WordPress Locally on Your Computer
If you choose the right hosting account, you won’t need to install WordPress locally. For example, ScalaHosting’s managed VPS solutions support staging, so you can set up a testbed and try out various features before rolling them out to the live website.
Nevertheless, there may be scenarios where a local site is required. Luckily, setting one up is not too difficult.
The world’s most popular CMS can run on just about any computer. In fact, its minimum hardware requirements can be met by the average home PC from the mid-2000s. Running it on your laptop or desktop shouldn’t be a problem. Let’s take a look at the steps:
Step 1: Setting Up a Local Server With MAMP, WAMP, or XAMPP
In addition to the hardware resources, WordPress needs a few software components that facilitate website management and operation.
Specifically, we’re talking about:
- A PHP interpreter that allows your computer to understand the code in the WordPress files.
- A web server to process browser requests.
- A database management system that creates the database and allows WordPress to access the data inside it.
These applications are usually unavailable on operating systems designed for home use. You can try installing them one by one, but that would probably take too long and is almost guaranteed to be tricky.
Fortunately, you can go for a so-called solution (or software) stack. In essence, a stack is a suite of software applications and components that enable your computer to act as a web hosting server and allow you to install WordPress offline. There are a few options to choose from.
Mac users will probably be looking at MAMP – a software stack that installs Apache, MySQL or MariaDB, and PHP, Perl, or Python on macOS devices. A similar solution called WampServer is available for Windows users. Both do a fine job, but in terms of popularity, they are surpassed by XAMPP.
XAMPP was developed by Apache, and its higher adoption rates are partly due to its compatibility with Windows, macOS, and Linux.
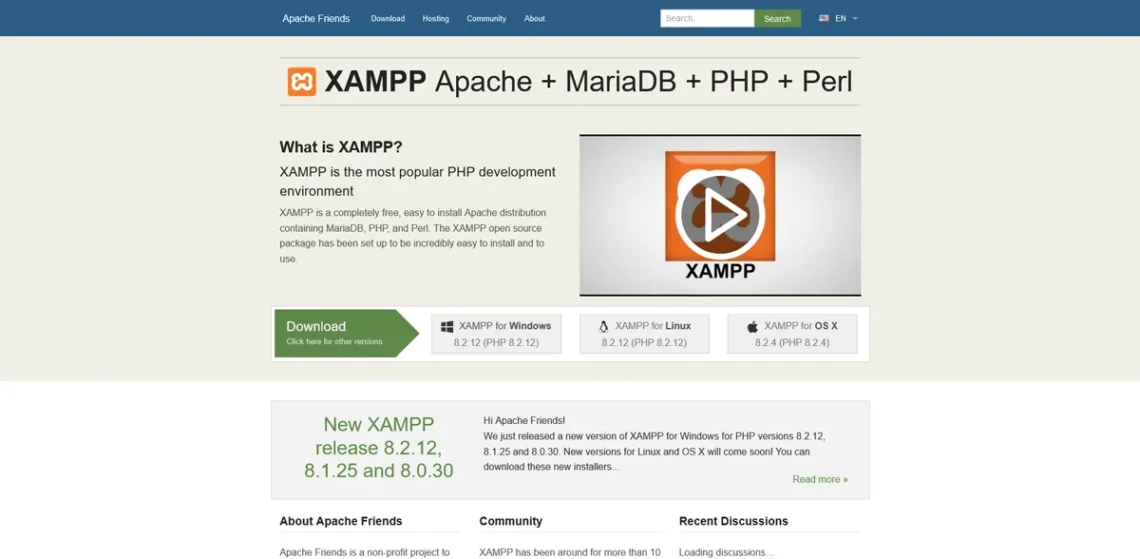
The stack is completely free to download and use, and it comes with all features as standard – there is no premium version.
The suite includes all the components you need to install WordPress and build a website on your local computer:
- Apache web server;
- MySQL or MariaDB;
- PHP.
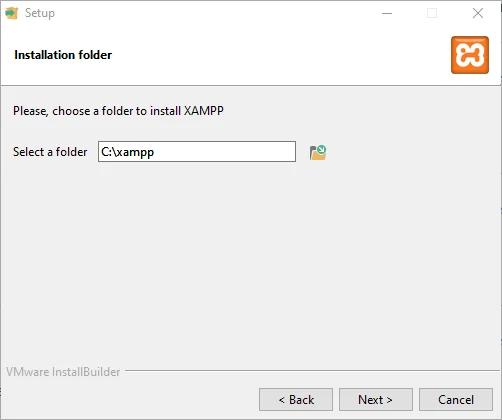
It has a standard installation wizard that guides you through the process. You only need to remember that XAMPP may encounter issues if Windows’ User Account Control (UAC) feature is enabled. To eliminate the chance of errors, avoid installing XAMPP in C:\Program Files\. The default installation folder is C:\xampp, and it should work fine.
After the installation, open the XAMPP control panel and click the Start buttons next to Apache and MySQL.
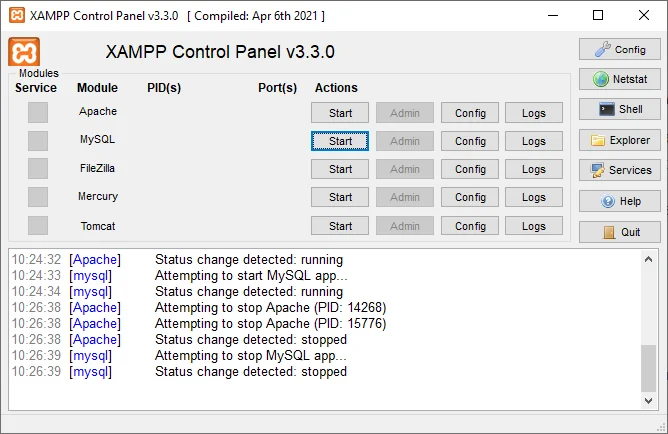
You can confirm that everything is up and running by opening a browser window and going to http://localhost. You should see the XAMPP dashboard.
Step 2: Download and Extract WordPress
XAMPP is configured to use the htdocs folder inside XAMPP’s installation directory (C:\xampp\htdocs\ for Windows users) as the home directory. Inside it, there will be a document root for your local WordPress site.
Go to https://wordpress.org/download/ and download the archive with the WP version you need to use. Inside is a “wordpress” folder containing the content management system’s files. If you extract the archive to C:\xampp\htdocs, the installation will actually be located in C:\xampp\htdocs\wordpress, which is ideal for our purposes, as it will automatically create a document root for our new installation.
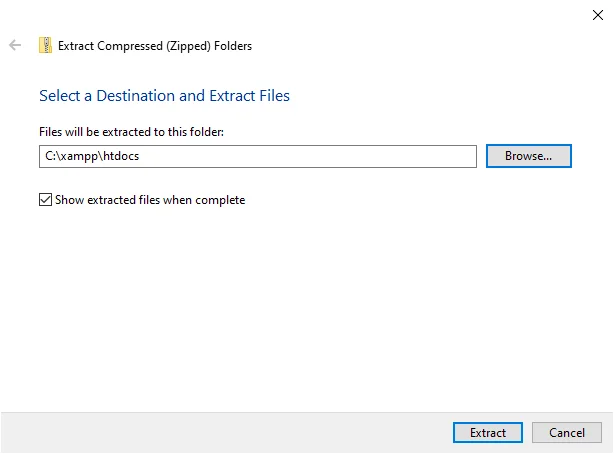
If the files are correctly extracted, you should see the initial WordPress installation page when you open a browser window and go to http://localhost/wordpress (XAMPP must be running). There’s just one thing you need to do before you use it to set up your local website.
Step 4: Creating a Local Database and Running the WordPress Installer
Open a browser and go to http://localhost. Click the phpMyAdmin link in the top bar.
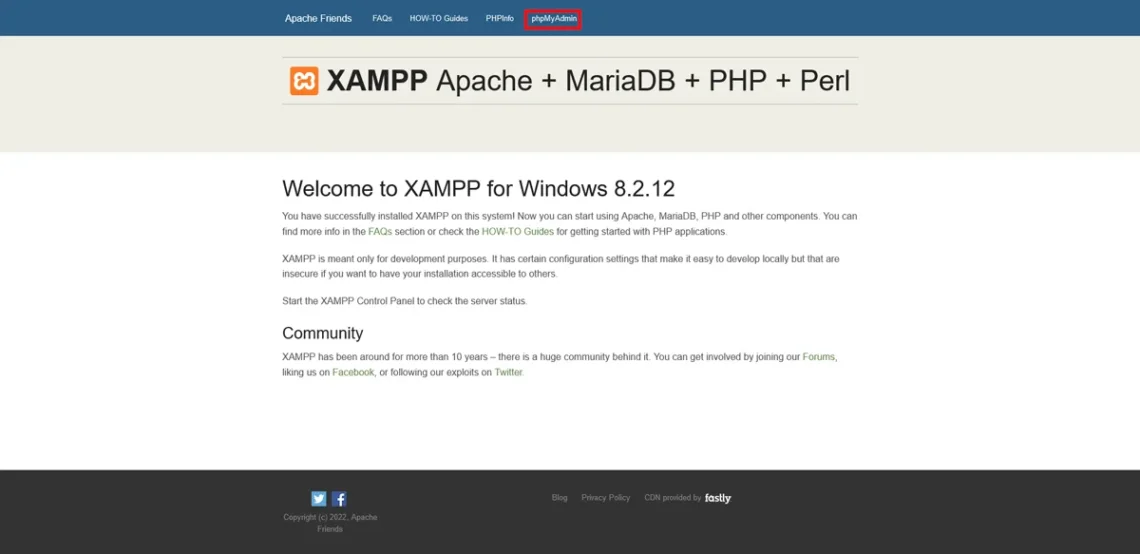
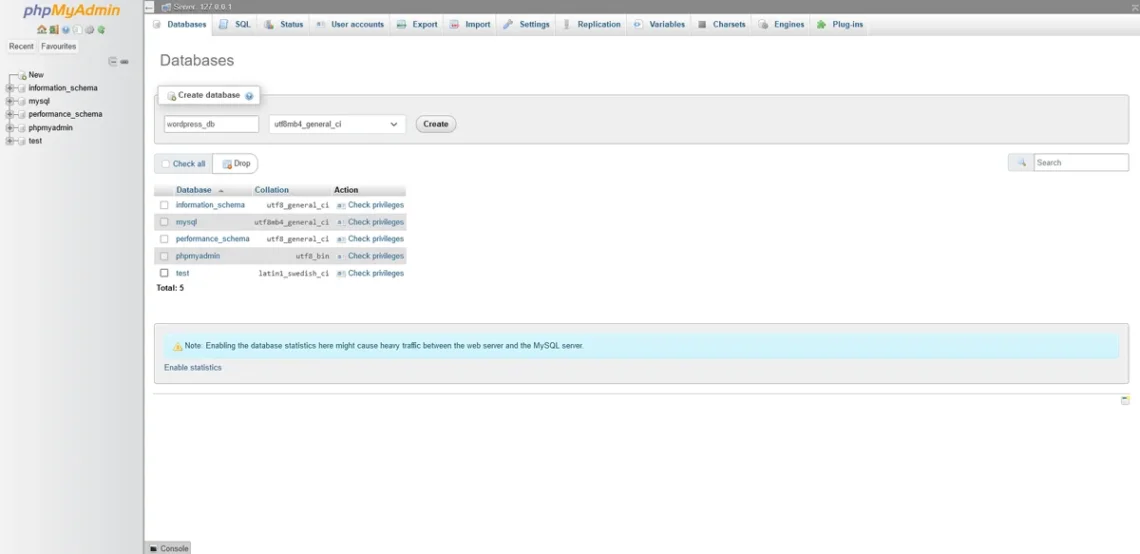
Click the Databases tab, and in the Create database section, enter the name for your local database (for example, wordpress_db). The default option in the collation drop-down next to it should work fine for you. Click Create to set up the database.
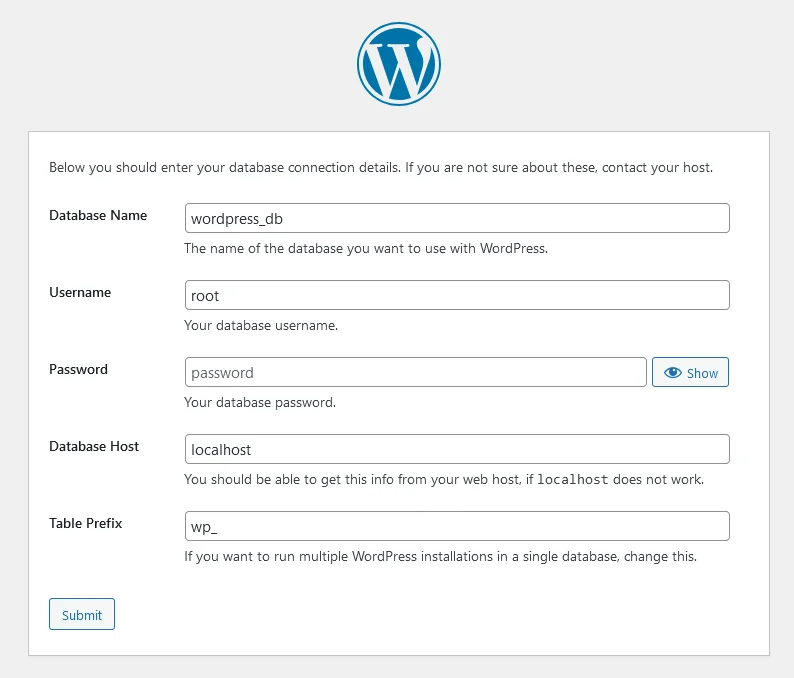
It’s time to go through the WP installation wizard. Go to http://localhost/wordpress and choose a language. The wizard will warn you that you’ll need to have your database information with you. Click the Let’s go! button to proceed.
Enter the name of the database name, and in the Username field, put root. We’re using the root MySQL user, which is fine because it’s a local installation, and no outside connections are allowed. On your web hosting account, the root user is most likely disabled for security reasons, so you need to create a new one.
The root user doesn’t have a password by default, so you can leave the rest of the fields as they are.
WordPress will try to establish a connection with the database. If everything’s okay, you’ll see a Run the Installation button that lets you create a WordPress account and finish the setup.
Note that if you want to develop your site in a local environment and then move it to a proper web hosting server, you’ll have some work to do later.
Things to do After Installing WordPress
With WordPress installed, it’s time to start building your website.
Here’s where to begin:
- Choosing and installing a WordPress theme: The official WP repository holds over 12,000 free WordPress themes, and websites like ThemeForest, Envato, and TemplateMonster give you countless more options. With so many designs, picking the right one is a challenge. However, the reward of creating an easily recognizable website is definitely worth the effort.
- Essential plugins to install right after setup: WordPress without add-ons won’t work for you, but be careful not to go overboard with the plugins. Consider the features you want to implement and determine which extensions best fit your needs. Aspects like performance and SEO can also be vastly improved by the right add-ons, so don’t forget to do some research and see which search engine optimization and caching plugins may be useful.
- Consider some speed optimizations: Depending on your hosting environment, you may have additional tools to improve your website loading speeds and reliability. For example, if you use one of ScalaHosting’s managed VPS solutions, you can install LiteSpeed or OpenLiteSpeed on your server, allowing it to process more requests with less hardware load.
- Configure your backups: You could face serious headaches if your backups are not configured correctly. Whether it’s a mistake you made while trying out a new plugin or a security breach, a working backup can save your site’s life. With some hosting providers, the backups are preconfigured out of the box. For example, ScalaHosting’s shared and managed packages give you free daily automated backups stored in an offsite location. With other hosts, you may need to set them up manually or use a backup WordPress plugin.
- Beef up your site security: You can start by reviewing the user accounts with access to your WordPress dashboard and their privileges. Consider additional security features like two-factor authentication for both the site’s backend and your web hosting control panel.
Last but not least, review and change WP core settings if needed. You can set the site title from the installation wizard, but other core WordPress settings can only be accessed after you set it up. You can change the tagline, icon, and timezone, and plenty of settings help you determine things like your site’s comment moderation policy. Don’t forget to review every aspect of its behavior to ensure it fits with local and global security and privacy regulations.
Troubleshooting Common Installation Issues
Following the steps outlined above, you should have no problems installing and starting work on your WordPress website. Automatic installers take most of the strain out of the task, and even the manual setup is fairly straightforward, so it should all go according to plan. That’s the theory, anyway.
In reality, there are many variables, and quite a few components must work together for the process to go smoothly. And what happens if they don’t?
You might encounter a few common issues after the installation. Luckily, troubleshooting them is pretty easy in most cases.
- Dealing with database connection errors
“Error establishing a database connection” is the most common error message users see after a WordPress installation. It means WordPress can’t access the database and is, therefore, unable to fetch the required information. There could be a few reasons for this.
- Incorrect database details in the wp-config.php file.
Your first port of call is to open the wp-config.php file and double-check the database name as well as the MySQL user’s credentials. If you’re unsure what the data must be, you can open the MySQL Databases section in your control panel. You’ll see the database and the user, and if you don’t know the password, you can reset it. Update the information in wp-config and try again.
- The MySQL service is down.
Management platforms like SPanel allow you to check whether all services are up and running. If you don’t have that option, you can ask your host’s support specialists to restart MySQL if needed.
- The database is corrupted.
Database corruption will prevent WordPress from accessing the information it needs to render your website. The structured query language has a REPAIR statement, which might help in some instances. However, restoring the database from a backup is often a more reliable way of ensuring everything works and no data is lost.
- White Screen of Death (WSoD)
If you try to load your website and see a blank screen with no error messages, you’ve encountered the infamous White Screen of Death. Because WordPress doesn’t tell you what’s wrong, the investigation can be a little tricky. Fortunately, the list of potential culprits is not that long.
- Plugin issues
Your first port of call is to check your add-ons. Code-level errors can cause a WSoD, and compatibility issues between plugins and themes are also not unheard of.
The White Screen of Death also affects the WordPress dashboard, so you can’t just log in and disable the problematic add-on. If you’re comfortable working with the command-line interface, you can do it via WP-CLI.
If you’re not, use your control panel’s File Manager or an FTP client to navigate to public_html/wp-content/plugins. There, you’ll see a folder for each of your installed plugins. By renaming the add-on directory, you effectively deactivate it because WordPress can no longer find its files. Try doing this for every extension until you identify the problematic one.
If the WSoD is caused by one of your plugins, this is the fastest way to restore your WordPress site.
- Memory limit exhaustion
The default WordPress PHP memory limit is 32MB, which may be enough if your site is still relatively simple. However, as you add more media and plugins, you could exceed it. The easiest way to increase the memory limit is through the wp-config file. The string you need to edit is: define(‘WP_MEMORY_LIMIT’, ’32M’);. The limit can go up to 256MB.
- Server-side issues
If the problem persists, you may want to contact your hosting provider’s support team and ask them to investigate and see if everything works on their end. A good host should be able to pinpoint the issue straight away.
- File permission issues
In some cases, incorrect file permissions can cripple a particular feature. In others, it could bring the entire website down. File permissions can be edited both through an FTP client and via your control panel’s File Manager. If something’s wrong, double-check to ensure file permissions are set at 644 while folders are fixed at 755.
- 404 errors
If your homepage works fine, but you see a lot of 404 errors when you browse through your posts, then there’s most likely a problem with the WordPress permalink settings. Log in to your WP dashboard and go to Settings > Permalinks. Clicking Save will force WordPress to regenerate the .htaccess file, which is often enough to fix the problem.
- Getting locked out of the WordPress dashboard
You may find yourself locked out of your website backend for several reasons. Sometimes, a problematic plugin causes the issue, and sometimes, it could be a redirect problem.
However, more often than not, it’s simply a matter of forgotten login credentials. You can change the username and password through phpMyAdmin. The login data is stored in the wp_users table, and before you save the new password in its respective field, you must select MD5 from the Function drop-down.
However, if your hosting account has a control panel and a WordPress Manager feature, it’s easier to do it from there.
Final Takes
We can’t wait to see you online. This tutorial should have taught you how to install WordPress, both manually and through a control panel.
From here on out – it’s all up to your imagination. Utilize WP to the fullest and build a fantastic project that will wow every visitor.
Frequently Asked Questions
Q: Can I install WordPress without a host?
A: WordPress has two separate versions. The free and open-source version is available for download at WordPress.org. There is also a hosted variant sold on WordPress.com. The latter is offered under the Software-as-a-Service (SaaS) model and requires no additional hosting account.
Q: Do I have to install WordPress manually?
A: More often than not, the answer to whether you should install WordPress manually would be No. Most web hosting companies utilize software auto-installers to help you set up any application with a few mouse clicks. Additionally, hosts are often happy to take care of the initial installation for you. Only in rare cases when you can’t use outside help will you have to go for a manual setup.
Q: Can I install WordPress on my computer?
A: Any local machine can host a WordPress website, but first, you need to configure it to work as a web server. This requires some initial preparation and the setup of a software stack designed to make WordPress work.

