Thinking of moving your WordPress website to a new hosting provider?
The fact that you’ve landed on this page suggests that you are. More specifically, you’re looking for a guide to help you complete the transfer with as little hassle as possible.
The thing is, if you decide to move your site to ScalaHosting, you won’t need it at all.
Instead of migrating files, dumping databases, and editing core configuration files, you can let our technical experts do it for you. All they need is a support ticket containing the login details for your old hosting account.
Decades of experience and thousands of successful WP migrations mean you can expect a completely seamless transition with zero downtime. Our technicians will transfer the WordPress core and all your site data, and after ensuring everything works fine, they’ll notify you to change your domain DNS settings. The entire process requires minimum effort from your side and will cost you nothing.
Of course, if you want to do it yourself, we have the steps for you below.
Oh, and just before we get to them, we should point out that the migration is nowhere near as complicated as it may appear at first.
With the right approach, even a complete novice can tackle the task, and the experience can actually be quite educational, as it gives you an insight into how your WordPress website works.
Let’s get to it then.
What Do You Need to Migrate a WordPress Website?
- Time – Your website size and complexity affect the time you’ll need to transfer it, and if you haven’t done it before, the process will likely be a bit slower than usual. Nevertheless, the migration of a standard WordPress site should take no more than an hour.
- Tools – Both your old and new accounts are most likely equipped with a control panel that has a File Manager and database management tools, helping you with the most critical phases of the migration. You can speed up some of the steps using an FTP client, and those with some command-line experience may decide to use SSH.
- Technical skills – The entire migration can be completed through a point-and-click interface. You don’t need experience or any specialized technical knowledge. However, you do need to plan carefully and consider all potential pitfalls, so let’s start from the very beginning.
Compatibility Checks
It may sound like a no-brainer, but you must first ensure your chosen environment is well-suited for a WordPress site migration. The silliest thing you can do is to opt in for a new hosting provider only to find out they don’t support your CMS. For example, if you mistakenly choose a Windows server, deploying your WordPress website on it would be quite challenging.
So, what do you need to keep in mind?
Two things should be of prime consideration – your application core and your WordPress plugins.
The CMS itself is fairly reasonable when it comes to system requirements – it needs PHP and MySQL to function correctly, so pretty much any Linux server configuration can do the job. Naturally, you have to ensure the new account’s programming and database management solutions are compatible with your particular WordPress version.
WP themes and plugins should not be underestimated, either. Each add-on has specific requirements, so you must check if yours would work well on the new hosting server. Keep a close eye on your plugins’ supported PHP versions and ask your host if they have the ones you need.
IMPORTANT: The ScalaHosting support team will gladly review your entire site and check the version requirements for your core application and add-ons. We support all PHP versions from 7.4 onwards, and Scala clients can even switch between them easily from their control panel with us.
Backup Your WordPress Site
Automated daily backups should be included in your hosting service, and they are essential for keeping your website safe, regardless of whether you’re making any changes to it. However, when undertaking something as serious as a WordPress migration to a new host, an additional manual backup will ensure you can restore your pages back to normal if things don’t go according to plan.
There are several ways you can go about creating a secure copy of your site. You can:
- Ask your hosting provider to perform a data backup and give you the archive file location
- Utilize a WordPress plugin to create a backup file
- Create a full account backup through your control panel
The third option is by far the easiest. For example, if your server is equipped with SPanel, you can have a full account backup with a few simple clicks.
First, log in to SPanel’s User Interface and select the Backup utility from the Files section on the homepage.

The New Manual Backup button is at the top of the page.
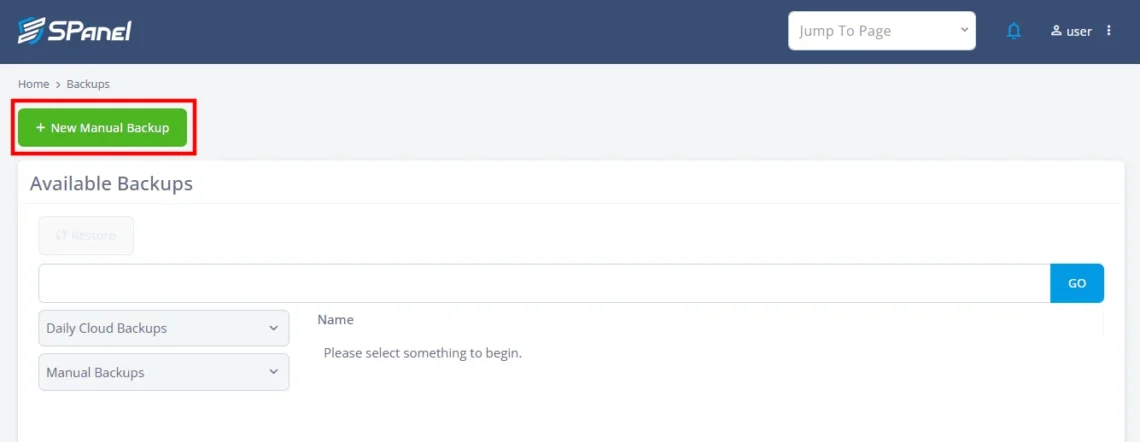
The interface lets you choose various settings for your new backup. The one we need today is the Full account backup toggle switch. Once you select it, you can pick the archive’s format and decide whether to include your emails.

After you click Submit, SPanel will start generating your backup, allowing you to continue working on other things. When ready, your backup file will be saved in your account’s home folder. You can also download it from the Backup utility in SPanel’s User Interface.
Thanks to your backup, you don’t need to worry about losing data if something goes wrong during the site migration.
Еxport Your WordPress Database
To move your website to a new location, you first need to export the data from its old database location. Traditionally, this is done with the help of phpMyAdmin, an open-source database administration utility that is integrated into most modern web hosting control panels.
The steps are relatively straightforward:
- Log in to your control panel.
- Go to PhpMyAdmin under the Databases tab.

- Once inside, find your database on the left and choose the Export tab from the top menu.


- You will see options for Quick and Custom export. Make sure to keep the Format drop-down as SQL.

- Click the Go button. You will be prompted to choose a destination on your computer to download the database file archive.
The process is fairly simple, but the interface is quite old-fashioned, and users may find it somewhat unintuitive. That’s why, if you use SPanel, you have an even more straightforward method for exporting information from a database.
- Log in to SPanel’s User Interface and open the MySQL Databases utility.

- Find the database you need to export and open the Actions drop-down next to it.
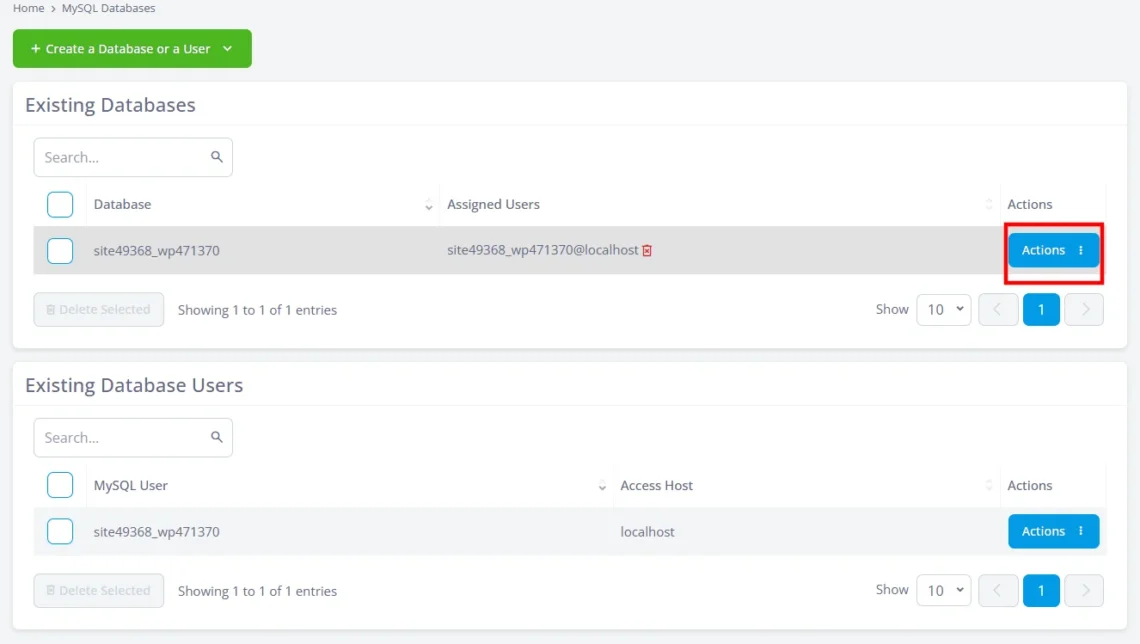
- Click Export & Download Database and save the SQL file to your computer.
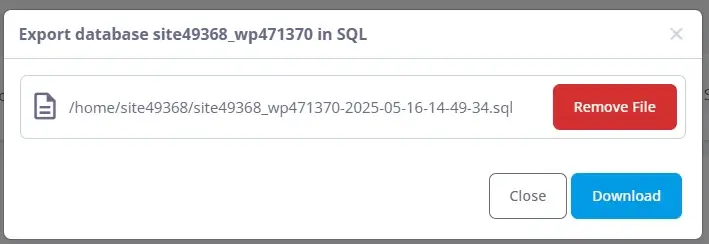
You now have a copy of your WordPress database saved on a local machine. We will need that later, but now we must focus on the site files.
Transferring Your WordPress Files
It’s time to download our website files. We can use the File Manager in our control panel or transfer them via an FTP client like FileZilla. Here’s a breakdown of the steps:
Transferring files using a File Manager
- Open the File Manager
The File Manager is usually accessible from the homepage of your control panel. In SPanel, it’s located in the Files section.

- Navigate to your site’s document root folder.
The document root directory contains your WordPress site files. In most cases, it’s called public_html and is visible as soon as you open the File Manager.
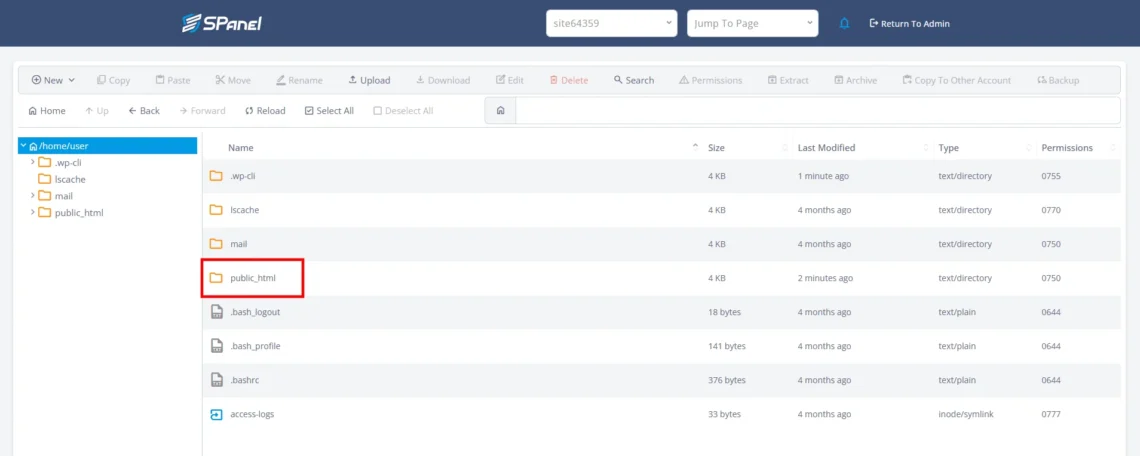
If you see directories named wp-admin, wp-content, and wp-includes, you’re in the right place.
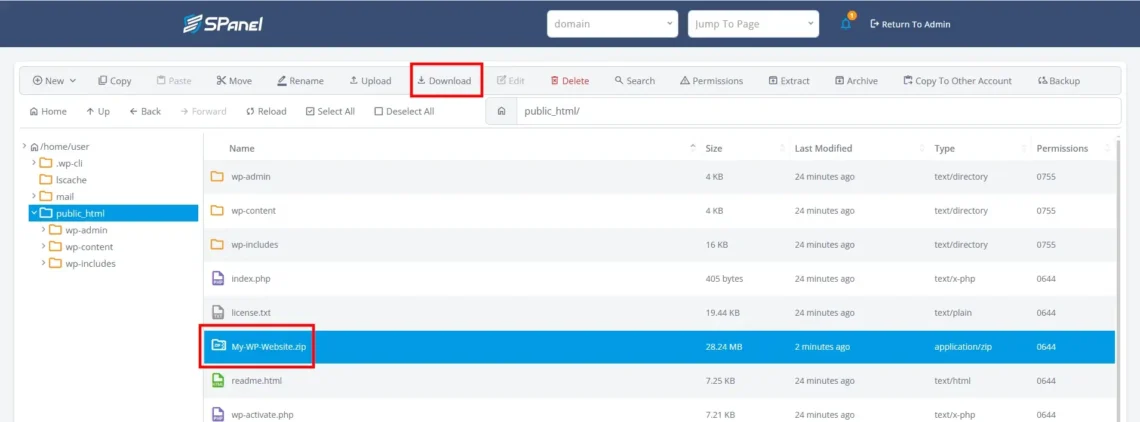
Archive your files and download them.
You need to select all the WordPress files and folders in your document root. Most File Managers have a Select All button to make your life easier. If there isn’t one, you can click on the first item you see on the list, scroll down while holding the Shift key on your keyboard, and click on the last one.
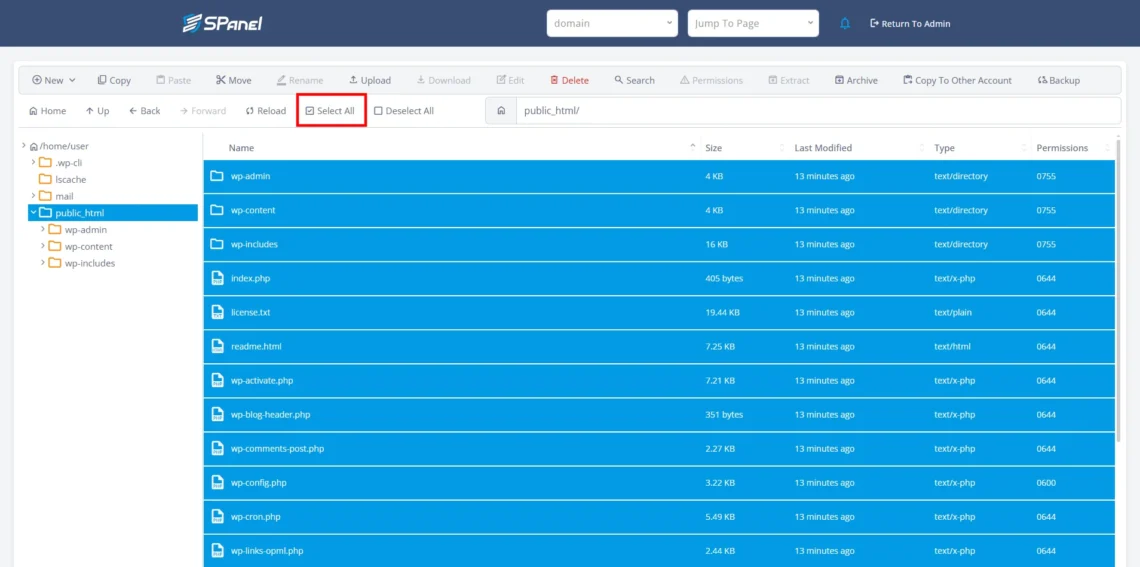
Finally, right-click and select Archive. Your control panel asks for the format and name of the archive before it compresses the data.
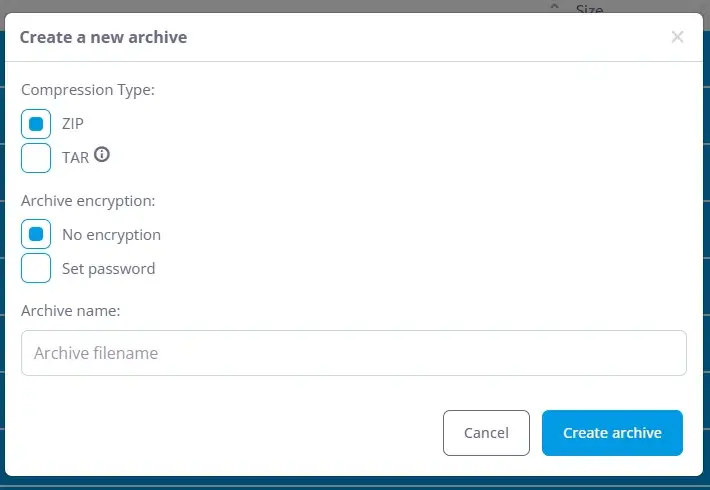
You’ll see the archive file in your document root directory. You can now use the File Manager’s interface to download it to your computer.
- Upload the archive to your new server and extract the data.
It’s time to log in to the control panel on your new hosting account, open the file manager, and go to the public_html folder. You need to upload the archive with your site’s files. Usually, there’s an Upload button, though you can often drag and drop the file from your local directory. Once it’s on the server, all you need to do is right-click on it and select Extract.

With that, your site’s files have been successfully transferred to the new server.
Transferring files using an FTP client.
The steps involved in migrating your site’s files with an FTP client are different, but the principle is essentially the same – you first download them from your old account to your local computer and then upload them to the new server.
Here’s a step-by-step guide:
- Log in to your old hosting account.
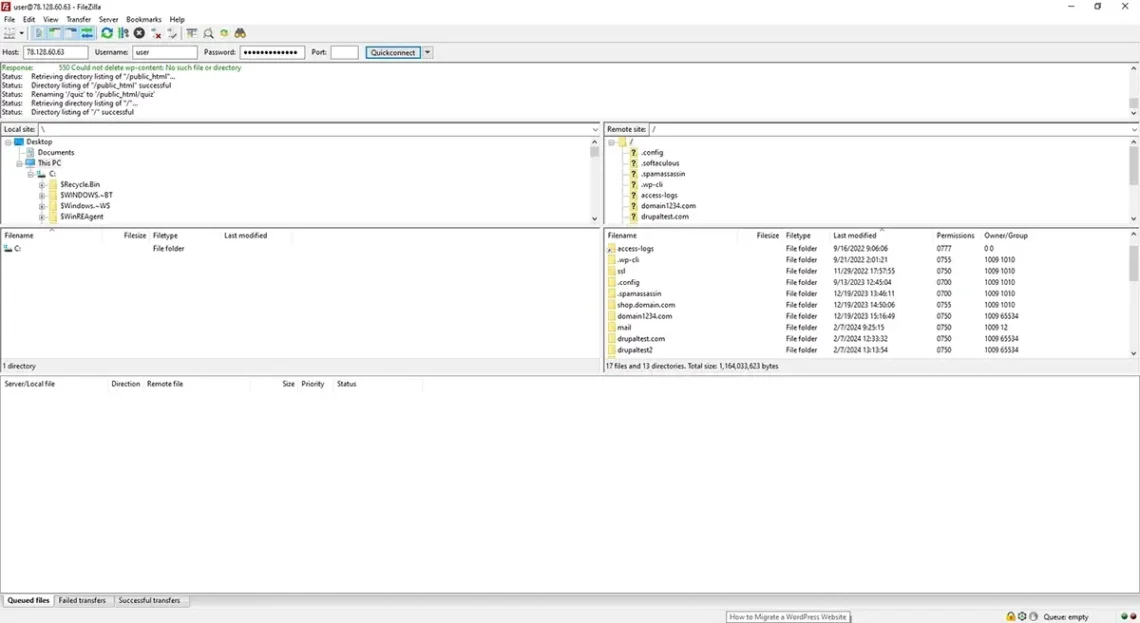
The interface differs from FTP client to FTP client, but in all cases, you need your old account’s hostname, username, password, and port number (if you leave it blank, the client application uses the default FTP port – port 21). Here’s what you see if you use FileZilla – the world’s most popular FTP client.
- Download your files to your computer.
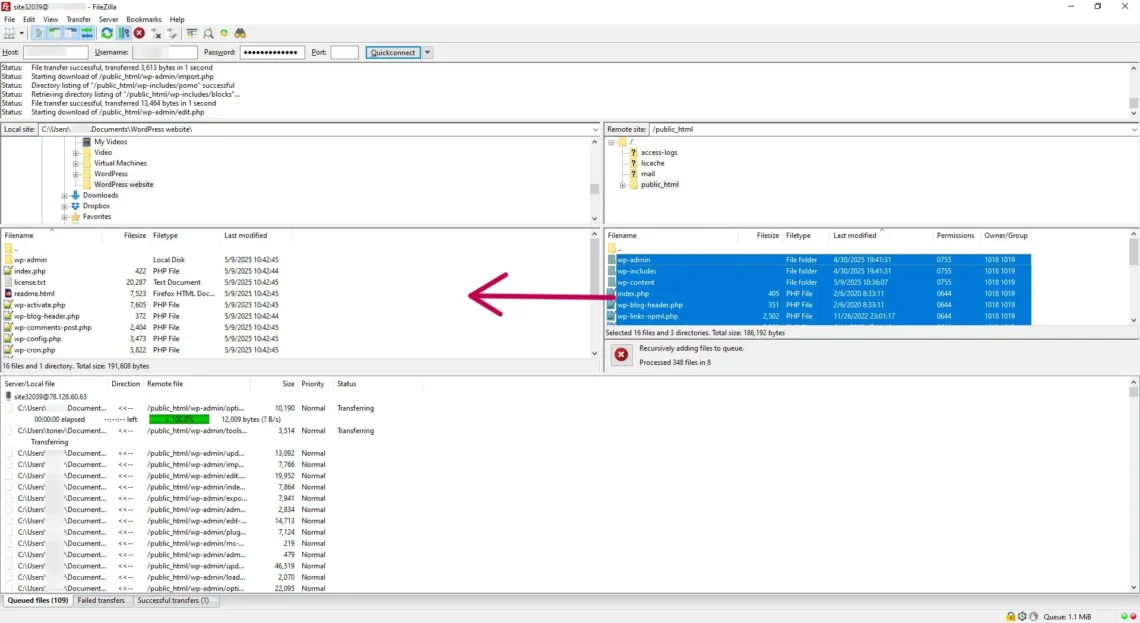
The right section shows the contents of your hosting account, and the left displays the files and folders on your local machine.
On the right, navigate to the public_html folder. On the left, pick a location on your hard drive where you’ll store your files for the migration. Select all the files and folders on the right-hand side (you can click on one item and then press ctrl+a) and drag and drop them to the left-hand one.
- Connect to your new server and upload your files.
Next, we need to upload the data to the new server. Disconnect from the old account and use the hostname and login details you got when you signed up with the new hosting provider.
The left section should display the site’s files stored on your local machine. In the right-hand one, you need to navigate to the public_html folder on your new account. Select all files and folders on the left and drag them to the right.
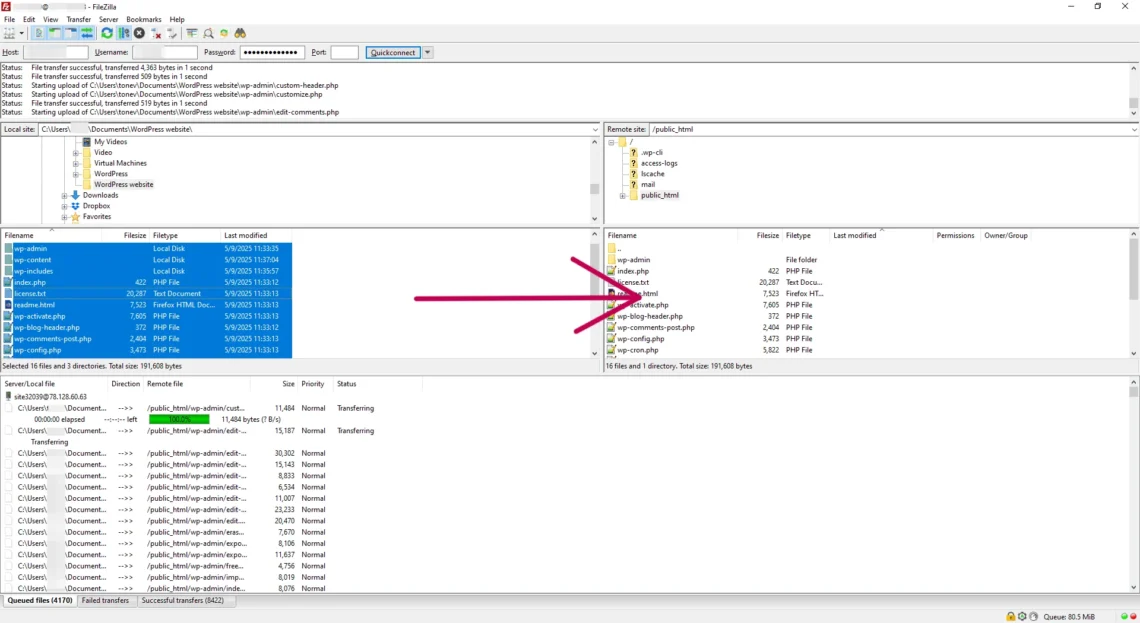
The size of your website and the speed of your internet connection are among the main factors that will decide how long you’ll need to wait for the files to be transferred between your old server, your computer, and your new account. For a clean website with only its default add-ons, the entire process takes less than 10 minutes.
With the files taken care of, it’s time to return to the database and recreate it at your new web host.
Create a New WordPress Database
We have already saved an SQL file from our existing website on our computer, but we cannot just upload it to the new server. We have to recreate the database and import the information into it.
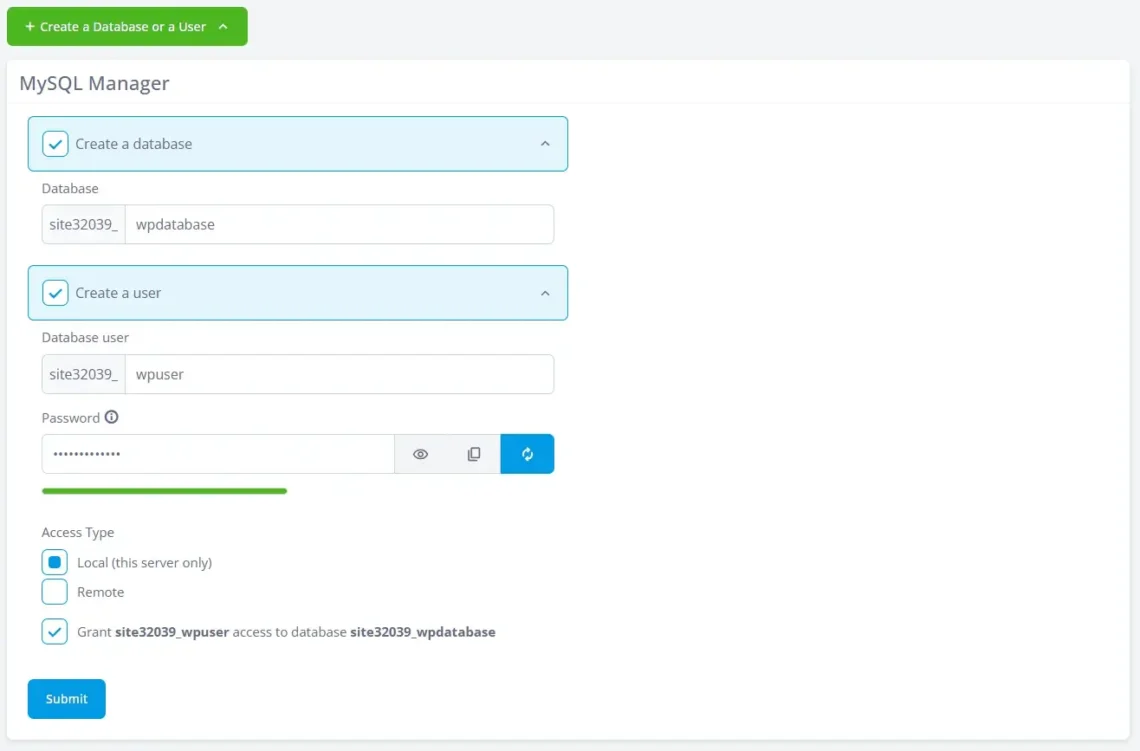
The first job is to set up a new empty database. Modern server management solutions like SPanel have user-friendly utilities for managing MySQL databases. Usually, they’re accessible from the Databases section on the control panel’s homepage.

Inside, you’ll see a list of all existing databases. Because this is a new account, it’s likely empty. Above it, you should be able to see a button to create a new database.
Make sure you select the Create a user checkbox as well. WordPress needs the MySQL user account to access and store information in the new database. From then on, it’s a matter of filling the empty fields. You need:
- Name for the new database
- Username for the user
- Password
Make sure you memorize the login credentials for the new MySQL account, as you’ll need them in a minute. Also, don’t forget to select the Grant access to database checkbox.
Import Your WordPress Database
With most control panels, you’d now need to go to phpMyAdmin, click on the new database from the menu on the left, and go to the Import tab, where you can select the SQL file you downloaded from your old account.
If you use SPanel, the process is significantly more straightforward. Back in the MySQL Databases utility, you have an Actions menu next to each database.

One of the options is Import Data, and the interface you see after clicking on it is pretty self-explanatory.
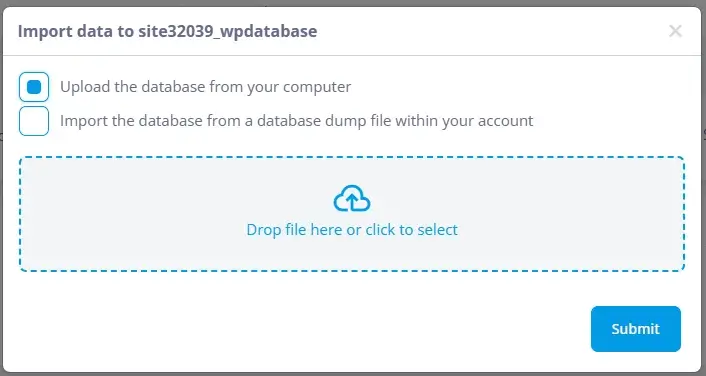
After you select the SQL file from your computer, SPanel will upload it to the server, and when you click Submit, it will start importing the data into the new database. When it’s ready, you’ll see a message at the top of the screen.
The entire import should take no more than a minute or two. After it is done, you can proceed to the next step.
Configuring Your wp-config.php File
Your WordPress files have been successfully migrated to your new server, and a new database with your site information has been created. What you need to do now is configure the WP installation to work with the database.
To do it, you need to edit wp-config.php, WordPress’s main configuration file. It’s located in your site document root folder and contains information about your website’s core settings and instructions on how WP can connect to your new database. Our job is to ensure those instructions are correct for the database we created and imported during the previous step.
There are several ways to edit wp-config.php. More technically savvy users may prefer to use the command line, for example. You could also download the file using FTP, modify it on your computer, and then re-upload it. However, the most convenient option is to edit it straight from your control panel’s file manager.
With most File Managers, if you double-click on the wp-config.php file, you will automatically open the built-in text editor.
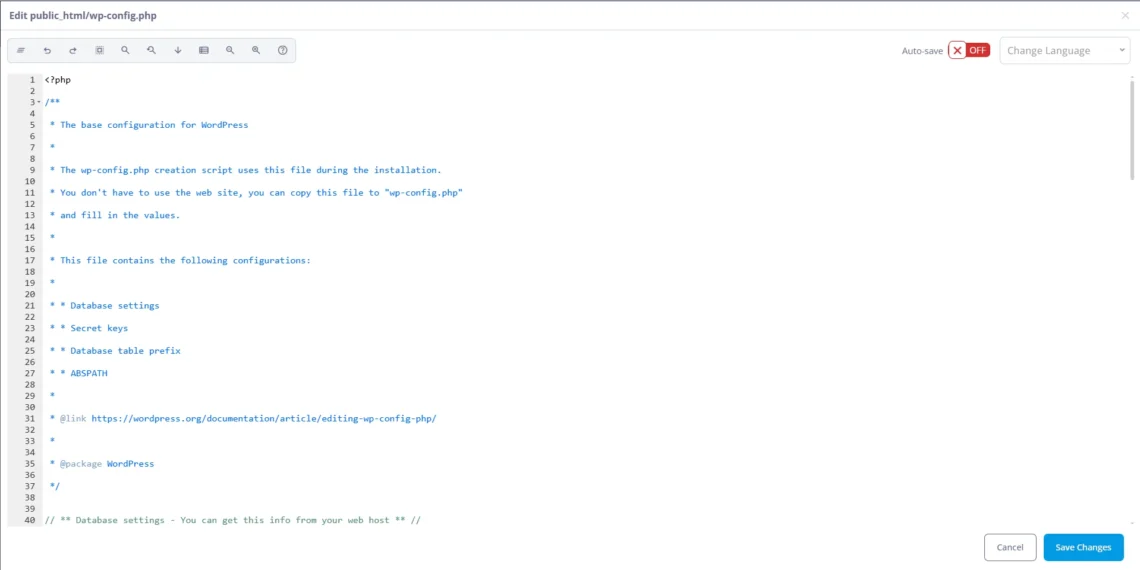
Scroll down to the section that says “// ** Database settings – You can get this info from your web host ** //“. The lines you need to edit look like this:
define( ‘DB_NAME’, ‘[the name of the database on your old server]’ );
define( ‘DB_USER’, ‘[the username of the MySQL user account from your old server]);
define( ‘DB_PASSWORD’, ‘[the password of the old MySQL user account]’ );
You need to replace the old information with the new database name and login credentials.
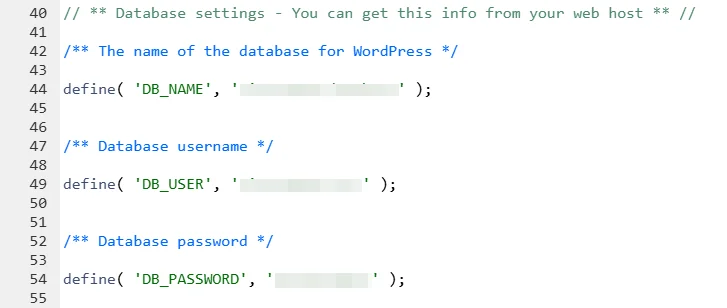
Save the changes when you’re done.
Testing Your Website
It’s time to verify that your website is loading fast on the new server. At this point, your domain should still be pointing to your old hosting account, but you can use your computer’s hosts file to ensure the migration is successful. This way, your WordPress site will remain operational while you iron out any potential issues.
Sounds too complicated?
Here is an excellent guide to help you edit the hosts file.
After you’re done, open your website and be sure to click every button and test every functionality.
If you’ve followed the steps outlined above, you should have no issues. Still, a WordPress website is a complex structure with many components that must be in the right place. If there is a problem with any of them, it’s best to identify the culprit now rather than later when the domain is pointed to the new server.
Once you’re done testing, don’t forget to return your hosts file to its previous state.
Updating DNS Settings
You have already moved your files and database, but the domain still resolves to the old server IP address. To point it to your new hosting service, you likely need to change the nameservers. The correct ones are included in the welcome email you’ve received from your host, and your domain registrar should help you with the procedure.
On rare occasions, you may need to change the domain’s A records instead of the nameservers. Yet again, your host and domain registrar will give you more information on how to proceed.
IMPORTANT: Don’t forget that DNS changes require some time to propagate globally. Usually, that happens within a few hours, but it can sometimes take up to a day. If you want to avoid downtime, keep your old hosting account active after changing your domain’s DNS settings.
While there is no definitive way to ensure the propagation period is over, a few online DNS propagation checkers can give you an idea of when it’s safe to disable the old service.
Updating Permalinks (If You Use a New Domain)
This step is necessary only if you plan to use a new domain with the migrated website. WordPress is a domain-centric application. URLs and file paths are hardcoded into the database, so entries must be updated when switching to a different domain. Otherwise, you’ll end up with broken images and URL paths.
WordPress users can benefit from an ever-growing ecosystem of plugins that allow them to change all kinds of functionalities and add a limitless variety of features to their websites. Updating permalinks is no different, and the WP community offers numerous tools for that purpose.
The more popular choices include:
- Search & Replace Everything by WPCode
- Update URLs by KaizenCoders
- Better Search Replace
- Search & Replace by WP Media
Any of these WordPress add-ons will help you replace your old URLs with new ones. Here, for example, is how you do it with the Search & Replace Everything add-on.
The first step is to install the plugin. Log in to your WP Dashboard, go to Plugins > Add Plugin, and type Search & Replace Everything in the search box in the top-right corner. The add-on you’re looking for looks like this:
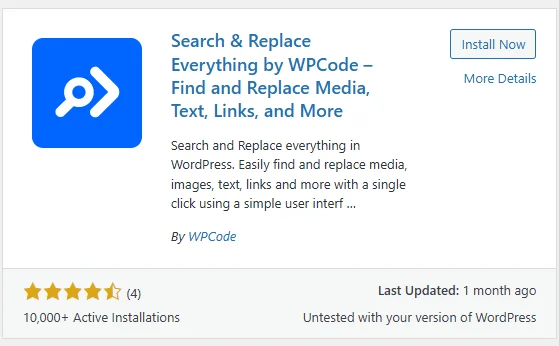
Click the Install Now button and give WordPress a few seconds to download and set up the plugin. When it’s done, click Activate.
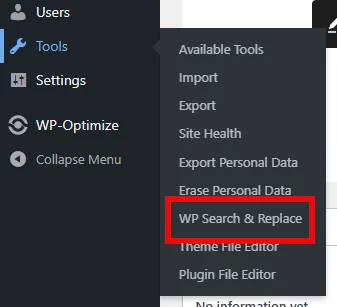
A new sub-menu called WP Search & Replace has now appeared under the Tools section in your WordPress dashboard.
The interface is pretty intuitive. The Search for field is for the old domain, and Replace with is for the new one.
Click Select All under the Available Tables list and hit Preview Search & Replace.
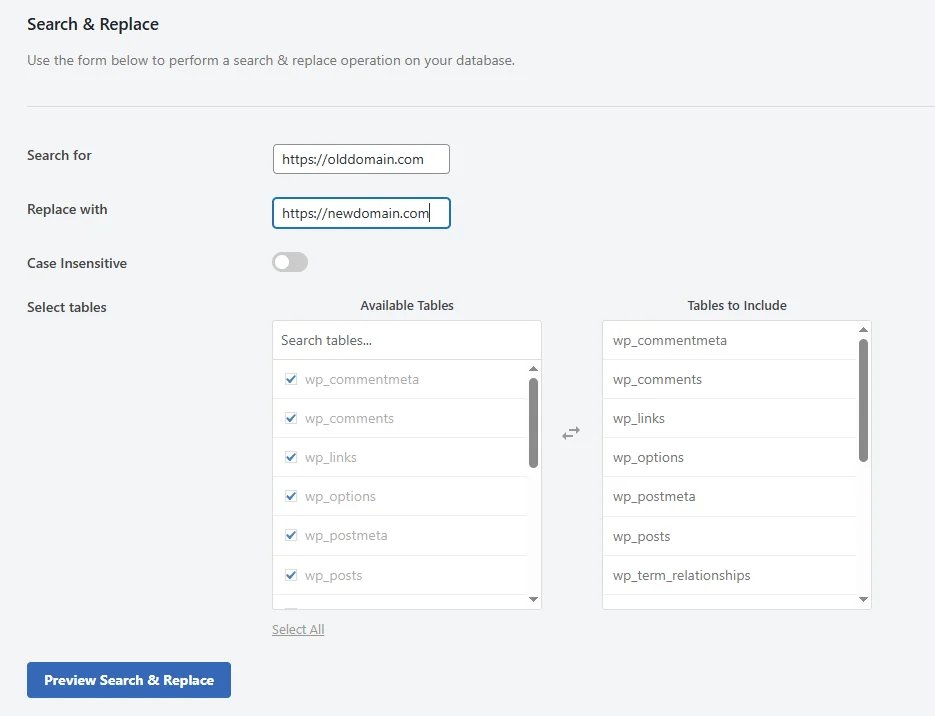
The plugin will scan your database for matches and show you all the changes it will make if you decide to proceed. Go through them, and if you’re happy with the changes, click Replace All.
Using a Migration Plugin to Move to a New WordPress Host
While we’re on the subject of plugins, we should also mention that WordPress add-ons can help you move your entire website. The steps above should show you that manually moving a WordPress website from one provider to another isn’t as much of a hassle as you may have thought.
However, a migration plugin can automate much of the process and save you even more time. Here are one or two potential caveats, but before we get to them, let’s see how it works.
Quite a few WordPress plugins have been developed specifically to help you move your site from one provider to another. Here are some examples:
- All-in-One WP Migration
- Duplicator
- UpdraftPlus
For our guide, we will review the steps to migrate a WordPress project with All-in-One WP Migration.
- Install WordPress on your new server.
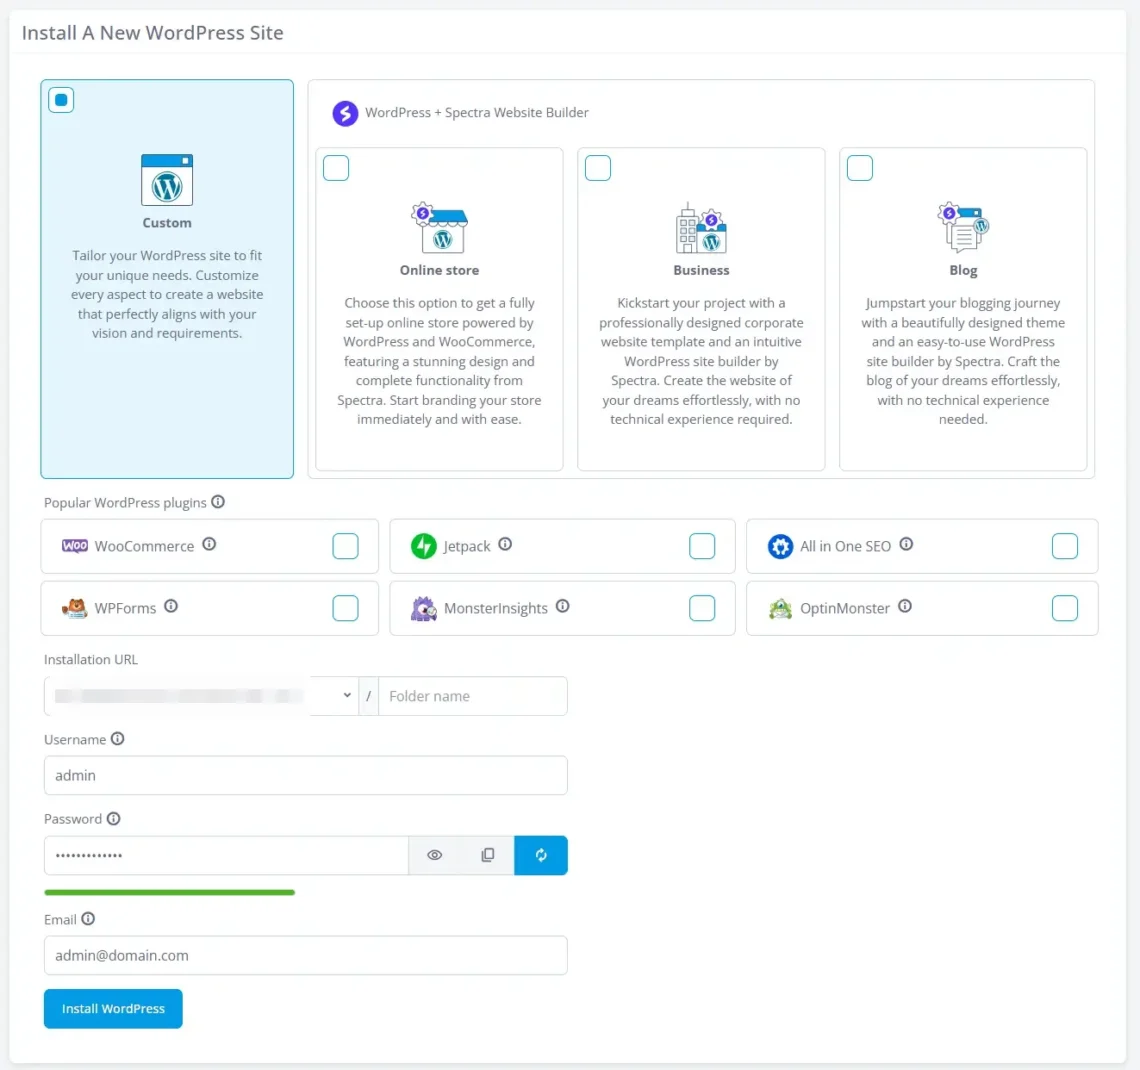
Your first job is to ensure WordPress is set up and ready to go on your new server. Without an active installation, you can’t use a plugin to migrate your site.
Most control panels are equipped with auto-installers like Softaculous. If you use SPanel, however, you have a dedicated WordPress Manager that makes the installation even easier.
- Set up the All-In-One WP Migration plugin on your old and new WordPress installations.
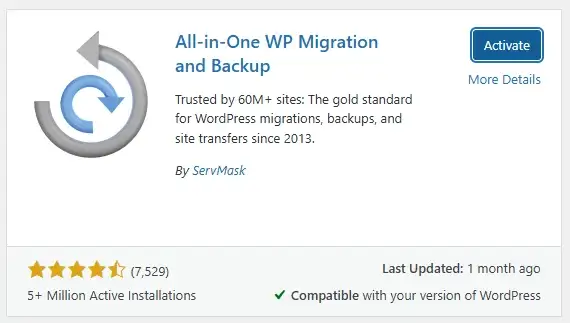
The plugin must be present on both the source and destination websites. The installation procedure is standard: use the search box in the Plugins > Add Plugin to find the All-In-One WP Migration add-on, install it, and click Activate to ensure it’s enabled. Repeat the steps on both WordPress installations.
- Export your site from your old hosting provider.
Log in to the WordPress dashboard at your old hosting provider. Click All-in-One WP Migration > Export. The plugin gives you several options for exporting and storing your site data. Click the first one – File. The All-in-One WP Migration plugin will automatically export the information into a .wpress file. When it’s ready, you’ll see a download button. Save the file on your computer.

- Import the file into the new WordPress installation.
It’s now time to transfer the data to the new hosting provider. Log in to the WordPress dashboard at the new server. Go to All-in-One WP Migration > Import and choose File from the Import From drop-down. Select the .wpress file from your computer. The plugin will warn you that the current settings and data are about to be overwritten. After you click Proceed, you’ll need to wait for the import to complete.

- Make sure your website works as expected.
Because you made changes to the database, the All-in-One WP Migration plugin will log you out of the WordPress dashboard. You can log back in using the credentials for your old website and start checking whether everything is in place. Don’t forget to test all pages and click all buttons.
Overall, migrating a WordPress site with a plugin sounds like a no-brainer. You don’t need to worry about moving files, exporting and importing databases, or using tools you may not be familiar with. However, sometimes, things don’t go according to plan. Here are a few scenarios:
- Incorrect migration of data and settings
Plugin developers work hard to improve their products’ reliability, but despite this, add-ons occasionally fail to successfully replicate the entire WP configuration from the old host to the new one.
The reasons for this could be varied and complicated, but the upshot is always the same – you have to review and re-check the settings of your core, themes, and plugins to ensure everything works. - Exceeded file upload limits
There are differences in how various migration plugins work, but in almost all cases, you have to export a file from your old server and upload it to the new one. The more data you have on your site, the bigger the file, which could cause problems. The maximum PHP upload limit applies because you’re uploading the data through the WordPress dashboard. If you exceed it, the import will be unsuccessful.
There are some workarounds, like transferring it via FTP, but they always involve more work and hassle.
- Excessive load, time-outs, and memory exhaustion
Importing and exporting data increases server load. The bigger your website, the more strain it puts on the hardware, and you could compromise the entire server’s performance. To combat this, hosts often put memory and execution time limits, especially on shared accounts. If you hit them, the entire process comes to a halt.
Some hosting setups give you access to tools that help you lift these limits and complete the migration. However, they’re not necessarily the easiest utilities to work with.
All in all, transferring a WordPress website from one host to another using a plugin sounds great, but a few potential challenges could hamper your progress. Ultimately, the time you saved over a manual migration could be spent trying to overcome the various hurdles. Be sure to bear this in mind when planning your transfer.
Troubleshooting Common Migration Issues
You don’t need much experience or advanced technical skills to move your WordPress website from one hosting provider to another. The architecture of the world’s most popular content management system is simple enough to allow even complete novices to do it, and you usually have plenty of tools that help speed up the process.
However, post-migration issues do pop up occasionally. Fortunately, the most common problems are relatively easy to fix. Here are some of them:
Broken links
One of your first jobs after completing the migration is to check if all links on your site are fully functional. This is integral for ensuring the migration has been successful and is also important because broken links can affect your WordPress SEO performance.
But how do you test all your links?
Some SEO plugins can identify and help you fix broken links, though the functionality is often only included in the premium versions. Dedicated browser extensions can also highlight links that don’t work.
However, your best option is to embed the functionality straight into WordPress. If you go to Plugins > Add Plugin in your WP dashboard and search for Broken Link Checker, you’ll see quite a few plugins that can actively scan your website, identify links that don’t work, produce detailed reports, and even provide quick fixes.
File permission issues
A malfunctioning website post-migration could often be attributed to incorrect file and folder permissions, especially if you see symptoms like the White Screen of Death, 403 forbidden errors, failed theme and plugin installations, etc.
Luckily, changing file and folder permissions is fairly straightforward. Crucially, though, you must know the correct ones.
Unless you have applied some custom rules on your WordPress projects, the values you’re looking for should be:
- 755 for folders – the owner can read, write, and execute them.
- 644 for files – the owner can read and write them, while other users can only read them.
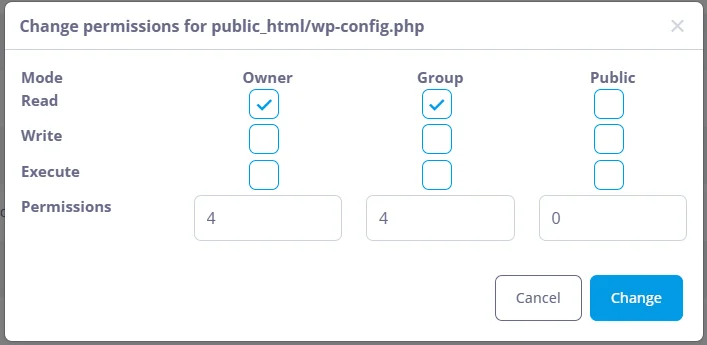
- 400 or 440 for the wp-config.php file – WP’s main configuration file is critical for the operation of your website, which is why experts advise keeping it in a read-only state.
This being WordPress, there are file management plugins that allow you to change file and folder permissions. The thing is, these add-ons don’t work in all hosting environments, and if you’re not careful with them, you could break the functionality of other themes and plugins or even the entire website. Furthermore, failing to uninstall the extension after you’re done is a security risk. All in all, you’re better off doing it via an FTP client.
The steps are pretty simple, especially if you use FileZilla.
Connect to your hosting account and navigate to the public_html folder. Press ctrl+a to select all the files and folders in your document root and click File Permissions.
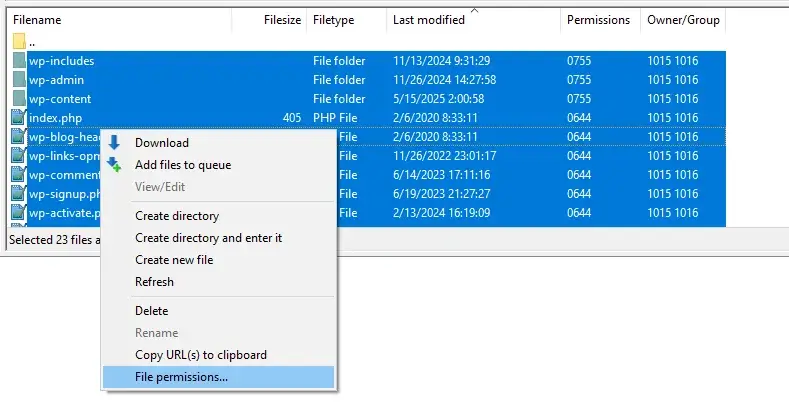
In the Numeric value field, enter 755. Click the Recurse into subdirectories checkbox and then click Apply to directories only.
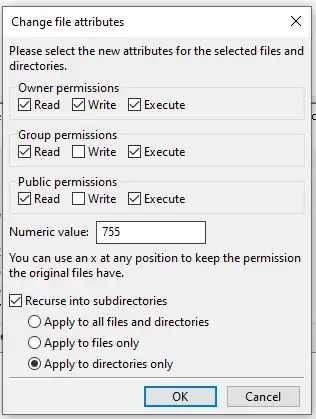
Click OK and wait for FileZilla to make all the changes.
When done, press ctrl+a again to select all the items in your document root. Then, while holding the ctrl key, click on wp-config.php. We’re de-selecting it because we have separate permissions settings for it, which we’ll apply in a minute.
Right-click on one of the other items and click File Permissions. This time, the numeric value is 644, and the options you need to select are Recurse into subdirectories and Apply to files only.
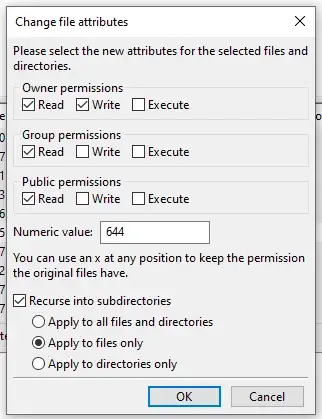
Finally, select the wp-config.php file only, right-click on it, and hit File Permissions. Enter the 400 or 440 numeric value and press OK.
Note that in some cases, the FTP account you’re using may not have the privileges to change the permissions to 400 or 440. If it doesn’t work via your FTP client, you can use your control panel’s File Manager. Yet again, the Permissions option is available in the context menu that appears after you right-click on the file. The interface is about as intuitive as it gets.
Error establishing a database connection
It’s one of the most common error messages users encounter when moving WordPress from one server to another. It can appear for several reasons, but luckily, troubleshooting the problem is reasonably straightforward.
Here’s how to proceed:
- Check whether the MySQL server is up and running.
WordPress can’t communicate with the database if the MySQL service on your hosting server is offline. If you use SPanel, you have an indicator telling you which services are operational in the Admin Interface. If the MySQL server is down, try to restart it, and if that doesn’t work, get in touch with your host’s support specialists, who will investigate further. - See whether the database and MySQL user are successfully created.
Open the MySQL Databases utility in your control panel and check whether the database and user you created are there. If they are, you can try to re-import the data from your old account again.
- Double-check the credentials in the wp-config file.
Often, it’s all down to a simple typo. Open the wp-config.php file with your File Manager’s text editor and double-check whether the database name and user credentials are correct. In our case, the database is hosted on the same server as the website, so DB_HOST should be defined as “localhost.“
- Repair the database.
If nothing prevents WordPress from communicating with the database, most likely, the database itself is corrupted. Fortunately, WP has a built-in mechanism that can repair it. To enable it, open the wp-config.php file and add the following line:
define(‘WP_ALLOW_REPAIR’, true);
Next, go to https://yourdomain.com/wp-admin/maint/repair.php. There are two buttons on the page. The first one simply repairs the database, which should be enough to resolve your issue. With the second one, WordPress also attempts to optimize it and extract a bit more speed from it. The optimization process for smaller databases should last no more than a few seconds. Bigger ones will require more patience.
WordPress will inform you when it’s done and remind you to remove the WP_ALLOW_REPAIR line from the wp-config file.

Final Takes
The complexity of the WordPress website migration process depends on many factors, including the size of your project, the data volume, the number of plugins and themes, etc. However, the principles are always the same and shouldn’t be too difficult to understand.
Furthermore, hosting providers and control panel developers have built numerous tools that make your life much easier. Of course, it’s still a serious task, with several things that could go wrong. Fixing them won’t be too much of an issue, even for an inexperienced website owner, but if you want to save yourself the trouble, you can always move to ScalaHosting and leave all the work to our experts.
Feel free to contact our sales team if you need more information.

Frequently Asked Questions
Q: What are the steps to manually migrate a WordPress site?
A: A manual WordPress migration typically goes through several key steps:
1. Copying files from the old server to the new one
2. Exporting data from the old database
3. Creating a new database and importing the site data
4. Configuring WordPress to work with the new database
5. Testing
6. Updating the domain’s DNS settings
Q: Will my website suffer from downtimes during a migration?
A: If done right, a WordPress website migration should involve no downtime. Keep your old hosting account active and your domain name pointed to it. Perform the site transfer and ensure everything works as expected in the new environment. You can then point your domain to the new server, and only then should you cancel your old hosting account if needed.
Q: How long does a WordPress site migration usually take?
A: The duration of the site migration strongly depends on the size and complexity of the WordPress website. A fairly small and simple project can take less than an hour. The bigger it gets, the more time you should expect it to take. Large enterprise sites with many custom settings can take a good portion of the day.
