If you want to build an online store, your first job is to familiarize yourself with the tools that help you get the project up and running.
You’ll learn that the world’s most popular ecommerce platform is called WooCommerce. You’ll also find that it runs on top of the WordPress content management system.
To a complete novice, this may not make much sense, so let’s try and clear things up a bit.
What Is WooCommerce?
Although many of you may have heard of WordPress, some may not be completely aware of how it works. It’s a content management system that helps you build an entire website through a graphical user interface. So, instead of writing hundreds of lines of code, you can upload content and change how your website looks and behaves via a backend dashboard.
In its default state, WordPress is best suited for creating blogs. However, its popularity has given birth to an enormous repository of plugins, extensions, and themes, making the platform extremely flexible and suitable for a much broader range of projects.
WooCommerce is one such plugin. Its purpose is to enable ecommerce functionality on a standard WordPress website.


Why is WooCommerce So Popular?
According to W3Techs, WordPress powers over 40% of the world’s websites. WooCommerce also tops the charts when it comes to online store platforms, leading by quite a margin ahead of established shopping cart applications like Magento and PrestaShop.
Some may say that the primary driving force behind their popularity is the fact that they’re both free and open-source. This isn’t entirely correct.
Many other website-building platforms are free to use but are nowhere near as popular. That’s because WordPress and WooCommerce have a few distinct advantages over them. Let’s have a look at them:
- Cost
Even if you use an open-source application, you still need a hosting account to launch your online store. With WooCommerce, finding one shouldn’t be a problem.
Both WordPress and its ecommerce plugin are lightweight enough to run on a standard shared hosting plan when the traffic is still relatively low – something other shopping cart applications can’t do. In addition to this, because they are so popular, hosting providers must all configure their services for the best possible WP performance. As a result, there’s healthy competition, hence higher quality and lower prices.
- The broad range of features
Even out of the box, you get plenty of features to create a fully-fledged online store in as few clicks as possible.
You can migrate your products from other services, put them in categories, add descriptions, configure shipping and payment options, etc.
- The modular architecture
We’ve already established that you can use plugins and extensions to adapt WordPress to your requirements. The same can be said about WooCommerce.
The plugin allows for the installation of additional extensions. They can not only improve the store’s looks and user experience but also help you with crucial tasks like arranging shipping, processing payments, and applying local tax laws. In short, they can be invaluable in keeping the entire project afloat.
- Ease of use
Ease of use is usually subjective, but we think we won’t be wrong in saying that, unlike other platforms of this kind, WooCommerce is decidedly novice-friendly.
Even complete newbies will get used to the interface quite quickly. There are setup wizards and tooltips to help you with basic tasks, and all the tools and menus are exactly where you expect them to be.
- The global community
There are millions of users who know WordPress and WooCommerce inside out.
Whatever technical questions you may have, an answer is never more than a couple of clicks away. People are willing to help, and they’ve also created countless guides, tutorials, and courses. If you’re ready to invest enough time, you too can soon become a WooCommerce expert.

Installing WordPress
Installing WordPress consists of three main steps:
- Placing WP’s files into the site’s document root folder.
- Creating a database.
- Configuring WordPress to work with the database.
It’s not the most complicated process in the world, but if you haven’t installed WordPress manually before, you may be intimidated by the prospect. Luckily, you probably have nothing to worry about.
Shared and managed hosting accounts usually come with automatic installers like Softaculous. With them, setting up a WordPress website is as easy as picking the document root directory and choosing the login credentials for the WP dashboard.
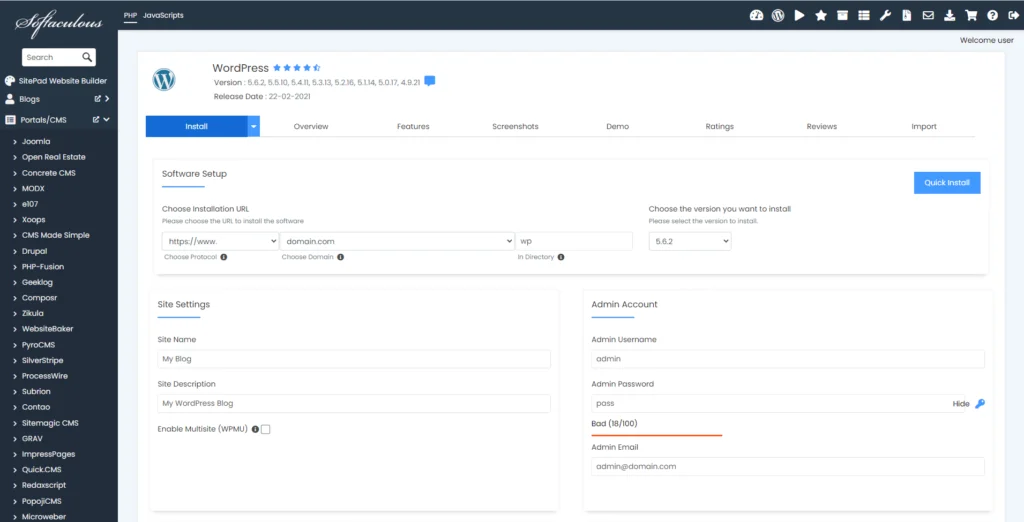
The auto-installer will upload the files to the correct folder, set up the database, and configure everything for you.
After WP has been successfully installed, you’ll be able to log in to the dashboard at https://[yourdomain]/wp-admin.
Installing WooCommerce
If this is a brand new WordPress installation, you can go right ahead and install WooCommerce immediately.
After you log in to WP’s dashboard, go to Plugins > Add New.

Use the search box to find WooCommerce and click Install Now.

The installation will be complete in a few seconds. All you need to do now is activate the plugin.

In other words, you can start work on your brand new WooCommerce online store in no time.
However, if you’re enabling ecommerce functionality on an existing WordPress site, you may want to take things easy at this stage.
Sometimes, installing a new plugin on a live WordPress website causes problems. They are usually rooted in conflicts between the new add-on and an existing one. The consequences could range from broken functionality or barely noticeable errors to service downtime. The good news is, avoiding all this is relatively easy.
Before setting up WooCommerce, it might not be a bad idea to look at the list of currently installed plugins. Experts advise checking them out periodically and removing the ones you no longer use. This could be a great opportunity to do that.
After you’re left only with the add-ons you use, do some research on each of them and check whether they have presented known compatibility issues with WooCommerce. If you find there have been problems, you might want to check out some alternatives.
Ideally, you’d clone the entire WordPress installation and create a staging environment where you can install WooCommerce and ensure everything works as intended before updating the production site.
Going Through WooCommerce’s Setup Wizard
To make things easier, WooCommerce has an initial setup wizard that lets you quickly configure some of your store’s basic options. You can skip it, but if you want to get started quickly, you’re better off following it.
It first asks where your business is located. This information allows WooCommerce to configure the default currency and other localization settings.

On the second page, you need to choose which industry your business operates in. You can select multiple options, and if you choose Other, you can provide a description yourself.

WooCommerce next asks you what type of products you’re going to sell. Out of the box, it lets you sell physical items, software applications, and subscriptions.
Selling memberships, bookings, bundles, or customizable products requires premium extensions that cost between $4 and $21 per month. Billing is annual, and there’s a 30-day money-back guarantee.
Once again, you can select multiple options.

Next, WooCommerce will try to figure out how big your business is. It first asks you for the number of products you want to display and whether or not you’re selling them elsewhere at the moment.

WooCommerce will then ask you whether you want to have some of the most popular WooCommerce extensions installed from the start. The suggested add-ons can help with anything from configuring payment options to popularizing the website on social media. You can check them out individually and decide which ones you need.
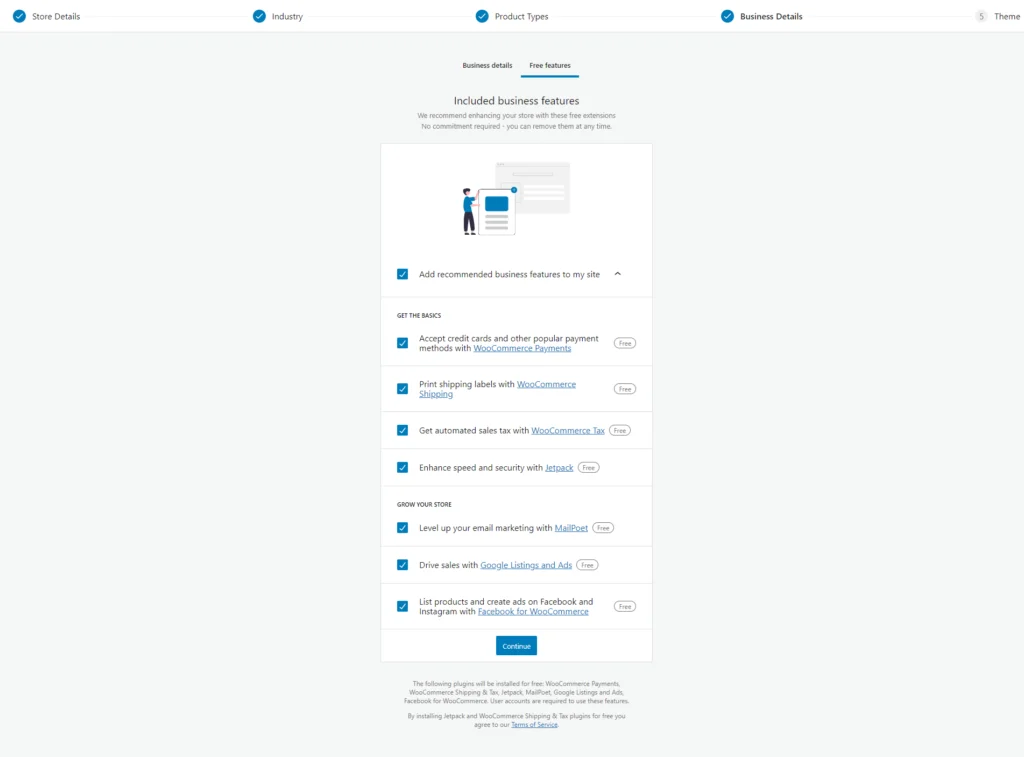
Finally, it’s time to pick your online store’s appearance.
The first option you see is to keep your current theme. Most WordPress templates are compatible with WooCommerce, though it might not be a bad idea to make sure everything looks alright before you make the final changes to the production site.
Alternatively, you can choose a WooCommerce-specific theme. There are many free and premium options both inside the setup wizard and on third-party websites. The theme can be changed at any time.

This is the final step of WooCommerce’s setup wizard.
Adding Payment Options
It’s time to build your online store. Let’s start by configuring the available payment options.
During the setup wizard, WooCommerce asked if you’d like to install several free extensions. Among them is WooCommerce Payments.
In the past, WooCommerce used to support PayPal out of the box, but its developers decided to build their own payment gateway powered by Stripe. It has a few distinct advantages over other solutions of this kind.
As a website owner, you’ll like it because it lets you manage all your finances inside the WordPress dashboard. Thanks to it, you can manage orders, control payments, and issue refunds without logging into third-party websites. The transaction fees seem pretty reasonable, as well.
Users will also appreciate some things. In addition to the most widely used bank cards, WooCommerce Payments supports Google Pay and Apple Pay, giving customers plenty of options. In addition to this, when placing an order, they won’t be redirected to a third-party page, making the entire checkout process much smoother. This should help lower the cart abandonment rate.
If WooCommerce Payments is installed on your website, the Payments section will appear on the main menu inside your WordPress dashboard. Open it and click Finish setup to create an account and configure your site’s checkout page.
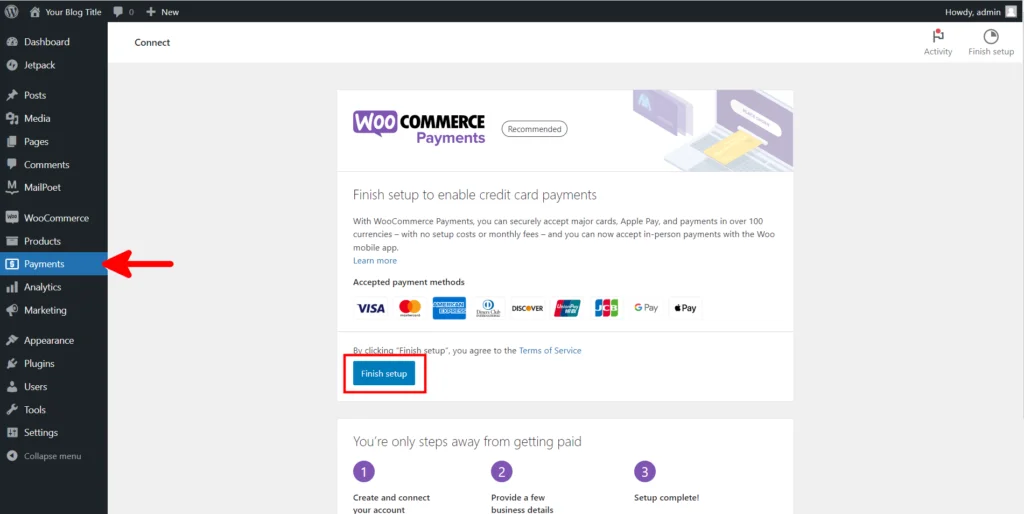
The only downside of WooCommerce’s payment gateway is that it’s not a global solution. In fact, it supports businesses in just 18 countries, meaning many of you will be unable to use it. Luckily, you have plenty of other options.
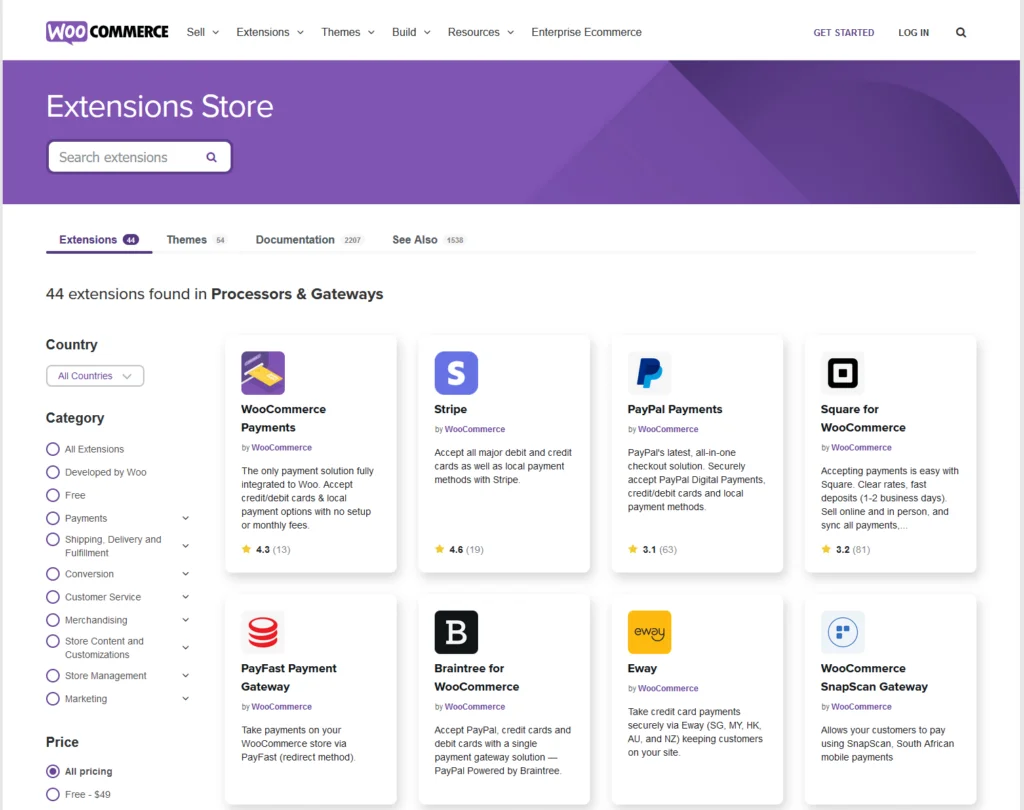
At the time of writing, the Processors & Gateways section of WooCommerce’s Extension Store has 44 add-ons, all integrating different payment service providers into your online store. In addition to global vendors like PayPal, Stripe, and Square, you have many local gateways, so you should have no problems finding the service you’re after at the right price.
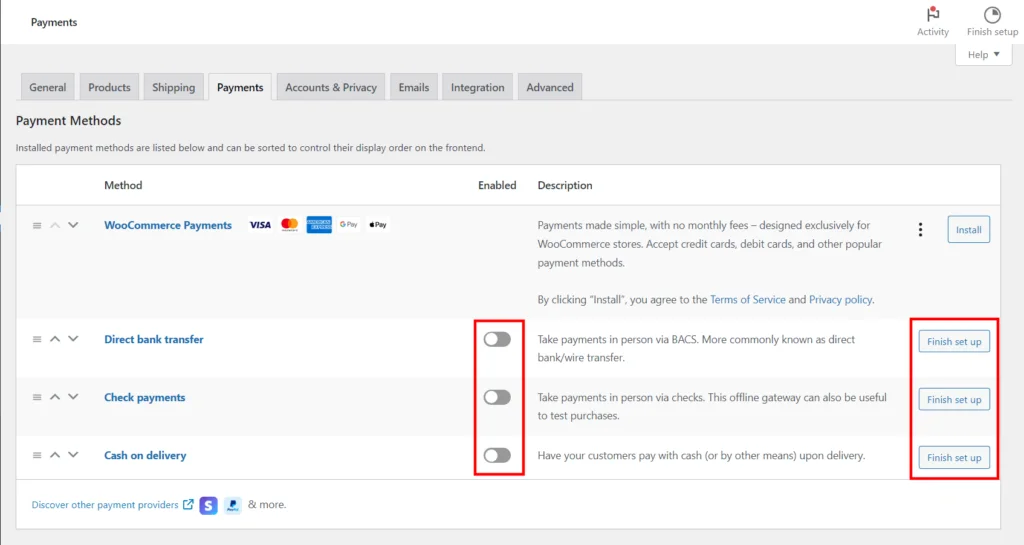
You have a few offline payment options, as well. To configure them, log in to your WordPress dashboard and go to WooCommerce > Settings > Payments. You can allow users to pay via:
- bank transfer
- check
- cash upon delivery.
Use the toggle switch available next to each payment method to enable or disable it, and click the Finish set up button to put clear instructions on what users need to do.
Setting Shipping Options
The next thing on the agenda is to configure your shipping options.
Go to WooCommerce > Settings and set your Selling location(s). The drop-down menu lets you choose between:
- Sell to all countries
- Sell to all countries, except for…
- Sell to specific countries

Further down, you have the Shipping location(s) drop-down menu. The options are:
- Ship to all countries
- Ship to all countries you sell to
- Ship to specific countries only
- Disable shipping & shipping calculations

If shipping is enabled, you’ll see a corresponding tab at the top of the page. Click on it to add your shipping zones and configure your shipping methods.
By default, your region will be added as a shipping zone if you’ve specified the address of your online store. The second default zone is Locations not covered by your other zones. It’s up to you to decide whether you’ll configure any shipping methods for it. If there aren’t any, customers who enter an address outside your existing zones will get a message saying that shipping to their location is not possible.
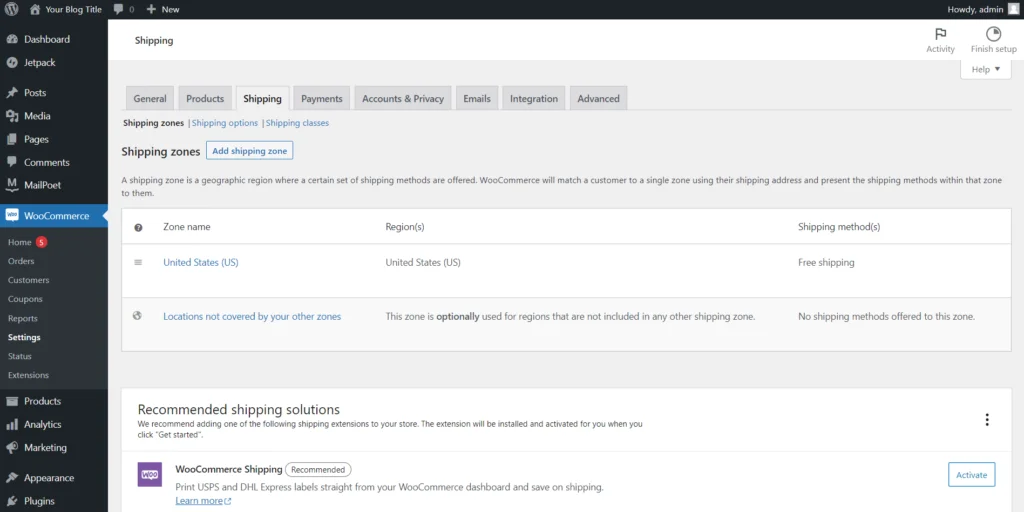
The button for adding new shipping zones is located near the top of the page, and you can modify existing ones by hovering over them and clicking Edit. The interface is pretty easy to understand.
You first need to pick a name for the zone and then associate some regions with it. A region can be a continent, a country, or a state (a local county). The Limit to specific zip/postcodes option can further narrow down the territory associated with the zone.
You can add one postcode per line, enter a range (e.g., 90000…91000), or even use wildcards (e.g., 92***).

Below the zone name and the region, you can manage the shipping methods. You can choose between:
- Flat rate
- Free shipping
- Local pickup
You can add multiple shipping methods to the same zone, and after you set them, you can modify them by hovering the mouse cursor over them and selecting Edit.
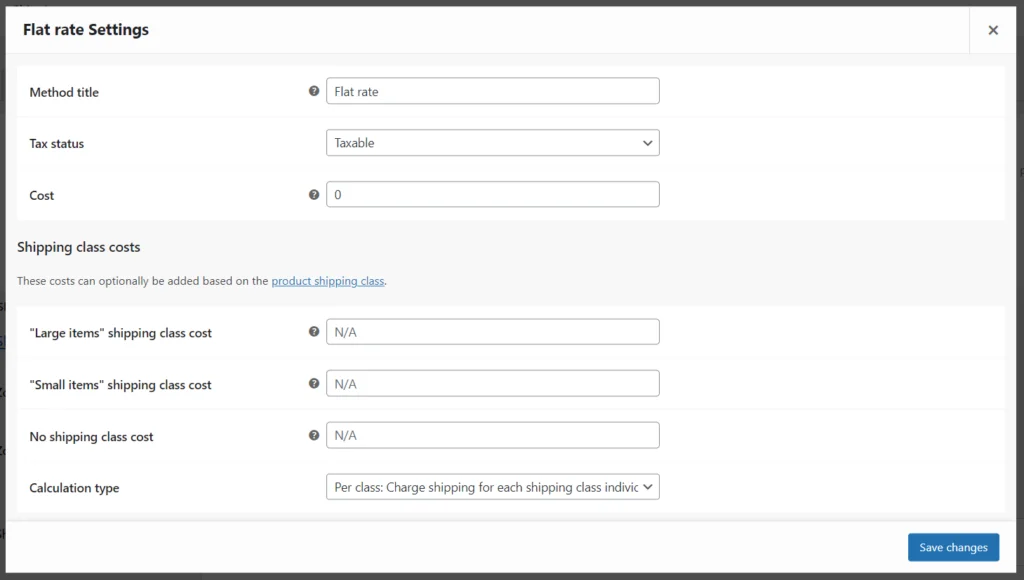
The flat rate settings include the title, the tax status, and the price of the shipping service. You have a few options that are not immediately visible.
Let’s say you want to have a base shipping cost of $5 (or the currency your store uses) and an additional fee of $1 for every item in the shopping cart. You can enter the following line in the cost field:
5 + ( 1 * [qty] )
Your shipping fees can also be a percentage of the item’s cost. For example, you can charge 10% of the order total, but no less than $5 and no more than $50. The line is:
fee percent=”10 min_fee=”5″ max_fee=”50″

The same settings are available on the Local Pickup shipping method.
If you add the Free shipping method, you can require a minimum amount, a coupon, or a combination of the two.

Going back to the WooCommerce > Settings > Shipping tab, you can see a Shipping options section. From there, you can configure WooCommerce’s shipping fee calculator and default shipping address and activate debug mode (not recommended on a production site).
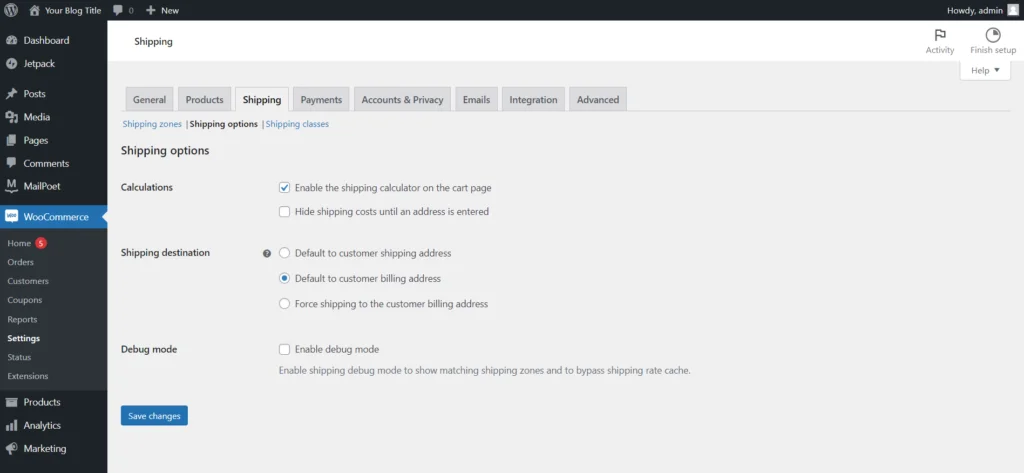
The last section on this tab is labeled Shipping classes. Shipping classes help you categorize your products and assign different shipping fees to them. Let’s say that you sell large and small items. For the large ones, you’ll charge $6 per item, and for the smaller ones, the fee is $4.
To do that, you first need to create two classes from the page you’re currently looking at.

Then, all your products will need to be assigned to the correct class (more on that in a minute). Finally, you can go to your shipping zones, edit the flat rate shipping, and assign different fees for the separate classes.
Adding Products
On your fresh installation, the Add products button is available inside the WooCommerce section of your WordPress dashboard. You can also go to Products > Add New.

You can add your products one by one or upload them all at once via a CSV file. If you have an existing online store, WooCommerce also has a solution for automatically migrating the data from the old platform.

If you add your products one by one, you can either do it with a template or go straight to the editor. The only difference is that with a template, WooCommerce will first ask you whether you’re adding a physical item or a digital download.
Those who have previously worked with WordPress will be instantly familiar with the interface. Those who haven’t will likely get used to it pretty quickly. There are helpful tooltips to speed up the process, as well.
Under the Product name field, you can write a description with the classic WordPress editor. The formatting tools are standard for this sort of utility and are exactly where you expect to find them.
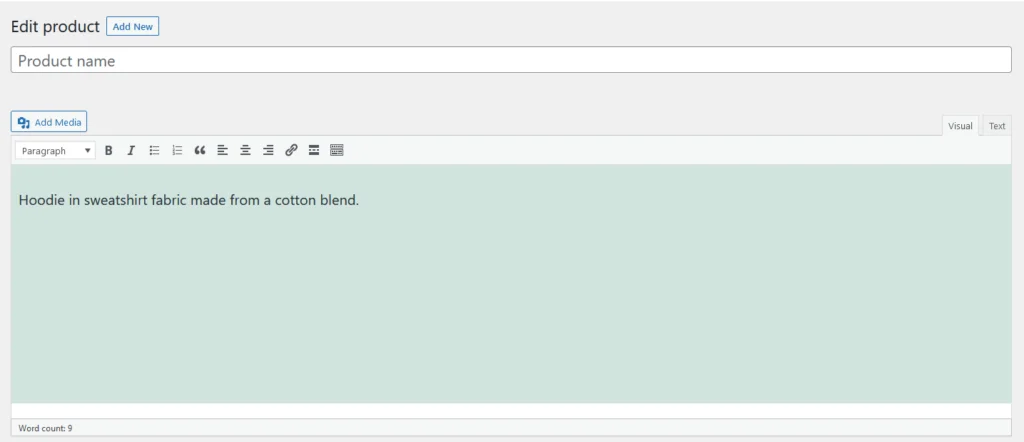
Below the editor, you have menus with plenty of options for categorizing and pricing, adding attributes, setting the shipping class, recording inventory details, etc.

Further down, you’ll find the short description section. This is what users will see before they land on a product page. Once again, you’ll use the classic editor.

From the column on the right, you manage the product’s visibility, the imagery associated with it, the tags, and the categories it falls in. Depending on your plugins, you may have more options here.

Adding Extensions
Now that you’ve added your products and configured the payment and shipping options, you can safely say that you have a fully functioning online store. Users can land on one of your product pages, add whatever they want to the cart, and proceed to finish the order. All you need to do is ensure they will do it.
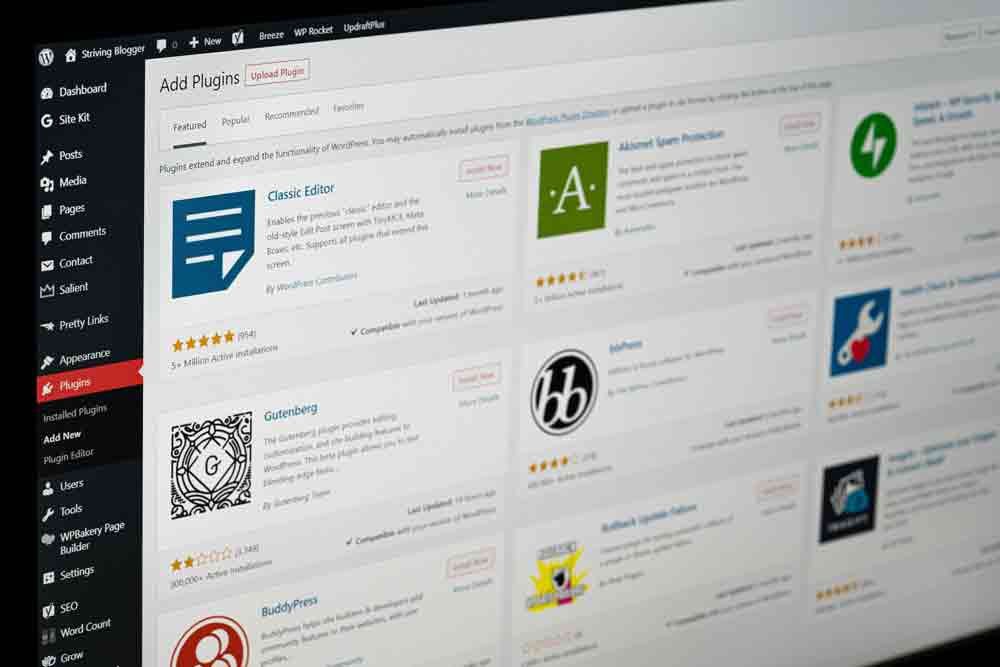
Extensions can help a great deal. The WooCommerce extension store has hundreds of free and paid plugins that can turn a humble online store with barely any features into a bells-and-whistles ecommerce business with an impeccable user experience.
The add-ons have pretty much all bases covered.
Some are designed to improve your site’s frontend. You can implement things like product recommendations, better search and filtering functionality, product add-ons, sleek galleries, etc.
Some can be crucial in building important features and developing the entire business. You can set up booking and subscription platforms, integrate additional shipping providers and payment gateways, set your store’s terms of service and privacy policy, track stats, etc.
Last but not least, you have plenty of extensions that help you popularize your store. You can have anything from seamless social media integration, through detailed analytics data recording, to tools for improving conversion rates.
In addition to all this, you have WordPress plugins that add features and enhance your site’s user experience and performance. WooCommerce is such a massive part of the WP ecosystem that most plugins you’ll find are likely compatible with the platform. Nevertheless, it might not be a bad idea to test all add-ons in a staging environment before launching them on the live website.
WooCommerce and WordPress plugins can help you turn your plans into a reality and play an integral role in the entire project’s development.
That being said, putting too many extensions on your site probably isn’t the best idea. The more add-ons you install, the greater the risk of compatibility and performance issues.
It’s impossible to say how many is too many, but it’s safe to say that you should always avoid installing add-ons you don’t use. Also, any drops in performance should warrant a review of the list of installed extensions.
Conclusion
Choosing WooCommerce over other shopping cart applications makes a great deal of sense. The platform is flexible enough to help you create pretty much any type of store you can think of, and it’s easily capable of supporting your business while it grows.
You should not underestimate the complexity of a new ecommerce project. Still, the good news is that WordPress and WooCommerce can help you get started without any advanced technical or coding skills. There are quite a few things to think about, but the default features and the enormous pool of extensions and resources make every step of the complicated process much simpler.
This includes the initial setup.
FAQ
Q: How do I add WooCommerce to WordPress?
A: You can install WooCommerce just like you would install any other WordPress plugin. It’s available on WP’s official repository, so you can add it straight from the dashboard. Some automatic installers can also set it up for you alongside WordPress from the very start.
Q: How do I add multiple products to WooCommerce?
A: WooCommerce allows you to upload multiple products at once with the help of a CSV file. In addition to this, there is a mechanism for automatically importing products from other ecommerce platforms.
Q: What type of products can I sell with WooCommerce?
A: You can sell pretty much anything you can think of. Out of the box, WooCommerce is capable of listing both physical items and digital downloads, and with the help of extensions, you can set up subscriptions, create a booking system, etc.
