Virtual Private Server (VPS) hosting packages are now much more affordable than they used to be, making them a completely viable alternative to the traditional shared plans. If you’re considering getting a VPS for your upcoming project, you may have already seen there are two types of services – managed and unmanaged VPS hosting solutions.
Our goal today is to find out whether an unmanaged VPS is suitable for a WordPress website.
The short answer is: Yes, it definitely is. Both the managed and the unmanaged (or self-managed) VPS packages support WordPress websites. It’s no surprise as the open-source CMS only needs a combination of PHP and MySQL to run properly.
So, want to learn how to do it? We’ve got you.
Today we’ll discuss how to set up WordPress on an unmanaged VPS hosting plan.
Things to know before you start
A managed VPS is, understandably, a more user-friendly option. You get a control panel where you can manage most aspects of your hosting service, including your files, databases, email accounts, etc.
Most control panels also come with automatic installers for applications like WordPress. Pretty much everything is controlled via a Graphical User Interface (GUI), and your hosting provider is responsible for configuring the server and the software installed by default.
Of course, you also have dedicated support from your hosting provider. Every time you need technical assistance, you can contact an experienced specialist and figure things out.
An unmanaged VPS is a bit different. During the signup process, you usually get to choose which operating system you want to use. Your hosting provider sets up the virtual server with the OS you picked and gives you full access to it. As the term “self-managed” suggests, from then on, you’re pretty much on your own.
It’s up to you to configure the server and install everything, from the database management application to the content management system. You are free to set things up just the way you want them, which is great if you have more specific requirements.
The level of technical expertise you need to have, however, is much higher. If you are confident you can manage an entire server, you can safely pick a self-managed VPS and choose one of several ways of installing WordPress on it.
What should you prepare?
There are several ways to go about the task.
For example, you can decide to set up a control panel first. By doing that, you will be able to easily control your hosting service, just like you would with a managed solution.
cPanel and Plesk are the world’s most popular platforms of this kind, and they both come with automatic WordPress installers integrated into them. Setting up the control panel itself could be a challenge, though, and you will need to pay some licensing fees, which could put pressure on your budget.
ScalaHosting offers an in-house developed alternative called SPanel. It packs many unique features for WordPress like a site lock and automatic updates, but without all the associated fees, like in cPanel.
There are other options, as well. EasyEngine is a command-line tool that installs Nginx, MySQL, PHP, and WordPress, all at once. It’s nowhere near as easy as using an installer, but the process is still relatively straightforward. It’s a free-to-use platform, but if you want to use Apache rather than Nginx, EasyEngine is not very useful. What’s more, it only supports Ubuntu and Debian, and its developers don’t plan on including any other distributions or operating systems.
Manually installing WordPress on an unmanaged VPS
For many of you, manually installing WordPress will be the most painless option. The only thing you need to ensure is that you have a web server, a database management application (MySQL or MariaDB), and PHP installed on your server.
In essence, installing a piece of software on any computer means putting the right files in the right places and configuring them to work with other components on the machine (in the case of WordPress – your website database).
Let’s take a look at the process step-by-step
1. Uploading WordPress files
With some Linux distributions, you may be able to automatically download the WordPress files to your server through the terminal. A universal approach would be to download the archive from https://wordpress.org/download/, extract it on your local machine, and upload the files to the server via FTP or command prompt. Unless you plan to use it in a subfolder or a subdomain, you need to ensure the files and directories are stored in your website’s root folder (public_html).
2. Creating a database
Next, you need to create a database and a database user for WordPress. The steps depend on your setup. If, you decided to pay for a web hosting control panel, creating a database and a user is done via a GUI. In SPanel and cPanel, for example, this is done through the phpMyAdmin section.
If you don’t have this option, you’ll need to log into the database management application through SSH and use the command terminal. Make sure you take note of the name of the database and the database user’s credentials, as we’ll need them in the next step.
3. Configuring WordPress
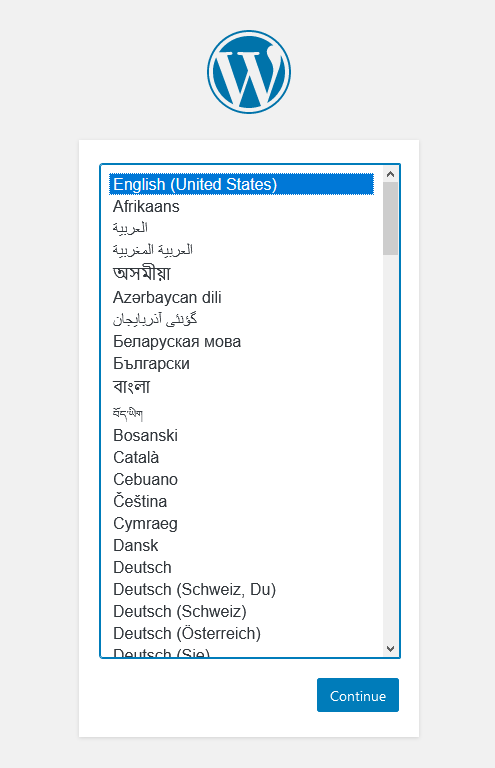
You now need to navigate to your website’s document root using your browser. WordPress will first ask you for the interface language you’d like to use. Bear in mind, that can be changed after the installation is complete.
The next page takes you through details like the database name and the user credentials. It also explains that by editing the wp-config.php file, you can manually configure WordPress to work with the database.
After you click on Let’s Go, you will need to enter the details into their respective fields. To make things easier, there’s information on what you need to enter in each field and where you can get it from.
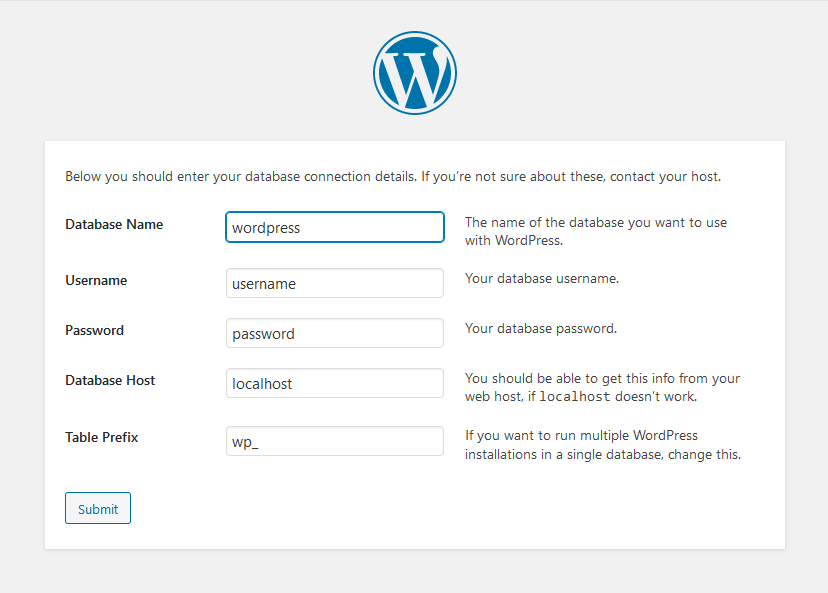
If the credentials you’ve entered are correct, WordPress will tell you it can now communicate with the database and is ready to start the installation.
4. Installing WordPress
On the next step, WordPress will ask you to configure your site title and pick your admin credentials. For your convenience, WordPress automatically generates a strong password for your admin account, though it’s up to you if you will use it or pick your own.
The installation reminds you to double-check the admin email. If you don’t have access to the admin inbox, you could end up losing control over your website, and you certainly don’t want that.
The Discourage Search Engines from Indexing this Site option will edit your robots.txt file and stop search engine bots from crawling your website. It’s a good option to have if you don’t want your site to be indexed while it’s still in development. You can later change this either through the WordPress dashboard or by editing the robots.txt file manually.
Back to the installation, WordPress will automatically enter the data into the database and will confirm the setup is complete. You’ll then be able to log into the WordPress dashboard and start work on your website.
Good job!
Possible glitches and how to avoid them
An automatic installation is certainly easier and quicker, but even a manual setup isn’t exactly riddled with potential problems.
Nevertheless, there might be some glitches that could cause the installation to fail.
For example, if you don’t enter the correct details for the database during the installation process, WordPress won’t be able to connect to it.
Problems also occur because of incorrect file and directory permissions. Checking and resolving them should be fairly easy both with an FTP client and through the terminal.
When you’re uploading WordPress files and folders, you must ensure nothing is left out and the structure inside the archive is maintained. If there are missing files and/or folders, the entire website might fail to load.
Overall, if your pages are not loading correctly, you’re better off starting the installation from scratch.
Common issues after a WordPress installation?
Keep in mind, there are some potential issues even after WordPress is installed on your server.
For one, you should ensure your domain is pointed properly, as your visitors won’t be able to view the website through the URL. If you want to work on the website while the domain is pointing to another server, you’ll need to modify the hosts file on your computer.
Other issues WordPress users experience often include errors related to exceeded memory limits, incorrect file and directory permissions, and a corrupted .htaccess file.
The global WordPress popularity is of great help here. The Web is full of tutorials and online communities that often help with WP-related questions and issues.
Advantages and disadvantages of manually setting up WordPress on an unmanaged VPS hosting plan
Most of the problems that could hamper your progress lie not with the WordPress installation but with setting up the core software and associated database.
With a managed server, everything is ready to go, so installing WordPress takes seconds rather than minutes. There is also the added benefit of having experienced hosting specialists backing you up.
With а self-managed VPS, all that convenience is gone, but you get a lot more control over your server. There is full customization freedom, which is invaluable when you have more specific software and hardware requirements.
Conclusion
There are many different ways to install WordPress, and the prospect of doing it manually might sound a bit intimidating to some users. But worry not, if you pay close attention to the process above, you should have no problems setting the CMS up and enjoying all the advantages of your self-managed VPS.
FAQ
Are there other ways of installing WordPress on an unmanaged VPS?
Linux users have quite a few command-line tools that can complete the setup, some even automate a part of the task. They’re not available on all distributions, though, and only suitable for people who are confident using the terminal. The manual installation remains the most convenient method for installing WordPress on an unmanaged server.
Can I install an older version of WordPress on an unmanaged VPS?
The goal of the self-managed plan is to give you control over what you want and need to install. Technically, there’s nothing stopping you from using an old version of WordPress, PHP, or any other component you might need to keep your website going.
Bear in mind, however, that old versions present a major security risk, and using them, especially after they’ve reached their end-of-support, is not advisable.
Why are self-managed VPS plans cheaper than managed ones?
Every single managed VPS is set up and configured by a team of experts with years of experience in the industry. You get to manage your hosting account through an easy-to-use control panel full of helpful tools and features, like a one-click WordPress installer. Your hosting provider is responsible for keeping the server running in full working order and will assist you if you need any configuration changes.
By contrast, the unmanaged package gives you full responsibility for installing and configuring the software that is supposed to keep your website running. The hosting provider is less involved in the entire process, and because a web hosting control panel isn’t a part of the package, there are no additional licensing fees. As a result, unmanaged virtual servers tend to be cheaper.
Are unmanaged VPS plans suitable for novice users?
With a self-managed plan, you are responsible for creating your own hosting environment. Quite a lot more is needed in terms of technical expertise, so inexperienced users might find themselves struggling very easily.
By contrast, the managed solutions come with an intuitive control panel and easy-to-use tools accessible through a web browser. Therefore, they are much more suitable for people who are just getting started.
ScalaHosting – How to Set Up WordPress on an Unmanaged VPS Hosting Plan

