WordPress has been the world’s most popular content management system (CMS) for years, powering over 800 million websites or about 43% of the internet. Despite the ever-changing online environment and increasingly complex user demands, WP still sits head and shoulders above the competition.
Mind you, this is hardly surprising.
You have an open-source platform that is easy to use, highly reliable, and extremely powerful. In less than two decades, WordPress grew from a run-of-the-mill blogging platform to a full-blown CMS able to build business websites, ecommerce shops, membership sites, and pretty much anything else you can think of.
It’s staggeringly versatile, but this doesn’t necessarily mean building and running a website with it is a walk in the park. There are many things to consider, and the performance must be among your highest priorities. How fast your content loads and how easy it is to navigate through your pages can be the make-or-break factor for your project’s success.
Today, we’ll explore the various optimization techniques you can implement to improve loading speeds and make your WordPress site more enjoyable to interact with.
Why Website Speed Matters for Your WordPress Site
Some of you may remember the early 2000s when the internet was a very different place. A typical web page contained little more than simple HTML and some images. There was no complex CSS or JavaScript, and because websites were mostly static, there were no database queries to process.
This meant that web pages would range between 50 KB and 200 KB in size – nothing compared to the current average of over 2MB. However, because dial-up connections were so slow, we’d still have to wait a long time for the page to load.
Nobody complained. Those were the page speeds back then, and we had no choice but to accept them. Things are different nowadays.
Connection speeds are much faster, and we expect data to appear more quickly on our screens. When it doesn’t, we grow impatient and click away, looking for another website to give us what we need.
We usually use Google to find it. The world’s biggest search engine wants our searches to be as efficient as possible, so when it sees a website taking too long to load, it places it low on its results pages.
So, neither people nor search engines will like your site if it’s slow.
But can we actually quantify these effects?
The Impact of Speed on User Experience and SEO
It’s difficult to devise a formula that estimates in absolute terms how website performance affects your business. This won’t stop some people from trying, though.
According to a recent study, a one-second delay in loading speeds results in 11% fewer page views and 7% fewer conversions. This may not sound like much, but if you’re running a WooCommerce online store generating around $100,000 per day, the annual losses will sit at approximately $2.5 million.
This is far from the only hit. If your site takes more than three seconds to load, about 40% of users would abandon it, and nearly 80% wouldn’t be back for another purchase.
The SEO impact is even harder to quantify, but there are quite a few facts that will tell you enough about how vital page speeds are for your Google rankings.
In 2021, Google introduced the Core Web Vitals – a collection of metrics designed to measure your site speed and responsiveness. They focus specifically on how performance issues affect the user experience and are officially implemented into Google’s ranking algorithm.
If you still don’t think this is a good enough reason to improve your WordPress site speed, consider that the top 10 results on all Google pages typically load in 3 seconds or less.
The focus for any website owner is to create high-quality content that users enjoy. However, as we’ve learned today, WordPress speed optimization could be just as important. Before you start tweaking WP to squeeze more performance from it, though, you need to know where you stand right now.
Check Your Current Speed: Tools and Benchmarks
Although speed is a major user experience factor, you can’t rely solely on your perception as a visitor when assessing your site’s page load time. You need an unbiased automated tool that analyzes numerous aspects of your site’s operations and gives you a detailed report.
You’ll be glad to find that dozens of platforms promise just that. They’re online, so they’re never more than a couple of clicks away, most of them are free, and they can usually generate a pretty thorough report on what’s going on.
But should you trust them blindly? And which are the best ones?
Top Tools to Measure WordPress Site Speed
There are quite a lot of tools out there you can use to measure the speed of your website.
In the following lines, we will cover the most popular ones you can use.
PageSpeed Insights

If you want to know what Google thinks of your WordPress website performance, go to PageSpeed Insights. The speed test was devised by the search engine company and is completely free to use.
Some might say that other tools of this type provide more detailed reports, but PageSpeed Insights’s focus on Google’s Core Web Vitals metrics means that it could prove invaluable in helping rank higher with search engines.
In addition to the Core Web Vitals analysis, you get a few actionable tips on improving your site’s performance. They’re not necessarily written in the most accessible language, but there’s nothing too complicated about them, either.
Pingdom
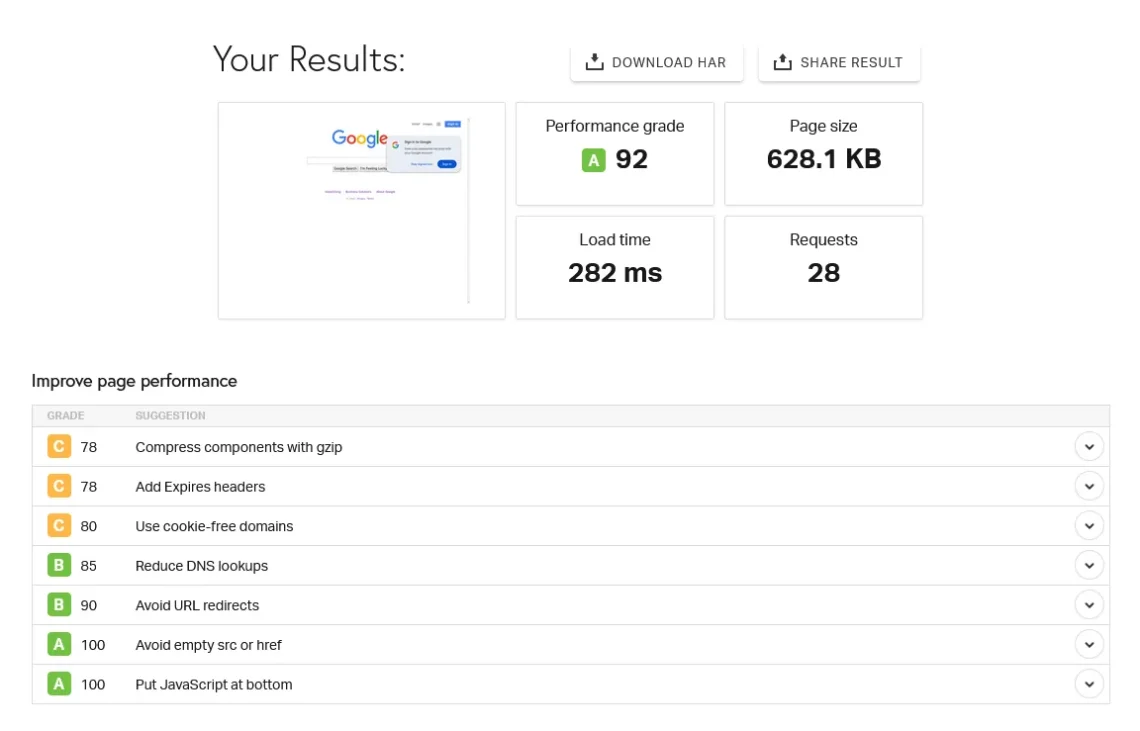
The reports Pingdom produces are highly detailed and contain everything from the size of the entire page to a comprehensive breakdown of how individual elements were loaded.
Among Pingdom’s perks is the ability to perform tests from numerous locations, letting you compare how your website does in all corners of the world. This allows you to focus on the geographical regions where speed is lagging.
There are plenty of tips for improving performance as well, though some users complain that following them could be tricky if one has limited technical expertise.
GTmetrix
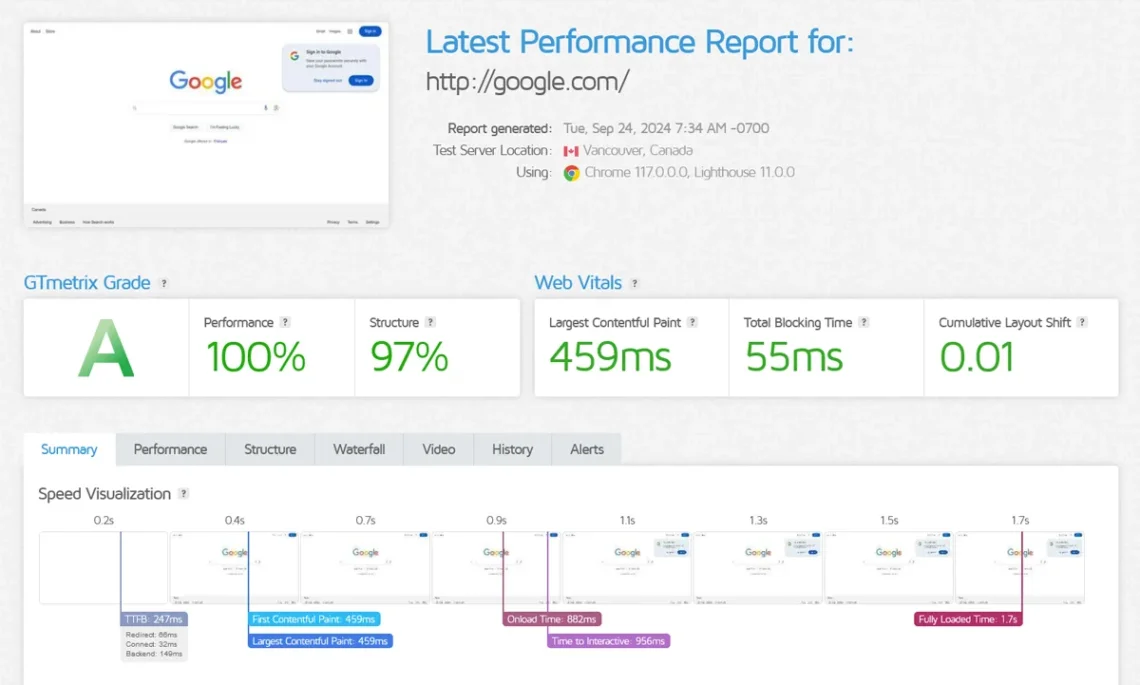
GTmetrix is another comprehensive online test that can be incredibly valuable when assessing your page load speed.
You can use the online tool without registering an account, but that would only give you a grade and some basic performance stats. A free account grants access to a much more thorough report, and if you upgrade to a premium plan, you can use some cool features like the ability to automatically monitor your web page speeds daily.
Like with similar speed tests, GTmetrix lists all the issues it finds on your site, but this time, you have a Learn how to improve this button next to each one. Users with limited website-building experience can rely on a huge knowledge base, which will help them remove potential bottlenecks.
Uptrends Speed Test
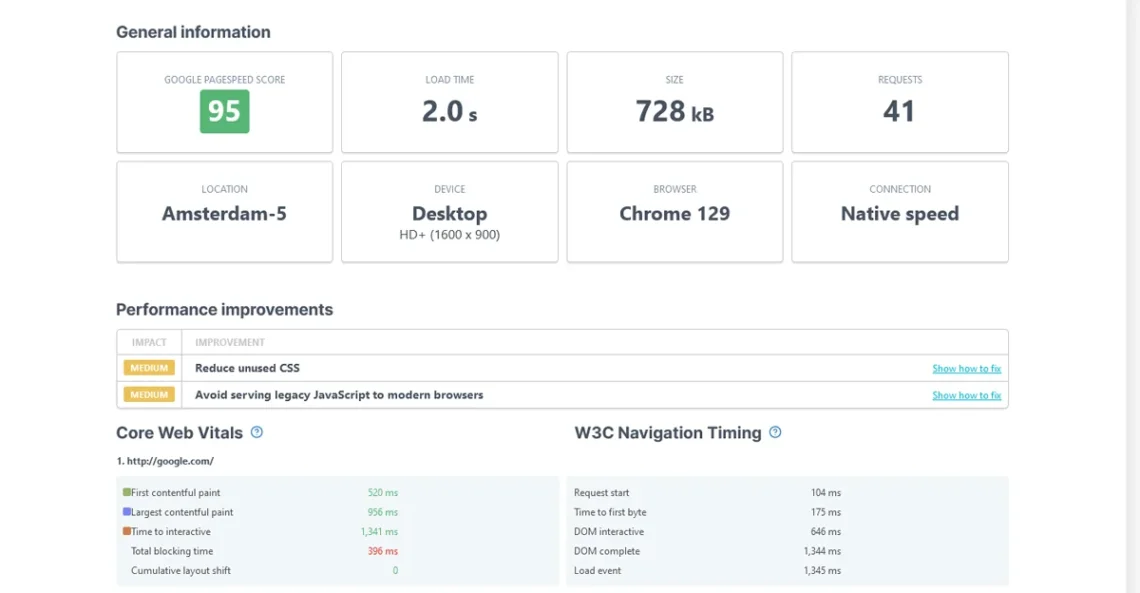
Uptrends’s speed test is similar to GTmetrix in that it offers a paid plan with performance monitoring options and useful information on how to eliminate detected issues.
Google’s Core Web Vitals take central stage in the report, making the tool excellent for improving search engine rankings. You can run tests with different user agents and resolutions from multiple locations, meaning Uptreds’s test is a rather comprehensive solution.
Understanding and Interpreting Speed Test Results
All speed tests grant you performance scores or grades designed to give you an overall idea of how well or poorly your site is doing.
Sounds good in theory, but you can’t rely on them alone. For one, they can vary wildly from one solution to another. For example, you may get an “A” grade from GTmetrix, while Pingdom could assess your site as a “C.”
And even if your grades are good across the board, there probably is still a lot you can optimize to squeeze more website performance. There are several metrics you should pay attention to, each with an ideal range you need to aim for. Let’s go through them below.
Load time
The load time indicates how long it takes for your site to be rendered fully on the user’s screen. Obviously, the quicker the load time, the better.
Ideally, you want your WordPress site to be fully loaded within less than 3 seconds of the user hitting Enter.
Time to First Byte (TTFB)
Other metrics critical for your site’s user experience and SEO have been getting a lot of publicity lately, which means that TTFB is often overlooked. However, it’s as crucial as ever.
Time To First Byte measures the socket connection – the time required for the first HTTP request to be sent and for the first byte of the page to be received by the user’s device. The lower it is, the more responsive the web server, so it’s not something you want to ignore. Ideally, you want your TTFB to be less than 200 milliseconds.
Core Web Vitals
The prominence of Google’s Core Web Vitals in performance reports is hardly surprising, given that they’re a critical ranking factor as well as an excellent indicator of the quality of user experience.
Three main metrics are included in this category:
- Largest Contentful Paint (LCP) measures how long it takes for the main content to load. This could be an image, a video, or a block of text, and it’s an indicator of how efficiently your website works. An ideal LCP is less than 2 seconds.
- Cumulative Layout Shift (CLS) is a visual stability metric that measures whether or not the page’s layout changes as it loads. You’ve probably seen the frustrating effects of this when you try to click a button only for it to move up, down, or to the side as another element has finished loading. Ideally, you should aim for a CLS score of less than 0.1.
- Interaction to Next Paint (INP) is a new addition to Google’s Core Web Vitals. It replaces First Input Delay (FID), and because it was only recently documented and recognized as an official metric, it’s still not available on all speed tests. Both INP and FID aim to assess page responsiveness by measuring the delay between a user input and a visual indication that something is happening.
This could involve putting a product in the shopping cart, submitting a message through the contact form, or simply opening a drop-down menu. The difference between INP and FID is that while FID focuses only on the first user interaction, INP monitors inputs throughout the page lifecycle. A good, responsive website should display an INP of less than 200 milliseconds.
Page Size
The page size includes all the HTML, CSS, and JavaScript code, as well as the media files that need to be transferred to your device to be displayed.
The smaller the size, the faster it loads, and ideally, you should aim for a page size of less than 2 MB.
Number of Requests
When you try to visit a web page, your browser fires off multiple HTTP requests to obtain all the files it needs to render the site on the screen. A modern website consists of many scripts, images, and other design elements, as well as a few external scripts and other assets fetched from third-party servers. You can implement a few techniques that keep it interactive while minimizing the number of requests. Your goal is to have a fully loaded page with fewer than 50 requests.
The metrics above are available on pretty much all speed tests, and knowing what they mean will help you identify and fix potential performance issues. However, to make the most of these tools, you must run your site through them regularly. The monitoring options offered by some services are worth considering if you have the budget, as they can enable you to identify issues before visitors even notice them.
Remember to review and take advantage of all the features speed tests offer. For example, if you have multiple test locations, see how your site loads in different parts of the globe and focus on improving the performance for the regions where your audience is concentrated.
Now that you know how to check your website’s speed, it’s time to learn how to improve it.
How to Speed Up a WordPress Website?
You’d think that speeding up your website would require advanced technical knowledge and coding experience. That is not strictly true with WordPress. You don’t need to rummage through hundreds of lines of code, write scripts, or spend hours in the Terminal to significantly improve your site performance.
This isn’t to say it’s a walk in the park. Multiple factors determine your WordPress website’s speed, and you must be thorough if you want to make a real difference. To help you, we put together a comprehensive checklist of the things you’ll want to look into.
Let’s get to it.
Choose High-Performance WordPress Hosting
Your hosting account provides the hardware resources that keep your site alive. How these hardware resources are delivered is critical for the performance.
This, coupled with the incredible diversity of providers and services, means that you will surely have some questions when choosing the correct setup.
Shared hosting plans offer the cheapest possible solution. They start at as little as a couple of dollars per month and can support a basic WordPress website, so they are the go-to solution for people who want to start a new project on a tight budget.
However, affordability comes with a few limitations. Numerous websites occupy the same server and share the same resources. The load fluctuates depending on the traffic individual projects generate, so the performance is never as consistent as you would have hoped.
Furthermore, hosts can’t allow one website on the shared server to gain too much traction without compromising the loading speed of its neighbors. As soon as your WordPress project starts to attract a more significant number of hits, you will need to move it to a more powerful solution.
A more powerful solution you can consider is the managed WordPress hosting service that can provide you with enough resources to host your WordPress websites.
Clever virtualization technology means you have guaranteed server resources and a completely isolated environment. It also gives you unparalleled scalability, especially when the service is deployed on properly configured cloud infrastructure.
Opting for a managed service will save you a lot of time setting up the server, configuring the operating system, and installing the software responsible for keeping your site online.
If your website is still in the early stages of development and the budget is tight, you can get the ball rolling on a shared plan. However, to save yourself a few headaches, pick a hosting provider that will give you the upgrade options when you inevitably need them.


Use a Lightweight Theme Optimized for Speed
Once you’ve found the right hosting company and platform, it’s time to think about the design of your website. The official WordPress directory has over 12 thousand free themes, and third-party websites offer countless more.
Many of them let you build a professional-looking design with a few clicks, but while the sleek visuals can be tempting, you shouldn’t underestimate the potential impact your theme might have on your site performance.
But how can you tell which theme has been performance-optimized?
The first and most essential step in determining whether a theme suits your project is to examine its origins. When checking the designs on the official WP repository, you can always look at the developer’s other themes and their reviews. If they’re used to writing templates that cause performance issues, this is bound to crop up.
If you decide to get a design from third-party websites, use only trusted sources like ThemeForest, Envato, and TemplateMonster. By relying on websites with a reputation for selling quality products, you can expect certain standards to be kept, which should help with both speed and security.
Remember to look for regular updates and support. If the authors are committed to keeping the theme active, they’ll roll out security patches and performance tweaks and ensure any issues are quickly ironed out.
The next aspect you want to examine is the theme size. There is no minimum threshold you can aim for. WordPress themes are just too different, so the volume of data they contain varies wildly. Nevertheless, when you compare two or more designs with a similar layout, it pays to check out how they’ll affect your WordPress site bandwidth.
The features and functionality of a theme are also worth considering. Some designs offer fully-fledged page builders with an interface as close as possible to a drag-and-drop. These may be extremely easy to use, but they’re also highly bloated, and the performance penalty is not necessarily worth it. Sometimes, a lighter theme with fewer customization options is the better choice.
The use of third-party scripts and fonts could also hamper your performance. The overall number of external HTTP requests increases, and because they are served by other providers, you have no control over the delivery.
Of course, these are just some ways a theme can affect your site loading speeds. Plus, there are many more variables involved.
For example, a complex, feature-rich theme with a page builder could still perform well if it’s deployed on a powerful server. At the same time, even the cleanest, most optimized design may struggle if installed on a WordPress site with too many plugins.
The only real way to determine how a theme affects your site is to test it. But how do you do that?
How to Test Theme Performance Before Installation
It’s easy to evaluate the impact of your WordPress theme after you start using it on your live website. You can just run one of the speed tests mentioned in the previous section.
The problem is that if the new theme slows down your site significantly, you’ll probably want to revert to the previous design. Then, you may try a different one only to find out that it’s not doing great, either, so you’ll return to the original again.
To regular users, these changes will look somewhat weird.
Ideally, you’d want to see how your chosen theme looks and performs on your website before you roll it out to the public. For that, you need a staging environment.
A staging environment is a copy of your site reserved for testing. It replicates your production site down to the last minor detail, so you can see exactly how various changes you’re considering would affect it.
Theoretically, you can deploy your staging environment on localhost. Still, because you can’t precisely simulate the performance of your web hosting server, it won’t give you a clear idea of how any new additions to your site affect its speed.
Ideally, you’d want to run your staging environment as a subdomain on the same server as the production site. Since you are working with WordPress, you can use a staging plugin to save yourself the headache of cloning the entire site and ensuring its environment is replicated perfectly. However, with SPanel, your job is even easier.
One of the key features of ScalaHosting’s web hosting control panel is the WordPress Manager – an advanced utility that helps you deploy and manage WP installations on your hosting account. It has many features, but among its most convenient ones is the ability to create a staging environment with as little as a couple of clicks.
Go to WordPress Manager from SPanel User Interface and locate the WP installation for your production website. Open the Actions drop-down menu, select Stage, and specify the URL of your staging site.
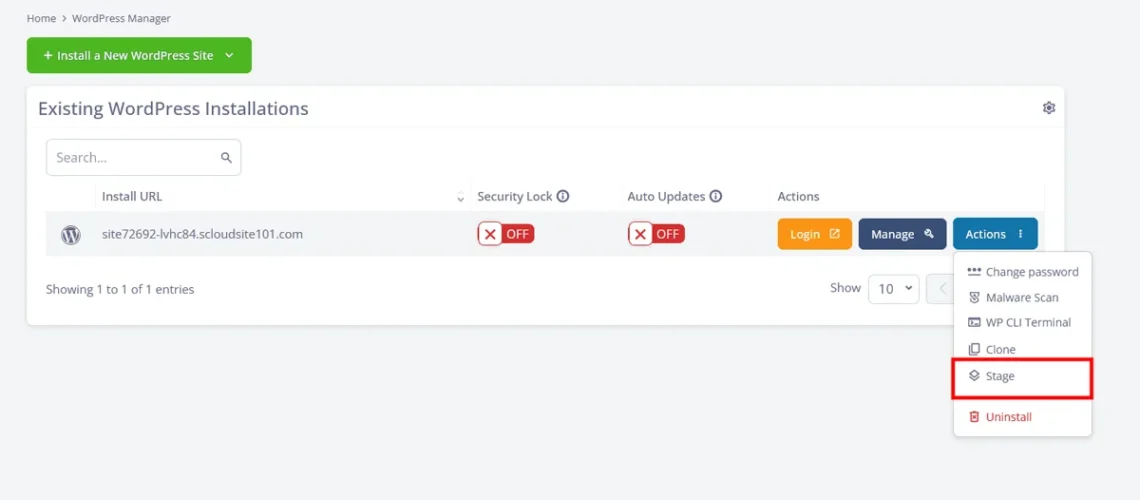
Your staging installation should be ready to go in no time. You can log in to its back end straight from the WordPress Manager interface and install the theme you want to test.
If your staging site is publicly accessible, you can use one of the online speed tests to see how the new theme has affected it. If it’s password-protected, Google Chrome’s DevTools can help.
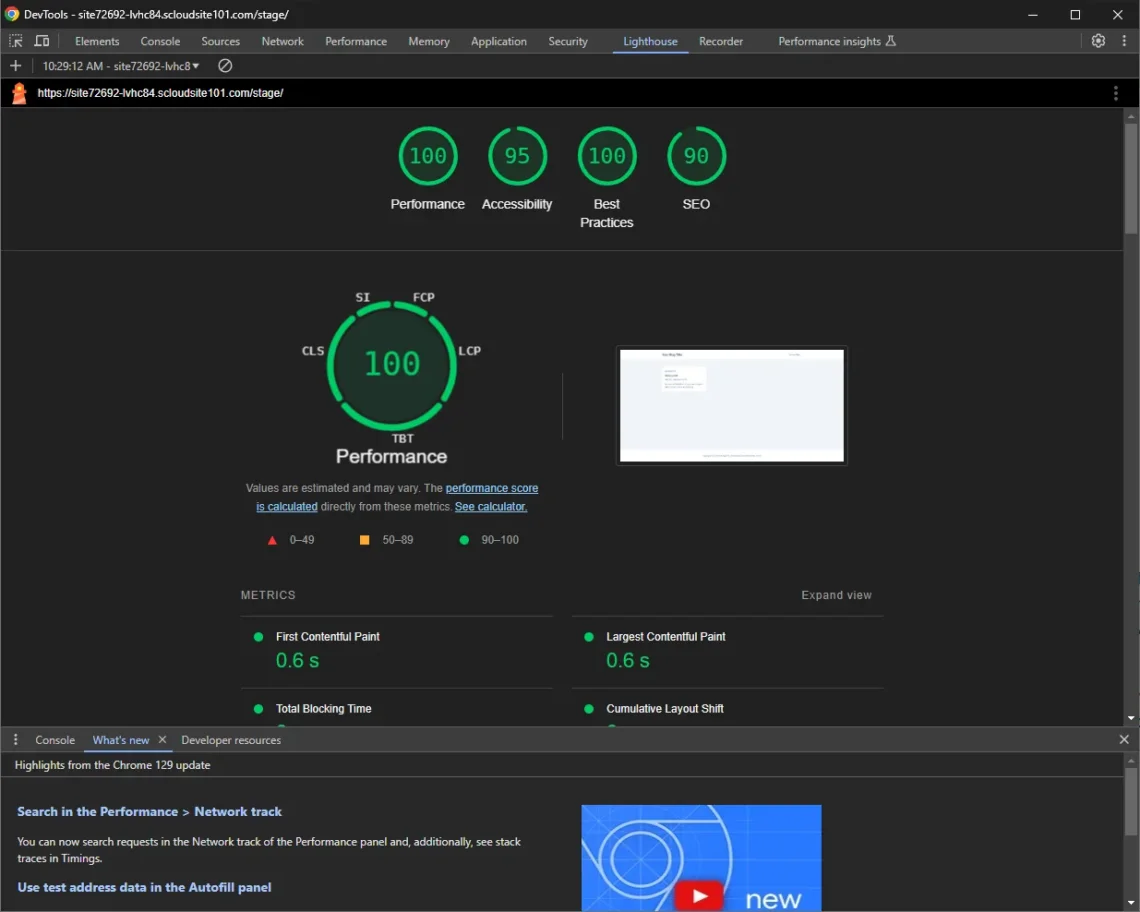
Open a new Chrome window and navigate to your staging website. Press F12, go to the Lighthouse tab and click Analyze page load. Chrome will reload the page and generate a report similar to the one delivered by PageSpeed Insights. You can then compare your staging and production site scores to see how the theme affects your WordPress speed.
Install a Caching Plugin for Instant Speed Boost
Caching content is one of the most effective ways to make your WordPress site load faster. The concept is pretty straightforward.
A cache is, for all intents and purposes, a temporary storage facility. When one user lands on your site, some of the page data is copied to the cache. Then, when the same data is requested again, it’s served straight from there instead of being fetched from the server.
Depending on how the information is stored, you have three main types of caching:
- Server-side caching: Frequently requested information can be temporarily stored in the server RAM. Instead of generating it every time a user visits your website, it can be retrieved from memory much more quickly.
- Browser caching: Browsers can store copies of your HTML, JavaScript, CSS files, and other static assets on the user’s local device. When the visitor needs the same data again, the browser won’t wait for it to arrive from the server.
- Content Delivery Network (CDN) caching: After you sign up for a CDN, it will copy and store your static files on hundreds of servers worldwide. When visitors land on your website, the cached data is delivered to them from the closest node, thus reducing latency and minimizing the load on your primary hosting server.
You need a plugin to configure your WordPress website to efficiently cache data. Choose the right one, and you’ll be able to control all three types of caching. Let’s look at some of the best options on the market.
Best Caching Plugins for WordPress
Below, we will show you the best caching plugins you can use to speed up your WordPress website.
With them, you’ll be able to increase your site’s speed and increase the overall WordPress performance. Let’s see more on that in the next section.
LiteSpeed Cache
LiteSpeed Cache can work with Apache or Nginx, but if you want to take advantage of all its features, you’re best off using it with the LiteSpeed web server. This way, you can configure it to cache data with one of the world’s most powerful caching engines.
The easy integration with QUIC.cloud, LiteSpeed’s CDN service, further boosts its performance benefits. There are yet more optimization tools that can do things like limit post revisions and database calls to improve other aspects of your site’s performance.
WP Rocket

Unlike the rest of the plugins on our list, WP Rocket is a premium product available only to paying customers. While this may deter users on a tight budget, those who can afford it can enjoy excellent features like cache preloading, mobile caching, dynamic page caching, etc.
In addition, you have many other speed optimization tools under a single dashboard.
W3 Total Cache
W3 Total Cache is yet another powerful speed optimization tool. It’s available on WP’s official repository and is completely free.
It covers all the bases when it comes to caching, including object, WordPress database, and browser caching, as well as CDN integration. It lets you easily configure various caching mechanisms and has features that deal with multiple other aspects of your WordPress site performance.
WP Fastest Cache

While some criticize WP Fastest Cache for its cumbersome-looking interface, there’s no denying its power as a WordPress caching plugin. You can download it for free from the official WP repository, and if you want a more comprehensive set of features, you can opt for the paid version.
Yet again, the plugin’s capabilities span well beyond just the caching mechanisms, and this particular aspect of performance optimization is covered well. Standard tools that help you leverage browser caching and preloading are all there, but you also get more control over how and when your site cache has to be refreshed.
How to Configure a Caching Plugin for Optimal Results
This is far from an exhaustive list of all the WordPress plugins focused on caching. There are many more, all featuring a bewildering array of submenus, buttons, and toggle switches.
Fortunately, they often have tooltips and links letting you know what each setting does, so figuring out how to configure them shouldn’t be too much of a problem. Furthermore, reputable plugins usually come with detailed documentation telling you how to take full advantage of their features.
If this sounds like too much hard work, we have guides on how to set up each of the plugins listed above for the best possible performance.
You can check them out via the links below:
Yet again, you can use your staging environment to see the effects of your caching add-on before rolling it out to production.
Optimize Images for Faster Loading Times
Colorful images draw users’ attention and make them read your content, so it’s no wonder they take up so much of your page.
It’s estimated that between 50% and 75% of a typical web page’s size consists of images. They make up the most significant chunk of data that has to travel between your server and the user device, and there’s no shortage of people trying to find ways of reducing it.
Caching is the most straightforward approach. Serving images from the cache lets you improve loading speeds while minimizing the number of requests hitting the server. Regardless of your caching plugin, you will most likely have the tools to set it up correctly.
However, there’s a lot more you can do.
- How to compress images without losing quality
You want to shrink your image file sizes as much as possible without making them grainy or pixelated. To achieve that, we need to compress them correctly.
Initially, the technology was only available on expensive and advanced editing applications like Photoshop, with free online services like TinyPNG appearing later. If you use one of these platforms, the compression would have to be made on your machine before the file is uploaded to the server, which is a nuisance, especially if you have an existing website and hundreds of images you want to optimize.
Fortunately, image compression tools have also been included in several WordPress extensions.
In addition to their caching capabilities, most of the plugins we discussed in the previous section can also compress your photos and pictures and reduce their file sizes. Furthermore, image optimization add-ons like Smush and ShortPixel are specifically designed for this.
IMPORTANT: It may be a good idea to avoid using both caching and image optimization plugins at once. If you allow multiple extensions to edit your files, you could end up with errors or corrupted data.
Check out each plugin’s features and see if they meet your needs. Once you’ve decided which add-on you’ll use, test it on your staging site before rolling it out into production. It’s also a good idea to keep a backup of your images, just in case.
- Using next-gen image format for faster loading speeds
For years, there was a pretty simple rule when it came to web design. You’d use JPEG for photographs, PNG for logos and graphics, and GIF for animations.
When GIF was invented, the World Wide Web didn’t exist, and when JPEG and PNG came about, it was a completely different place.
Google knew the ancient formats were due a replacement, so in 2010, it rolled out WebP. At the time, its creators proudly announced that it supports transparency, animations, as well as lossy and lossless compression, making WebP something of a Jack-of-all-trades format.
Although its credentials sounded promising, WebP didn’t have it easy during its first few years. Not many people paid attention to the format, and support was virtually non-existent after its launch.
Now, though, it works on all major browsers and image-editing applications. The key reason for implementing it on your site is that compared to traditional formats, its files are 25-34% smaller.
There are several methods for enabling and serving WebP images instead of traditional JPGs and PNGs:
- WebP conversion plugins – Extensions can automatically generate WebP versions of your site images and configure WordPress to serve them when the new format is supported. Among the add-ons that do it, you’ll find both image optimization tools like Smush and ShortPixel and caching plugins like WP Rocket.
- Manually uploading and serving WebP images – You can convert your files to the new format while they’re still on your computer and upload them to your server. To do that, you’ll need to make a couple of modifications. First, open your theme’s functions.php file and add the following:
function webp_upload_mimes($existing_mimes) {
$existing_mimes[‘webp’] = ‘image/webp’;
return $existing_mimes;
}
add_filter(‘mime_types’, ‘webp_upload_mimes’);
It allows WebP uploads, which are disabled by default. Next, you have to implement the following code inside your themes’ files:
<picture>
<source srcset=”image.webp” type=”image/webp”>
<img src=”image.jpg” alt=”Image description”>
</picture>
With this, you ensure WordPress serves WebP images to browsers that support them and falls back to traditional formats when the new one is rejected.
- Content Delivery Networks with WebP support – Some CDN providers, like Cloudflare and KeyCDN, can automatically convert your JPGs and PNGs into WebP files. They use their own servers for the conversion, so you needn’t worry about additional load compromising your performance.
Another format you should keep an eye on is AVIF. Like WebP, it supports lossy and lossless compression, transparency, and animation, and like WebP, it was built with one purpose – making image files smaller without compromising visual quality. AVIF has only been around since 2019, but it’s already supported by most major browsers, and reports suggest that it’s even better than WebP at what it does.
However, because the format is so new, implementing it into your project isn’t quite as straightforward. WordPress added AVIF support with version 6.5 in April 2024, so it’s available only to website owners who keep their CMS platforms up to date.
The number of tools for converting and implementing AVIF files on WordPress sites is also limited, meaning WebP is the more convenient option for the time being.
- Using correctly sized images and improving loading efficiency
The default main image on the homepage of WP’s Twenty Twenty-Four theme takes up an area measuring 1280×600 pixels. You can replace it with a 2560x1200px image, but the theme will still display it in its original placeholder.
In other words, your image won’t take up more screen real estate, but its file size will almost certainly be bigger and will inevitably slow your WordPress site down.
Resizing images isn’t hard. You can even use something as simple as Microsoft Paint, though you’re probably better off picking a more advanced program like Photoshop or GIMP. With these applications, you can set the resolution to 72 DPI, which is the accepted web use standard. If you don’t want to deal with local applications, you can use browser-based editors like Canva.
WordPress has a few features of its own that help avoid loading larger images for no good reason. Every time you upload a photo to your Media Library, the application automatically generates three versions – a thumbnail, a medium image, and a large image. Depending on the theme, these are used in various places across your site, and they eliminate the need to load the picture in its original format every time it appears on the screen.
If you go to Settings > Media in your WP dashboard, you can set the maximum dimensions of the pictures WordPress generates and optimize bandwidth usage on every page load.
- The benefits of lazy loading images on your site
Lazy loading is the technique of delaying the loading of images until the browser needs them. When you visit a web page, you initially see the site logo and the pictures at the top of the page, so these are the ones WordPress loads. As you scroll down, you reach more images, and the CMS fetches them one by one when they need to appear on the screen. If you hit Back before reaching the very bottom, visuals situated in the footer won’t be loaded at all.
How does this affect performance?
You have fewer initial requests and lower server load. This means more available hardware resources and a fast WordPress site. Furthermore, the browser receives a smaller volume of data, so the visible part of the page is rendered more quickly, and users can start interacting with it immediately.
The effect is so significant that WordPress now has lazy loading embedded into its core. Every website built on WordPress 5.5 or newer has the technique implemented by default. With version 5.7, the feature was tweaked to include <iframe> elements, and with 5.9, it was refined even further.
By default, the WordPress admin dashboard doesn’t have tools for enabling or disabling lazy loading. If you need to tweak its behavior, you’ll either need to dig deep into the WordPress code or use a plugin like WP Rocket.
- Stripping metadata to save yourself a few extra bytes
Whenever you take a photograph, your camera or phone records quite a few details like a timestamp, the make and model of the device taking the picture, its settings, etc. These are all attached to the file and, therefore, contribute to its size. They’re called EXIF data, and if you want to view them, you can right-click on the image when it’s saved on your computer and go to Properties.
Don’t expect to massively reduce the size of your files by deleting them, but when you’re trying to improve the performance, every byte counts.
Most image optimization plugins can automatically strip your images of any EXIF metadata.
Enable GZIP Compression
Just as you can shrink your images, you can also reduce the size of your text-based files. This includes your HTML, CSS, and JavaScript files, and it’s done with the help of GZIP compression.
The idea is fairly simple. When a visitor accesses a web page, the web server fetches all the HTML files, CSS stylesheets, fonts, and other assets required for the content to appear on the screen. Instead of sending all these files individually, it compresses them and puts them in a .gz archive, which arrives on the user’s computer. The browser decompresses the files and renders them on the screen.
GZIP compression allows for an overall data reduction of up to 80%.
GZIP isn’t the only compression algorithm out there. Some technologies, like Brotli, can achieve an even better compression ratio, but they’re either too slow or not supported by all browsers and servers. That’s why GZIP is still considered the golden standard.
To enable GZIP compression, you just need to add a few lines to your web server’s main configuration file. If you use Apache or an Apache drop-in replacement, paste the following directive into the .htaccess file in your website’s document root:
<IfModule mod_deflate.c>
AddOutputFilterByType DEFLATE text/html text/plain text/xml text/css text/javascript application/javascript application/json application/xml
</IfModule>
If you don’t feel comfortable editing critical configuration files, you can use one of the caching plugins we mentioned earlier. Pretty much all of them allow you to enable GZIP compression with a couple of clicks.
Minify and Combine CSS, JavaScript, and HTML Files
Compression takes the data in your text-based files and reduces its size. But can we make it so there’s less data to compress? And crucially, can we do it without disrupting our WordPress website operations?
If you haven’t seen programming code before, you can easily open one of your site files with your control panel File Manager. If you’re scared you may break something, it’s best to use your staging site. Here, for example, is what a portion of the functions.php file looks like of WP’s Twenty Twenty-Four theme.
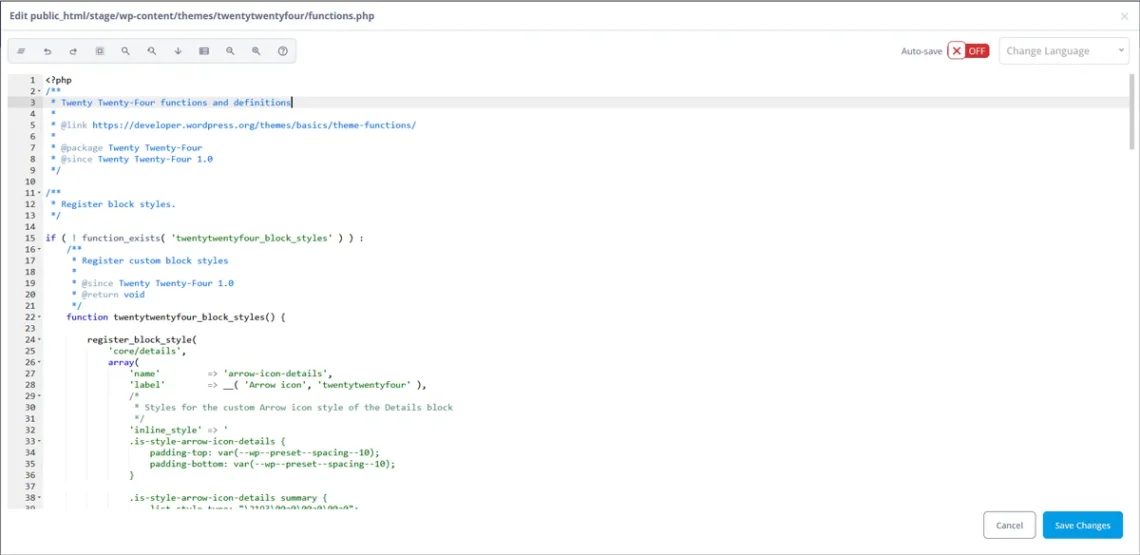
As you can see, you don’t have a wall of random symbols. The code has a structure, with comments (indicated by asterisks), line breaks, white spaces, etc., making it look neat and organized.
This is Coding Best Practices 101 and is essential for making the code readable. It ensures that programmers can more easily find their bearings when tweaking the code or locating a bug.
However, the comments and whitespaces are not critical to your site functionality or appearance. We can remove them, and the file will look like this.
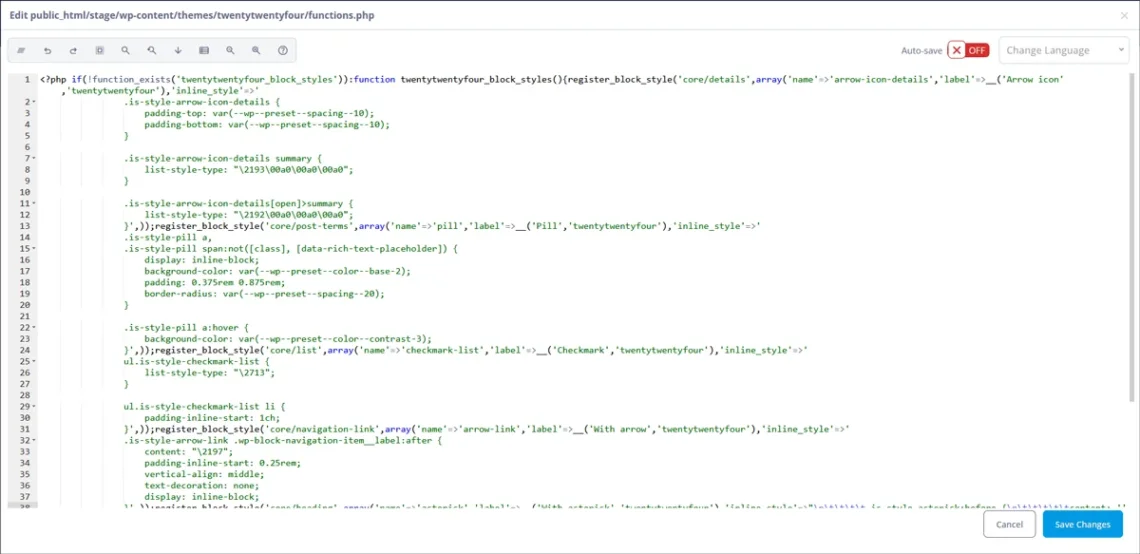
The code is much more condensed and difficult to read, but the website still works flawlessly.
What we’re interested in, however, is that while the original functions.php file weighs around 5.4KB, the one without the comments is just 3.75KB – a reduction of around 30%.
The technique is called minification, and it’s not too difficult to see how it can affect your page loading speeds.
Of course, your WordPress site contains hundreds of thousands of lines of HTML, CSS, and JavaScript code. Going through them and manually removing the non-critical bits is not something you want to do.
Thankfully, caching plugins like WP Rocket and Lite Speed Cache can automate the process.
They can also combine multiple CSS or JS files into one, thus reducing the number of requests the web server has to process and minimizing the load. This sounds like a great feature, but if you have it in your chosen WordPress caching plugin, you may see a warning attached to it.
That’s because combining multiple files into one could cause potential problems or conflicts. Be sure to test the functionality on your staging site before using it in a production environment.
Choosing and Integrating a Content Delivery Network (CDN)
A content delivery network is another wonderful method for WordPress website speed optimization. You get access to a global network of servers spread in all corners of the world. In the case of bigger providers, we’re talking about hundreds of locations. The CDN copies your static content and stores it on all its end nodes.
Then, when visitors access your site, much of what they see is delivered by the CDN server closest to them. The data has less distance to cover and arrives more quickly.
Those of you with limited website-building experience may have two concerns. You may think that a service as complicated as a CDN would cost a lot of money and assume it would be tricky to integrate it into your site. Luckily, those fears are often unfounded.
- How much does a CDN cost?
There are many CDN providers out there with different locations, features, and pricing policies. It pays to look at all of them, but the one you’re most likely to choose if you’re on a budget is Cloudflare.
Unlike other CDN operators, Cloudflare offers a free plan that allows website owners to use servers in 330 data centers across 120 countries. Most premium features are reserved for the paid plans, but you still get DDoS protection, a configuration-free SSL certificate, and a web application firewall (WAF).
- How do I use a CDN for my WordPress website?
Integrating a CDN with WordPress isn’t a problem, either. Because it’s such a popular method for improving performance and security, server management platforms like cPanel and SPanel give you tools for easily enabling Cloudflare’s CDN service on your site.
Many other content delivery networks are available, as well. They’re usually paid, but the bills aren’t as high as you may expect. The setup steps depend on the network itself, but many caching plugins can help you integrate the service with as little hassle as possible.
Regularly Update the WordPress Core, Themes, and Plugins
WordPress core, your themes, and your plugins consist of hundreds of thousands of lines of code. Bugs and errors are inevitable in such an enormous volume of work.
Sometimes, they lead to a broken feature or unexpected behavior, and sometimes, they wreak havoc with the performance. They can also allow hackers to compromise your site and steal your data.
When a bug is discovered, the developer is informed so they can start work on a fix. This fix is implemented in the next version of the WP core or the offending plugin. It’s up to the website owner to install it as soon as it rolls out.
When developers aren’t fixing newly discovered bugs, they are working on improving their products. This means, among other things, optimizing the code base and introducing new features that speed up the software and enhance its functionality.
Yet again, you’ll only get these features if you install the latest WordPress core and plugin versions.
So, why don’t people do it?
Thousands of projects run on WordPress versions that are a few years old now, and website owners are even more apprehensive about updating their themes and plugins.
They fear installing the new version could potentially cause conflicts with other components on their WordPress page. This is not an entirely illegitimate concern.
Every now and again, a new version of the WordPress core turns out to be incompatible with a particular add-on or theme. Similarly, an update of a plugin could cause it to malfunction because it doesn’t get along well with another extension.
Instead of risking potential downtime and a lengthy debugging process, people often run their websites on old versions of their chosen software. Is there a way to avoid this?
- How to safely update your WordPress site without downtime
There are many methods for ensuring all new versions of the WordPress core and its plugins and themes are automatically installed as soon as they are released. Let’s have a look at some of them.
Go to the WordPress dashboard and click Plugins > Installed Plugins. On the right, you’ll see a column labeled Automatic Updates and an Enable auto-updates button for every plugin.

Regardless of whether this feature is turned on, you’ll see link notifications in the WP dashboard about available updates for the core or any installed themes or plugins. Unless that is, you’ve enabled automatic updates through your control panel.
If you use SPanel, the feature is available inside the WordPress Manager.

It can be used for all WordPress installations on your account, and enabling it is a matter of clicking a toggle switch.
Of course, website owners who are concerned about compatibility issues will likely leave it turned off. At best, they’d prefer to install updates manually, and at worst, they wouldn’t bother at all.
The truth is that reputable, actively developed themes and plugins are often harmless. Every update is thoroughly tested before its rollout, so compatibility shouldn’t be a problem. Still, if you want to ensure everything works, you can use your staging website.
As you can see from the screenshot above, SPanel’s auto-update feature can be enabled for the staging environment only, allowing you to properly test every single update before rolling it out to production. To do that, open the Actions drop-down menu and click Push Live.
If you stumble upon a compatibility issue, it won’t affect your live site, and you’ll have the time to report the problem to the developer so they can fix it.
This is the procedure you want to follow for the best possible results. On the one hand, you’ll be sure your updates won’t compromise your site in any way, and on the other, you will be able to enjoy all the performance and security advantages of using the latest WordPress core and plugins.
Speaking of procedures, you may want to build a habit of regularly auditing your WordPress installation and deleting any unused plugins and themes. This will ensure more efficient use of the available resources, which in turn, leads to a faster WordPress site.
Conclusion
Speeding up a WordPress website may sound like a complex job. In reality, all you need is a checklist of what you’ll want to improve and the tools to help you implement the recommended optimization techniques quickly and efficiently.
Following all the tips above will take some time, and you’ll likely need to adjust your workflow to form new habits and follow some best practices. However, given the enormous performance, user experience, and SEO benefits you stand to reap, the extra effort will definitely be worth it.
Frequently Asked Questions
Q: Why is my WordPress website so slow?
A: Many factors could lead to a slow website. Checking whether your web hosting account adequately meets your WordPress project needs should be the first step in identifying the culprit behind the compromised performance. If it’s up to the job, you can look at the results of some online website speed tests that will help you locate the bottleneck and give you actionable tips on eliminating it.
Q: How can I speed up my WordPress website without a plugin?
A: Many optimization techniques embedded in caching plugins can also be implemented manually. However, they usually require editing critical configuration files or executing commands. Whether or not you can do everything by yourself depends on your technical skills and access levels.
Q: How do I optimize WordPress images for the web?
A: You can start by converting your images to the new WebP format, as it can produce up to 34% smaller files than traditional JPGs and PNGs. Resizing the images in the WordPress Media Library to the dimensions your site requires will reduce the amount of storage space and bandwidth they take up, and stripping off any unnecessary metadata will save you a few bytes.

