We all know updates are important – not only do they get rid of bugs, but they also improve the overall security of the apps or platforms you’re using. This is especially crucial with Learning Management Systems (LMSs) where any unauthorized breach can affect thousands of people.
That. of course, is highly valid for the most popular LMS solutions out there – Moodle. Worried that you don’t know how to update Moodle? Or maybe the process looks a bit intimidating? We’re here to help!
Let’s start from the beginning…
What is Moodle?
Moodle is a free learning management system (LMS) that works with all operating systems. Students and teachers alike can create their own courses, set assignments, upload presentations, and more. The platform is user-friendly and has numerous resources to ease the onboarding process. In order for Moodle to function properly, frequent updates are necessary.
Find Out Your Moodle Version
There are two ways to find your Moodle version out. Which one will work for you depends on your role – Admin or Teacher. If you’re a Moodle Admin, go to Site Administration and choose Notifications. The current version of the platform will be visible at the bottom of the page.

In case you’re a Moodle Teacher and the platform is either in English or German, you can see the version in the Moodle docs. It will show up at the bottom of any page on the Moodle LMS.
For any other language – simply check the URL. Your site address will contain a number, for example, 25, which means your version is 2.5.
Let’s update…
How to Update Your Moodle
The process is a bit lengthy, but don’t worry – we’ve got it all covered.
Check Moodle’s Requirements
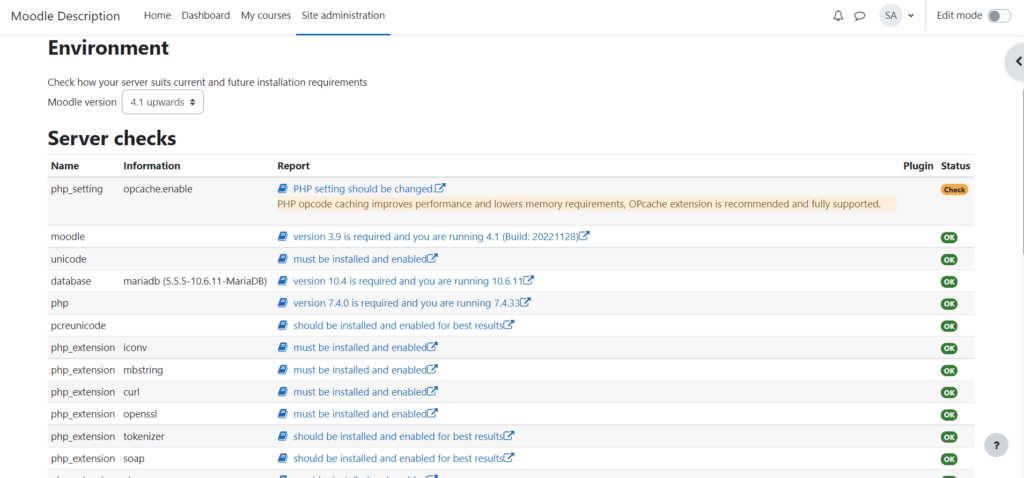
That’s maybe the easiest part. Go to Site Administration, choose Server, and click on Environment. You will see files with release notes for the server and client software requirements.
Those will vary, as they are based on:
- Server
- Database
- Browser
So, read carefully!
After you’ve completed this step, you need to back up your site.
Here’s how to do it and why it matters:

Backing Up Your Moodle Site
Before you update, you need to back up:
- the code
- your Moodle files
- your database
The way to save your database will depend on the system you’re using. There’s documentation available on Moodle’s official site that will guide you through the right steps. Tools like phpMyAdmin, MySQLDumper, and AutoMySQLBackup will prove to be an invaluable helper for the task.
IMPORTANT: Don’t change any data during the backup process! It will interfere with it and you won’t like the results.
The uploaded files can be found in a directory called moodledata. From there, you can:
- use a file transfer program and move everything on a drive or a computer
- create compact files (for example, zip) via a compression program of the entire moodledata
As for the code, the Moodle directory offers three options:
- rsync in Linux – enables you to copy only the changed files to another host
- FTP – used in cases when hosting provider does not allow ssh
- SSH – you can back up the entire database using the wget command
Updating Plugins and Third-Party Components
If you enable Automatic updates deployment in Moodle, the associated plugins will also upgrade during the update process. There’s a button for available updates at the Plugin Check screen that will show you if any are necessary.
In case you’re updating manually, you need to check the Moodle Plugins directory to see if there’s a new version available. If there is – you will need to download the plugin package, then extract it to the appropriate location in the Moodle code.
When all is done, you’ll be ready to install the updated software.
Installing the Updated Moodle Software
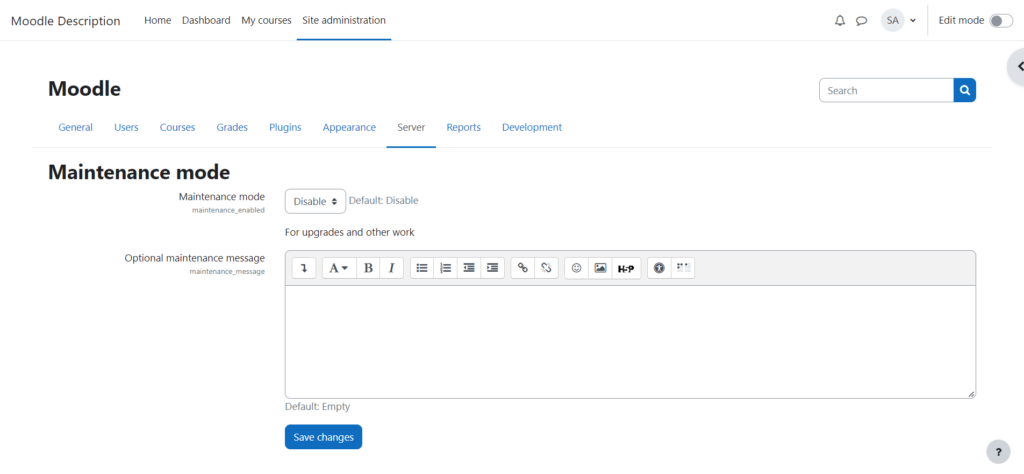
First and foremost – put Moodle into Maintenance mode. This will prevent non-admin users from logging in and messing with the process. You can do so by going to Site Administration > Server > Maintenance Mode.

Now, head on to Moodle Downloads to get the latest stable version of the app in the form of an archive. Before you extract its contents in your /moodle folder, make sure to move the old files from mysite.com/moodle to mysite.com/moodle/OLDSITE (or whatever you want to call it). You can now go ahead and unzip the compressed file.
One last thing – after you are done with the steps, to copy the old config.php file back from the /OLDSITE to your /Moodle folder.
IMPORTANT: If you have plugins you wish to keep, you need to add them to the code tree. Again, be careful not to overwrite anything.
All the instructions above are valid for the standard install package. In case you’re using Linux or need Git – Moodle has the steps outlined on its company website.
Final Steps
All that’s left for you to do is trigger the update.
To do so take your Moodle site out of Maintenance Mode. You know the drill already: go to Site administration and then Notifications. The platform will automatically detect the upgrade.
More often than not, it will do all the SQL database or file system upgrades without needing any help from you. If there’s a bump on the road, Moodle will show you a message with instructions on how to proceed.
Sounds easy enough, right? Well, things can get even easier if you find a reliable Moodle hosting provider.
ScalaHosting and Moodle
Teachers, schools, and educational organizations from all over the world can unlock the full power of Moodle with ScalaHosting. The long years of experience with LMS websites have taught us that there is no better environment for such a project than cloud VPS hosting.
Virtual servers give you full customization control, optimized performance, and enhanced security at very affordable rates. Our managed VPS plans are well-tailored for beginners as all technicalities are handled by our 24/7 professional support.
Whether you need to run online courses, create quizzes, or set up different levels of member access – Moodle and ScalaHosting are a wonderful match!


Wrap Up
Congratulations, you’re now ready to enjoy the latest version of Moodle!
What’s even better – you know how to update the LMS on your own.
Just remember the vital things – check Moodle’s requirements, don’t change any data during the backup process, and add your plugins to the code tree. All of this should be done while the LMS is in Maintenance mode, which you should disable, once you’re ready to trigger the update.
Not so intimidating now, is it?
FAQ
How do I know what version of Moodle I am using?
If you’re a site admin, you can see your current Moodle version when you go to Site administration > Notifications. You can locate it at the bottom of the page.
Moodle Teachers can see the version in the Moodle docs, at bottom of any page on the Moodle LMS. If the platform is not in English or German – check the URL for a number. That will specify your Moodle version.
How do I cancel my Moodle update?
To cancel your Moodle update, you need to first back up your Moodle database. You can then restore the backup and get a hold of the previous version from Git or the official website. Lastly, just connect your restored database with the old code.
How do I turn off Moodle maintenance mode?
You can turn off Maintenance mode in Moodle by going to the Site Administration section and then Notifications. You’ll see the disable option inside.


