How do you speed up a WordPress website?
Many of you start by googling the best performance optimization techniques for the world’s most popular Content Management System (CMS).
While going through the search results, you’ll likely stumble upon the name “LiteSpeed.”
Many guides mention it as one of the technologies that can significantly reduce loading times and completely transform your site’s user experience. However, they often don’t go into too many details about how it works or how it can benefit your site. They don’t tell you how to take full advantage of it either.
This is where today’s guide comes in.
You’ll learn exactly how LiteSpeed affects your WordPress website and how to maximize its benefits.
Let’s start with the basics.
What is LiteSpeed?
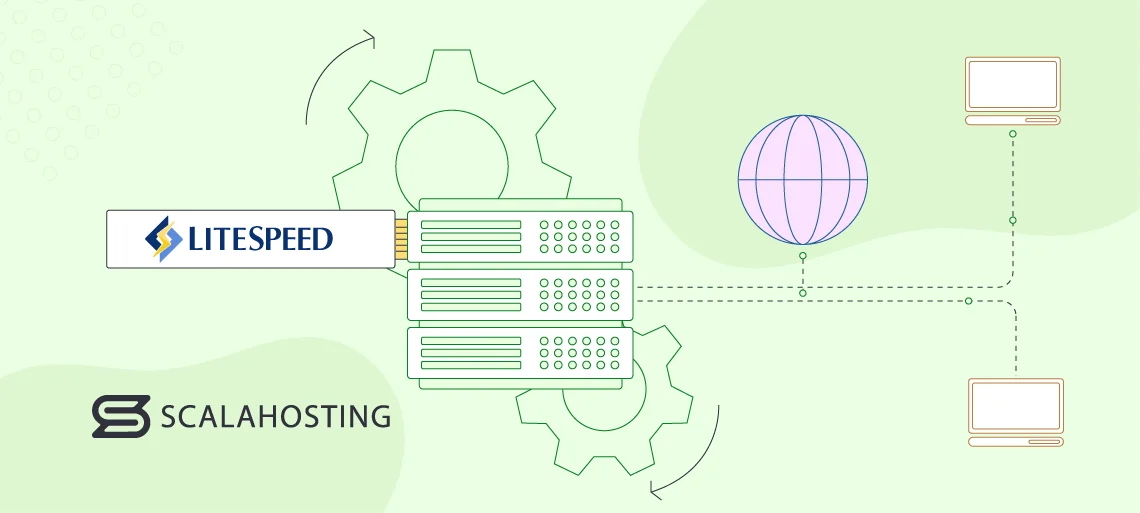
LiteSpeed is a web server. Note that the web server is different from the hosting server. The latter refers to the physical or virtual machine that hosts your website.
The web server is software you install on your hosting account. Its role is critical: it receives incoming requests, processes them, and sends the required data as a response. In other words, without the web server, your WordPress website wouldn’t be accessible at all.
LiteSpeed isn’t the only solution of its kind out there. It’s not the most popular either.
Historically, this title has been held by Apache, a platform rolled out in 1995 and still used today. Various sources indicate that Nginx, a newer solution, has taken over as the most widely used web server. However, because it’s often utilized as a reverse proxy for Apache, these stats could be a bit misleading.
The fact is, LiteSpeed’s market share isn’t as big as you may think, given its promised performance boost. So why is that?
LiteSpeed is owned and developed by a company called LiteSpeed Technologies – a privately-held venture founded in 2002 by a software engineer called George Wang. The web server comes in two flavors: LiteSpeed Enterprise and OpenLiteSpeed.
LiteSpeed Enterprise
LiteSpeed Enterprise is the proprietary version of the web server. Its underlying technology allows it to be much faster than its competitors, and it has another advantage that users particularly like – it’s a drop-in replacement for Apache.
This version of the web server works with all of Apache’s configuration files and directives, so switching to it is as simple as installing and enabling it.
The downside is that unlike Apache, which is open-source and completely free, LiteSpeed Enterprise is a paid product. It’s available under license, with fees depending on the hosting account’s hardware configuration and the number of domains.
OpenLiteSpeed
OpenLiteSpeed is the open-source version of the LiteSpeed web server. It offers the same architecture and performance benefits as the LiteSpeed web server enterprise edition without requiring a license.
So where’s the catch?
Well, OpenLiteSpeed lacks a few features, and because it is an open-source solution, you can’t expect a dedicated technical support team to help you with any issues you may have.
The more significant difference, however, is how the web server is configured. Both LiteSpeed Enterprise and OpenLiteSpeed use the same configuration structure as Apache. You still rely mostly on the .htaccess file and the rewrite rules created to configure how your website works.
However, while LiteSpeed Enterprise will immediately reflect every change to the .htaccess file, OpenLiteSpeed needs a web server restart after every edit. This could be an annoyance, especially if you host multiple websites on the same server.
So, LiteSpeed Enterprise’s licensing fees paywall it from many server owners, and certain differences in website management procedures mean that OpenLiteSpeed often isn’t users’ first choice.
What is LiteSpeed Cache for WordPress?
A properly installed LiteSpeed web server works with WordPress out of the box. The web server understands the directives in the .htaccess file, and all the settings from the previous Apache setup are carried over automatically.
You only have to configure WordPress to work with LSCache – LiteSpeed’s cache module. For that, you can use a plugin, which you need to set up and configure.
The add-on in question is called LiteSpeed Cache (sometimes referred to as the LSCache plugin). It’s developed by LiteSpeed Technologies and is completely free. There are versions of LiteSpeed Cache for other popular website-building applications like Joomla, Drupal, Magento, and PrestaShop.
As its name suggests, its main purpose is to help you configure WordPress to work at the LiteSpeed server level for the best possible results. Caching is far from the only thing it does.
In fact, it’s a fully-fledged optimization add-on similar to WP Rocket, Autoptimize, and Hummingbird.
Bear in mind that you need to be careful if you’re considering using more than one of these add-ons at the same time. Because they offer the same functionality, they could cause conflicts if they work on the same website. If you’re sure you want to use them alongside each other, make sure you test them in a staging environment to see If they play along.
But what could make you want to pick LiteSpeed Cache over the rest of the performance-enhancing WP extensions?
Key Features of LiteSpeed Cache
When the LiteSpeed Cache plugin was first released, its primary objective was to ensure WordPress made the most of the LiteSpeed server software. However, over time, the add-on got quite a few handy features that span well beyond the communication between the CMS and the web server.
Here are the main ones:
- Full-page caching: The direct communication with the web server allows LSCache to cache both static and dynamic content. This means previously visited pages load pretty much instantaneously while hardware load remains minimal.
- Image optimization: A lot of the data transmitted between your server and users’ devices consists of images. LiteSpeed Cache has quite a few tools designed to shrink the size of pictures and photos and make them load faster.
- Content Delivery Network (CDN) integration: A content delivery network speeds up your website by caching data and storing it on multiple servers across the globe. When a visitor requests it, it’s delivered from the closest node, so it appears on the screen much quicker. LiteSpeed has the necessary utilities to help you integrate the CDN service of your choice with your website and ensure data is loaded as efficiently as possible.
- Object caching and database optimization: LiteSpeed Cache can help you optimize your database automatically by removing unnecessary entries and better organizing the ones you use. With the right setup, it can also store database queries and accelerate dynamic content generation.
- Server-level caching: Most caching plugins employ WordPress’s PHP layer to manage the cache. The CMS is responsible for generating and serving new data as well as delivering the information stored in the cache.
Another important feature is page optimization. WordPress is renowned for its ease of use, but under the hood, it’s actually a pretty complex software application. It has a huge codebase, which is inevitably cluttered by extra themes and plugins. LiteSpeed Cache can streamline all that code for you and help you ensure it’s loaded as efficiently as possible.
Installing and Activating Litespeed Cache on Your WordPress Site
Installing the LiteSpeed Cache plugin is no different from installing any other WordPress add-on. It’s available in the official WP plugin repository, so you can set it up straight from the WordPress dashboard.
Here are the steps:
- Log in to your website backend
The WordPress dashboard is located at https://yourdomain.com/wp-admin/.
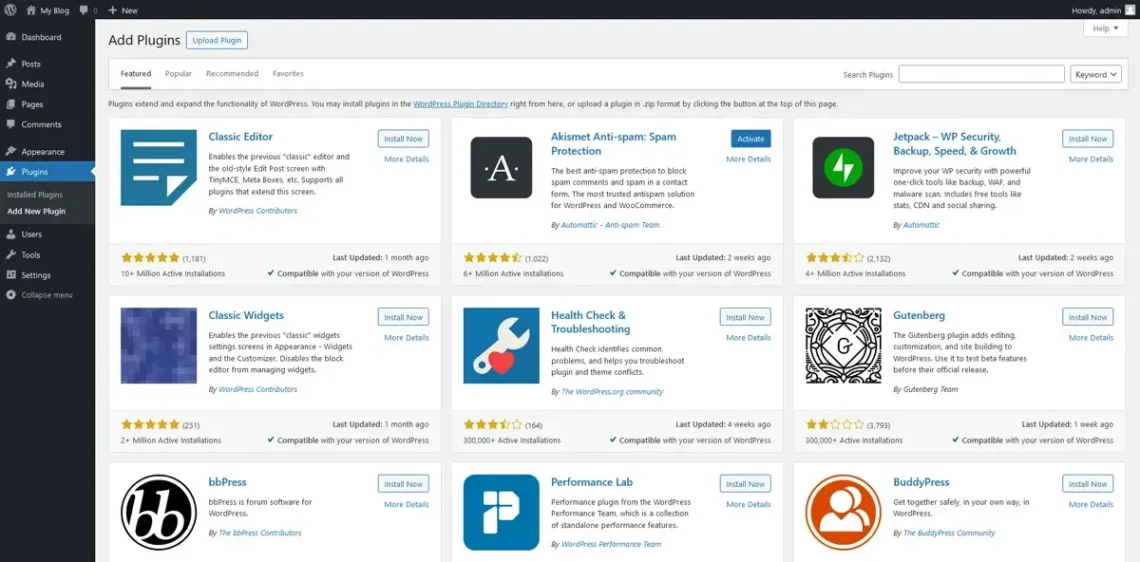
- Go to Plugins > Add New Plugin
The page gives you direct access to all the plugins in the official WP repository.
- Search for LiteSpeed Cache and install it
A handy search bar in the top-right corner lets you easily find what you’re looking for. Enter “LiteSpeed Cache” into it, and the plugin you need should be the first result you see. There will also be an Install Now button. Click on it and wait for WordPress to complete the installation automatically.

- Activate the plugin
In a few moments, the same button will be re-labeled Activate. Click on it to enable the LiteSpeed Cache plugin.

The add-on should now be installed and ready to use. However, the LiteSpeed Cache plugin includes quite a few tools and features. You have to ensure they’re properly configured if you want to reap all the performance benefits they offer.
How LiteSpeed Cache Boosts WordPress Performance
A whole new section will appear in the dashboard’s main menu after you install LiteSpeed Cache.

If you open it, you’ll see a dashboard full of stats, buttons, toggle switches, and sub-menus. You may think that making all this work would be a tall order, and indeed, if you don’t know what you’re doing, it could be a bit overwhelming.
However, we’ll show you how to set everything up with a few clicks. Before that, you need to ensure the hosting environment allows you to make the most of the LiteSpeed Cache plugin.
You don’t need the LiteSpeed web server to use the LiteSpeed Cache add-on. The plugin can easily be installed if your site is powered by Apache or Nginx. However, LSCache and a number of the plugin’s features will be missing.
If you want to make the most of the add-on, it’s best to use either LiteSpeed Enterprise or OpenLiteSpeed, which is fully compatible with our WordPress hosting plans.
With some management platforms, you can change the web server yourself. For example, with SPanel, it requires no more than a couple of clicks.
Log in to SPanel’s Admin Interface and go to Web Server Manager.
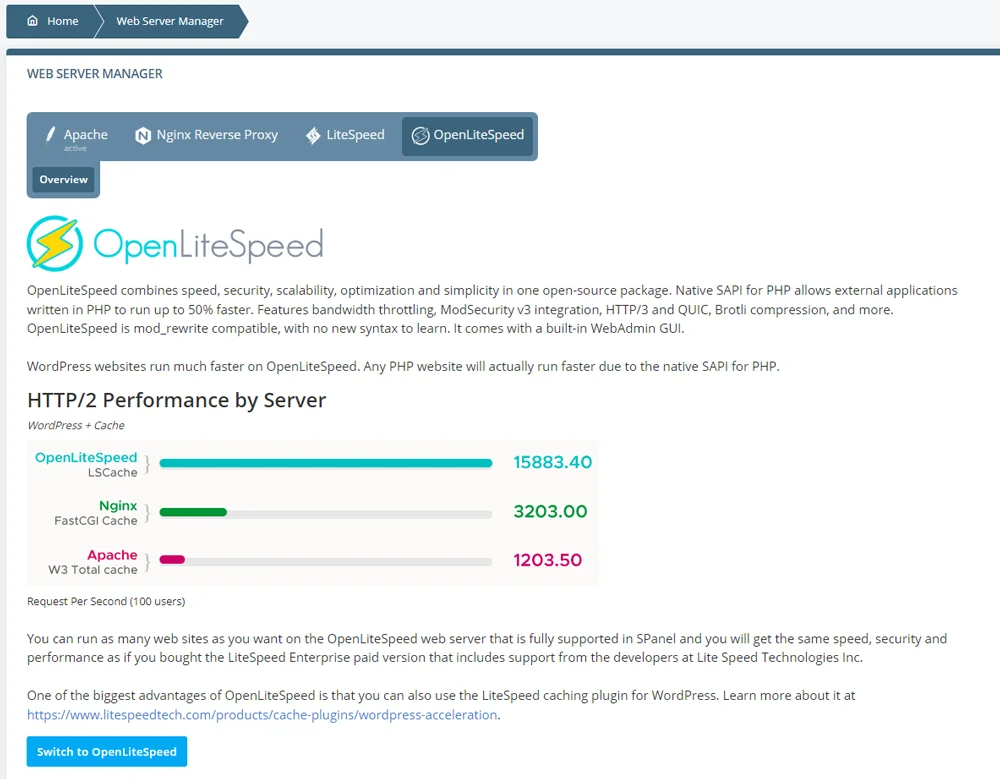
Owners of ScalaHosting’s managed VPS solutions will see four options:
- Apache
Because most website owners are so used to working with Apache, we use it as the default web server for our VPS plans.
- Nginx Reverse Proxy
Nginx can work as a reverse proxy for Apache. That way, you can use Nginx’s asynchronous architecture and caching engine without completely overhauling the website. With SPanel, enabling Nginx as an Apache reverse proxy is as easy as clicking a few buttons.
- OpenLiteSpeed
The open-source version of the LiteSpeed web server can also be enabled in seconds.
- LiteSpeed Enterprise
LiteSpeed’s proprietary version requires a license key. If you don’t have one, our sales specialists can help you get it.
It’s now time to return to the WordPress dashboard and configure LiteSpeed’s caching plugin for the best possible loading speeds.
You should still see a significant performance difference even if you leave all the plugin’s default settings. However, by tweaking the configuration, you can really make the most of it.
How difficult is that?
Well, it depends on whether you’re configuring the plugin yourself. If you are, you’ll have to go through every button and menu, learn what they do, and figure out how to configure them for the best possible performance.
We’ll help you with that in a minute. However, first, we’d like to show you a more straightforward way of configuring the LiteSpeed Cache plugin.
At ScalaHosting, we’ve been working with LiteSpeed Enterprise and OpenLiteSpeed for some time now. Our technical experts know how these web servers work.
Having helped thousands of WordPress users with technical inquiries of all shapes and sizes, they also know a thing or two about the world’s most popular CMS, as well.

Let’s walk you through the process:
- Download the configuration file
The best LiteSpeed Cache settings are loaded in the .data file, which you can download through the link below.
Download ScalaHosting’s Configuration File
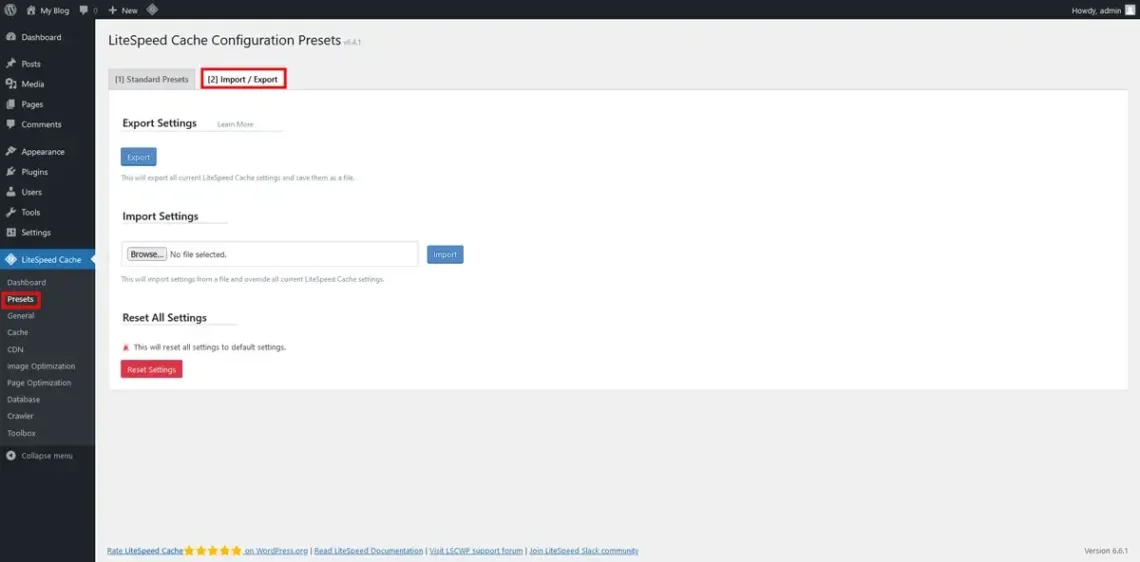
- Log in to your WordPress dashboard and locate LiteSpeed Cache’s Import function
LiteSpeed’s plugin has a handy feature that lets you import a ready-made configuration. From the LiteSpeed Cache dashboard, go to Presets and click the Import/Export tab.
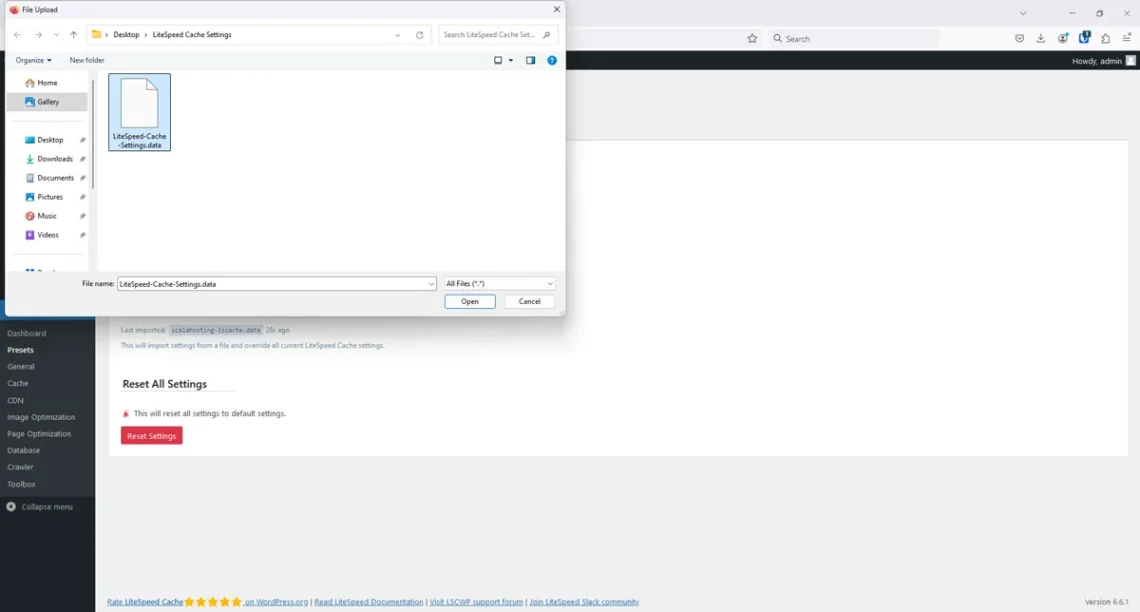
- Select the configuration file from your computer
Click the Browse button, navigate to the configuration file you downloaded during the previous step, and double-click it. Then, click the Import button to upload the file and apply its settings.
But what are these settings exactly? And do you need to tweak any of them or can you rely solely on the configuration offered by our technicians?
To find out, we’ll now go over the main pages in the LiteSpeed Cache preferences.
Dashboard Overview
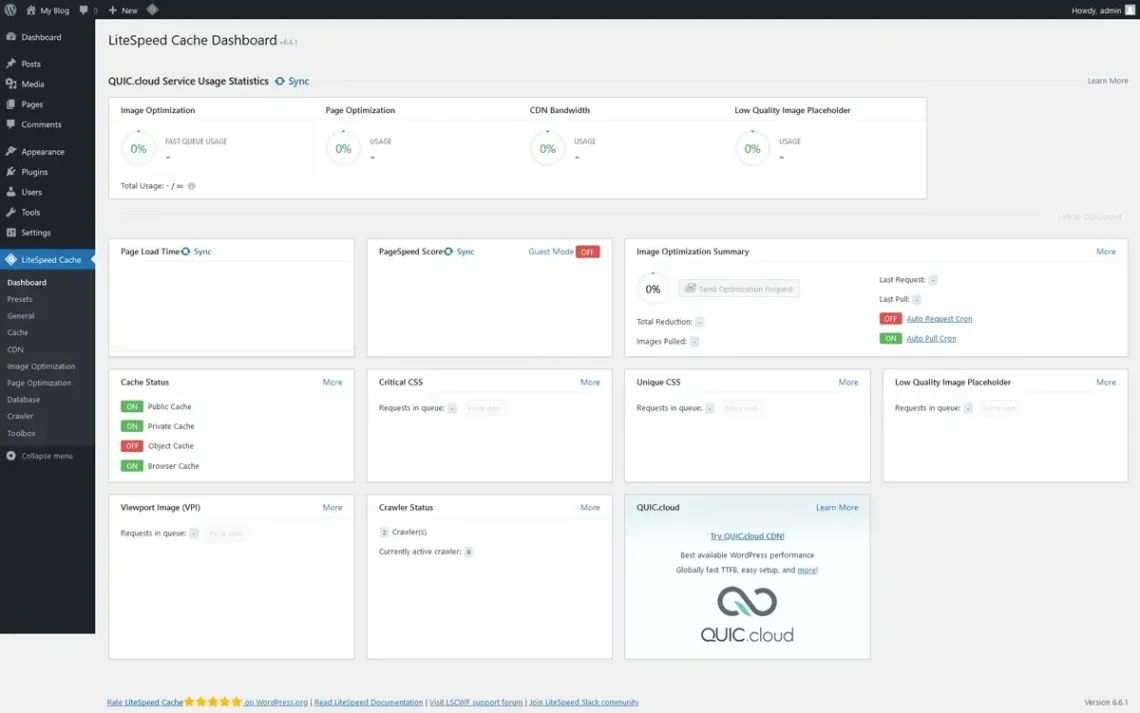
The first is the dashboard, which loads when you click LiteSpeed Cache from the main menu. Its purpose is to give you an overview of how the LiteSpeed Cache plugin works. You can see which optimizations features are enabled, and sometimes, there may be filtered admin banner messages on the top of the page if a particular tool requires your attention.
What you see here is determined by what you do on the other pages and menus. Let’s have a closer look.
Preset Configurations
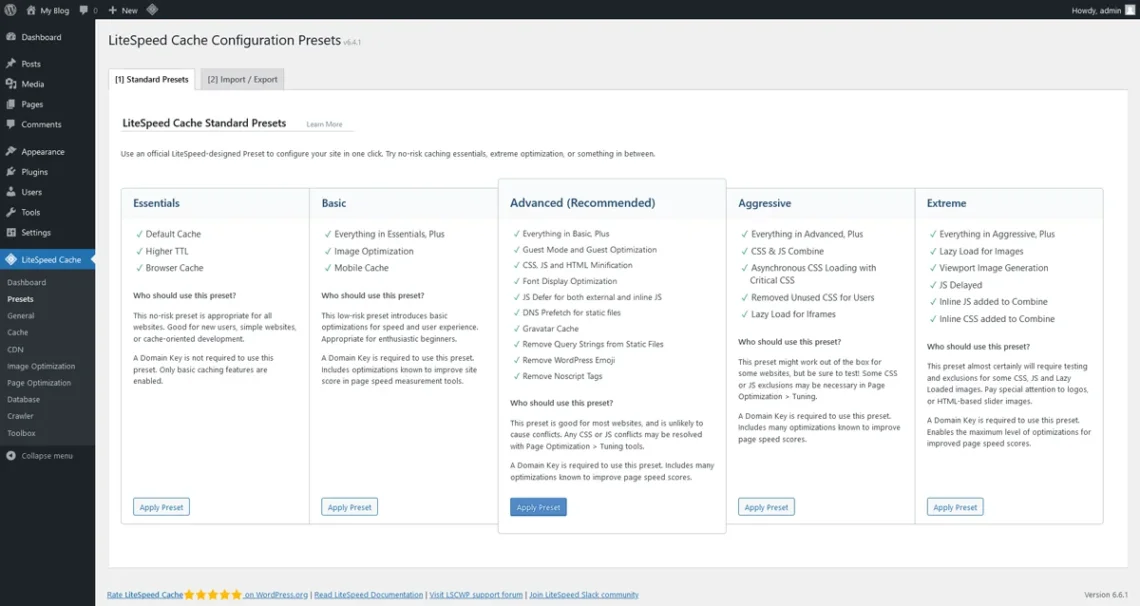
We’ve already seen some of the functionality in the Presets menu. There are several preset configurations that allow you to quickly change the settings of the LiteSpeed Cache WordPress plugin.
These configurations concern everything from the caching mechanisms and policies to image and page optimization, and they can be activated with a single click. You can also import custom configurations through DATA files via the Import/Export tab. If you need to use them on a different site, you can also export your settings from the same place.
Configuring Basic Settings for Optimal Speed
Moving on, we get to the General menu and the General Settings tab. At the very top, you have the Automatic Upgrade toggle. If enabled, LiteSpeed will automatically install new versions of the plugin as soon as they’re released.
On the one hand, turning on automatic updates will ensure you get all the latest security patches and performance-enhancing features, ensuring your site is both reliable and secure. On the other, testing new versions of plugins in a staging environment before deploying them to production could sometimes save you some headaches. Ultimately, it’s up to you to decide whether to install the updates manually or let the system do it on its own. Whatever you do, make sure you always use the plugin’s latest version.

Next up, it’s the QUIC.cloud domain key. QUIC.cloud is a Content Delivery Network (CDN) built and maintained by LiteSpeed Technologies. Unusually for a CDN service, its focus is on dynamic rather than static content. If you want to use all of LiteSpeed Cache’s features, you must link your domain to QUIC.cloud.
The first step is to click the Request Domain Key button. After your request is completed, the domain key will be auto-filled in the field, and the Link to QUIC.cloud button on the right will become active. It leads you to the QUIC.cloud website, where you need to set up an account and associate your website with it.

Below the QUIC.cloud section, you have something called Guest Mode. If you enable it, you’ll have a cacheable landing page that is loaded automatically whenever a user visits your site for the first time. The idea is that the server will spend less time gathering information about the visitor and will instead load the page straight from the cache root. If you click the Tuning tab, you can configure which IPs and user agents will automatically be served a guest mode page.
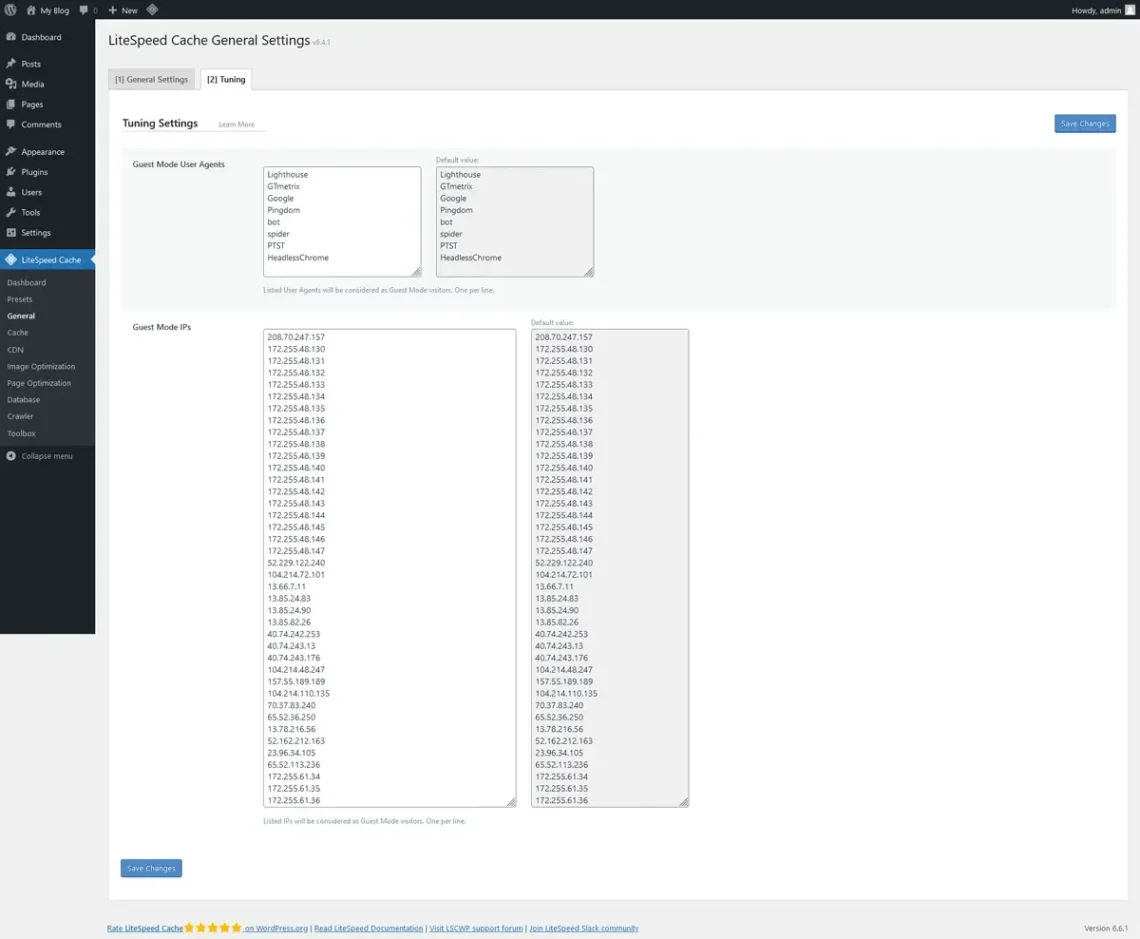
It may indeed give you a boost, especially if you use the Guest Optimization option, which implements some additional image and page optimization techniques on these particular cached pages. However, it’s not always the most efficient way of serving content to first-comers on your site. It could sometimes lead to increased server load, so it’s best to think carefully before enabling it.

Below the Guest Mode section, you have a field where you can enter your hosting server’s IP address.
LiteSpeed has a crawler that regularly scans your site and refreshes expired cache files. By entering your server’s IP address, you eliminate the domain resolution phase and allow the crawler to obtain the required data more quickly.
Below it, you see a toggle switch that allows you to enable/disable notifications about news, updates, and promos from LiteSpeed Cache.

Don’t forget to click Save Changes when you’re done.
Advanced Caching Options in LiteSpeed Cache
The settings in this menu control the LiteSpeed plugin’s cache features. They’ll only work if the LiteSpeed web server is installed and enabled or if you use the QUIC.cloud CDN.
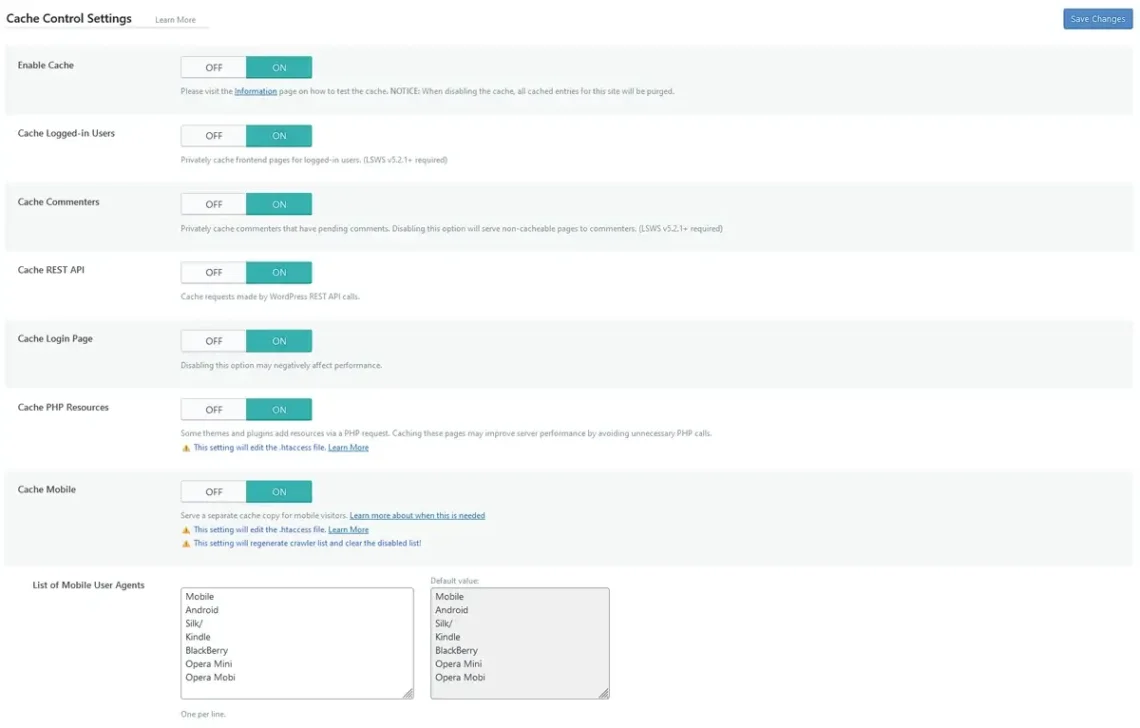
The Enable Cache toggle switch is at the top of the page and should be enabled by default. If you turn it off, all cached files will be purged.
Below it is the Cache Logged-in Users toggle switch. If this option is enabled, LiteSpeed will automatically cache pages for logged-in users, which could be particularly useful if you run a membership website. Most other projects won’t see a significant change in loading speeds.
How the Cache Commenters toggle switch affects your site’s performance depends mainly on your comment moderation procedures. In basic terms, the setting privately caches pending comments for commenters.
The next option on the LiteSpeed cache settings page is Cache REST API. Calls to WordPress’s REST API are usually made by third-party software like themes and plugins. The exact performance benefits of this option differ from project to project, but since every WordPress website uses themes and plugins, enabling it is bound to push your loading speeds in the right direction.
Below it, you find the Cache Login Page option. Pretty much every WordPress website has a login page of some sort, so it’s best to enable it.
The Cache PHP Resources option is also best left enabled. It can cache and serve resources typically retrieved via PHP requests. In other words, it reduces the number of requests fired at the web server, improving the performance and keeping the load low.
The last toggle switch in this section is labeled Cache Mobile. With close to 60% of global internet traffic coming from mobile devices, you’d think that enabling it is very important. However, if you’ve built a website with a modern responsive design (as you should), it won’t make much difference. Its benefits will be more visible if you have mobile-specific content. Below the toggle switch, you can manage the list of mobile user agents.
Further down, you have several other caching features for managing how individual database queries and URIs are handled. Left in their default state, they should work for most websites. It’s best to touch them only if you know what you’re doing.
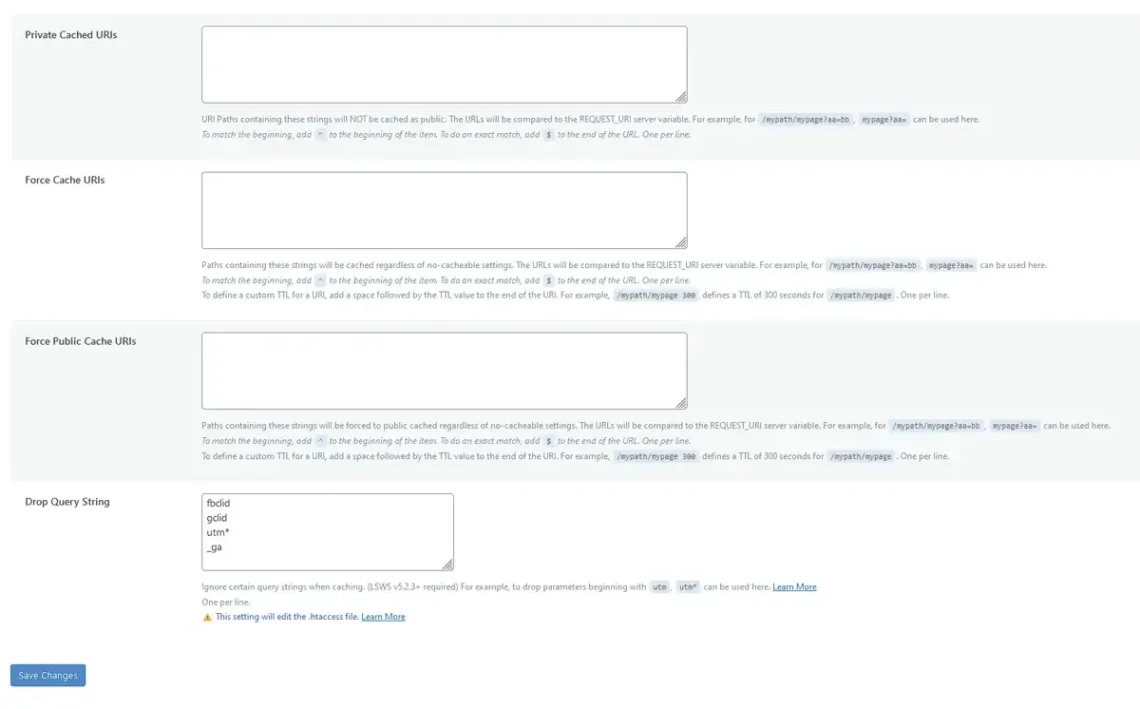
You have a few more tabs to customize cache rules for your website. Here’s a quick run-down of what each of them does:
- TTL
Through this one, you determine how long each piece of information stays in the cache before it’s refreshed.
- Purge
The settings in this tab let you control how and when data is deleted from the cache.
- Excludes
This section allows you to specify URIs, query strings, post categories and tags, cookies, etc., that remain unaffected by the cache.
- ESI
ESI stands for Edge Side Includes. The settings in this section only work if you use LiteSpeed Enterprise or QUIC.cloud. They are designed for logged-in users, let you fragmentize a dynamic web page, and allow LiteSpeed to assemble it when serving it to visitors.
- Object
When object caching is enabled, LiteSpeed stores copies of responses to database queries. When the time comes to serve these results to visitors, they’re taken straight from the cache. The gains are two-fold: in addition to the faster data delivery, you have fewer PHP requests and a lower server load.
Bear in mind that your site’s object cache status depends on certain technologies that are not necessarily supported by all hosts. Before you configure the settings in this section, it’s best to consult your provider and ask them what their setup includes.
- Browser
Your WordPress website can store some data in the user’s browser cache. Retrieving it from there means it won’t have to travel from the data center to the device and can be rendered much more quickly. This can make a world of difference for regular visitors.
- Advanced
The tab has a warning saying that the settings here are only for advanced users. It contains things like specific TTL for AJAX functions and login cookies, and there’s even a function that starts loading a page the moment a user hovers the mouse cursor over the link.
These options can improve your site’s performance, but if you don’t use them correctly, you can do more harm than good, so be sure to proceed with caution.
Using LiteSpeed Cache With a Content Delivery Network (CDN)
The following section deals with the Content Delivery Network services you can employ on your website.
At the top, you see the QUIC.cloud CDN toggle switch. It enables the API functionality of LiteSpeed Technologies’ CDN and effectively allows it to start caching dynamic content from your site.

While QUIC.cloud caches dynamic content, you can use a second CDN service for static files. It’s the best way to utilize the power of the LiteSpeed web server and give your site a serious boost.
The settings for the second CDN are found on the same page. Most content delivery networks require you to create a subdomain (e.g., cdn.domain.com) and point it to the same document root as your primary domain.
Registering an account on the provider’s website and linking it to your page will be required as well. To make the static CDN work alongside LiteSpeed and QUIC.cloud, you need to enable the Use CDN Mapping toggle switch and specify the subdomain in the CDN URL field. In the same section, you have several tools for controlling which static assets are to be cached by the content delivery network.
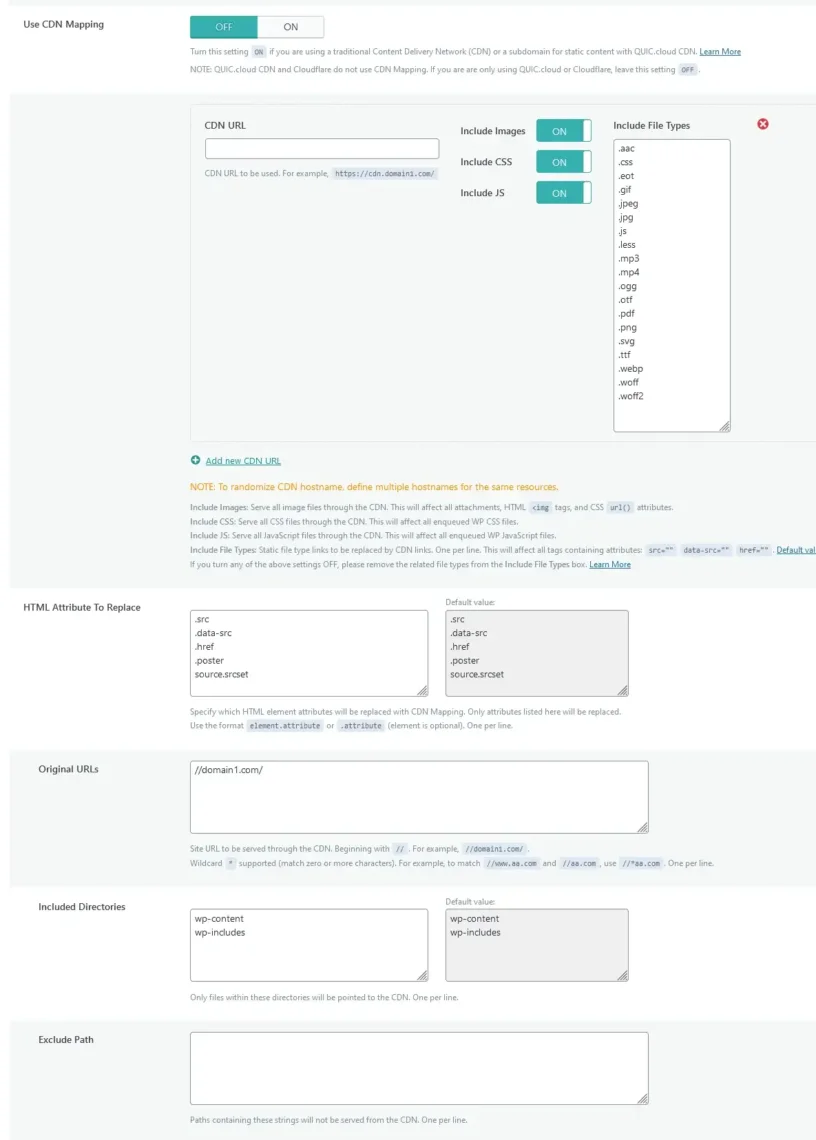
If you use Cloudflare, you don’t need to touch any of the settings above. Its approach is completely different and doesn’t require a dedicated CDN subdomain.
Instead, you need to log in to your Cloudflare dashboard and get the global API key. Enter it into the respective field alongside the rest of the required information and enable the Cloudflare API toggle switch.

Click Save Changes to apply the new settings.
Image Optimization With LiteSpeed Cache
LiteSpeed Cache is a fully featured performance optimization plugin rather than a simple caching add-on. Its capabilities extend well beyond linking your site to a CDN.
For example, it’s great at shrinking the size of your images, making them quicker to download and render on the visitor’s screen. This improves the user experience and your search engine rankings.
Unlike other image optimization plugins, LiteSpeed Cache doesn’t use your hosting server’s resources to optimize your media files. Instead, it sends them to LiteSpeed Technologies’ servers, which process and return them to your hosting account. That’s why, to use the image optimization tools available in the plugin, your domain has to be connected to the QUIC.cloud service.
From the Image Optimization Summary tab, you can send optimization requests whenever you upload new images, monitor the queue, and view stats on how the plugin has improved your site’s overall performance.
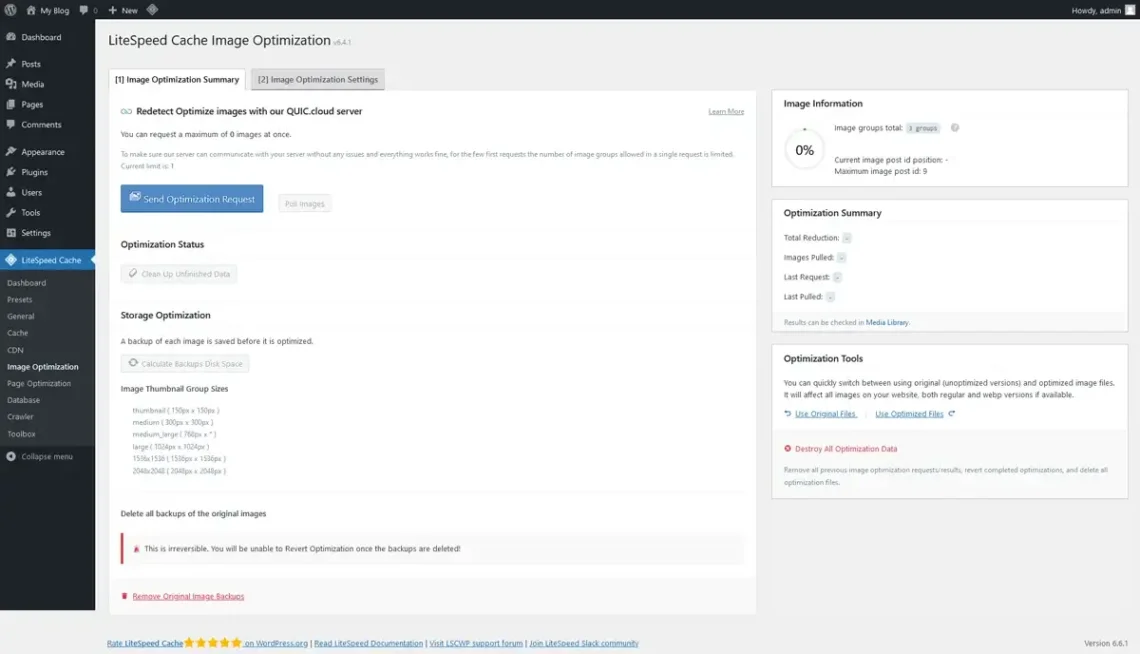
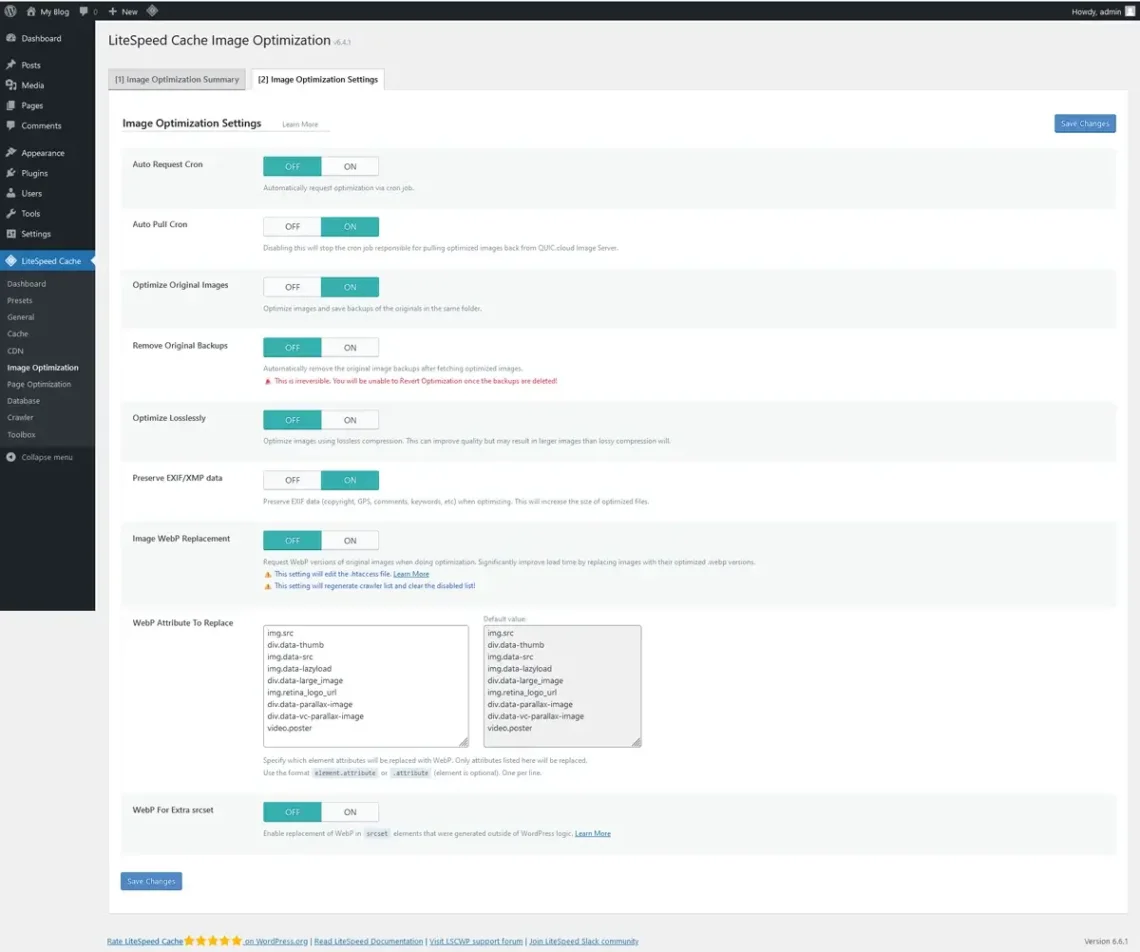
Through the Image Optimization Settings, you determine exactly what the plugin does and how. Let’s take a closer look at the options:
- Auto Request Cron
This toggle switch sets up a cron job that periodically sends optimization requests to QUIC.cloud’s servers, eliminating the need to do it manually after every image upload. The requests are coordinated with the server load to avoid image optimization timeout errors.
- Auto Pull Cron
By default, LiteSpeed Cache periodically synchronizes all the images on your hosting account with the ones on QUIC.cloud’s image servers. If you disable this toggle switch, it will stop doing it.
- Remove Original Backups
By default, LiteSpeed Cache serves the optimized images to users, but it also keeps the original as backups. Enabling this toggle switch will erase all original pictures currently on your hosting account and will stop keeping backups in the future.
- Optimize Losslessly
Lossless compression shrinks the size of images without compromising their quality. The downside is that the file size reduction may not be as significant as it is with lossy compression, but if you’re building a site where images are an essential part, this option should definitely stay on.
- Preserve EXIF/XMP data
Most photos contain a ton of data concerning where and when they were taken. If you enable this toggle switch, all that data will be preserved at the expense of slightly larger file sizes. If you don’t need it, you can disable the toggle switch and speed up your site a bit more.
- Image WebP Replacement
This toggle switch will tell QUIC.cloud to convert traditional images to WebP, a newer, more versatile, and resource-efficient format. It can reduce a file’s size by as much as 34%, and although adoption hasn’t been great, WebP images are now supported by pretty much all browsers and editing programs. Enabling the feature makes sense if you want to make your site faster.
- WebP Attribute To Replace
This section allows you to decide which formats will be converted to WebP. To extend the list, simply enter one image format per line.
- WebP For Extra srcset
This toggle switch enables WebP replacements for elements generated outside WordPress.
Once you’re ready, click Save Changes to apply the new settings.
If you’ve had any experience with other performance-enhancing WordPress plugins, you should be familiar with some of the settings inside the Page Optimization menu in LiteSpeed Cache’s dashboard.
For example, the CSS Minify and CSS Combine options can reduce the size of the data your web server has to process by combining multiple stylesheets into a single file and removing any comments or blank spaces. You can also store critical CSS code inside the HTML.
If your site is connected to QUIC.cloud, you can have LiteSpeed’s CDN service load CSS asynchronously after it generates it for each individual page.
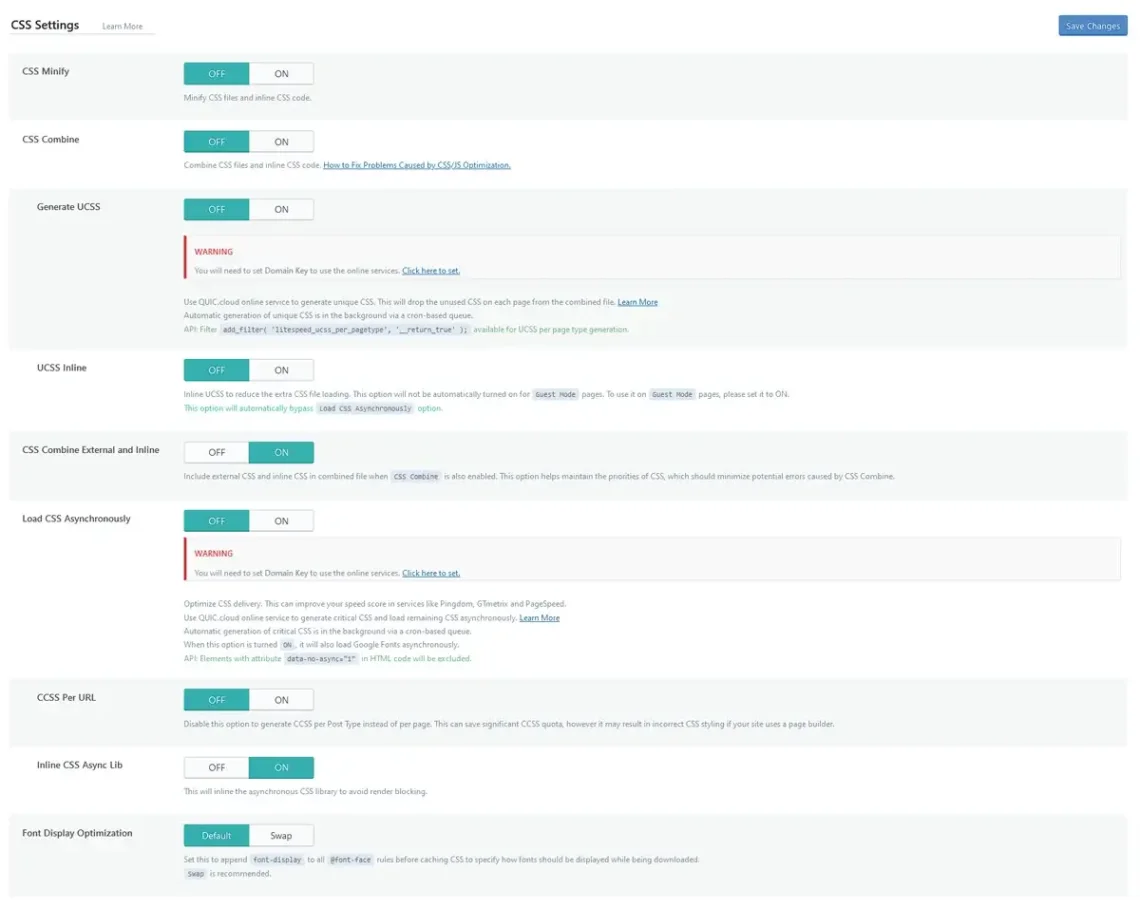
These techniques can also be applied to your site’s JavaScript files. In addition, you can configure LiteSpeed Cache to defer JS loading until the page is parsed or delay it until the user interacts with it. This could improve your site’s FID (First Input Delay), one of Google’s Core Web Vitals – a set of metrics the search engine recently introduced to measure websites’ user experience. However, it could also cause errors, so test the functionality before rolling it out in production.

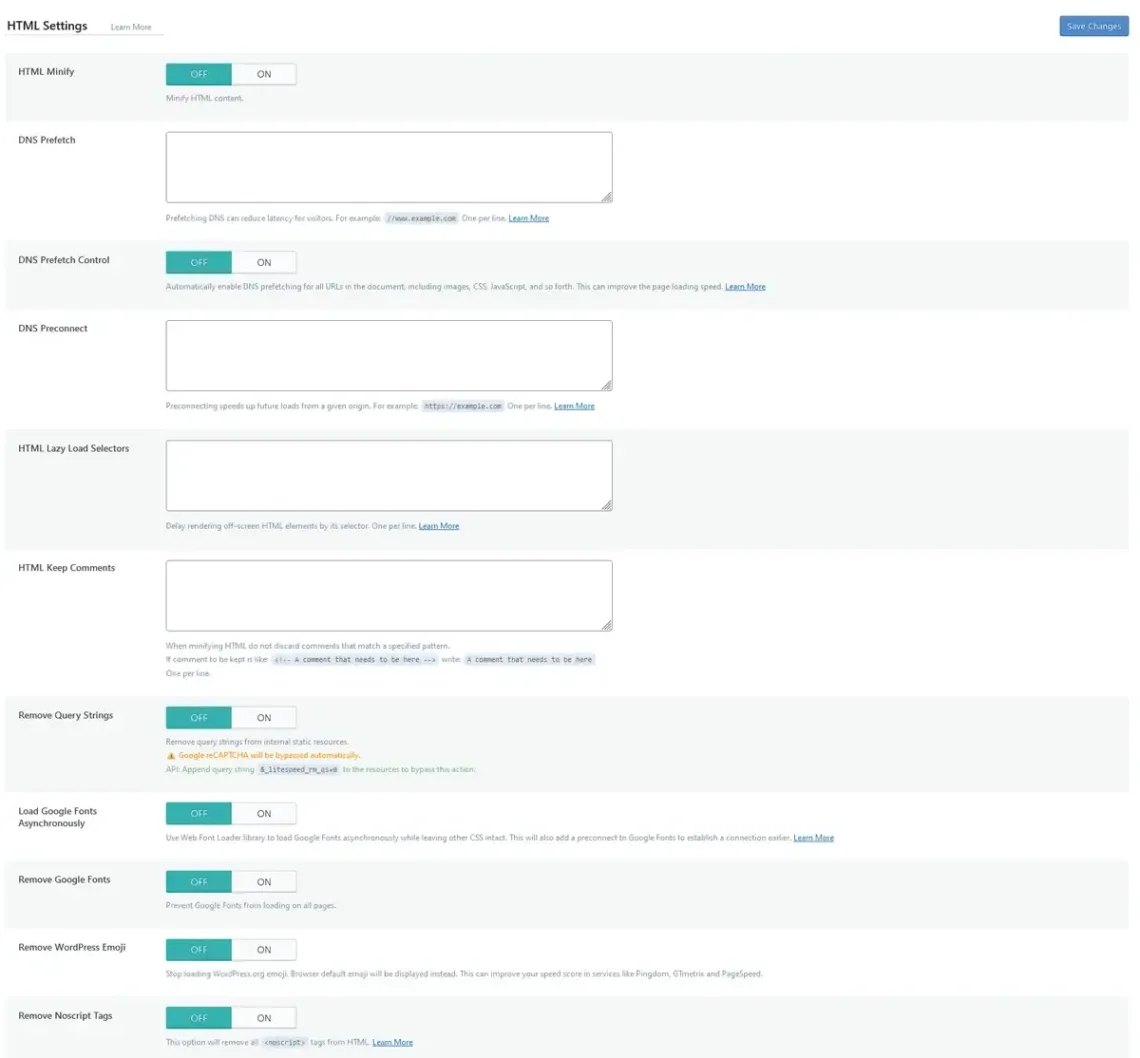
LiteSpeed Cache can also optimize your HTML code. The minifying toggle switch is at the very top of the HTML Settings tab.
Below it, you have the option to use DNS prefetch. The user’s browser will proactively perform domain resolution for links and resources you decide to include in the field. With the DNS Prefetch Control toggle switch, you can extend that functionality to resolve the domain name of the main URL and all associated assets, including CSS stylesheets, images, JavaScript files, etc.
The difference between DNS Prefetch and DNS Preconnect, the next option on the list, is that the latter completes the connection handshake. Both options don’t actually speed up your website, but they make it more responsive when users interact with your pages.
LiteSpeed Cache also lets you enable lazy loading for specific parts of your website. This means elements situated at the lower end of the page won’t be loaded until the user scrolls down to them. The reduced number of requests hitting the web server at once speeds up the rendering process. To enable lazy loading for a specific HTML element, enter its ID or class into the HTML Lazy Load Selectors field.
When HTML files are optimized automatically, all the comments inside the file are deleted to reduce its size. However, this can make the code hard to read. If you want to retain comments with specific keywords, you need to enter them into the HTML Keep Comments field, one keyword per line.
If query strings are attached to static content, caching engines and browsers won’t cache it. The Remove Query Strings toggle switch deletes all query strings from static files, meaning more cached data and faster loading speeds.
With the Load Google Fonts Asynchronously option, you can tell your website to load Google fonts independently from other page elements. The toggle switch also enables DNS pre-connect for Google, speeding things up further.
If you use your own fonts and store them on your hosting server, you can use the Remove Google Fonts option. It eliminates requests to outside resources, so it will slash loading times. However, be sure to test the website before you enable this option in production. Even if you’re unaware of it, themes and plugins may use Google fonts, so turning them off could break your site.
With the Remove WordPress Emoji option, your site will stop using the WordPress emoticons. Browsers will have fewer resources to fetch from your server and will instead use the local emoji set.
The <noscript> HTML tag is traditionally used to provide compatibility with browsers that don’t support JavaScript. Nowadays, you’d be hard-pressed to find such a browser, but you may encounter users who turn JS off for security reasons. At the end of the day, deleting the tags with the Remove NoScript Tags option can speed up your site. Still, it’s up to you to decide whether the performance benefits outweigh the potential compatibility issues.
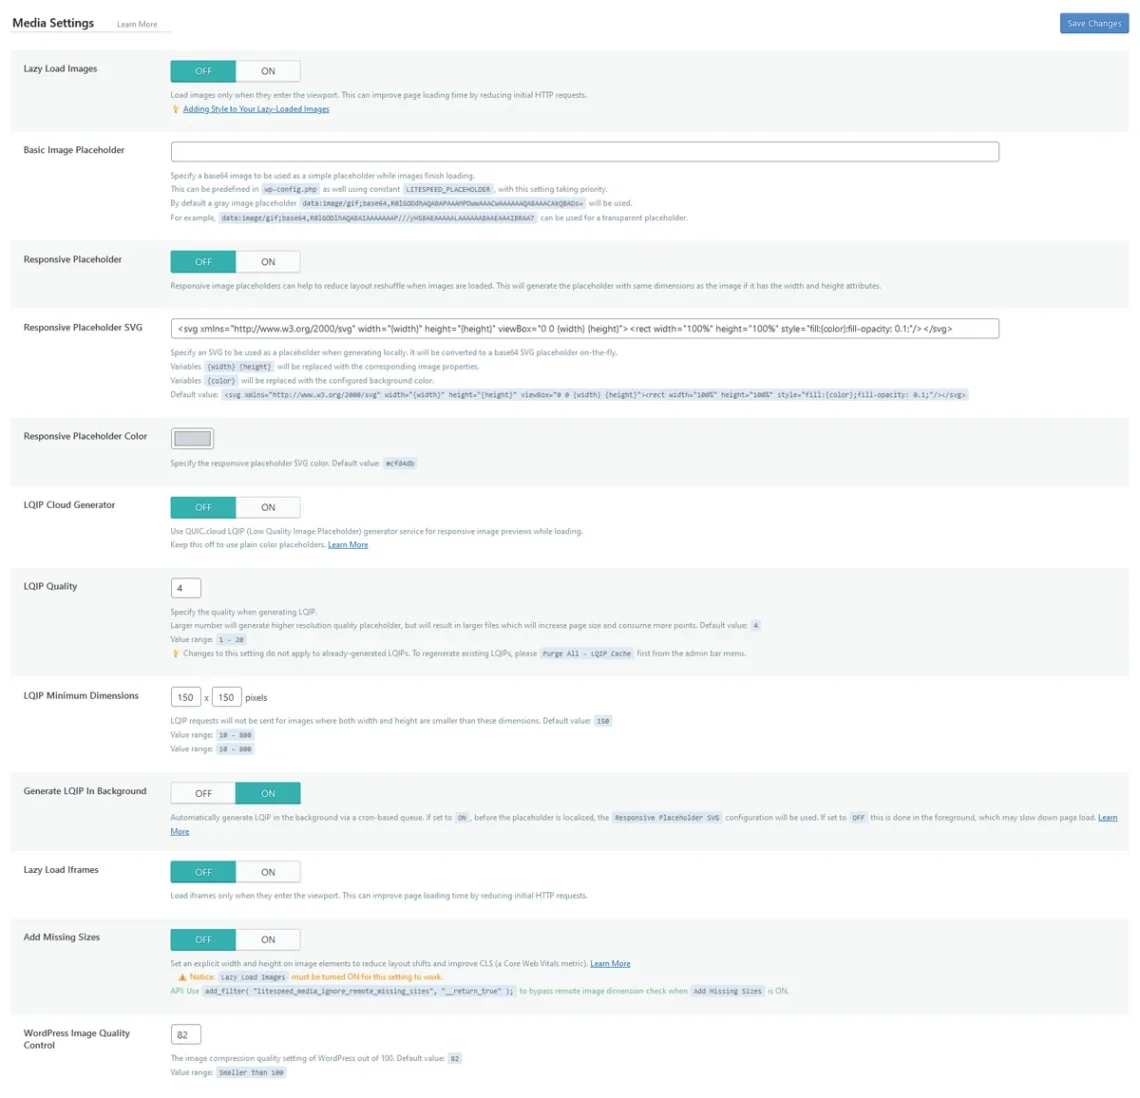
Media Settings is the last tab in the Page Optimization section to which you need to pay closer attention. The majority of options on this page revolve around lazy loading.
The first toggle switch enables LiteSpeed Cache to Lazy Load Images. When it’s turned on, images below the fold won’t be loaded until users scroll down to them. The server will have fewer requests to process simultaneously, so it will render the page more quickly.
In the Basic Image Placeholder field, you can specify a placeholder that will be displayed while the main image is being loaded. WordPress displays a grey field by default, but you can use any picture you like. However, you must enter it into the field in a Base64 format. You can use an online Base64 encoder to get the required string.
Next, it’s the Responsive Placeholder option. When enabled, LiteSpeed Cache will resize the placeholder to match the original dimensions. This will improve the Cumulative Layout Shift, another of Google’s Core Web Vitals. In lay terms, it will ensure the individual design elements on your page don’t move around much while the content is being loaded.
The following two options (Responsive Placeholder SVG and Responsive Placeholder Color) determine how your placeholder will look. If you don’t want to use a plain color, you can enable the LQIP Cloud Generator toggle switch.
LQIP stands for Low Quality Image Placeholder. QUIC.cloud uses its backend nodes to generate a low-quality version of the original image that acts as a placeholder. LiteSpeed Cache gives you a few more options to precisely configure the LQIP quality, dimensions, and how it’s loaded.
Below them is the Lazy Load iFrames toggle switch. After you turn it on, elements surrounded by <iframe> tags won’t be loaded until they enter the user’s viewport, reducing the number of initial HTTP requests even further.
Through the Add Missing Sizes option, you automatically add width and height attributes to all images and videos on your site. The idea again is to minimize layout shifts while your site is loading and improve the overall user experience.
Finally, it’s the WordPress Image Quality Control value. Ranging from 0 to 100, it determines WP’s image quality compression setting. It’s set at 82 by default, which should work for most websites. However, LiteSpeed Cache allows you to change it according to your needs.
The next tab is labeled VPI, which stands for Viewport Images. This service helps improve the efficiency of LiteSpeed Cache’s Lazy Loading capabilities by more accurately estimating which images and iframes should be loaded as soon as the visitor opens the page.
As you may have guessed, the Media Excludes tab lets you determine which media files shouldn’t be lazy loaded, regardless of whether or not they’re visible on the screen. You can use the tools available here to include your site’s logo and minimize those annoying (and SEO-harming) layout shifts.
Through the Localization tab, you can configure LiteSpeed Cache to pull and serve third-party resources locally. Caching them on your own server allows you to deliver them more quickly.
Via the Tuning and Tuning-CSS tabs, you can configure how JavaScript and CSS files are minified and loaded inline. These tools give you even more freedom to tweak the configuration and find a bit more performance without compromising the user experience. However, you must be familiar with the WordPress file structure to use them efficiently.
Optimizing the WordPress Database With LiteSpeed Cache
Even the cleanest code and the optimal caching settings won’t produce the results you’re after if your WordPress database is cluttered. There are many options for speeding it up, but unfortunately, many of you often don’t have the time and technical expertise to explore all of them.
Fortunately, thanks to your LiteSpeed plugin, you have a few tools that help you clean up and improve your database’s performance. You can find them under the Database menu in LiteSpeed Cache’s dashboard.
They automate quite a few of the tasks that traditionally speed up WordPress websites. Here’s the list of buttons you’ll see on the page:
- Post Revisions
If you click this one, only the currently published versions of your posts will be saved. You will lose the ability to quickly revert any changes you’ve made over the lifespan of your content, but you’ll delete many unnecessary entries from your database.
- Orphaned Post Meta
After you delete an unwanted post, some metadata is often left behind. LiteSpeed Cache can find it and remove it for you.
- Auto Drafts
While writing or editing a post, WordPress automatically saves drafts so you don’t lose work in case the connection breaks up. Once the post is saved, you don’t need these drafts, but they remain in the database. LiteSpeed Cache can delete them for you.
- Trashed Posts
When you want to delete a post, you first put it in the trash, from where you can delete it permanently. With this button, you effectively empty the trash.
- Spam Comments
Comments marked as spam (even when they’re manually moderated) are not permanently deleted and remain in the database. This button removes them for you.
- Trashed Comments
With this button, you permanently delete all comments in the trash.
- Trackbacks & Pingbacks
Some themes leave trackbacks and pingbacks in the comments section when other bloggers link to your posts. You can get rid of them using this button.
- Expired Transients
Transients are a form of caching. Query results are stored in the database for a predetermined period of time so they can be served to users more quickly in the event of a cache hit. They have their own cache expiration rules and are not always automatically removed when they’re no longer needed. With this button, you can delete them and clear up some space.
- All Transients
All transient data can be purged through this button.
- Optimize Tables
The OPTIMIZE function in MySQL streamlines your database’s operation by reorganizing tables and reclaiming unused space. Thanks to this button, you don’t need to use phpMyAdmin or the command line to employ it.
In addition, you have a Clean All button that activates all the functionality listed above except for the Optimize Tables one.

From the DB Optimization Settings tab, you can change the maximum number of revisions and their age.
Crawler and Other LiteSpeed Cache Options
The crawler is the mechanism LiteSpeed uses to check which pages of your WordPress website can be cached. Its settings can be found in the respective menus.
You can set up multiple crawlers. For example, you can have one for desktop and one for mobile user agents. The Summary tab shows you all the crawlers, along with the actual cached pages, the ones that are yet to be crawled, and those that are blocklisted.
You can manually reset the crawlers’ positions or initiate a new crawl.
In the Map tab, you can find a sitemap of all your posts and pages and information on whether or not they’ve been crawled. From the Sitemap Settings tab, you can add a custom sitemap and tweak a few more settings related to the URLs that are supposed to be crawled.
In the Blocklist tab, you’ll find the posts and pages that will not be cached. Some entries on this list are automatically added, while others are managed by you.
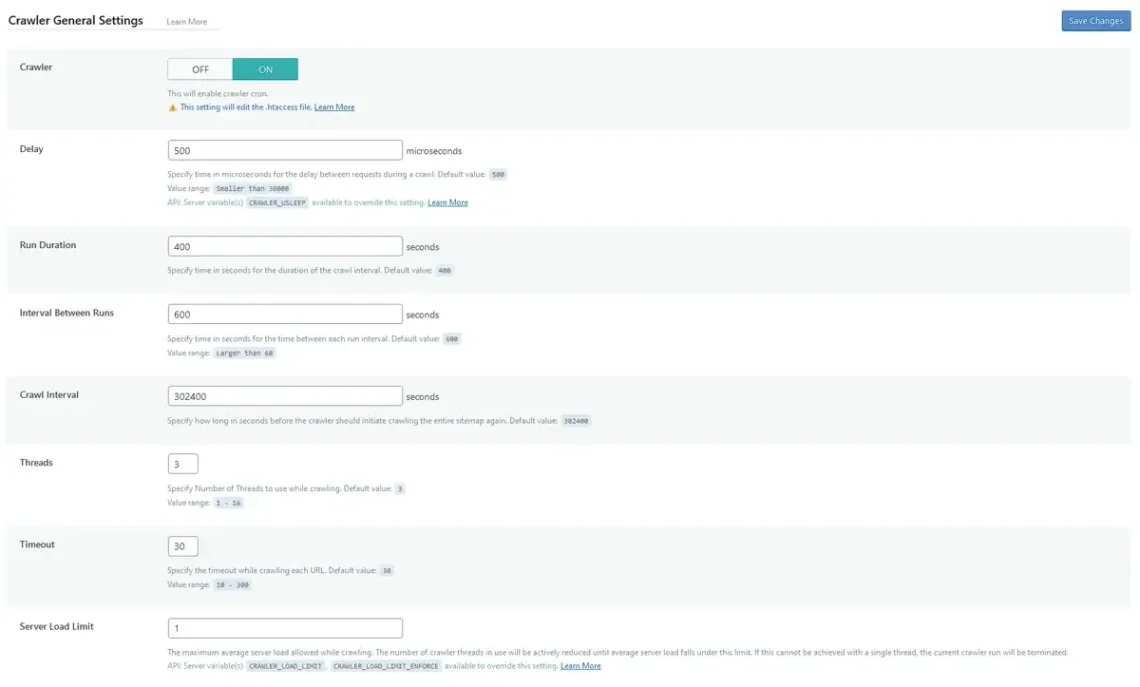
You can turn the crawler on or off in the general settings menu. However, it needs to be enabled at the server level before you can do this. If you use SPanel, this will happen as soon as you activate one of the two LiteSpeed server editions. If this isn’t the case, you’ll need to have a server admin configure LSCache for you.
Below the toggle switch at the top, you have options for the delay between requests, the run duration, the interval between crawls, and the crawl interval.
Adjusting the maximum server load and the number of threads used ensures that the crawler will not slow your website down.
After you’ve gone through all the previous sections of the LiteSpeed Cache dashboard, you can leave the plugin alone. However, occasionally, some manual interference may be needed. Most of the utilities you’ll need in such cases are located in the Toolbox section.
There are several tabs, all dealing with different aspects of the plugin’s operations. Let’s examine them:
- Purge
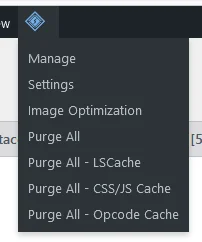
You have quite a few options for removing data from your private cache. Using the buttons under the Purge tab, you can delete individual cache entries or the entire cache. Most of these functions are also available as shortcuts on the top admin bar.
- Import/Export
This tab covers the same functionality as the one in the Presets menu. It lets you easily export and import settings for the LiteSpeed Cache plugin.
- View .htaccess
This tab allows you to view the URLs of the frontend and backend .htaccess files and their content. If you want to modify them, you’ll still need to either download and edit them locally or do it straight on the server via the command line or a file manager.
- Heartbeat
The tools in this tab are designed to help you control how LiteSpeed Cache works with WordPress’s Heartbeat – an API that allows users’ browsers to communicate with the server automatically. This could be very useful for things like autosaving posts while you’re writing them, but if you’re not careful, it could put an excessive load on the server.
- Report
The Report tab is useful if you contact LiteSpeed Technologies for additional help. You can automatically generate a report containing vital information about your settings and hosting environment and send it straight to LiteSpeed’s support team. Alternatively, you can allow them to log into your site’s backend and manually fix the issue.
- Debug Settings
This tab allows you to quickly turn certain functions on and off to see how your website works with and without them. This could be very helpful when you’re trying to diagnose an issue.
- Log View
The debug, purge, and crawler logs can be viewed, downloaded, and deleted from this tab.
- Beta Test
Through this tab, you can download and install a beta version of LiteSpeed Cache and be among the first to see the latest features before they are added to the plugin’s stable releases.
Testing and Analyzing Site Speed Improvements
The LiteSpeed web servers use proven technology to provide website owners with better performance. It’s been around for a while, and we know that it works.
The same goes for the optimization techniques you can implement with the help of the LiteSpeed cache plugins. They’ve been successfully used by thousands of website owners looking for better performance.
All in all, the theory suggests that the combination of the two will make your site much faster. If you set everything up correctly, both you and your site visitors will feel the difference.
But can you quantify it?
Plenty of online speed tests can assess many aspects of your website performance and even give you tips on improving it. They’ll help you see just how much of a difference LiteSpeed’s solutions can make.
It’s a good idea to run your website through one of these tests before you set up LiteSpeed and LiteSpeed Cache so you have a benchmark and then test it again with the web server, the plugin, and the best configuration in place.
Tests by Pingdom Tools and GTmetrix are among the first hits on the search engine results pages, often used to determine site speeds. However, the utilities you need to pay the most attention to are the ones developed by Google. They put more focus on the factors the world’s biggest search engine considers when it ranks your website, so the information they give you could directly affect your SERP positions.
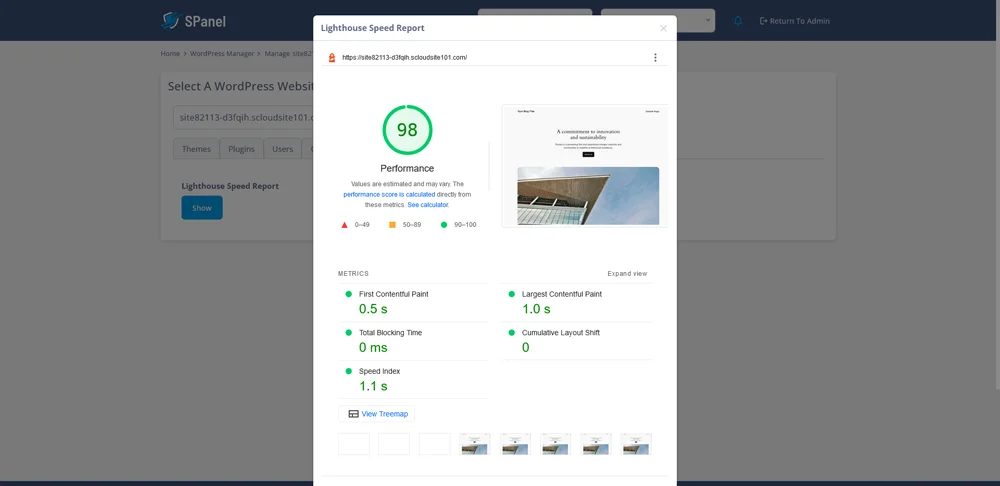
One of Google’s tools is Lighthouse, an open-source utility that simulates a page visit under controlled conditions and gives you a fair assessment of your site’s performance. Lighthouse considers several key metrics and aligns its results with Google’s Core Web Vitals, so the suggestions you get from it can genuinely help you improve your site’s user experience.
For SPanel users, employing Lighthouse will soon be a matter of a couple of clicks. A new version of ScalaHosting’s proprietary server management platform is in the works, which will feature, among other things, many changes to the user interface as well as a revamped WordPress Manager.
Through it, you can generate, view, and download a Lighthouse speed report for your site with a single click and without leaving SPanel’s interface.
Conclusion
The quest to speed up your WordPress website can be lengthy and arduous. Traditional performance-enhancing techniques could work to some extent, but you sometimes need to consider your overall hosting setup and the different technologies you can use.
The LiteSpeed web server is one of the solutions that can really make a difference. Configuring it to work with WordPress may sound daunting, but if you know what you’re doing, it won’t be tricky at all.
Frequently Asked Questions
Q: How do I optimize LiteSpeed in WordPress?
A: LiteSpeed Technologies, the company that owns the LiteSpeed web server, has developed LiteSpeed Cache. This WordPress plugin helps you configure your CMS to extract the best possible performance from LiteSpeed.
Q: What does LiteSpeed Cache do exactly?
A: The LiteSpeed Cache plugin has been around since 2016, and over the years, it has grown into something much bigger than a simple tool for making WordPress work with LiteSpeed. It’s now a fully-fledged performance-enhancing extension with many features that improve numerous aspects of your site’s performance.
Q: How do I increase my WordPress website speed?
A: Everything from the size of your images to the type and speed of your hosting account could influence your website’s performance. Numerous techniques for improving it exist, but implementing them correctly requires a lot of research and careful analysis of the bottlenecks and how they can be eliminated.

