WP Rocket: Boost WordPress Speed (Full Review)
Because of their impact on performance, optimization plugins are now considered an integral part of any WordPress project. When users go through the broad range of options, they usually pick one of the many free caching plugins that, considering the absence of a price tag, often come with an impressive set of features.
WP Rocket is not free. It’s a premium WordPress caching plugin available under a subscription model. Yet, it’s been one of the most widely regarded and popular add-ons of its kind for years.
This suggests that it has more to offer than its free counterparts. Let’s see if this is the case.
What is WP Rocket?

WP Rocket was first developed by Jonathan Buttigieg and Jean-Baptiste Marchand-Arvier in 2013. It was quickly recognized for its effective caching capabilities. In addition, WP Rocket can implement code and image optimization techniques like lazy loading, minification of HTML, CSS, and JS files, and many others.
WP Rocket is now managed by WP Media, a company co-founded by its original developers. It’s strictly a premium plugin, and its price depends on the number of projects you want to use it on.
The WP Rocket license costs just under $60 for a single website and includes technical support and updates for a year. If you decide not to renew your subscription afterward, the plugin will continue to function normally, but you won’t be able to use any future releases or get expert assistance.
How to Install WP Rocket
Since WP Rocket is a premium product, it’s only available from its own website. After you process the payment, you can download the ZIP file containing the plugin. The installation is practically seamless, but before proceeding, you must ensure that any other WordPress caching plugins like LiteSpeed Cache, WP Fastest Cache, WP-Optimize, WP Super Cache, or W3 Total Cache are deactivated.
To install the WP Rocket plugin, follow these steps:
- Log in to your WordPress dashboard and go to Plugins > Add New
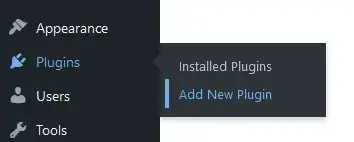
- Click the Upload Plugin button located in the top-left corner of the page and click Browse…

- Navigate to WP Rocket’s ZIP file and double-click to upload it.

- Click Install Now and wait for the installation to complete

Finally, you need to activate WP Rocket. As soon as you do, the plugin will immediately start caching the contents of your website.
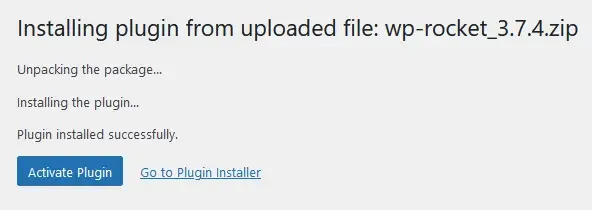
Even in this default state, you should see site speed improvements, especially if your website is bigger and not properly optimized. Nevertheless, applying the recommended WP Rocket settings can further reduce loading times and generally streamline your website operation.
You can choose which users are going to be served cached content, enable mobile cache, and determine the cache lifespan. More settings are available to optimize your website CSS, JavaScript, and media files.
WP Rocket also comes with CDN support, and the integration is especially easy if you use Cloudflare.
Preloading is available as a feature and can be configured by a sitemap. You can load external content even quicker with the help of the Prefetch DNS functionality.
WP Rocket’s dashboard is nicely laid out, with tooltips and help boxes scattered all over. They explain what each button and toggle switch does, so even a novice user can easily operate it. The interface is full of documentation links, helping you get around most issues. You can also find tons of YouTube videos with helpful tips and tutorials on making the most of the plugin. Because this is a premium product, you can always contact the plugin developers via a support ticket.
Ease of use is one of the biggest selling points of the add-on, and WP Rocket excels in that direction, especially when compared to similar caching add-ons.
WP Rocket Options and Optimal Settings
Many website owners will be relieved to hear that you don’t need to spend hours configuring and tweaking WP Rocket to see visible improvements in your WordPress website loading speeds. In fact, the WP Rocket developers claim that about 80% of the most common performance optimization techniques are applied as soon as you activate the plugin.
Desktop and mobile caching is automatically enabled, so visitors should see the difference regardless of their devices. You can further modify the .htaccess file to enable browser caching, which improves the experience for users who visit multiple pages on your website.
Thanks to another function of the .htaccess file, GZIP compression is also enabled by default. This makes cached files considerably smaller and easier to process, helping you save server resources.
Google Fonts optimization techniques are also included. The plugin combines multiple font requests into one, reducing the time needed to process them. Until recently, the option was available under the File Optimization tab. However, the developers found the feature so useful that they removed the switch from the interface and left it enabled.
With Basic Preloading activated by default, WP Rocket starts generating cache files immediately after installation.
WP Rocket has quite a few out-of-the-box features, but there are many extra options to attract your attention.
Dashboard
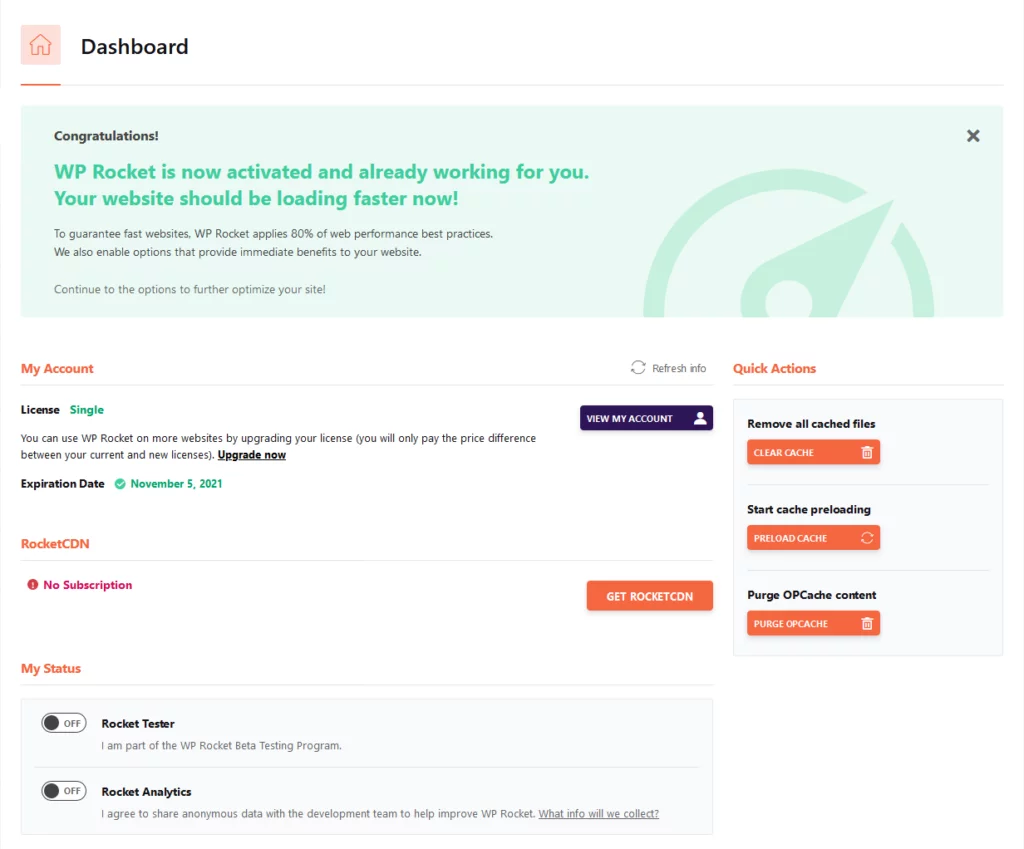
The Dashboard tab on WP Rocket’s admin panel is mostly informative. It contains data about your account and its status, as well as links to popular video tutorials and frequently asked questions.
The Quick Actions section contains buttons to clear the cache, purge the OPcache, or enable cache preloading. Those are some of the essential features you’ll probably use often.
Cache tab
You can enable caching for mobile users (ON by default) in the Cache tab. If you use a dedicated mobile theme and plugin instead of a responsive design, WP Rocket can also create separate cache files for it.

From the User Cache section, you can enable cache for logged-in users, and the Cache Lifespan tab lets you determine the period after which cached files will be deleted. By default, it’s set at 10 hours, which should be more than suitable for most websites. That said, if you publish new posts frequently or make regular changes, you might want to reduce the lifespan.

File Optimization tab
The settings in the File Optimization tab revolve primarily around your website’s CSS and JavaScript files. If you decide to try them out, enable them one by one, and if you see that any of them are causing problems, turn them off and make sure they stay disabled.
The Minify CSS Files function lets WP Rocket go through your CSS files and remove unused CSS code, whitespaces, and comments, reducing the size of the sheets. If you click the Combine CSS Files box, WP Rocket will combine multiple CSS files into a single one and eliminate some of the requests the server needs to process.
The Optimize CSS Delivery option can improve the perceived load time of your website by generating the critical-path CSS for every page type on your website. The plugin can also load CSS asynchronously, further improving performance from a user’s point of view.

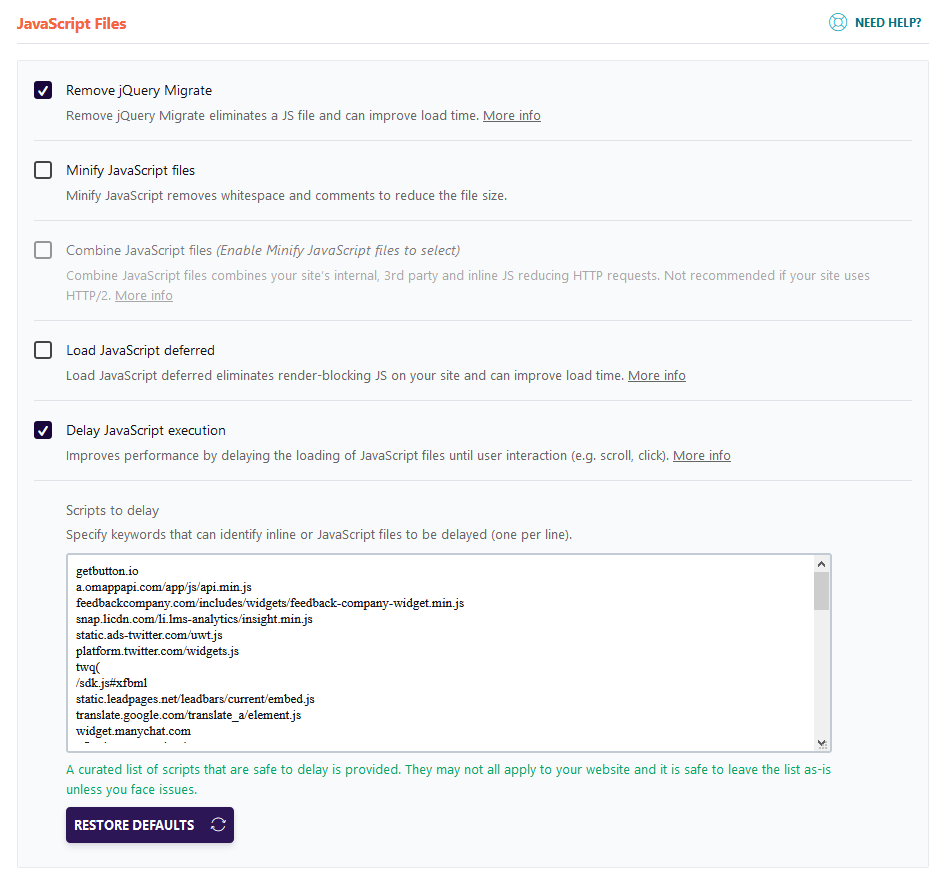
If the Remove jQuery Migrate checkbox is selected, WP Rocket will improve the load time by eliminating an automatic request for a JS file that is often unnecessary. Bear in mind, however, that some themes and plugins use the file, so this option can cause a conflict.
The Minify JavaScript files and Combine JavaScript files options can also optimize your JavaScript files. However, as the tooltips warn, this could cause problems, especially if your website uses HTTP/2.
If the Load JavaScript Deferred option is enabled, your website will load JavaScript files with the defer attribute, meaning they won’t block the downloading of other assets. By default, this option will also enable Safe Mode for jQuery, which will load the main jQuery file at the top of the document and ensure all themes and plugins function normally.
Delay JavaScript Execution is a relatively new feature that, if enabled, stops the execution of JavaScript files until user interaction occurs. The list of scripts that will be delayed is available in the field below the checkbox, and you can add more entries if you see fit. If you decide to leave this option enabled, test it thoroughly.
Media tab
The Media tab in the WP Rocket admin panel helps you optimize the loading and delivery of site images and videos. LazyLoad is a feature that can dramatically improve your website’s perceived and actual loading time by only loading media files when they’re about to enter the visible part of the screen.
If, for example, you have a large, high-resolution image located near the bottom of the page, it won’t be loaded until the user scrolls down to it. It must be said that lazy loading images has been the default behavior of all WordPress versions since WordPress 5.5.
Nevertheless, WP Rocket’s LazyLoad gives you more control over the functionality and extends it to iframes and videos, which makes it all the more useful.

WP Rocket is designed to disable emoji requests from WordPress.org by default. This option ensures that instead of firing unnecessary external HTTP requests, the visitor browser will load the emojis from its own database.
If you choose to Disable WordPress Embeds, others won’t be able to embed content from your website. The performance benefit comes from the eliminated JavaScript requests with WordPress embeds.
The WebP Caching feature can enable WP Rocket to serve cached images in the new WebP format to compatible browsers. WebP uses both lossy and lossless image compression, and its files are between 25% and 34% smaller than traditional JPEGs and PNGs. It can definitely speed up your website, but you’ll likely need one of the many third-party plugins specializing in image optimization to convert your old pictures to the new format.
Preload tab
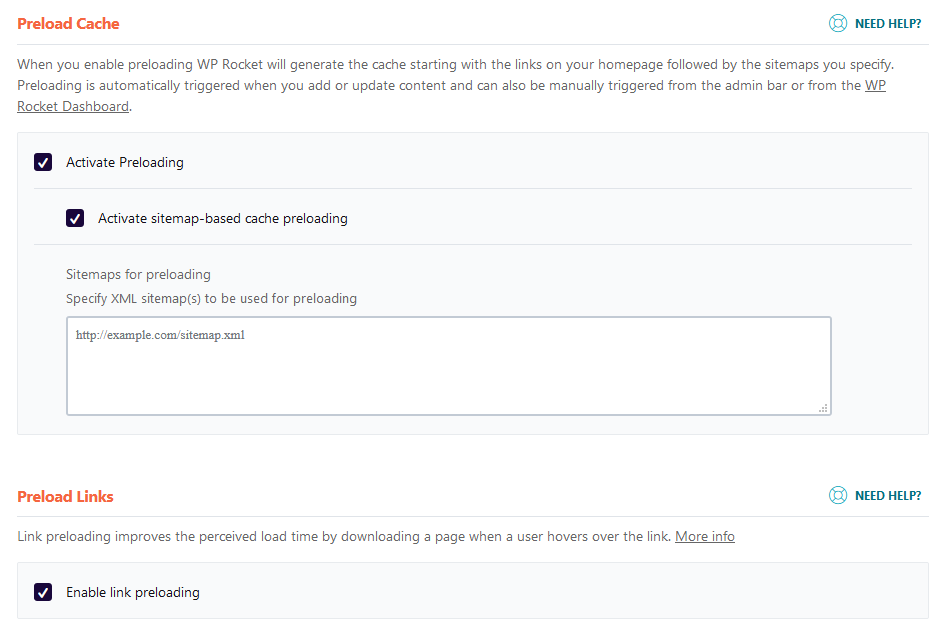
Unlike other caching plugins, WP Rocket comes with the Preload functionality enabled by default. Normally, WP Rocket generates cached pages starting with the documents linked on your homepage. However, you can activate sitemap-based cache preloading through the Preload tab. This way, WP Rocket has a list of URLs to cache.
Note: You can use a sitemap generated by an SEO plugin.
Link preloading was introduced in WP Rocket 3.7. It can improve the perceived loading time but will not affect your page speed score, as tested with benchmark tools like Pingdom and GTMetrix.
It is triggered whenever a visitor hovers over or touches a link for over 100ms. Instead of waiting for the visitor to click on the link, WP Rocket loads the HTML of the page in the background, so when the user finally clicks, the page loads instantaneously. According to the WP Rocket documentation, only Chromium-based browsers support the feature, so the effects won’t be visible to all users.
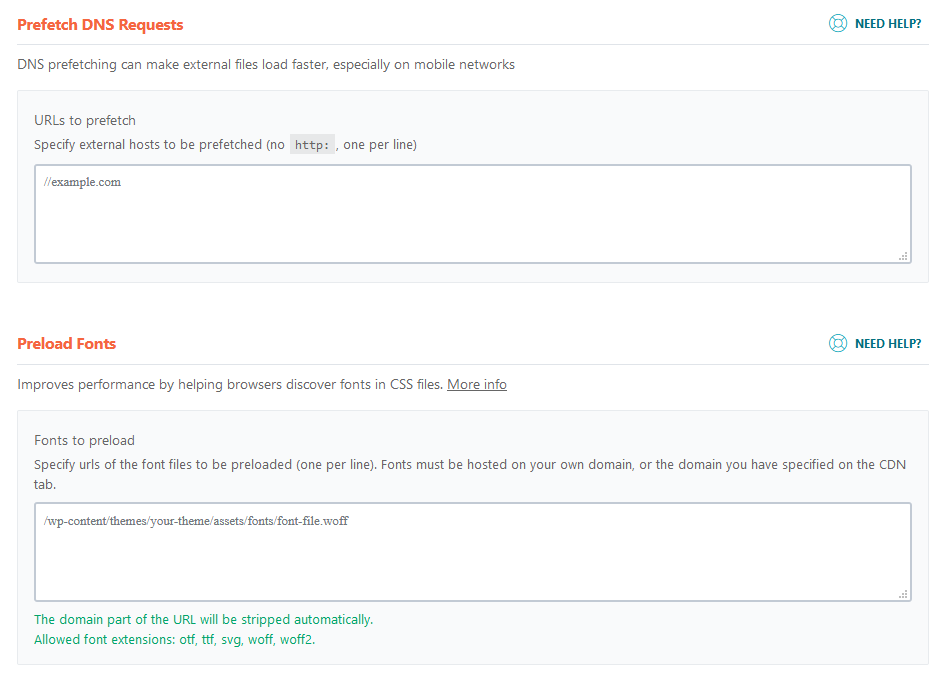
In all likelihood, your website uses some external assets – fonts from Google, embedded YouTube videos, or social sharing buttons. Every time a user visits your website, these external assets must be located and fetched.
WP Rocket can speed up the loading of the external data by processing the DNS lookups quicker. The feature is called Prefetch DNS Requests, and it’s turned on by default. However, you do need to provide a list of external hosts.
Third-party tools like GTmetrix tell you exactly which external URLs are fetched when your website is loaded. You can use this information to assemble the list in WP Rocket’s admin panel. Alternatively, you can use one of the lists of commonly used external hosts that can be found on Google.
Fonts hosted on your domain can also be preloaded. This can improve your WordPress site speed, but you need to be careful when doing that.
If you put all your fonts into the list of cache URLs, you risk creating many unnecessary requests and slowing down your website. If you’re unsure where they’re located, GTmetrix’s Waterfall feature can help you find out.
Advanced Rules
Many experts believe the settings in this tab work fine for most websites in their default state. Nevertheless, it pays to know what each one does.
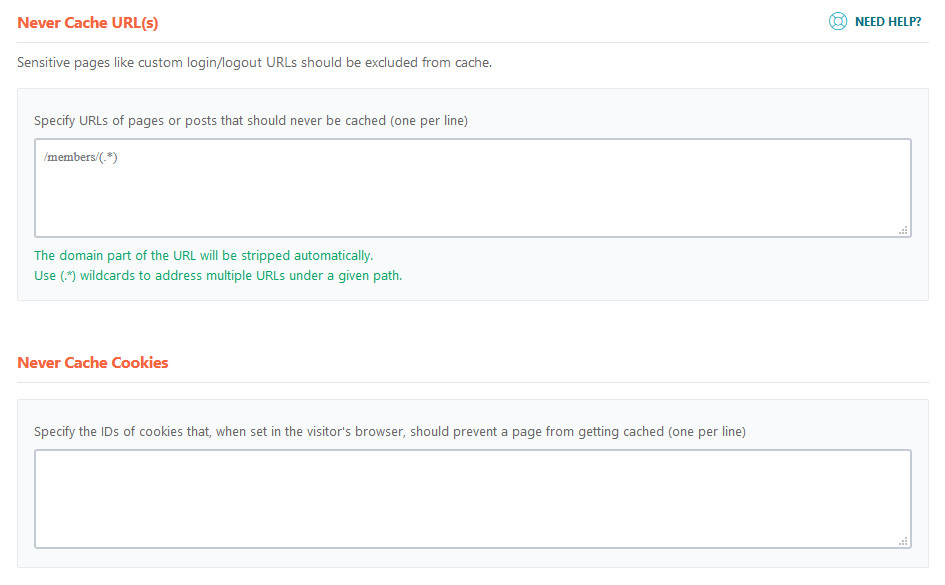
In the Never Cache URL(s) list, you can enter the pages you don’t want to cache. This is especially useful for ecommerce websites and should include login, shopping cart, and checkout pages. Bear in mind, however, that WP Rocket works with most ecommerce platforms out of the box, so you only need this one if you use a custom setup.
You can paste a list of cookie IDs in the Never Cache Cookies field. If the IDs are found in the visitor’s browser, WP Rocket will prevent the page from caching.
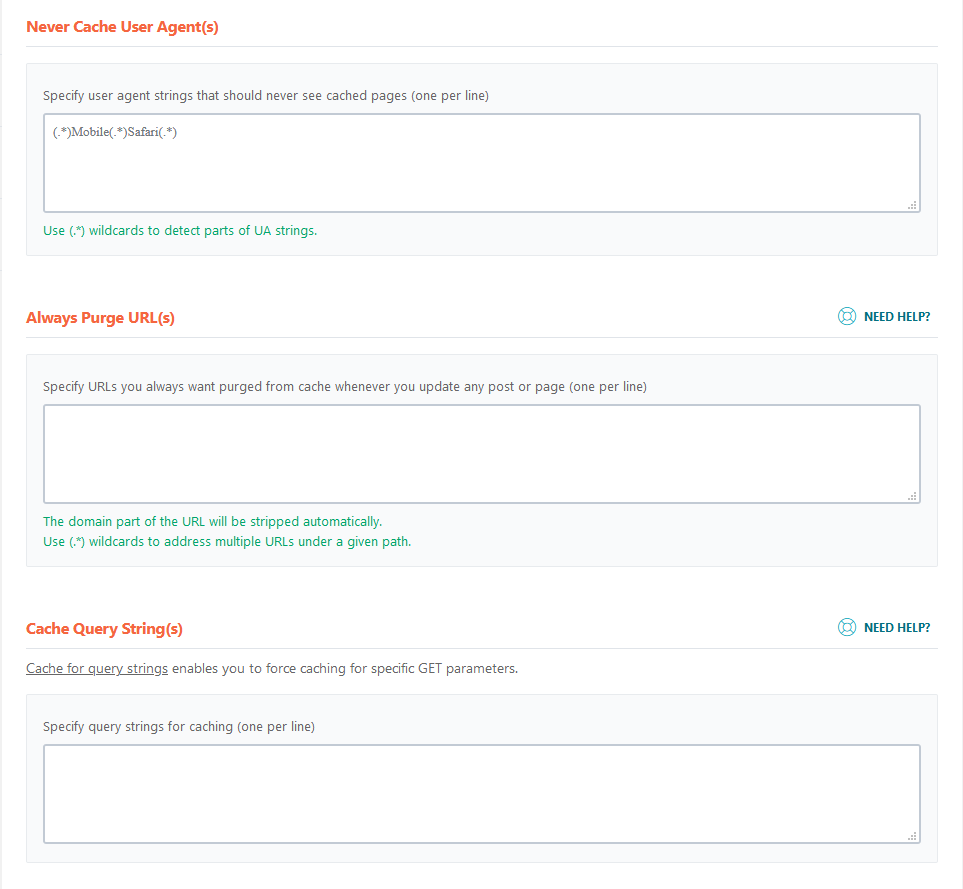
This list and the Never Cache User Agent(s) setting allow you to prevent certain visitors from triggering the plugin’s caching mechanisms. This feature is useful if you want to ensure that search engine bots don’t cache the pages they crawl, for example.
In the Always Purge URL(s) list, you can enter pages that will automatically be purged from the cache when you update an existing post or publish a new one. You may be tempted to apply this setting to the homepage to ensure that new posts appear as soon as they go live.
But WP Rocket has already got you covered.
The plugin automatically clears the homepage cache when new content is uploaded. In other words, it’s another setting that could be useful only in very specific circumstances.
The Cache Query String(s) option is handy for caching the results of popular search queries or filters if you have an ecommerce website. Don’t forget to click Save Changes to apply the new settings.
Database
The options in the Database tab are focused on removing clutter and helping your website deliver requested data more quickly and efficiently.
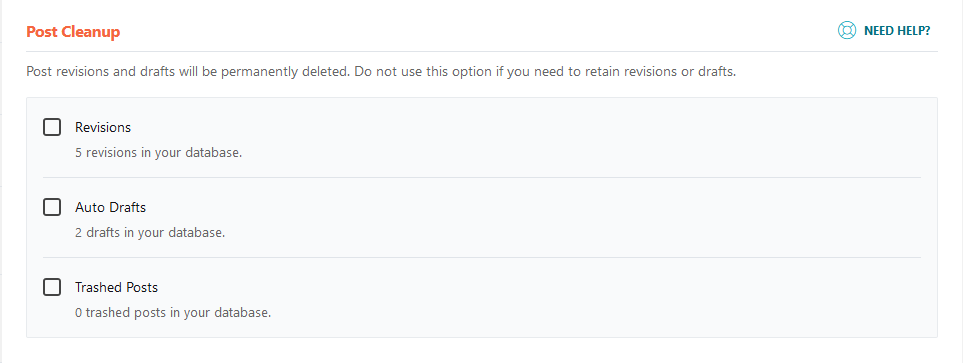
For example, through the Post Cleanup section, you can get rid of a lot of data you don’t necessarily need. The Revisions checkbox relates to the old version of published posts or drafts you’ve edited.
Auto Drafts concerns the automatic drafts WordPress creates while you’re writing a post, and the Trashed Posts checkbox selects the deleted posts for removal. Keep in mind, though, that these actions are irreversible.
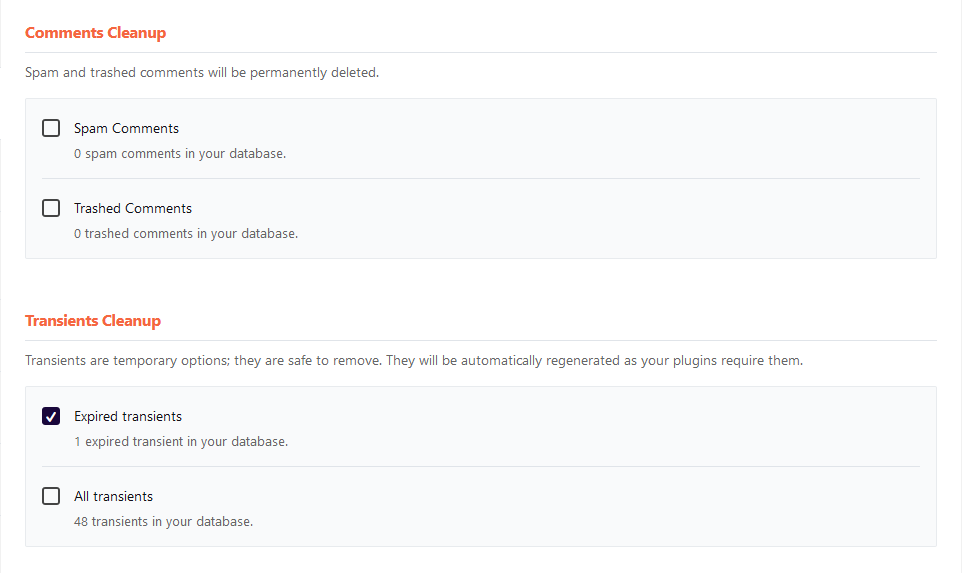
WP Rocket lets you remove Spam and Trashed comments as well. WordPress auto-deletes them after 30 days anyway, but this is still an excellent way to quickly and easily tidy up the database.
WP Rocket can also clear up transients. Transients allow developers to temporarily store data that helps their software applications and plugins work more smoothly. They are stored in your website’s database and often contain a lot of information.
WP Rocket lets you either delete the Expired transients only or remove All of them.
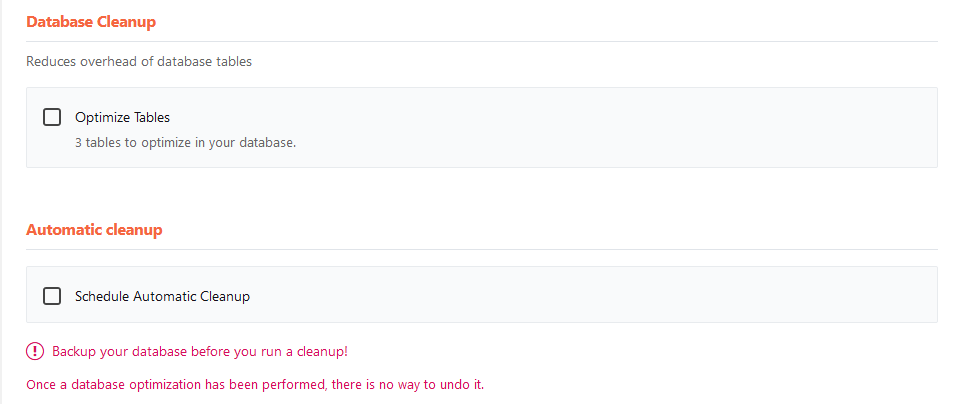
In addition to deleting unused information, WP Rocket can also restructure your database to make data retrieval quicker. The option is labeled Optimize Tables, and it’s best to have a backup before activating it.
All database cleanup operations are irreversible. Once you delete an entry, you can’t restore it, so these actions are not automated by default. If you want WP Rocket to periodically clean up some unwanted entries in your database and/or optimize its tables, select the appropriate checkboxes and click Schedule Automatic Cleanup. All you need to do is set how frequently the plugin will clean your database.
CDN tab
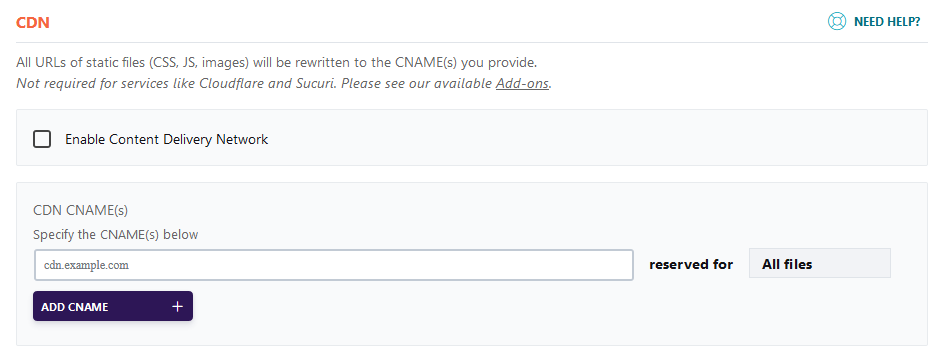
The CDN tab helps you configure WP Rocket to work with your provider of choice. A CDN (or Content Delivery Network) stores copies of your website’s static files on a network of servers located worldwide. The server closest to your website visitor then returns this content.
With over 300 points of presence worldwide, Cloudflare is one of the biggest and most popular CDN services on the market. If you’re one of the millions of website owners who use it, you don’t need to touch anything in the CDN tab. WP-Rocket’s developers provide the functionality you’re after through a dedicated tool in the Add-ons section.
For example, the CDN tab helps you make the most of other content delivery networks like Rocket CDN. Start by selecting the Enable Content Delivery Network checkbox and enter the CNAME records (your CDN provider can show you what they are) into the appropriate field.
Through the Exclude Files from CDN list, you can control which files are handled by your CDN provider.
Heartbeat API
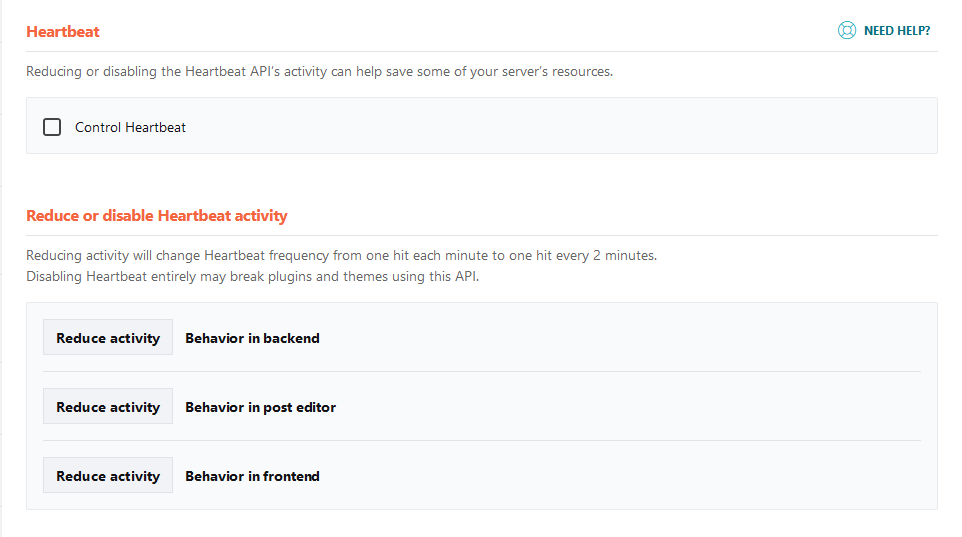
The WordPress Heartbeat API is a function of the WP core that enables valuable features like autosaving, post-locking, etc.
The problem is all these features rely on quite a few HTTP requests, which inevitably affects the website’s overall performance. There are dedicated plugins that throttle these requests to improve the speed, but WP Rocket has this functionality built-in.
The Heartbeat tab lets you either Reduce the Heartbeat activity or Disable it altogether. You can modify its behavior for the backend, the frontend, and the post editor. How you’ll proceed depends on your personal project.
For example, if you are the only author, no one else will be editing posts, so you can deactivate the API for the post editor, possibly even the entire backend. Be sure to test your website after tweaking the settings in this section.
Add-ons Tab
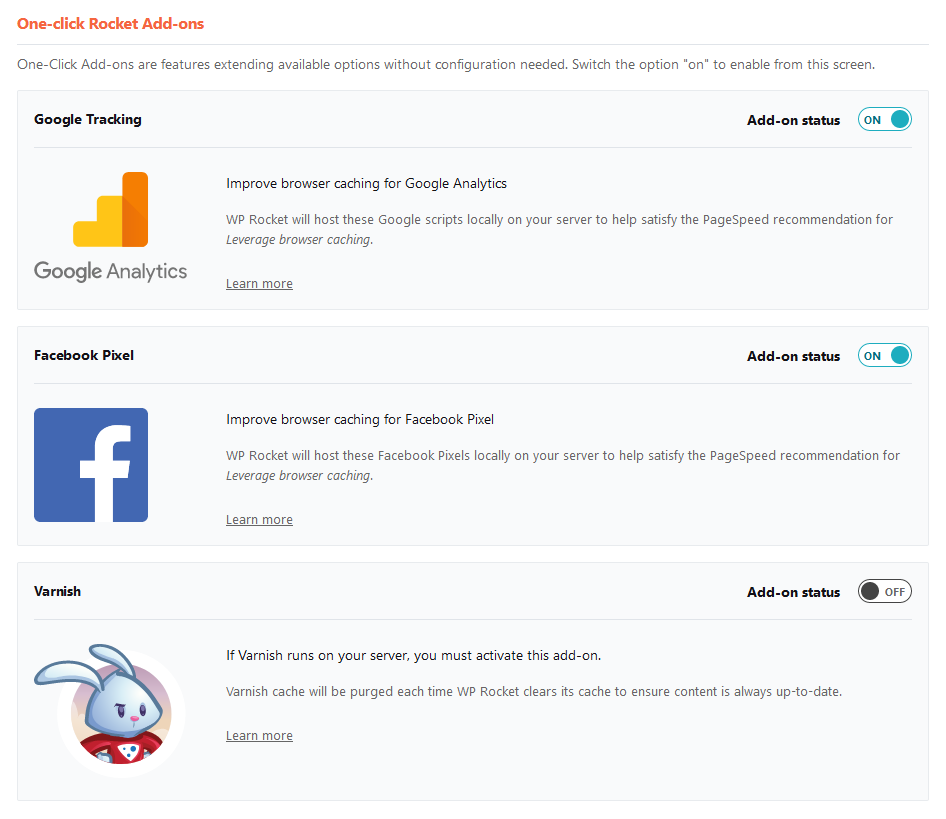
If you’ve configured everything correctly, you should have a reasonably fast WordPress website. Nevertheless, WP Rocket’s Add-ons tab hides a few more lucrative options for further speed boosting.
If you use Google Analytics, you often see a Leverage browser caching warning when you test your WordPress site performance with PageSpeed. This warning is usually triggered by GA’s scripts, which are fetched from Google’s servers and have short cache expiration periods. To fix this, WP Rocket can host the scripts locally and apply custom caching rules.
Websites that use Facebook pixels to track user activity also trigger the occasional warning from performance testing tools. The reasons are similar, and so is the WP Rocket solution.
The next add-on concerns the Varnish HTTP accelerator that is available on some servers. When enabled, the module will ensure the Varnish cache is purged alongside WP Rocket’s. That way, users will always see up-to-date content.
If you use the Cloudflare CDN, WP Rocket gives you access to a few tools that help you better integrate the content delivery network into your website. You can start by enabling the CF add-on from the Add-ons tab and clicking the Modify option.
You’ll need to get your Global API key and Zone ID from Cloudflare and enter them along with your email address into the respective fields. When your account is integrated, you can control some of CF’s settings directly from the Add-ons tab of WP Rocket.
The Development Mode toggle switch lets you debug and observe changes to cacheable content in real time. Once you’re done, you need to disable it manually, and if you don’t, WP Rocket will turn it off for you after three hours.
By activating the Optimal Settings switch, Cloudflare’s configuration adjusts for the best possible speed, performance, and compatibility with WP Rocket’s optimization mechanisms. The plugin developers recommend leaving this setting turned on.
The Relative Protocol toggle switch should only be turned on if you use Cloudflare’s flexible SSL feature. It’s only necessary if your site isn’t fully protected by an SSL certificate. Nowadays, everyone can get a free certificate from Let’s Encrypt, and management platforms like SPanel can even configure it to work with your domain automatically. It makes no sense to run your website without one.
The Clear All Cloudflare Cache Files button, located below the toggle switches, purges all cached resources for your website. Usually, you won’t need it unless you’ve made some changes to your Cloudflare configuration.

WP Rocket also integrates with Sucuri’s web application firewall. An add-on lets you synchronize the cache removal of WP Rocket and Sucuri, ensuring users always see up-to-date content. All you need is the API key available under the API tab in your Sucuri Firewall account.
Tools tab
After you’ve configured the ideal WP Rocket settings, you can export them and apply them to another WordPress installation with as little as a few clicks. After you click the Download Settings button in the Tools tab, WP Rocket will back up your configuration and put it in a JSON file.
After you have installed WP Rocket on another WordPress website, you can use the Upload File and Import Settings button to apply your configuration in seconds.

WP Rocket Installation and Configuration with ScalaHosting
Before you install WP Rocket, you must ensure your WordPress website is deployed in the right hosting environment. That’s the only way to unlock the plugin’s full potential.
Over the years, ScalaHosting’s sysadmin and technical support specialists have worked with thousands of WordPress projects and have seen first-hand how the world’s most popular CMS works. Our WordPress VPS hosting solutions guarantee your dedicated resources and a completely isolated environment, ensuring maximum security and reliability.
They are running on top of a proper cloud infrastructure designed and developed by our very own system administrators, who have ensured you get unmatched scalability and endless customization options. In other words, you have a setup that allows you to drain every last drop of performance with the help of WP Rocket.
The plugin is fairly straightforward to configure. There are quite a few tooltips and helpful links, so if you take your time, you should have no issues installing WP Rocket and choosing the settings that will give your website speed a proper boost.
Still, if you ever feel stuck or need help determining your next step, you can always contact our technical support experts. Our industry-leading response times and top-level expertise guarantee that you will soon have all the necessary information.


Conclusion
The WordPress ecosystem provides a broad choice of add-ons that can significantly improve your website’s performance. It’s impossible to single out one of them as the best caching plugin out there, but certain facts can show you which ones have the edge over the competition.
For example, many WP Rocket alternatives are completely free to use. Yet, they don’t have the premium add-on’s enormous following and the vast volume of helpful resources freely available online.
This testifies to the fact that WP Rocket is a highly comprehensive solution with quite a few key benefits. Best of all, taking full advantage of them shouldn’t be a problem, even for less experienced users.
Frequently Asked Questions
Q: Do I need a caching plugin?
A: Caching can have a significant impact on website performance, and with metrics like Google’s Core Web Vitals having an increasingly larger impact, it can also boost your search engine rankings. If you’re a WordPress user, there’s no easier way to enable caching than with a plugin. That’s why these add-ons are considered an integral part of the arsenal of any WP developer.
Q: Can I use WP Rocket for free?
A: WP Rocket is a premium product and doesn’t offer a free version. The fee for using it on a single website is $59 per year and includes support and access to the latest version of the plugin. The same package for three websites costs $119 or $299 if you want WP Rocket to cover unlimited web projects.
Q: How do I fix a slow WordPress website?
A: If you’re not happy with the performance of your WordPress website, the hosting environment is probably the first thing you need to check. An upgrade may be in order if you find out that the service isn’t powerful enough. If your hosting account is suitable, you should definitely think about adding a great caching plugin that will properly speed up your site.
ScalaHosting – Optimize Website Speed with WP Rocket

