Why Is Your Website Loading Slowly
Everyone hates slow-loading websites. Why, then, do we often see pages that take ages to load?
The problem is, while people do realize how important website performance is, they often struggle to troubleshoot speed-related issues simply because they don’t know where to start.
Today, we’ll try to lend a helping hand by going through the factors that affect the site’s loading speeds as well as some strategies for improving performance.
First, though, let’s see why speed is so important.
Why You Should Improve Your Site’s Loading Speeds
Let’s look at the problem of website speed from both sides of the screen. First, imagine you’re looking for something on Google. The first search result seems relevant, so you click on it. However, the website is taking far too long to load. Nowadays, you’re used to getting instant access to whatever information you’re looking for, so you go back to Google and look at the next result.
Now imagine you’re the owner of the first website. You’ve worked hard to make it to the top of the search engine results pages (SERPs), and you’ve probably prepared some excellent content and products for your site’s visitors. Yet, poor performance rendered all that effort worthless, and a potential customer clicked away practically immediately.
People don’t tolerate slow websites, and if you don’t do enough to keep the performance at decent levels, you will effectively be losing money. You don’t need to take our word for it, either.
In 2012, Amazon calculated that if its page load speed slows by just one second, the conversion rate drop would result in a whopping $1.6 billion in lost revenue. Mind you, back in 2012, Amazon’s annual sales were hovering around $60 billion per year. Right now, they’re at $470 billion.
The financial repercussions are not the only problem. Slow loading speeds affect the website’s user experience, and the user experience is something search engines take very seriously. If your site’s performance is not up to scratch, you’ll struggle to reach the rankings you’re after, and you’ll find it harder to attract the traffic required to sustain your project in the long run.
So, improving your site’s performance is undoubtedly worth it. First, though, you have to know what you’re working with.
How Do You (and Google) Measure Loading Speeds?
You don’t measure a website’s speed with a stopwatch. There are far too many factors at play, including the speed of your internet connection, the type of device you’re using, etc.
To properly evaluate the performance, you need to study many different components and consider multiple factors when determining how quick the site is.
It’s a complicated task, but luckily, there are tools that can do the heavy lifting for you.
Plenty of site speed tests are just a Google search away. They all come with slightly different features, but, in essence, they all function the same way – you enter your site’s domain, and after analyzing its performance, the tool gives you a score. Often, you get a detailed report telling you which aspects of your site’s speed could be improved.
It pays to use several tests if you want to be thorough. One of the tools may spot something the others have missed, so reviewing multiple reports is definitely worth it. There is, however, one speed test that you probably need to pay a bit more attention to.
On the face of it, PageSpeed Insights doesn’t differ that much from the rest of the tools of this kind. You enter a URL, PageSpeed Insights analyzes it, and it produces a report containing potential problems with specific aspects of the site’s performance. However, as it was developed by Google, it gives you more details that could be directly related not only to your speed but also to your search engine rankings.
The section that should be of particular interest is situated near the top and is labeled Core Web Vitals Assessment. Google’s Core Web Vitals are a set of metrics introduced in what was described as one of the biggest changes to Google’s ranking algorithm. They’ve been in place since August 2021, and, as their name suggests, they’re very important for your site’s position on the results pages.
The idea behind these metrics is to quantitatively measure the site’s performance from a user’s instead of a device’s perspective. They show that Google is now more interested in perceived performance and responsiveness rather than out-and-out speed.
Here’s a quick breakdown of Google’s Core Web Vital metrics.
Largest Contentful Paint (LCP)
This metric measures the time required to load the main content on the page. By main content, Google means the largest text block or image visible on the screen and the section of the page visitors are most likely to be interested in.
Similar metrics were used in the past, but they didn’t necessarily represent what people see, so they were deemed inaccurate. LCP aims to give you a more precise representation of the perceived performance we talked about a second ago.
First Input Delay (FID)
It’s not just about rendering content on the visitor’s screen. Google also wants a responsive site that reacts quickly when people interact with it. That’s why the FID metric measures the time between the visitor’s first input (e.g., a click on a link or a button) and the response to this interaction.
You have probably seen websites with poor FID performance – the site appears to be loaded, but when you try to click a link, nothing happens. This is because the browser’s main thread is busy loading other, less visible elements of the website (e.g., external CSS files or JavaScript code). The result is a slower overall response time and a poorer experience for the visitor.
Cumulative Layout Shift (CLS)
The Cumulative Layout Shift metric measures the page’s visual stability or lack thereof. More often than not, poor performance in this respect is caused by too many elements loading at the same time. You’ve undoubtedly seen a website with low visual stability. You’ve waited for it to load, and you’re about to click a link or a button, but at the last moment, an ad appears at the top of the page, moving everything below it. You end up either tapping away on an empty space or, worse still, following the wrong link.
In the same section of PageSpeed Insight’s report, you have three more metrics that are not a part of Google’s Core Web Vitals but are just as crucial for your site’s performance.
- First Contentful Paint (FCP) – First Contentful Paint measures the delay between the moment a page starts loading and the moment actual bits of content appear on the screen. This could include text, images, or other elements. The metric is important because it assures you that something is happening.
- Interaction to Next Paint (INP) – A good INP score is indicative of an interactive site. A modern website should give visual feedback upon visitor input. For example, after you enter your login credentials, the page should give you some indication (e.g., a spinning circle under the login form) showing you that the server is checking your username and password. It’s important to ensure this indication appears as soon as possible, as it confirms that the website is working.
- Time to First Byte (TTFB) – This is one of the oldest metrics for measuring site performance. As its name suggests, TTFB measures the time between the moment a request for a particular resource is sent and the moment the first byte of the response arrives. This time can be affected by DNS lookups, TLS negotiations, redirects, process startup, and others. Unlike the rest of the metrics in this section, TTFB doesn’t necessarily reflect what people see on their screens. However, the better the TTFB, the sooner the browser will start to render all the elements on the screen.

Google’s Core Web Vitals metrics have been the focus of quite a few discussions recently. During one of them, Vlad Georgiev, ScalaHosting’s co-founder and CTO, joined a panel of experts that included Eric Enge, an SEO guru and author of The Art of SEO, Brian Teeman, one of the brains behind Joomla, Robert Deutz, the President of Open Source Matters (the company running the Joomla project), and Philip Walton, a Board Member at the Joomla organization.
The topic of the webinar was search engine optimization and the latest web and content development trends designed to keep your site close to the top of the search engine results pages. Needless to say, loading speeds were also discussed, with the focus placed on the importance of a powerful hosting service. If you’re interested in improving your site’s search engine rankings, the video below is well worth the watch.
An Exclusive Insiders Look Behind The SEO and Web Development Curtain
As you can see from our webinar, there are quite a few things you need to do to achieve a good position on the search engine results pages. However, very near the top of your priority list should be keeping the metrics we discussed above in the green.
If they’re not, you have a problem to fix, and identifying it won’t be easy if you don’t know where to look. That’s why in the next section, we’ll discuss some of the most common reasons for slow loading speeds, and we’ll give you some suggestions on what you can do to eliminate them.
Reasons for Poor Website Performance
Modern websites rely on many different components working in harmony. When there’s a problem, it’s often difficult to know where to start looking for the root cause. However, when it comes to performance issues, the first port of call is pretty clear – the hosting service.
An unsuitable hosting account
No matter how much you optimize your website, if the underlying hosting service is not up to the job, you’ll experience performance issues. But how do you ensure your hosting account is suitable for your project?
Well, you need the right provider and the correct type of hosting service.
The hosting market is so saturated it may be difficult to find differences between individual hosts. However, no two services are alike, and to get the best performance for your site, you need to inspect the individual offerings, focusing on several key aspects.
Location
If your host server is situated in the US, and a user from Europe accesses your website, they’ll need to wait for the data to travel all the way across the Atlantic before it lands on their screens. This takes time and slows down the entire site. Ideally, you want to find a host with data centers close to your audience’s geographic location.
Hardware and technology
Don’t forget to check what sort of machines individual hosts use. The hardware can make a world of difference when it comes to website speed. For example, SSDs are much faster than HDDs, and drives with the new NVM Express (or NVMe) interface give you even better performance than traditional SATA devices.
Configuration
Of course, even the most up-to-date hardware will amount to nothing if the server isn’t set up and configured properly. That’s why it’s important to research as many providers as you can and shortlist those with a reputation for speed and reliability.
There are plenty of review websites where you can get a comprehensive picture of what different hosts offer. From these websites, you may also learn more about the next vital aspect of every hosting service.
Technical support
24/7 support is pretty standard nowadays, but agents aren’t always as responsive as they should be. Your host’s support specialists must be quick in handling site speed problems. They should be able to identify the issue and either fix it if it’s on their end or provide you with information that will help you resolve it yourself.
Choosing a provider is only half the story, though. Pretty much all hosts offer several different styles of hosting, and it’s up to you to choose the right one.
At the cheaper end of the scale, you have shared hosting plans. Starting at just a few dollars per month, the temptation to go for one of them is real. It certainly makes sense from a financial perspective.
However, you can’t expect much in terms of performance.
Shared hosting gets its name from the fact that hundreds of different websites are hosted on the same server. Because you share the same hardware with all these projects, your performance depends on what they’re doing. A traffic spike on a single website can push the server’s load levels through the roof, meaning the rest of the projects on the same machine will also be affected.
This is a problem because consistent performance is just as important as good performance. People expect websites to be predictable, and they hate unforeseen slowdowns.
Google won’t be impressed if your speed goes up and down all the time, either. Its crawlers scan your website all the time, and the metrics inside the PageSpeed Insights report are calculated over a period of 28 days. You can’t expect high search engine rankings if your site displays good loading speeds half the time.
A virtual private server (VPS) is a much better solution if performance is high on your priority list. It may be more expensive than the shared plans, but it’s also more powerful. Crucially, you have a set of hardware resources dedicated entirely to your site, so you don’t need to worry about anyone else slowing you down.
There are more benefits – you have a dedicated IP, and thanks to the virtualization layer, you can easily scale up your server whenever you exceed its current capacity. There’s no need to migrate the website or redirect the domain. You simply update the server’s hardware configuration with a couple of clicks, and that’s it. With the hosting solution sorted, it’s time to look into the rest of the things that may slow down your website.
Render blocking resources
JavaScript and CSS are essential to any modern website. Before they became so ubiquitous, we had static pages, everything was displayed in Times New Roman, and the design was limited to the background color and some imagery. Now, we have interactive web applications with dynamic content that can keep you occupied for hours on end.
Thanks to JavaScript and CSS, our websites are now more interactive and better looking. The downside is, JS and CSS code can cause performance issues when it’s not executed at the right time.
When a user visits a website, their browser starts reading the HTML code and rendering the page’s elements on the screen. When it reaches a redirect to a JavaScript file or a CSS stylesheet, it pauses the rendering of all visual elements while it’s loading slow JS/CSS code. A single script can slow down the entire site and leave visitors disappointed.
Sometimes, the JS/CSS code must be parsed in the initial stages of loading the page if everything is to function properly. However, executing the code can often be delayed until after the main elements have been loaded. In some cases, the code is not even necessary and can be removed.
Luckily, identifying the scripts that slow you down should be relatively easy. Inside the PageSpeed Insights report, you can scroll down to the Opportunities section and open the Eliminate render-blocking resources menu. There, you’ll see a list of JS and stylesheet files that are slowing your site down.

If you use a content management system, you can most likely find a plugin or an extension that automatically deals with the problem. Most add-ons designed to improve your site’s speed are equipped with the functionality alongside many other features. For those lacking coding experience, a plugin is the way to go.
However, if you’re confident, you can also address the issue manually. If you open the page’s code, you can find mentions of the offending files inside <script> tags. For example:
<script src=”script.js”>
The tag above tells the browser to pause the rendering of the design elements while the code from script.js is fetched and executed. Remove it, and the script will not be active on the page at all.
However, if you need the script, you can reduce the page load time by asynchronously loading it or pushing its execution to the back of the queue. With the async attribute, you can make the browser fetch the code while it continues loading the all-important HTML elements. Their rendering will only be paused during code execution, reducing the overall load time.
The tag would look like this:
<script src=”script.js” async>
With the defer attribute, the browser pings and fetches the code while parsing the HTML elements. However, the actual script execution is delayed until after the initial page load. Here’s what the code would look like:
<script src=”script.js” defer>
The two attributes can’t be used in tandem. Which one you’ll choose depends on the script itself. Generally speaking, it’s accepted that defer is preferable for non-essential scripts, while asynchronous loading is more applicable to code that needs to be loaded as soon as the web page is rendered.
Editing your site’s code is risky, and even the tiniest mistakes could lead to serious problems. So, before you make any changes to your production website, set up a staging environment and make sure everything functions smoothly. After that, you can rerun the PageSpeed Insights scan to see if the problems have been successfully resolved.
Unoptimized code
To load a page, a user’s browser must send a certain number of requests, fetch the code from the host server, and then execute it to render all the elements on the screen.
How quickly it’ll do that depends on two main factors – the volume of code that needs to be executed and the number of HTTP requests the server needs to process in order to transfer the site’s data. First, we’ll tackle the volume. The technique for reducing the size of large files is called minification — removing elements from your code that are not crucial to the way the site looks.
During the development stage, programmers tend to write well-structured code that is easy to read. The reasoning behind this is pretty simple – if there’s a bug, a pair of human eyes will need to review the code for any mistakes.
That’s why white spaces are left between the individual elements, alongside plenty of comments indicating what each line does. This is important for website maintenance, but it does little to improve performance.
All these unnecessary comments and empty new lines still need to be parsed by the browser, and the more you have of them, the more time it will take to process them. Yet, from a visitor’s perspective, they bring absolutely no functional value.
Here’s a graphic illustration of what we’re talking about. Below is a screenshot of a regular CSS stylesheet opened in a text editor. The file belongs to Twenty Twenty-Two, one of the default WordPress themes, it contains just under 150 lines of code, and it weighs in at around 5.5 KB.
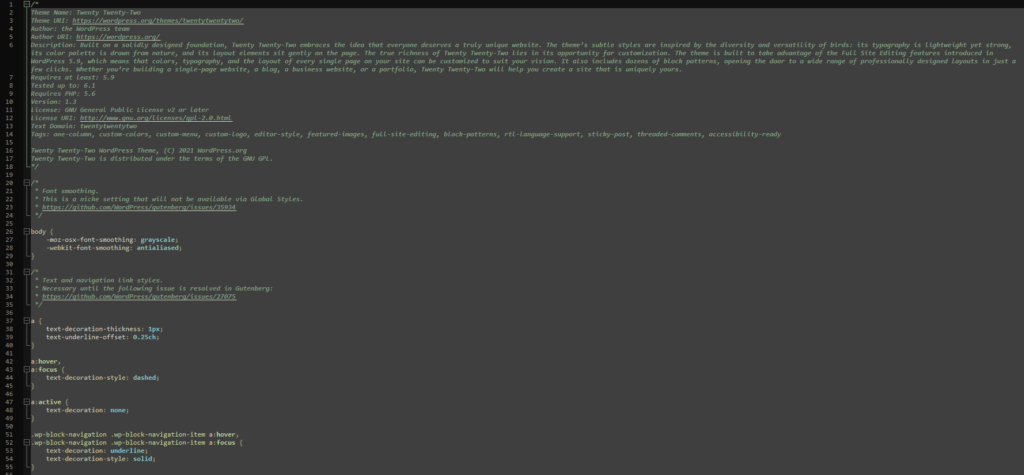
Run it via an online minification tool, and the code looks like this:

You get the same functionality, but the file contains a single line of code and takes up just over 2.3 KB. Now imagine how much difference minification can make on a website with multiple complex CSS and JavaScript files. But how do you implement the technique?
CMS users will likely find an extension that can automatically minify their bulky code. For example, most caching plugins for WordPress have the functionality built-in.
Another alternative is to use an online minifier where you either enter the URL of the file you want to modify or paste the code. There are also command-line alternatives you can install on your hosting account.
You’re not short of options, but you must remember that minification isn’t perfect. Because you’re using an automated tool that edits your site’s core files according to a set algorithm, errors are not uncommon, especially on more complicated scripts. Be sure to test the code in a staging environment before pushing it to production and confirm the performance benefits.
Furthermore, minified code is practically impossible to debug, so remember to save a copy of the original file with the proper formatting and comments, especially if multiple developers are collaborating on the same project.
With the code cleaned, you can look into the different techniques for reducing the number of HTTP requests. When a browser tries to load a page, it first sends a request to retrieve data from the HTML file. Inside it, it will likely find that your CSS and JavaScript code is stored in separate files, so it will need to send additional requests. Too many HTTP requests, and the server will start to struggle to process the information and serve web content quickly enough.
CSS and JS inlining is one way to avoid this. Instead of loading it from outside sources, you can add your CSS and JS to the website’s code and remove external JavaScript files and stylesheets. It’s a simple copy-paste operation.
To inline CSS code, you must surround it with <style> and </style> and situate it inside the <head> section of the document. Inline styling is also possible inside an HTML tag with the style attribute, but this is not considered a best practice.
JS scripts are placed inside <script> tags and, depending on their purpose, can be pasted either in the <head> or <body> tags inside the document.
Executing the code straight from the main file is one way of reducing loading times. However, it’s not always the most efficient method. You should avoid inlining large volumes of code inside your HTML files, as this can sometimes have the opposite effect. In some cases, combining two JS or CSS files into one is the better strategy, and if you want the code to execute quickly, implementing a caching solution is an absolute must (more on that in a minute).
A poorly organized database
Most things you see when you open a web page are loaded from the site’s database. The same goes for many things you can’t actually see. For example, a typical WordPress site stores anything from the posts and pages, through account data, to comments, post revisions, access logs, and preferences in its MySQL database.
In other words, pretty much any activity on your site generates data. The thing is, you don’t always need that data. For example, not all WordPress site owners need post revisions, and there’s little point in storing the details of inactive accounts.
The fact that it’s useless isn’t the only reason why you might want it gone. The more data you store, the larger the database, and the larger your database, the slower the performance, especially if it’s not optimized.
In addition to increased disk usage, your database server will be trawling through tons of tables, rows, and columns to find the required entry. It will need more time to respond to queries, ruining the overall impression your site leaves on people.
The techniques for minimizing the volume of junk data depend on how much information you have and its nature. Sometimes, simple tweaks like disabling post revisions in WordPress are enough. In other cases, you need to go through the database and remove unwanted entries manually.
It’s also a good idea to use MySQL’s OPTIMIZE TABLE statement every now and again. It’s often described as the equivalent of defragmenting your computer’s hard drive. It reorganizes the physical storage inside the database’s tables and indexes, reducing storage use and improving I/O speed.
If you’re comfortable using the command-line interface, you can optimize your data via SSH.
As its name suggests, the OPTIMIZE TABLE statement is usually used on individual tables. To employ it, you first need to log into the database server with the following:
$ mysql -u (your MySQL username) -p
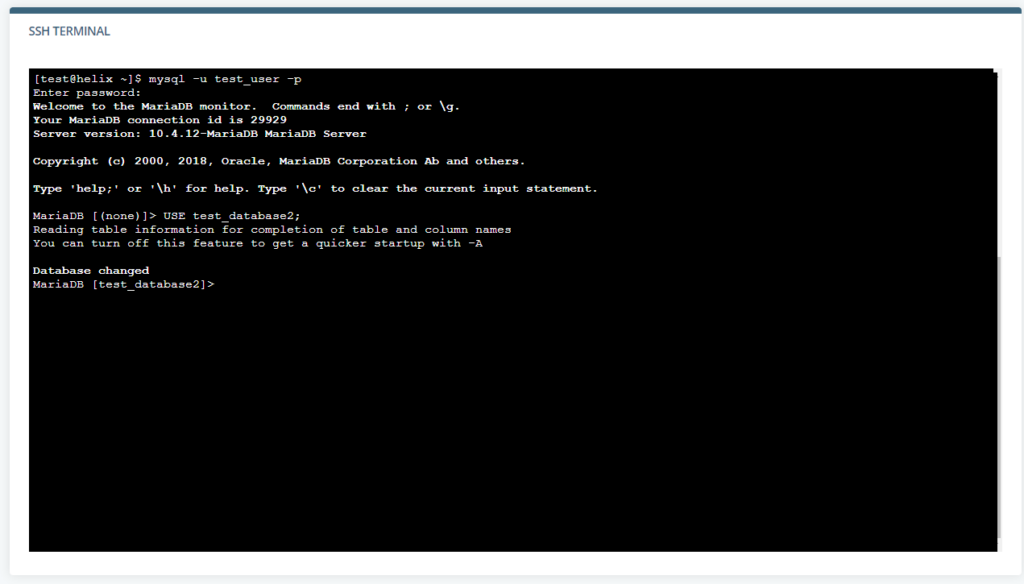
MySQL will ask you for your password and log you in. You now need to select the database you’re going to modify with the USE statement followed by the name of the database. The screenshot below will show you the output you should see.
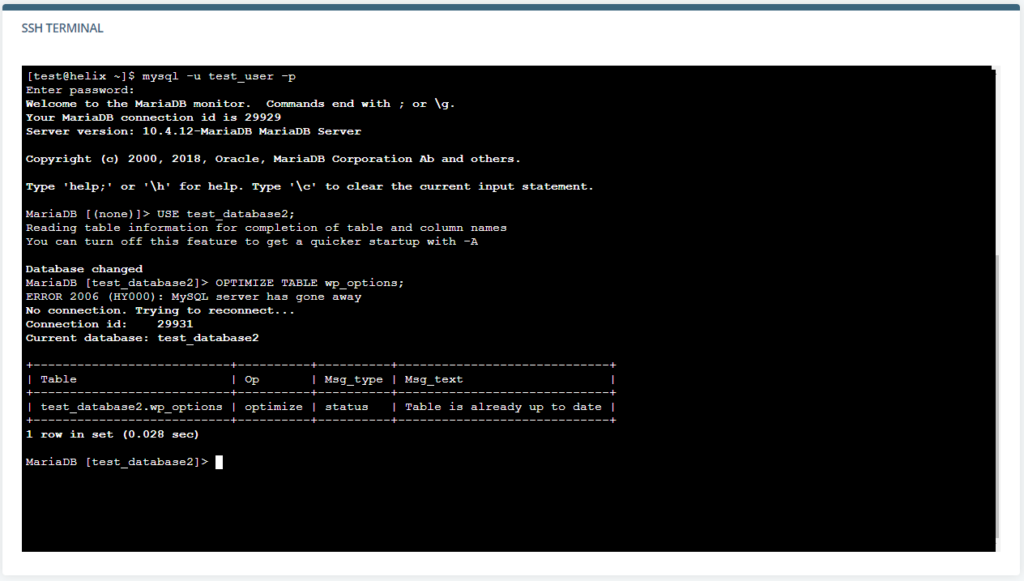
Finally, enter the OPTIMIZE TABLE statement followed by the name of the table and a semicolon (without it, MySQL won’t understand the command).
This wouldn’t be a viable method if your database has hundreds of tables, and you need to apply the same commands on all of them. Luckily, there is a way to optimize all the tables in the database at once.
Without logging into MySQL, you need to enter the following command:
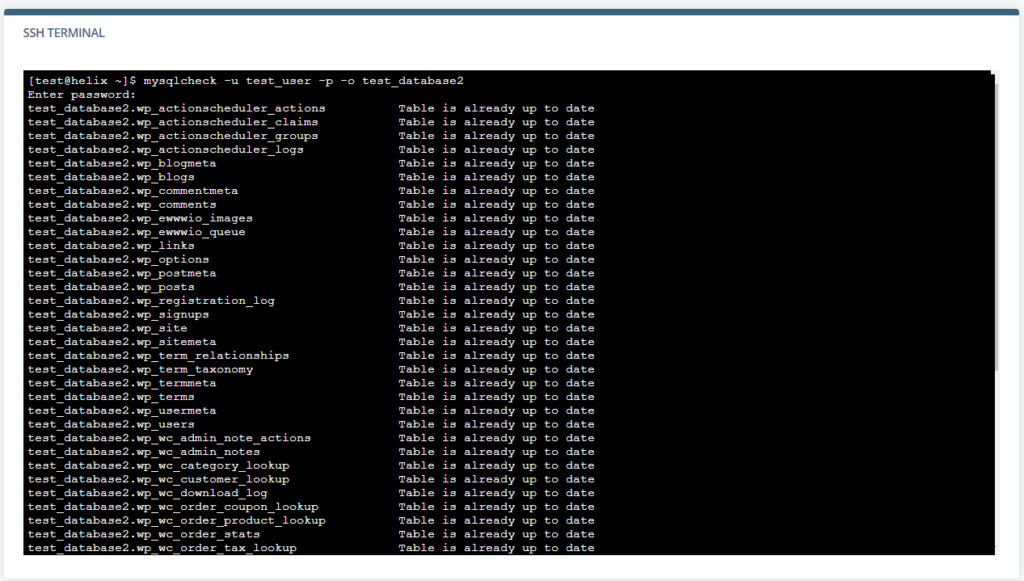
$ mysqlcheck -u [your MySQL username] -p -o [the database’s name]
The database server will ask for your MySQL password and proceed to optimize the entire database.
Those who find all these commands too complicated will be happy to hear that they can also optimize their databases via phpMyAdmin. The phpMyAdmin database management system gives website owners a graphical interface for easier control over their databases. It’s open-source, and it’s a part of most shared and managed hosting accounts. Usually, you can access it via your control panel.
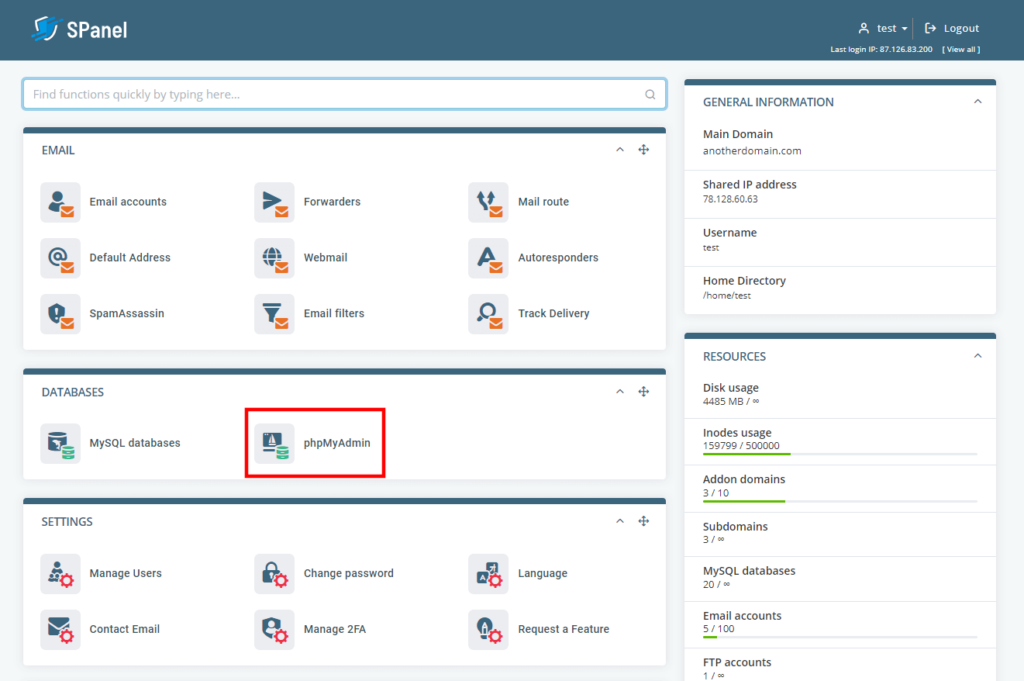
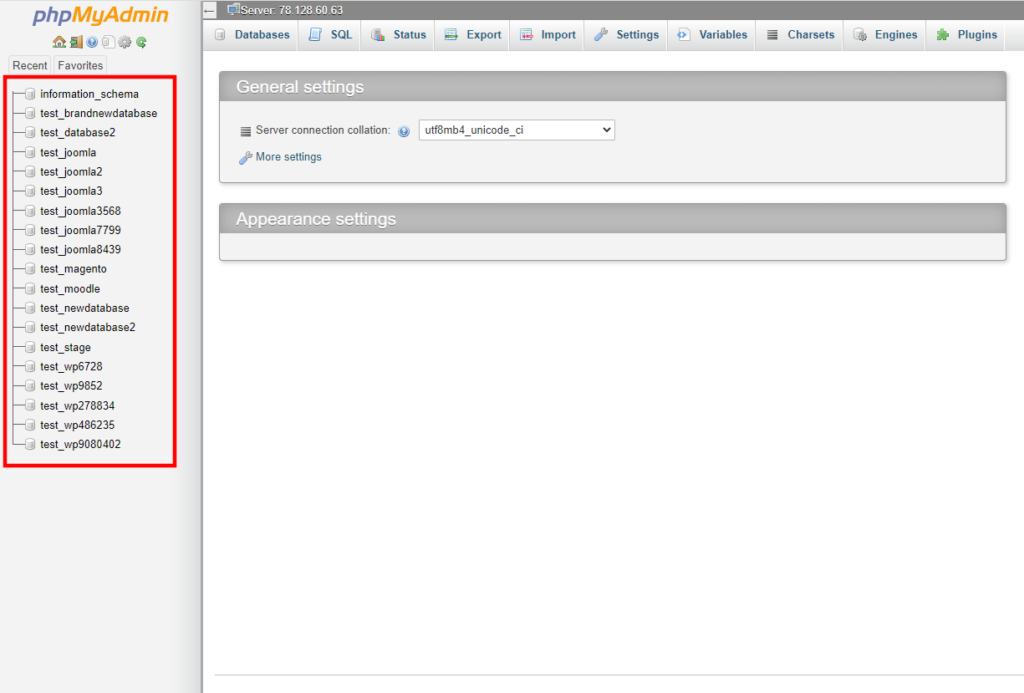
On the homepage, you’ll see a list of all your databases in a menu on the left. Select the one you want to modify, and phpMyAdmin will display all its tables in the central part of the screen.
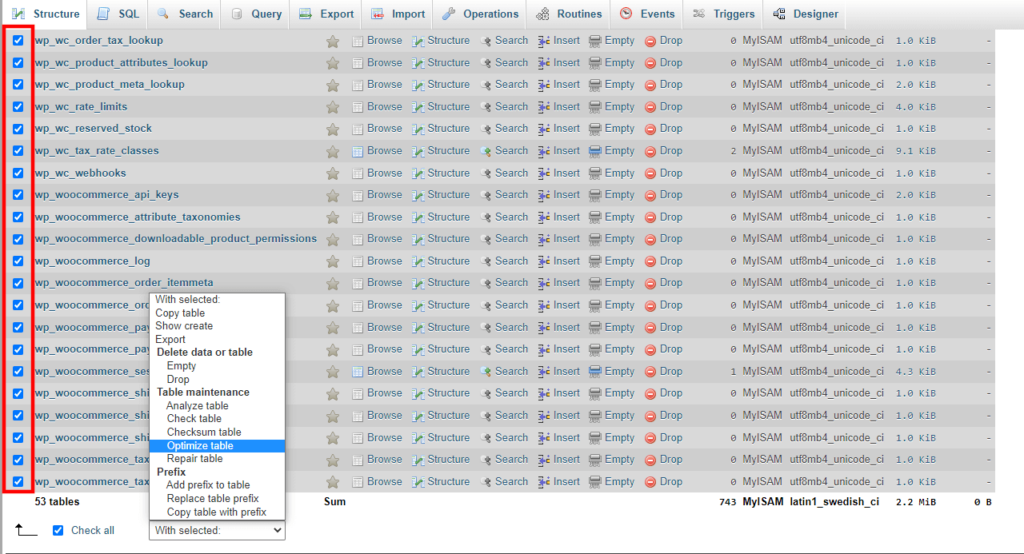
Use the checkboxes to select the tables you want to optimize and pick Optimize table from the With selected drop-down.
Too many plugins
Plugins are an inseparable part of pretty much any CMS-based project. They let you do anything from creating a contact form on your website to transforming a humble blog into a fully-fledged ecommerce business.
Individual developers and web agencies try to satisfy every imaginable demand, and you must take full advantage of the community that supports your application. However, you shouldn’t get carried away.
On the one hand, you have the security issues. Every plugin is a software product with its own bugs and vulnerabilities. If one of those vulnerabilities goes unpatched for some reason, your site could be at risk. Stability issues are not uncommon, as well.
However, the most visible problem with using too many plugins usually relates to the loading speeds. There are a couple of reasons for this.
The more plugins your website has, the more files it needs to work correctly. And the more files your website has, the more HTTP requests the server needs to process to render the page.
On the other hand, every plugin relies on multiple scripts to run. Some of these scripts run inside the browser, but others are executed on the server, so they take up valuable CPU power and memory. The net result is that the server struggles more to meet the same traffic levels. The problems will be felt the most by people on cheaper, less powerful hosting plans.
Sometimes, even add-ons designed to help you speed up your site have the opposite effect. For example, if two or more plugins try to cache the same files at the same time, the conflict could negatively affect your loading speeds.
So, what’s the solution, then?
Nobody can say with absolute certainty how many plugins are too many. Some WordPress experts reckon that shared plans are good for no more than 5 plugins, while most virtual and dedicated servers can easily run an optimized site with up to 20 add-ons.
However, taking these figures at face value isn’t such a great idea. For one, no two plugins are identical. For example, WooCommerce is a lot heavier than the Hello Dolly add-on that comes pre-installed on all WordPress sites. Furthermore, as we established already, there are differences between individual hosting providers and the speed and power they offer.
So, instead of counting how many plugins you can install before your site starts slowing down, you should carefully research every single add-on before installing it and only use the ones you’ll really need.
If you see any drops in your website’s performance after you install a new plugin, your culprit is pretty clear. Even if the effects aren’t immediate, however, you mustn’t ignore the possibility of a plugin (or plugins) slowing down your site.
Regularly auditing your add-ons and removing the ones you no longer use will help you achieve and maintain the loading speeds you’re after.
Media-heavy pages and unoptimized images
The average size of the modern web page hovers just above the 2MB mark. To put that into perspective, an archive with the installer of the classic computer game Doom weighs in at just under 2.4MB.
What does this mean?
It means that a lot of information moves between your host server and visitors’ computers when they try to access your website. To improve loading speeds, you need to reduce its volume as much as possible. But how can you do this?
Inside the 2MB mentioned above, you have the HTML document telling the browser what to display, the JavaScript files and CSS stylesheets, and any third-party-sourced elements that may load separately. However, the lion’s share of the data belongs to your site’s images.
You may be surprised to learn how much you can do to reduce their impact on your loading speeds.
Let’s start with the dimensions. If you’re going to show it in a 500X700 px frame, there’s little point in keeping it in full 4K resolution. Scaling and cropping the image down to the size required for your site will save you storage space and reduce the volume of data downloaded whenever someone accesses your website.
If you also want to have your image available in its original resolution, you can keep it and provide a link. That way, it won’t be loaded until it’s needed.
With the size done, you can look at the compression, quality, and metadata. Various techniques can significantly reduce the size of an image with practically unnoticeable effects on how the photo looks. We’re talking highly technical stuff that is not easy to understand if you’re not familiar with the characteristics of image files.
Thankfully, you don’t need to delve too deep into the technicalities because many popular image editing applications, like Photoshop, can take care of everything for you. They have a Save for web option that uses various compression techniques to reduce the file size and removes any unnecessary metadata, like the alt tag, for example. The effects on the image quality are minimal.
If you use a CMS, you can usually find plugins and extensions that can do everything for you straight on the server.
Finally, we move on to the image format. In the past, website owners had to choose between two standard file types for images – PNG and JPEG. The two use different compression techniques, which directly affect the file size. JPEG files can pack high-quality pictures into a relatively small container, so they’re definitely the preferred choice for the colorful imagery on your site.
Due to its lossless compression, the PNG format isn’t suitable for sharing high-resolution photos, but because it supports transparency, it can be used for your site’s graphics and buttons.
All this stands true today, but if you’re building a new website, you may also want to consider another format. It’s called WebP, and it was launched by Google in 2010. It supports both lossy and lossless compression, animations, and transparency, so it’s intended to act as an alternative not only to JPEG and PNG but to GIFs as well.
Its biggest advantage, however, lies in the fact that WEBP files tend to be between 25% and 34% smaller than the equivalent JPEG images.
WEBP adoption hasn’t been as quick as its benefits would have suggested, and in the past, many website owners steered clear of the format because support was limited. Nowadays, however, you have nothing to worry about.
WEBP images are rendered by most modern browsers, and image editing applications have also caught up. CMS-based websites can take advantage of plugins that convert image files to WEBP but also keep JPEG/PNG versions to serve legacy systems.
While paying attention to your image files, you may as well consider how they are embedded into the page. By default, the browser renders HTML elements in the order they appear in the document. It starts at the top and runs all the way to the bottom.
So, even if your page spans way below what you can see on your screen, you still need to wait for every image, button, and link to be rendered before it is fully loaded. If you want happy users, you need to avoid this delay.
Thankfully, a technique called “lazy loading” can help.
You may have heard of “the fold” in a web development context. The concept refers to the line that separates the elements you see when you first load a page from the ones that remain hidden until you scroll down to them.
If lazy loading is enabled, the logos, photos, buttons, and other images below the fold will not be loaded until they appear on your screen. This reduces the time between when a visitor starts loading the website and when they can interact with them – the First Input Delay metric from Google’s Core Web Vitals.
WordPress 5.5 introduced lazy loading as a part of the core, and websites based on other CMS applications can have the functionality provided by a plugin. If you need to do it straight from the code, add the loading=”lazy” attribute to the <img> tag.
Too many ads and external resources
You need to monetize your website and the effort you put into it, and often, ads are the only way to do it. However, you have to be careful with them. On the one hand, website visitors find them annoying, and it’s usually easy to see why.
Too many banners and animations obscure the content people come to see, especially on mobile devices, so make sure you keep the number of ads to a minimum and position them so that they don’t get in the way. This is especially true of the so-called rich media ads – ads that include video, audio, and other interactive elements.
The effects on the performance could be just as significant. Your advertisements usually come from an outside ad service like AdSense. When someone tries to open your website, in addition to the HTTP requests sent to your server, they’ll also need to wait for the ads to load from the ad platform’s infrastructure. Their speed is outside your control, and if they aren’t loading quickly enough, your cumulative layout shift performance will suffer, which affects your website loading time and search engine rankings.
The same goes for other third-party services and libraries. CMS plugins often rely on outside infrastructure, and so do social sharing buttons that are loaded from their respective social media site. It pays to bear this in mind when picking add-ons for your site. If you can, test them in a staging environment first and see how they affect your speed before pushing them to production.
While you’re at it, check how third-party typography services affect your performance, as well. Many website owners use providers like Google Fonts and Adobe Fonts (formerly Adobe Typekit) to get instant access to thousands of different typefaces.
The main benefit is that you can tweak your site’s design to your specifications, and you can be sure it will look exactly the same everywhere, regardless of the device. Although nobody is insured against outages, you can also rely on pretty good uptime.
However, by integrating a third-party font, you’re asking your visitor’s devices to make yet another request to an external server. And as we mentioned already, the higher the number of requests, the slower the website.
Check how much of an effect the typography service you use has on the loading speeds, and if it’s significant, consider the alternatives. Using hosted fonts is one of them.
A hosted font is a typeface you store on your server. When a user visits your website, it’s temporarily installed on their device, and the text is rendered exactly the way you want it. The browser will need to send additional HTTP requests for your fonts, but if they’re cached properly, the files can be served much more quickly, so the effects on the performance are minimal.
You can also think about using some of the so-called web safe fonts – typefaces that are pre-installed on pretty much any device and don’t rely on a special CSS declaration. Among them are Arial, Verdana, Tahoma, Trebuchet MS, and, of course, Times New Roman.
Outdated software
Most of you associate updates with security patches and new features that improve an application’s look and functionality. However, new versions are often designed to improve the software’s performance, as well.
An application must keep evolving if it is to provide optimum performance. Every software component on your server (regardless of whether it’s open-source) has a team of developers that continuously try to make their product not only more functional but also faster.
Here’s just one example – in 2013, the PHP development team included the OPcache extension in PHP 5.5. OPcache is a caching engine that stores precompiled bytecode in memory and eliminates the need to load and parse code during every request.
The performance benefits were significant, but developers realized that the speed could be boosted even further if scripts are stored in OPcache memory before the application is run. As a result, a preloading module for OPcache was implemented into PHP 7.4 and released in November 2019.
Just twelve months later, with PHP 8.0, PHP’s developers introduced the JIT (or just in time) compiler – an OPcache module designed to improve performance further still. Thanks to it, a dynamic assembler can allow PHP to bypass compilation, which improves calculation speed and reduces memory consumption.
As of yet, the performance benefits for web applications like WordPress are negligible, but PHP’s development team is determined to improve the technology to the point where everyone can see its potential.
If you don’t use PHP’s latest version, you won’t be able to take advantage of the speed boost.
Now that we’ve seen some of the factors that may be hampering your performance, let’s have a look at what you can do to turn a slow-loading website into a fast one.
Things You Can Do to Boost Your Loading Speeds Further
As you can see, troubleshooting a slow website is rarely easy. However, a thorough investigation is bound to reveal the problem. After you fix it, you’ll probably want to explore a few more options for improving your site’s performance.
Let’s have a look at them.
Use a Content Delivery Network
We’ve already touched upon the importance of having your website’s files close to your visitors. But what happens if you’re targeting a global audience? Well, you need to use a Content Delivery Network (or CDN).
A CDN consists of independent servers situated in different data centers across the world. After you sign up for the service, the CDN automatically creates copies of your site’s static files (images, CSS stylesheets, JavaScript files, etc.) and places them on several machines situated in different geographic regions. Whenever someone accesses your website, the CDN checks the user’s location and serves the content from the node nearest to them.
The static content covers a shorter distance and is more easily accessible.
Furthermore, a CDN will reduce bandwidth usage and decrease the load on your main server.
There are many CDN providers, all offering a wide range of plans with different prices and features. However, in terms of popularity, Cloudflare stands out from the crowd. In addition to the hundreds of points of presence, it presents enough features to satisfy most site owners’ needs. It’s so popular some of the top web hosting management platforms like cPanel and SPanel have even included tools for managing it straight from your control panel.
Best of all, while there are quite a few premium plans, Cloudflare also offers a fully-fledged CDN service that includes all points of presence across the globe completely free of charge.
Usually, all you need to do to use Cloudflare is register an account, add your site to the dashboard, and change the domain’s nameservers.
Enable compression
As we established already, one of the best ways to make your website perform is to reduce the volume of data that needs to travel between the browser and the server. And compression is one of the best ways to do that.
Those of you who have tried to save 2MB of data on a 3½ floppy disk know that using compression, you can significantly shrink the size of a file. There are different mechanisms for compressing information, but more often than not, the software scans a file to identify and abbreviate repeated information.
Compression is excellent for reducing the size of web files because programming languages rely on repetitive syntax. For example, in a regular HTML file, tags like <p> or <div> can be found dozens and even hundreds of times. By abbreviating them, the compression software reduces the number of lines of code, which results in much smaller file sizes. After receiving the file, the browser decompresses it and renders the page.
There are many compression algorithms, but in the context of website hosting, GZIP and Brotli appear to be the most popular. The reason for this is twofold. First, they compress data extremely efficiently, with both boasting a file size reduction of over 70%. They are also much quicker than other compression algorithms, and crucially, they are supported by modern browsers.
Many web hosts now realize the importance of page speed and understand that compression is one of the easiest ways to improve it. That’s why either GZIP or Brotli compression is likely enabled on your hosting account.
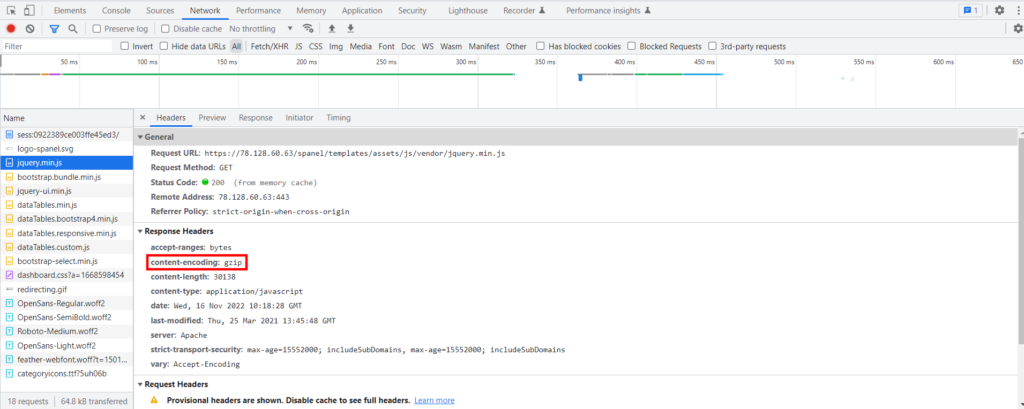
You can check whether that’s the case by examining the response headers in the Network tab of your browser’s developer tools. The content-encoding header will show you the type of compression used (if any).
Another option is to use a speed test. If your web files aren’t compressed, online tools like Google’s PageSpeed Insights will point it out and strongly advise you to do something about it. This shouldn’t be a surprise, as compression can help a lot with one of the most crucial Core Web Vital metrics – Largest Contentful Paint.
If you don’t have it, you first need to ask your host whether the module is installed on the web server. Enabling it usually requires root access, so you may need to ask your provider’s technicians to turn it on for you.
Once that’s done, you can edit the web server’s configuration file to set which file types are to be compressed. If you use a CMS, a plugin can usually take care of this.
Use a caching solution
It’s not just about how many requests a server needs to process, it’s also about how quickly they are processed. If the web server needs to retrieve the same bit of data again and again whenever someone visits the website, the delivery process would be incredibly inefficient. That’s why caching exists.
A cache is a hardware or software component designed to store data that can be quickly served whenever it’s needed. The information is kept for a limited time period and is updated regularly. Its nature and location depend on the caching mechanism.
There are three distinct types of caching:
- Site caching – The website is configured to identify individual visitors. When a person accesses the site for the first time, certain objects are loaded on the server, transferred to their device, and stored there for a predetermined period of time. The next time the same user returns, these objects are loaded straight from the cached memory.
- Browser caching – Browser caching is quite similar to site caching in that once the user visits a page, the static elements like large media files and JavaScript, HTML, CSS code, etc., are stored on the device. Once again, this eliminates the need to transfer all these assets the next time the site is loaded from the same computer. The main difference is that everything is controlled by the browser.
- Server-side caching – This time, the cached content is saved on the server and is served not just to a single user but to everyone. The Server-side cache includes the content stored by CDN nodes, which mostly comprises of static files. However, the primary host server can also be configured to cache database queries for quick data retrieval and precompiled PHP code.
All three types of caching serve the same purpose – to make your website better by reducing the time needed to load a page, so not enabling them makes no sense.
First, contact your host to determine whether their servers are configured to use a caching solution. Programs like Memcached and Redis are pre-installed on quite a few of the managed web hosting services on the market, and they do a good job of speeding your website up, especially if you configure it properly.
Some content management systems like Joomla offer built-in caching systems that can be enabled via the backend. With others, you’ll need to use plugins that, in addition to caching, offer a number of other performance optimization tools. If you can, try testing the different solutions in a staging environment. This will help you assess the individual plugins’ benefits (if any) and choose the one that suits you the best.
Use a faster web server
Most hosting services operate on top of the Apache web server. This is not surprising at all – it’s been around for well over two decades now, and many of the world’s most popular web applications were developed with Apache as a base.
However, we’re now in the twenty-first century, and there are other alternatives. They were built from the ground up to be better than Apache in many different aspects. Speed is one of them.
Nginx, for example, has been around since 2004, when it was released with the idea of creating a web server that can accommodate 10 thousand concurrent connections. It’s a fully-featured, standalone web server, but because it requires additional website configuration, most people install it on top of Apache and use it as a reverse proxy. In both cases, there’s a demonstrable performance boost for the websites running on it, especially if the traffic levels are high.
LiteSpeed Web Server (LSWS), and its open-source version, OpenLiteSpeed, present another alternative. They have an event-driven architecture that makes them up to six times faster than Apache when serving static content. LSWS is a drop-in replacement for Apache, as well, so configuring it to work with your website shouldn’t be a problem.
LiteSpeed’s developers have also released free caching plugins for the most popular web applications, boosting the speed gains even further.
Usually, you can’t just switch between web servers. For example, if you’re on a shared hosting plan, it’s impossible. You can do it on a virtual or dedicated server, but you need root access and plenty of sysadmin experience.
One notable exception to this rule is an SPanel VPS. By default, ScalaHosting’s managed VPSs run on Apache. However, because we’ve seen how much of a difference the web server setup can make, we’ve given our customers the freedom to change it with a few clicks.
You can do it via the Admin Interface. Go to the Web Server Manager section and choose the option you need. You can install Nginx as a reverse proxy on top of Apache or switch to LSWS or OpenLiteSpeed.
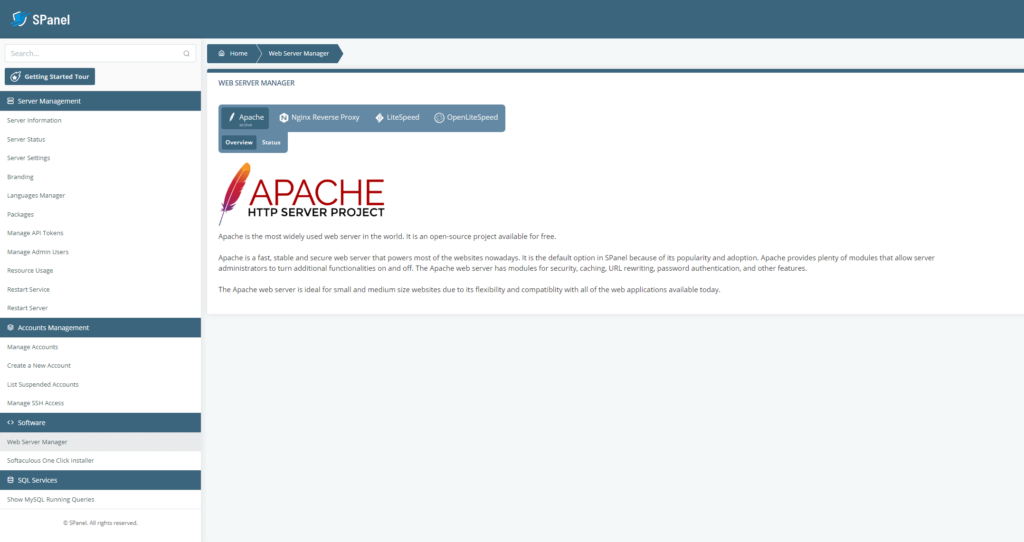
In addition to changing the setup, SPanel will apply configuration settings picked by our experts for the best possible performance.
If you can’t see the speed benefits or are experiencing problems, you can revert back to the standard Apache setup with a couple of clicks.
Add more servers
Some problems are better to have than others. For example, if your site is slowing down because it’s overwhelmed by high traffic volumes, your project’s popularity is growing, which is usually a good thing. Nevertheless, if this is to continue, you need to tackle the resulting excessive overhead, and if your site is big enough, simply upgrading to a more powerful server isn’t an option.
Multi-node clusters are built to cater to the custom need of large, complex websites with constant traffic load and high expectations in terms of performance. Their goal is to improve several different aspects of the server’s performance.
On the one hand, you have redundancy and the peace of mind that even if one of the nodes fails, there are other machines to take up the slack. This improves your uptime stats and makes your site more reliable.
You have load balancers distributing the strain among multiple machines, so you can be sure that even the highest, most unexpected traffic spikes won’t disrupt your site’s loading speeds.
Last but not least, you can situate your servers in multiple data centers in different countries. Your website will be synced automatically and always served from the location closest to the visitor. This ensures excellent performance across the globe.
Building such a cluster is an expensive undertaking. You need a lot of pricey hardware and a team of experts to set up and configure everything for you. However, if you decide to trust us with your website, we’d be more than willing to help you with the technical part.
Our specialists can have a good look at your project and advise you on what sort of configuration will suit your needs the best. Then, they’ll build your cloud cluster and give you access to it via SPanel – our proprietary management platform.
If you’re interested in this or any other of our hosting solutions, don’t hesitate to get in touch with us.


Final Takes
Mediocre performance is not something you can diagnose and fix in an afternoon. However, it’s important to appreciate just how worth it the efforts are.
How quickly your pages load determines the site’s bounce rates. The slower your website is, the more likely you are to lose valuable customers, so the speed could ultimately decide whether or not the project stays afloat. Furthermore, search engines will only rank you near the top of the results pages if your site is optimized.
So, although it may not sound like the most important thing in the world, website speed can actually have a significant impact on the entire business’ future. Make sure you treat it with the respect it deserves.
FAQ
Q: How do I optimize my HTML website?
A: The web server plays a big role when it comes to fast HTML websites. For example, LiteSpeed tests to serve content 4-6 times faster than the standard Apache configuration. You can also ensure better speeds with things like browser caching, adaptive images, CDN, the HTTP keep-alive function, and more.
Q: Does a slow website affect my SEO?
A: Yes, and in a big way too. There were speculations over the year that speed affects search engine results, but Google has recently confirmed that notion. What’s more, the company promises that faster websites will get increasingly more attention when ranking.
Q: What affects website speed?
A: Picking a reliable web hosting provider is an essential move that plays a big role in your page load times. The company is responsible for configuring your server, setting up caching, and other speed-related improvements. Apart from that, other factors can include your page coding, file types, software, and plugins, even your browser.

