A Tax in WooCommerce consists of a Tax Class containing one or more Tax Rates.
Tax rates are the actual fees applied to products in the shopping cart. You can set them to vary based on the customer location. This setting can be as broad as a country or region, or as specific as a ZIP code.
You can apply tax classes to products, shipping, or both. The body of the tax class is presented as a table that consists of separate tax rates, listed as rows. More on that in a bit.
When setting up taxes for your online store, there are 3 options:
1. Display product prices inclusive of tax
– A product costs $5. You’ve added a VAT tax of 20%. Your visitors will see the price of that product as $6 total, no further details shown.
2. Display product prices exclusive of tax
– The $5 product with a 20% VAT tax added to it will display as a $5 product, and the VAT tax will be listed in brackets alongside the shelf price.
3. Don’t use tax calculations
– Have tax rates and calculations disabled across your store. Now people see just the price you have entered.
Note: If you decide to skip on tax calculations initially and enter products with their final price (shelf price + tax), this functionality will just add taxes on top of the products’ price when you enable it later on.
Remember, it’s best to plan ahead when initially adding products and prices. It can save you a lot of time at a later stage.
You can restore tax calculations anytime by going to:
1. WooCommerce → Settings from the main menu.
2. Locate the General section of the WooCommerce Settings screen.
3. Look for the Enable Taxes option and click on it.
4. Remember to Save Changes afterward.
Tax Options
When visiting tax settings, the default screen that loads is Tax Options.
The Tax screen can be accessed from the main menu of WooCommerce → Settings → Tax tab.

Tax Options is used to manage how tax calculations are performed, add new tax classes as rates, and manage how taxes are displayed to your customers.
First off, it’s important to note you can add extra tax classes. They appear in different places across the Tax Options screen.
By default, there are two additional tax classes present in WooCommerce:
- Reduced rate
- Zero rate

Take note of these and click on the Shipping Tax Class drop-down above them.
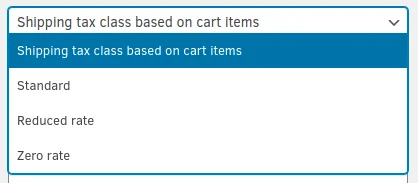
It displays the two additional tax classes present below the Standard Tax class.
Whenever there is a setting allowing you to pick a tax class, it will always mirror the values of the “Additional Tax Classes” fields. You will observe such behavior when working with plugins that extend the taxes feature.

This section handles how taxes are displayed in your store and types of additional tariffs, referred to as Rates.
As we discussed, prices entered with tax can be either tax-inclusive or tax-exclusive. Tax-exclusive is the default selection here.

Calculate Tax Based On

Uses the customer’s shipping address by default. Instead, you can have it work with:
- Customer Shipping Address
– The address of the person receiving the purchase (not necessarily the payer). - Customer Billing Address
– The address of the payer (not necessarily the recipient of the order). Billing and shipping addresses are usually different when people purchase gifts. - Shop Base Address
– Use this if you prefer your store to function with the presumption that visitors are coming from your area, unless they state otherwise during checkout.
Shipping Tax Class

Allows you to opt-out from the settings in the Shipping tab by using one of the tax classes you define on this screen. By default, the possible options are:
- Shipping tax class based on cart items
- Standard
- Additional tax classes – Zero Rate and Reduced Rate being the defaults
Note: Adding shipping rates is almost identical to all the tax classes. In fact, shipping is actually a tax class, but it’s been moved to a separate tab since it offers additional functionalities.

Rounding

Tax rounding is the process of rounding product prices after tax. If you haven’t done this before and want to have taxes calculated with your product prices — check with your local tax authority to see whether prices are rounded up or down to a whole cent. Additionally, note if this calculation is done with the total of the products in the cart or applied to each product individually.
To get Rounding into context, let’s first map out what the shopping cart looks like on the checkout page:
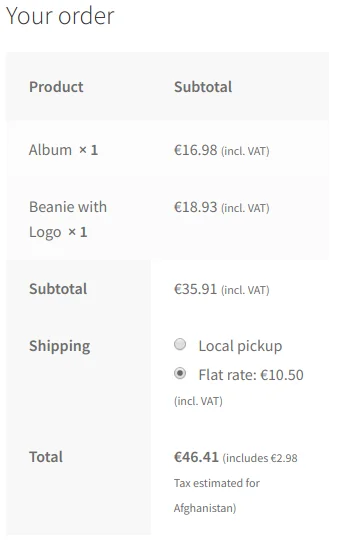
Your order is displayed in a table that features:
- Column headers
- Product lists
- Subtotal
- Shipping method and additional costs
- Cart total
The Rounding option on the Tax Options page does exactly what the label says — it rounds the sales tax up or down to a whole cent. This happens either at the Subtotal or at each line of the products list, affecting the total tax calculation.
The problem here is that Rounding per line will not be visible until you set Display prices during cart and checkout to Including Tax — the option located at the bottom of the Tax Options page.

Set this option to Excluding Tax if you need tax to be rounded at the Subtotal or to Including Tax for having tax rounded at each line of the products list.
Note 1: Once you have entered the tax classes and rates relevant for your business and region, make sure to test how they display on the checkout. WooCommerce has been known to mishandle tax rounding in the past and it’s still unclear if that issue has been fully resolved.
According to WooCommerce users, the problem is partly due to the settings for decimal places. You can set your currency to be displayed with 2 decimals (ex. 9.99). However, taxes usually use 4 decimals (ex. 9.1234), and that creates a conflict when rounding.
Possibly, the system first rounds up or down the 4 decimals of the price and tax calculation and then rounds the total price according to the decimal number in the currency options. This creates unexpected behavior, ultimately rounding prices down when you need them to be rounded up. In case you are wondering why that’s such a big deal – errors in tax reporting as low as 1 cent can get you a fine.
Note 2: When tax classes share the same name, they are summed together in the total.
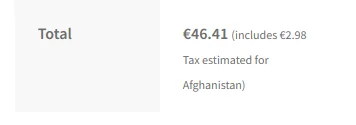
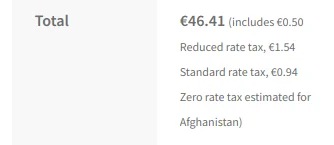
When the tax classes have separate names — they are broken down.
Steps for editing tax classes are in the next chapter: Tax Classes and Tax Rates.
Display Prices in the Shop

Keep this to Excluding tax if you want the goods in your product catalog to be displayed without any taxes applied.
Once you set it to Including tax, WooCommerce will attempt to calculate the taxes for products based on the setting you’ve chosen earlier using Calculate tax based on.
Example 1: Calculate tax based on is set to Customer shipping address. The customer’s address is in the UK and you have set a tax rate of 10% for the country. The result will be that products in the catalog will have a 10% tax rate applied to their prices, rounded up or down, depending on your settings.
Example 2: Calculate tax based on is set to Shop base address. Your shop is located in Italy and you don’t have a tax rate added for that location. Your customer visits from the UK and doesn’t see a tax applied to products. Not until they reach the Cart and Checkout pages at least.
Price Display Suffix

Use this field to specify a term for indicating that taxes are being included in the product prices. For example, the default value is inc. VAT.
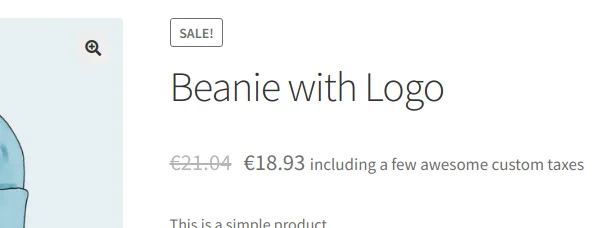
Note: The value of this field will only be visible if Display prices in the shop is set to Including tax.
Also note: The price display suffix is only featured in the Product and Catalogue pages, but not in the Checkout and Cart pages.
Display Tax Totals

This drop-down menu is responsible for how tax rates are broken down (or grouped) on the Checkout page.
By default, tax rates are Itemized, which means they are listed separately. Typically, they look like this:
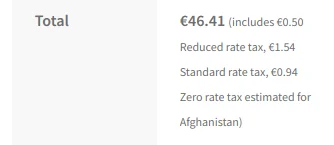
You can switch over by choosing the As a Single Total option. Once activated, the tax breakdown on the checkout page will look like this:

Note: These settings are overridden when all tax rates have the same name and appear as a single total.
Explanation: Tax rates come with the predefined name Tax.
Tax rate itemization works only when tax rates have distinctive names. If the name for all rates remains the default, they will all be grouped together because of their indistinguishable names.
Here is an example of how separate products with separate tax classes are displayed:
- Shopping cart contains:
- Product A
- Standard tax class (applied to product A)
- tax rate with a default Tax name
- Standard tax class (applied to product A)
- Product B
- Reduced rate tax class (applied to product B)
- tax rate with a default Tax name
- Reduced rate tax class (applied to product B)
- Product A
A different tax rate is assigned to each product, but they both use the same default name – Tax. As a result, WooCommerce will group the taxes together so that customers don’t see texts such as “includes 2.95 for Tax and 3.95 for Tax.”
Tax Classes and Tax Rates
For this example, we’ll be working with the default tax class, Standard Rates, although all tax classes work the same.

Upon visiting the Standard Rates section of the Tax settings screen, you are presented with an empty table of tax rates.

Additional Tax Classes
All additional tax classes function in the same manner as the Standard Rates tax class. Just make sure to give them a distinctive name, so you can easily assign them to the appropriate products.
Assigning Tax Classes
Tax classes are assigned at the Product level.
To assign a tax class to an existing product:
1. Click Products in the main menu.
2. Edit the desired product.
3. In the Edit Product screen, scroll down to the Product Data box.
4. The General tab is displayed by default. The last field there is the Tax Class menu. Use it to select one of the tax classes you created.
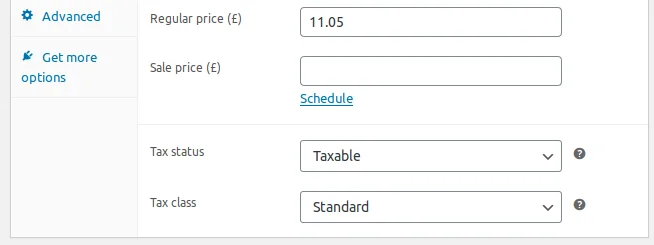
5. Be sure to Update your product when making changes in Product Data.
As you have probably noticed, there is much more going on in the Product Data box. We will cover this in more detail later.


