Building a functioning WooCommerce store takes a lot of time and effort, and seeing it fail to register the results you’re after can be extremely disappointing. What’s more, bringing it back on track isn’t always easy.
For example, many store owners invest a lot of time and effort into marketing and SEO techniques to boost traffic volumes. The number of visitors usually goes up, but often, the sales figures remain unimpressive. That’s because, in some cases, the reason for the poor performance is not a lack of traffic but a high cart abandonment rate and poor conversion.
And often, this is due to the website’s checkout page. Today, we’ll take a closer look at it and see how it can be improved.
WooCommerce’s Default Checkout
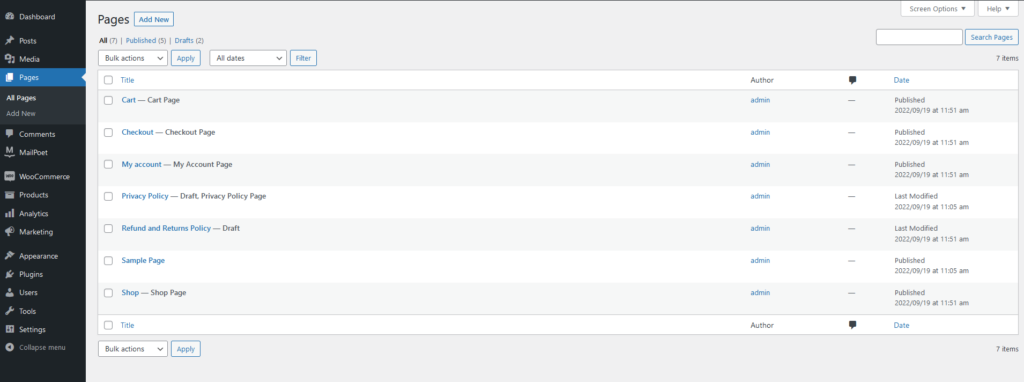
You don’t have to create a checkout page to start selling products on your WooCommerce store. As soon as you install WooCommerce, you already have one. You can see it in the Pages menu inside your WP dashboard.
If you open it, you’ll see that it contains a form with the following fields:
- First name (required)
- Last name (required)
- Company name (optional)
- Country/Region (required)
- Street address (required)
- Apartment suite, unit, etc. (optional)
- Town/City (required)
- State/Country (required)
- Postcode/ZIP (required)
- Phone (required)
- Email address (required)
- Order notes (optional)
There’s a Ship to a different address checkbox, which, if selected, opens an additional form for the recipient’s details.
Completing an order without requesting some customer details is not possible. However, you have to agree that in most scenarios, the form above is far too long.
For one, store owners rarely need that much information. For example, shipping addresses are irrelevant if you sell a digital application or an online service.
Furthermore, online shoppers aren’t renowned for their patience. The higher the number of fields they need to fill, the more likely they are to get bored.
Worse still, most users won’t know that this is WooCommerce’s default checkout form, so they’ll think you’ve put all these fields yourself. Some may wonder why you’re requesting all this information and may even have privacy concerns.
The net result is that they’re much more likely to leave the order unfinished and push the cart abandonment rate up.
There’s more. Although there’s no shortage of fields, WooCommerce’s default checkout form lacks some features that can significantly improve the user experience. And the better the user experience, the more likely people are to not only proceed with the order but also return to your site for future purchases.
Let’s see what we can do about it.
Hide Unnecessary Fields
If you try to open WooCommerce’s default checkout page in the classic or block editor, you’ll see a single line of WP shortcode. In other words, WooCommerce doesn’t let you edit the default checkout form out of the box.
If you want, you can make your own checkout page from Pages > Add New. Add the fields you need, save it, and then go to WooCommerce > Settings, open the Advanced tab, and swap the default checkout page for the one you created.

However, most people will probably find it more convenient to edit the existing checkout form with a plugin. There are plenty of add-ons to choose from.
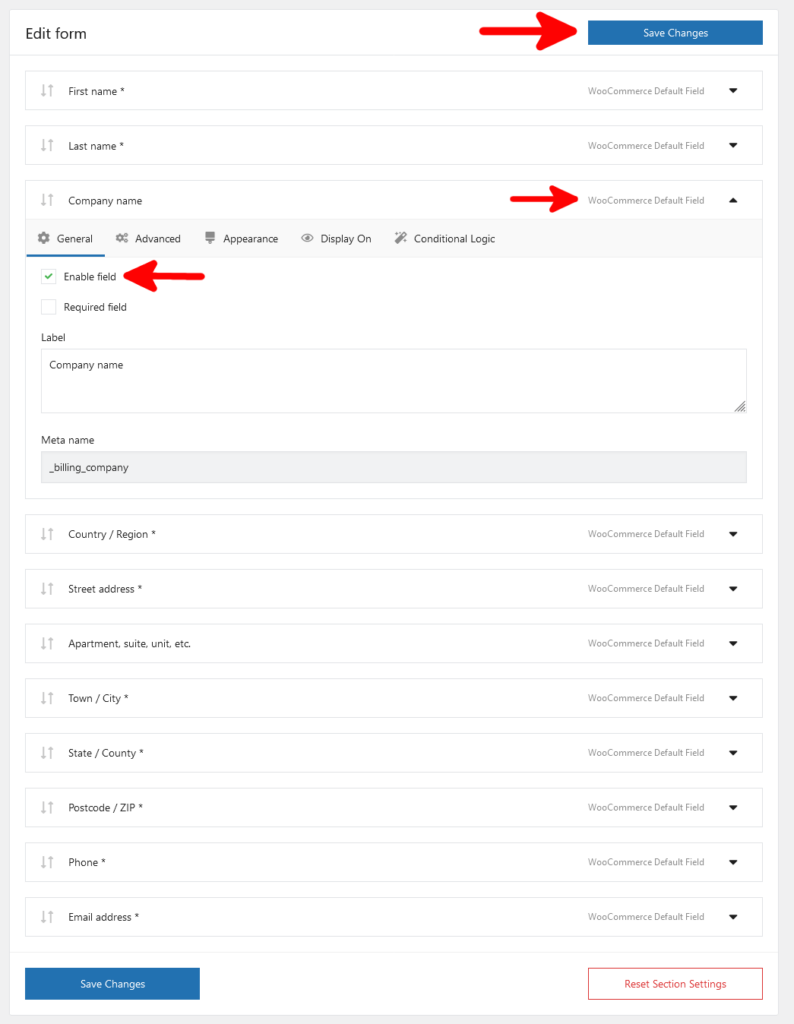
Search for “checkout editor” on WP’s official repository, and you’ll see quite a few relevant results. They all offer slightly different features, but pretty much all of them can let you disable some of the default checkout fields.
Below, you can see a screenshot showing you how to do it with Flexible Checkout Fields – one of the most popular plugins of this kind.
Set Up Coupons
You need to be careful with your strategy regarding coupons. The discounts users get with promo codes will inevitably impact your profits, so keep a close eye on the bottom line and make sure it stays in the green. However, they can also attract new customers and make existing ones return for future purchases.
The effects on the sales figures could be so significant that often, the positives outweigh the negatives. The good news is if you decide to offer discount coupons, you can enable them fairly easily with WooCommerce.
Log in to your WordPress dashboard and go to WooCommerce > Settings. Under the General tab, you’ll find the Enable the use of coupon codes checkbox.
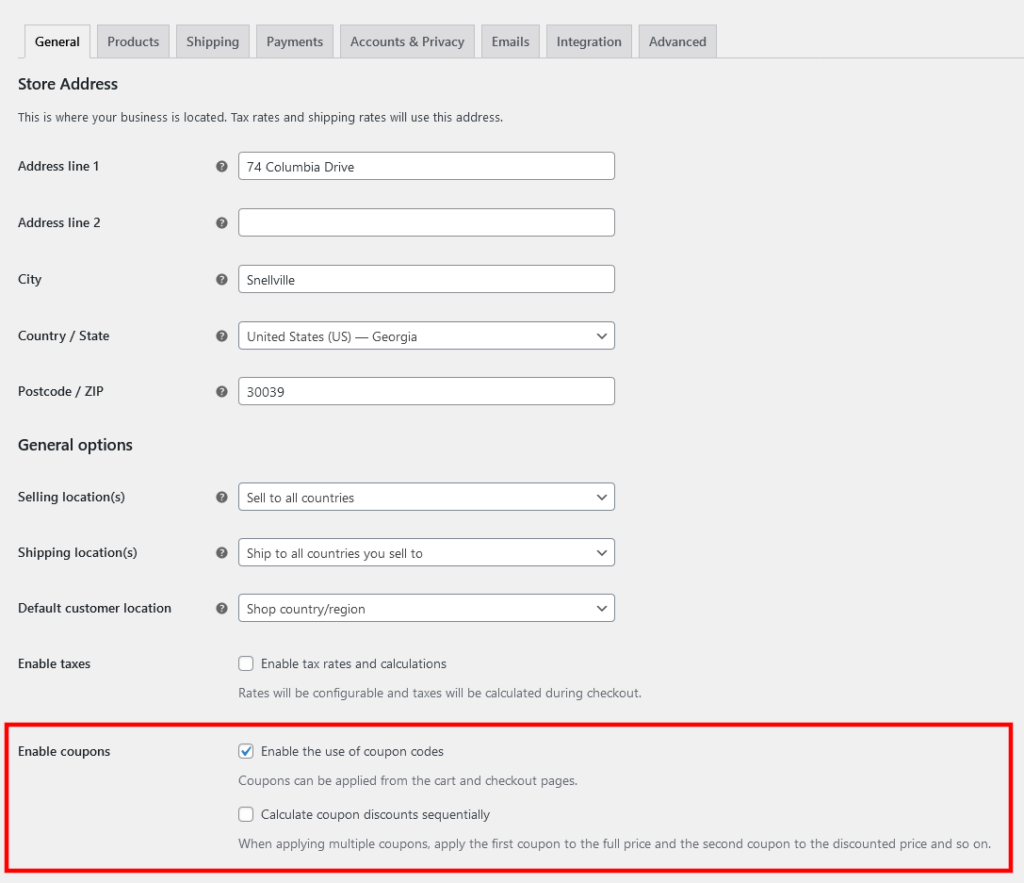
If you select it, you’ll see another checkbox labeled Calculate coupon discounts sequentially. It concerns scenarios where users have more than one coupon code. Applying the discount sequentially means that the second code will affect the price already lowered by the first one. Don’t forget to save the changes.
To create a new coupon, go to Marketing > Coupons. After WooCommerce 4.5, the menu was moved, so if you’re using an old version, you can find it in the WooCommerce section.
The Create your first coupon button has a prominent place on the screen, and the form it leads you to is fairly straightforward.
At the top, you need to either enter the coupon code yourself or have WooCommerce generate one for you. Below, you can write a description, and from the Coupon data section, you decide what the coupon does.
The options are plentiful, with a range of discount types and restrictions. When you’re ready with the configuration, click Publish to activate it. The code will become usable immediately. All you need to do is distribute it to your users.
Remove Any Distractions
The checkout interface needs to be as clean as possible. This doesn’t mean stripping the page of your logo and your branding, but it can help if you get rid of most of the unnecessary elements on the page.
How difficult (or easy) this will be depends on your theme. Some may require editing the theme files directly (which means creating a child theme), and with others, the customization options will be embedded inside the WordPress dashboard.
Speaking of themes, some WooCommerce designs incorporate a one-page checkout process. This means that users can add products to their cart and finalize the order with fewer clicks.
You may be surprised by how much this could influence the sales figures. When ecommerce specialists Elastic Path compared two checkout systems – one with a standard checkout flow and one with a single-page form – the latter demonstrated a 22% better conversion rate.
In other words, this is something you should definitely look into.
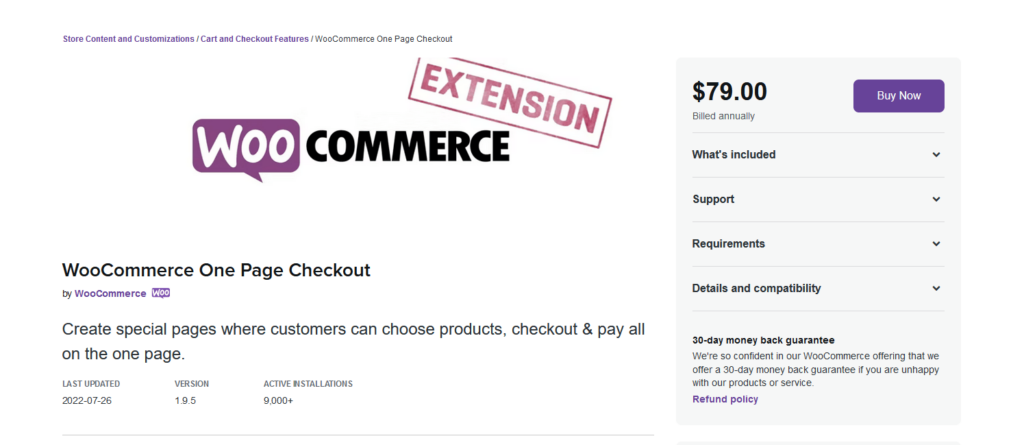
Fortunately, there is a workaround even if your theme doesn’t support it. The WooCommerce One Page Checkout extension was created by WooCommerce’s developers, so you can expect reliable performance and decent support. It’s available on the official extension repository, and with over 9 thousand active installations, it’s one of the popular add-ons.
It costs $79 per year if you want continuous updates and support, so you need to bear it in mind when reviewing your budget. However, given the effects it could have on your revenue, it might just be worth it.
Auto-Detect The User’s Country
By default, one of the first things users need to do after they reach your checkout page is to choose their country from a drop-down menu. Even though the said drop-down has a search box, finding the correct entry could take time. However, thanks to WooCommerce, this step can be eliminated.
If you open the General tab on the WooCommerce > Settings page, you’ll see a drop-down menu labeled Default customer location. There are four options:
- Shop country/region
- No location by default
- Geolocate
- Geolocate (with page caching support)

If you choose one of the last two options, WooCommerce will use visitors’ IPs to determine their geographical location, and when customers reach the checkout page, their country will be pre-selected from the list.
There are a couple of other steps, though.
After you choose the geolocation settings for the default customer address, WordPress will display a notification telling you that the feature has not been fully configured. WP needs access to MaxMind’s database to determine each user’s location, which means getting a MaxMind license key and configuring your site to work with it.
You need to fill in the form accessible from this link to create a MaxMind account.
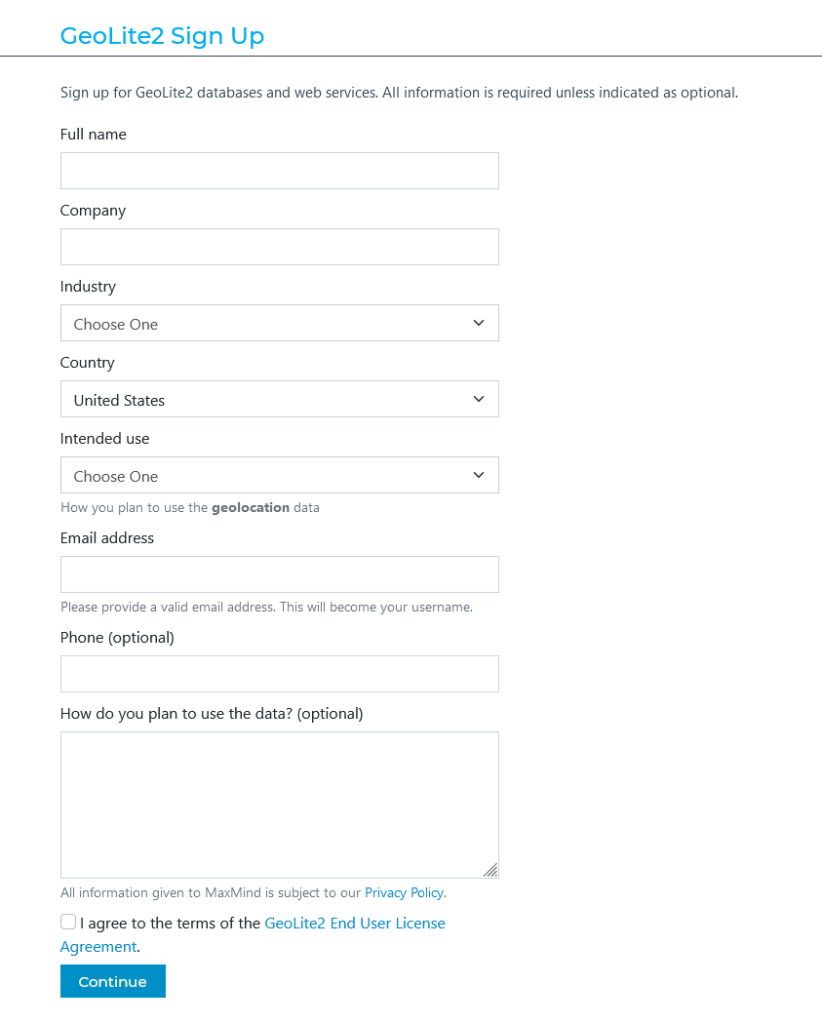
After you submit the information, MaxMind will email you the steps required to activate the account. Go through them, sign in at MaxMind, and go to Manage License Keys.
Click the Generate new license key button, and on the next page, select the No radio button in the section asking you whether the key will be used for a GeoIP Update.

The license key will appear on your screen. Make sure you copy it to a safe location, as this is the only time it will be displayed in full.

Go back to your WordPress dashboard and go to WooCommerce > Settings. In the Integration tab, there’s a field where you can paste your MaxMind license key.
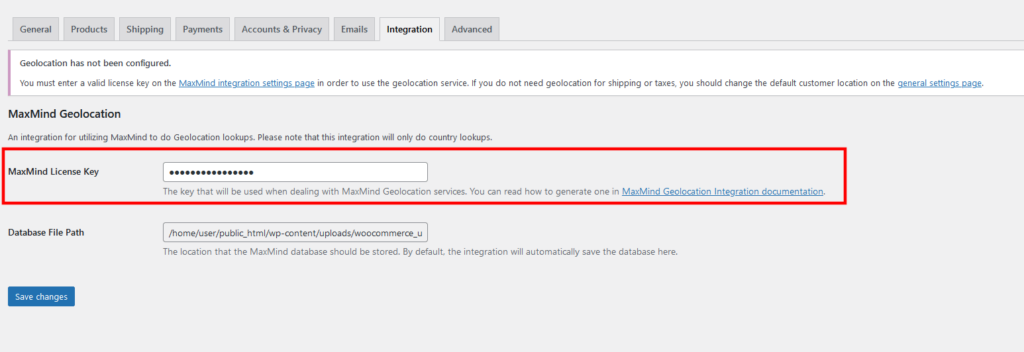
Don’t forget to save the changes before testing whether the system works.
Include Multiple Payment Options
Customers won’t be able to complete their orders if they have no way of paying. You must ensure your store offers enough payment options and allows users to easily complete their orders. WooCommerce, as well as the add-ons that facilitate transactions through various payment systems, give you great flexibility. The best bit is that implementing them rarely requires any technical skills.
In fact, shortly after installing WooCommerce, you’ll see an initial setup wizard that at one point asks you whether you’d like to install WooCommerce Payments – an extension that acts as WooCommerce’s own payment gateway.
The WooCommerce Payments extension is more convenient than other add-ons of this kind because it incorporates all your billing in the WordPress dashboard. You’ll be able to manage all your payments and refunds without signing into a third-party website. It’s built by WooCommerce’s developers, so you can expect good reliability and security, as well.
Crucially, it supports all major bank card issuers and popular payment systems like Apple Pay and Google Pay.
That said, although WooCommerce Payments covers a wide range of payment methods, you must bear in mind that it won’t fit all projects.
The global financial systems are well supported, but you won’t find any local gateways. Furthermore, it works in just 18 countries at the time of writing, so many of you will need to look for an alternative. Luckily, there’s no shortage of solutions.
WooCommerce’s extension repository is full of add-ons that let you easily integrate various payment processors into your online store. Because WooCommerce is the world’s biggest ecommerce platform, even small local gateways have released integrations, so you can rest assured that you’ll likely find what you’re looking for.
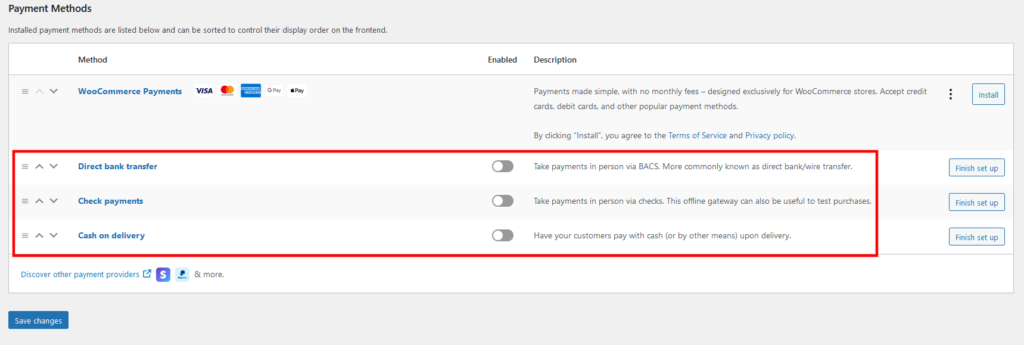
In some countries, electronic transactions aren’t as popular as they are in others, but thanks to WooCommerce’s offline payment methods, this shouldn’t be a problem for you. Without installing extensions, you can enable check payments, cash on delivery, and bank transfer options. To configure them, go to WooCommerce > Settings and open the Payments tab.
Enable Cart Abandonment Emails
Cart abandonment rate may be a bigger problem than you think. Research suggests that, on average, 70% of all orders remain unfinished, leading to huge losses and missed revenues. There are many techniques for minimizing them, with some being more effective than others.
Often, however, all you need to do is remind the user that they’ve left some products in their cart.
If a customer is on the fence about a certain purchase, a well-formatted abandoned cart email could be enough to tip the scales. With WooCommerce, sending these notifications can be completely automated.
There are some in WooCommerce’s extension repository, but you can also find a few on WordPress.org. As always, there are both free and premium options, so you need to take your budget into consideration when picking an extension.
They offer slightly different features, but pretty much all of them collect the user’s email address from the checkout page and wait to see if the order is completed. If it isn’t, the add-on sends the user a reminder after a preset period of time.
It’s a great tool, but to use its full potential, you need to plan carefully. A simple message saying “Don’t forget to complete the payment” isn’t going to do much. In fact, it could annoy the user and have the opposite effect. Try not to be overly aggressive in your attempts to persuade them, and although you can send multiple reminders, make sure users don’t feel like they’re getting spammed.
Most add-ons let you fully customize the notifications, so you can include your logo and place your brand in a prominent place. Some even let you use the customer’s name and the contents of their cart, which makes the email feel personalized, further increasing your chances of conversion.
These reminders are also an excellent chance to send your customers a coupon code and entice them with a nice discount.
Conclusion
Getting people to spend money on your online store is a complicated, multi-stage process that starts with implementing SEO techniques that attract traffic and ends with organizing a reliable shipping service and setting up a fair refund policy.
However, checkout is perhaps the most crucial step of the entire process. This is where users transition from visitor to customer, so it’s critical to pay it the attention it deserves and ensure it presents as little friction as possible.
FAQ
Q: How can I create a good checkout page?
A: It’s all about the user experience. Take a close look at the default WooCommerce checkout form and remove any fields, toggle switches, and buttons you don’t need. Make sure visitors can complete all the required steps quickly and easily and see if you can implement features that will make the experience a bit more enjoyable.
Q: How do I customize my WooCommerce checkout?
A: There are plenty of plugins that help you create a checkout experience that fits your project the best. With an add-on, you can do things like editing the checkout form’s fields, implementing the cart and the checkout on the same page, and even sending abandoned cart emails.
Q: How do I create a new field on WooCommerce’s checkout page?
A: Out of the box, WooCommerce doesn’t allow you to modify the default checkout form. You can, however, use a plugin to rearrange and re-label existing fields or add a wide range of new items to make the experience completely custom.

