Have you ever considered what you’re going to need in order to get your very own hosting company started? There are quite a few things to think about, including powerful servers, a team of experienced system administrators to ensure everything works, an army of support specialists to answer questions, keep customers happy, and the courage to enter an immensely competitive industry.
But for once, things might not be quite as complicated as they seem.
Table of contents:
- What is Reseller Hosting?
- Picking the Right Reseller Hosting Plan
- Activating a Reseller Hosting Plan
- Creating Hosting Packages with WHM
- Creating a New cPanel Account
- Managing Accounts
- Customization and Branding
- SPanel VPS – the Reseller Alternative
- Conclusion
What is Reseller Hosting?
By purchasing a reseller hosting plan, you effectively lease some storage space, bandwidth, and hardware resources from the hosting company, which you then offer to end-users. In a way, the hosting provider is the wholesaler, you are the retailer, and the website owners who choose your services are the buyers.
Your price rates and profit margin are entirely up to you.
Mind you, reseller hosting is suitable not only for people who are trying to launch their very own web hosting businesses. Web development and web design studios can offer hosting as an additional service as well.
Picking the Right Reseller Hosting Plan
ScalaHosting offers three different reseller hosting plans. They are all controlled through the Web Host Manager (WHM) dashboard and offer individual account management via cPanel. Our reseller solutions are based on a shared environment and support private nameservers.
Which one you’ll pick largely depends on the number of customers you have (or expect to have). You can easily upgrade to a more powerful plan at any point, so if you’re just getting started, your best bet would probably be to get the entry-level Scala1 package, which gives you up to 20 cPanel accounts, 1TB of bandwidth, and 25GB of storage.
Activating a Reseller Hosting Plan
Since reseller hosting plans utilize ScalaHosting’s shared servers, the activation of a reseller package is practically instantaneous. After the payment is successfully processed, your account will be activated, and you will receive a welcome email with more information on what your next steps should be.
The email includes the nameservers you need to set if you’re using an existing domain and the settings you need to use when configuring an email client.
If you have an active hosting account at another provider that uses WHM and/or cPanel, we can transfer all your websites completely free of charge. What you need to do is open a support ticket with the login credentials for your old host.
After the new nameservers propagate successfully (this can take around 24-48 hours), your WHM control panel will be available at yourdomain.com/whm. From there, you can start managing your reseller hosting plan. By default, WHM’s homepage shows you three key shortcuts: Create a New Account, List Accounts, and Add a Package. As a reseller, these are the shortcuts you’ll be using most often.
Creating Hosting Packages with WHM
Different websites have different needs, and if you’re serious about your hosting business, you must ensure the services you offer are suitable for as many of them as possible. If website owners are to consider using your service, they must have a range of hosting plans to choose from. Creating them with WHM is fairly straightforward.
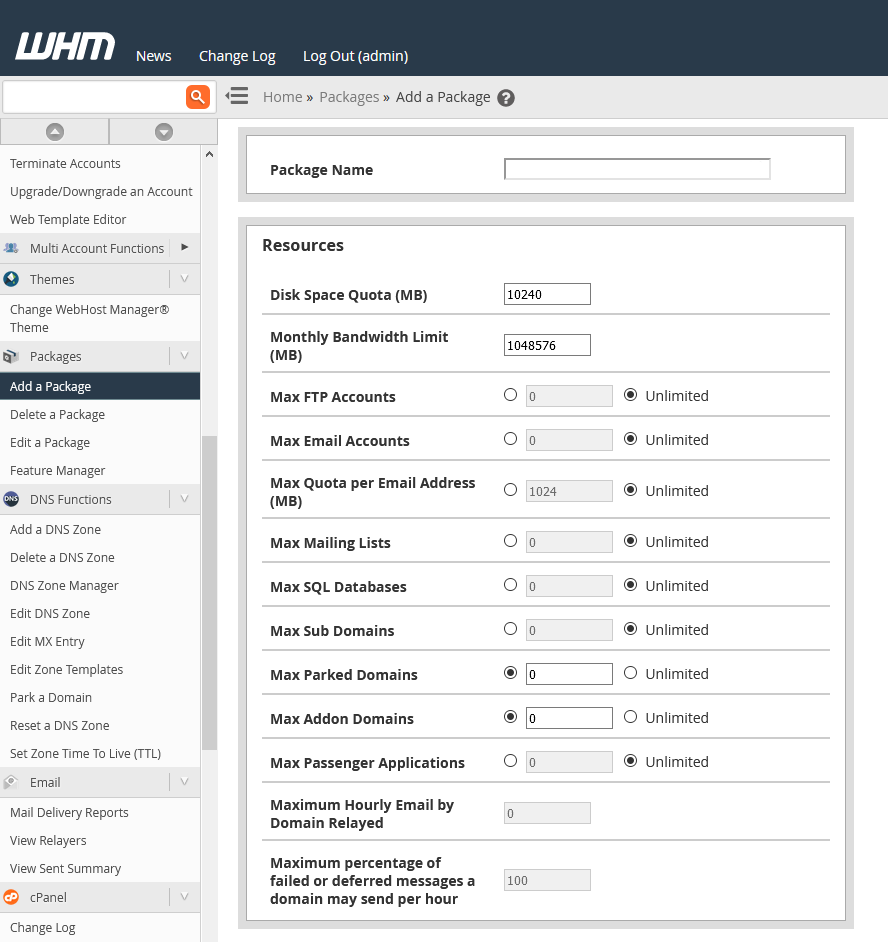
Go to Add a Package under the Packages menu in the sidebar. First, you need to pick a name for your package and then choose the amount of resources it will pack.
You have quite a few options here.
By default, the package comes with 10GB storage and 1TB bandwidth per month, but you can lower or raise these limits depending on what you plan to offer. You can choose how many FTP and email accounts your customers can create and then control many other aspects of the service, including the maximum number of mailing lists, SQL databases, addon domains, parked domains, etc.
All your hosting plans will be based on cPanel, and you can customize what sort of features your clients get depending on the plan they choose. This happens through the Feature Manager available under the Packages section in the sidebar.
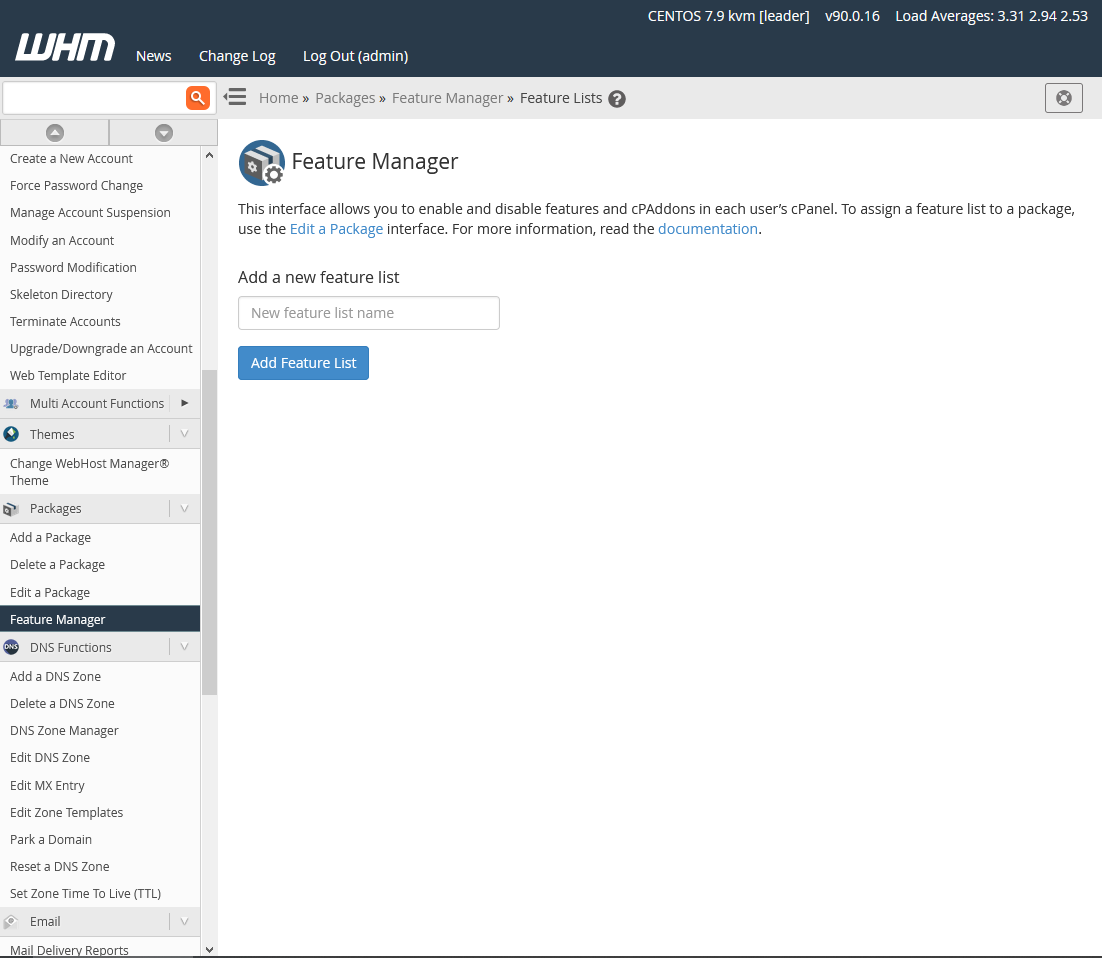
You need to create feature lists that you’ll assign to different plans. Doing it is as simple as picking a name for the list, clicking Add Feature List, and selecting the cPanel functionality that it’s going to provide.
With your feature lists ready, you can choose which one you’ll include in the plan you’re creating on the Add a Package page.
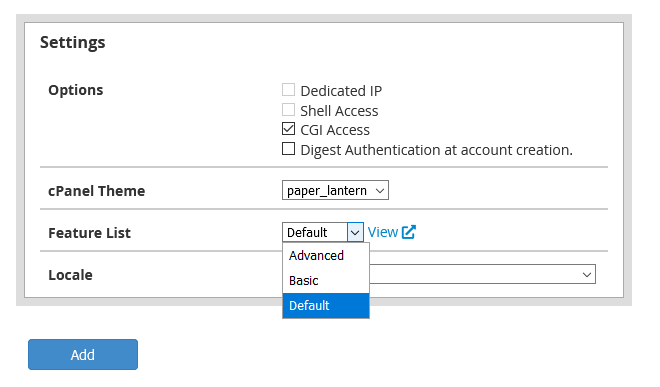
Before you save the hosting package, you have a few other options to play around with. You can select whether the hosting plan will offer the ability to execute CGI scripts, enable Digest Authentication support, and even choose the theme and language of cPanel’s interface.
When you’re ready with these settings, click Add to create the hosting package.
Creating a New cPanel Account
With the hosting packages taken care of, you can start creating cPanel accounts for your clients.
You can start with the Create a New Account page, which gives you usage statistics for your reseller plan. You can see how many of the available cPanel accounts you’ve already created, how much disk space they’re using, and how much bandwidth you have left.
Below it, there is a list of hosting plans you’ve already set up as well as information on how many cPanel accounts you can create under each package before you reach your service limits. The Limiting Factor column indicates which of the resources might act as a bottleneck.
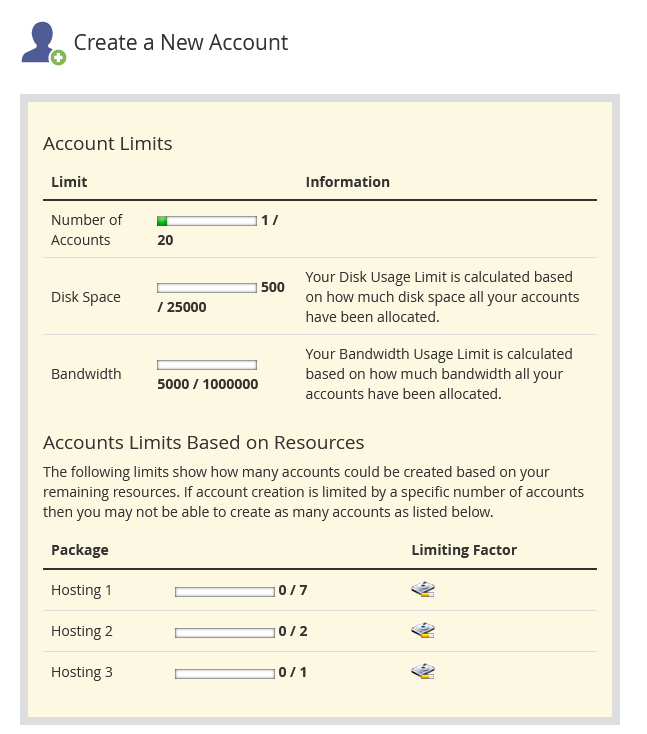
The fields you need to fill in to create an account for your client are available below the usage statistics.
You first need to set a valid domain for the new cPanel account. WHM automatically assigns a username based on the domain name (the default username for example.com will be example). Still, you can change it to a custom one, as long as it contains only lowercase letters and numbers and is less than 16-characters long.
Next up, you’ve got the password fields. To help you secure the account with a strong password, WHM gives you a password generator that automatically generates a strong password for the account.
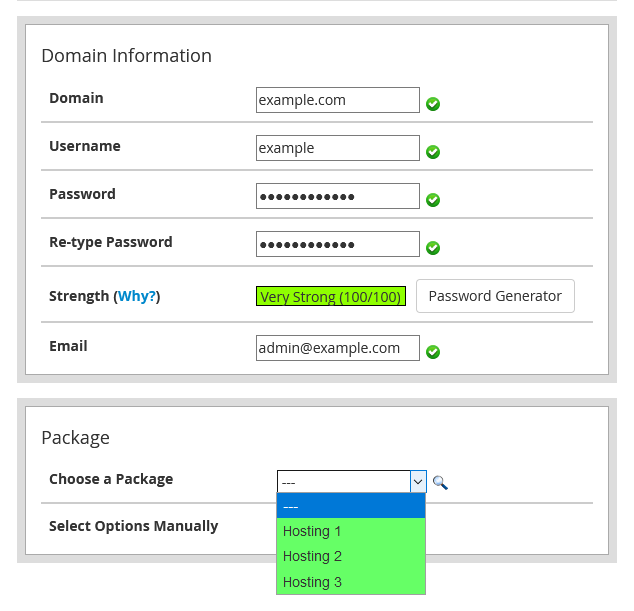
You now need to choose the hosting plan for the new cPanel account. Either pick one of the packages you’ve already created from the drop-down menu or click Select Options Manually to choose custom limits for the new client.
By clicking Save Manual Settings as a Package, you can also create a new plan with the settings you’ve just picked.
Further down, you can also change cPanel’s theme and UI language and manage the SpamAssassin spam filter (enabled by default).
The next section configures the email setting for the account you’re creating. If you leave them in their default state (with the Local Mail Exchanger option selected), the user emails will be handled by their cPanel account. Should they need to use an outside service like Gmail, for example, you can select Remote Mail Exchanger and configure the domain MX records.
To ensure the account’s email communication is secure, double-check if the DomainKeys Identified Mail (DKIM) and Sender Policy Framework (SPF) are activated (they should be enabled by default).
Once you’re happy with the configuration, click Create to activate the cPanel account.
Managing Accounts
As a reseller, you need certain control over your customers’ accounts. Everything you need to know about them is available in the Account Information section, and below it, in the Account Functions section, you get all the tools needed to manage the accounts.
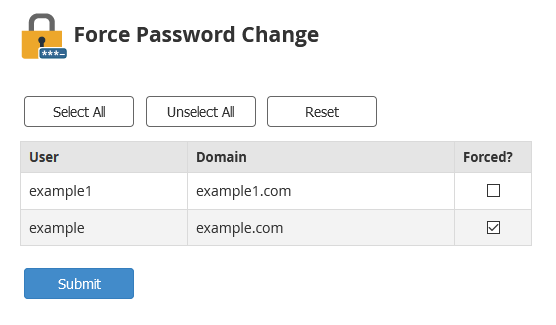
If you suspect a potential cyberattack and you think some of your clients may need to change their passwords, for example, you can click Force Password Change, select the accounts you want, and click submit. The accounts’ cPanel features will remain inaccessible until their owners change their passwords.
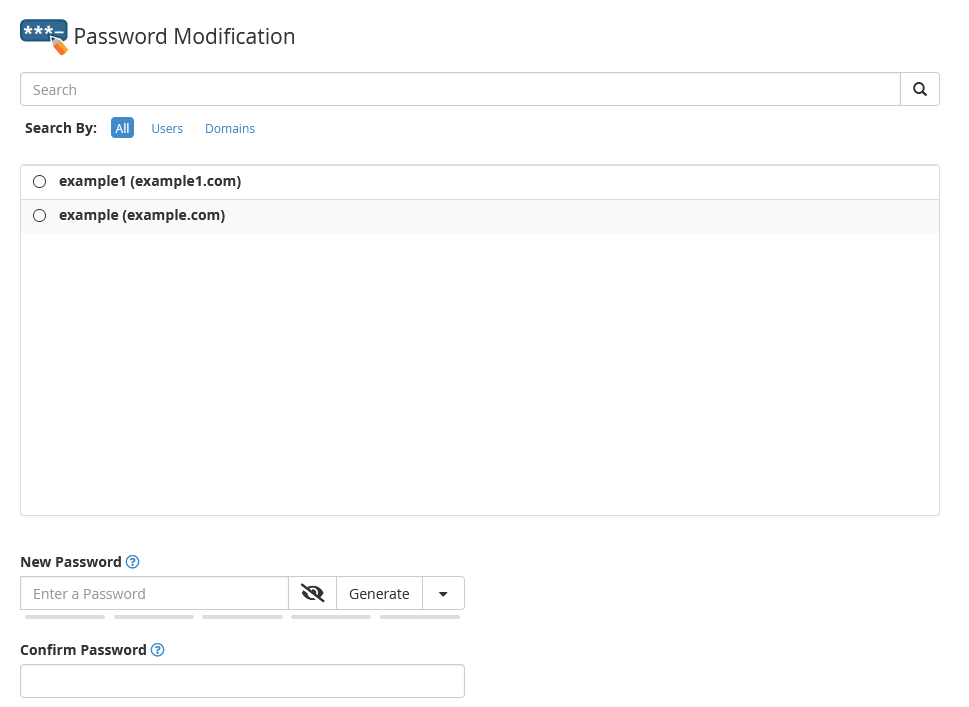
You can also change an account’s password yourself through the Password Modification tool. It’s as easy as selecting the account you want to modify, entering and confirming the new password, and clicking Change Password. Once again, WHM lets you use a password generator to ensure that the account is adequately protected.
 Тhrough the Upgrade/Downgrade an Account page, you can change an account’s hosting plan, while the Modify an Account page lets you change everything – from the allocated resources to the contact email address.
The Skeleton Directory page shows you where you can upload files and folders that will be present on all cPanel accounts upon activation.
Within the Web Template Editor, you can modify and customize the default pages that user accounts will display.
Then you have the Manage Account Suspension page, which lets you suspend and unsuspend accounts. When an account is no longer needed – you can terminate it through the Terminate Accounts page. Bear in mind, however, the account termination is an irreversible action, so make sure to use it only when you’re 100% sure.
Customization and Branding
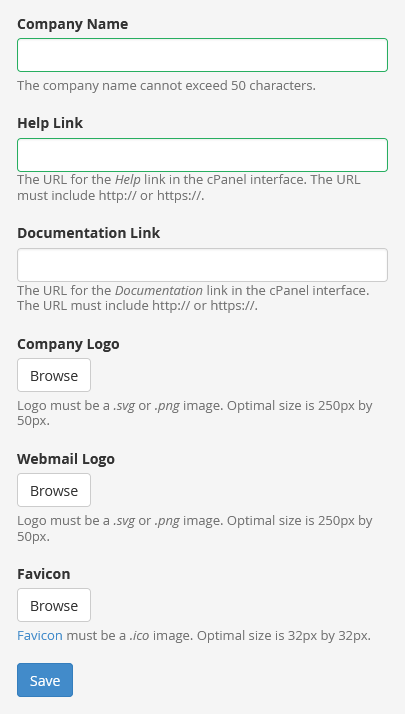
Your customers don’t necessarily need to know that you’re buying the hosting service from us and reselling it to them. You can use WHM’s Customization options to present your own brand and proudly display it in your clients’ cPanel accounts.
WHM lets you enter your own company name and set help documentation URLs, which will be accessible through cPanel. Your logo can be configured in the client cPanel, and the webmail login page lets you upload your own favicon.
The Customize Style lets you change cPanel’s default theme. There are a few themes available by default, but you can upload more if you want. Those of you with some coding experience might even want to customize cPanel’s look and feel completely.
You should take a look at the Public Contact tab as well. It lets you update the contact information that appears on default webpages, aiding your clients how to get in touch with you more easily.
SPanel VPS – the Reseller Alternative
In addition to our specialized plans, we have another solution for people who want to delve into the reseller business. Our managed VPS solutions give you all the functionality and ease of use of the reseller plans plus a few additional extras like the ability to integrate LiteSpeed for blistering performance.
The architecture is completely different. Instead of a shared environment, your clients will be hosted on a virtual server with guaranteed resources available at all times. As a result, the performance gets a great boost, and you’ve got enhanced scalability when it comes to adjusting the resources on your VPS plan.
Instead of the WHM/cPanel combination, you will control your reseller business through our proprietary SPanel management platform. It was designed especially for VPS hosting solutions and is much more streamlined toward novice users.
SPanel gives you everything you need to run a reseller business. This includes the ability to create and manage separate accounts for your customers, brand customization options, and tools for real-time usage statistics and server health information. You get more or less all the functionalities offered by WHM/cPanel at a significantly lower price.
Even the entry-level VPS solutions give you the ability to create as many accounts as you wish at no extra cost. As the two platforms are fully compatible, our support specialists can transfer all your data from your old WHM/cPanel host to your new SPanel VPS completely free of charge.
Conclusion
The hosting industry would be quite different without reseller services. They offer a brilliant solution for entrepreneurs who are confident they can build a successful business but don’t have the experience and resources to do it alone. They also enable website designers and developers to become a one-stop-shop for users who want to have their website designed, built, and maintained by specialists.
Most established hosting companies offer reseller solutions, and you could say that customers are spoiled for choice. With SPanel and our VPS plans, we’ve given users one more viable option that could be worth looking into.
