WordPress has long been the most popular Content Management System (CMS) platform for building websites. Because of its extreme versatility, it can be used to run a variety of projects, ranging from simple blogs to online stores.
Table of Contents: Getting Started With WordPress Hosting
- What is WordPress Hosting
- Choosing and Configuring Your WordPress Hosting Plan
- Billing Cycle
- Data Center Location
- VPS WordPress Hosting
- Understanding the SPanel Interface
- Setting Up Your Domain Name
- Installing WordPress Using SPanel
- Using SSL With Your WordPress Site
- Creating and Using an Email Address With Your Domain Name
- If You Need Assistance
What is WordPress Hosting
WordPress is a web-based application used to build, deploy, and maintain websites. Before you can build a website with it, however, you need a web hosting account.
There are various types of web hosting available. Each of these presents its own set of characteristics. For example, Shared Hosting is often cheap but unsuitable for hosting high-traffic websites.
If you want to run a WordPress website, you will still need to decide what type of hosting plan suits your needs. ScalaHosting offers two main types of WordPress Hosting plans – Shared and Virtual Private Server (VPS).
Choosing and Configuring Your WordPress Hosting Plan
The type of hosting service you choose can greatly affect how well your WordPress site performs.
If you’re running a small blog or website, Shared Hosting is typically sufficient. Online stores or those expecting more visitors should consider using VPS Hosting instead. Once you’ve chosen your plan type, you will have to decide on a number of other options:
Billing cycle
You can choose the duration of your billing cycle when signing up for your WordPress Hosting plan. This ranges from one month up to a maximum of 36 months. Longer billing cycles often benefit from higher discount rates. To maximize your savings, we recommend you sign up for the 36-month plan.
Data Center Location
Once you’ve chosen your billing cycle you will need to decide on your data center location. This is especially important if you have a specific target market in mind.
The closer your data center location is to where you expect your visitors to come from, the faster your site will load for them. ScalaHosting offers a choice of two data centers in the USA and one in Europe, and if you want to get an SPanel VPS, you can deploy it in one of 21 additional locations provided by our partners from AWS and DigitalOcean.
VPS WordPress Hosting
If you have decided to go for more powerful VPS Hosting to run your WordPress site, there are more considerations aside from billing cycle and data center location:
- Management: For those less skilled in the technical management of servers and networks, we highly recommend you opt for Managed VPS Hosting. These plans come with pre-installed applications that make it easier for you to build and run your WordPress site.
- Control Panel: The control panel is used to configure and maintain your VPS Hosting account. ScalaHosting offers a choice between SPanel and cPanel, both of which are extremely powerful and Graphic User Interface (GUI)-driven. Do note that cPanel licensing is relatively expensive and comes at an extra cost, while SPanel is completely free of charge.
- Server Customization: Since VPS Hosting is flexible in nature, you can choose the exact configuration of your account. This means you will get the exact amount of resources you need – CPU cores, SSD (storage) space, and RAM (memory). You can also choose your backup cycle or opt to have ScalaHosting engineers monitor your account 24/7.
Once you’ve completed the payment process, you should receive a confirmation email almost immediately. This will be followed shortly after by a welcome email, providing you with the information you need to access your web hosting account. Use that information to log in to your web hosting control panel.
Understanding the SPanel Interface

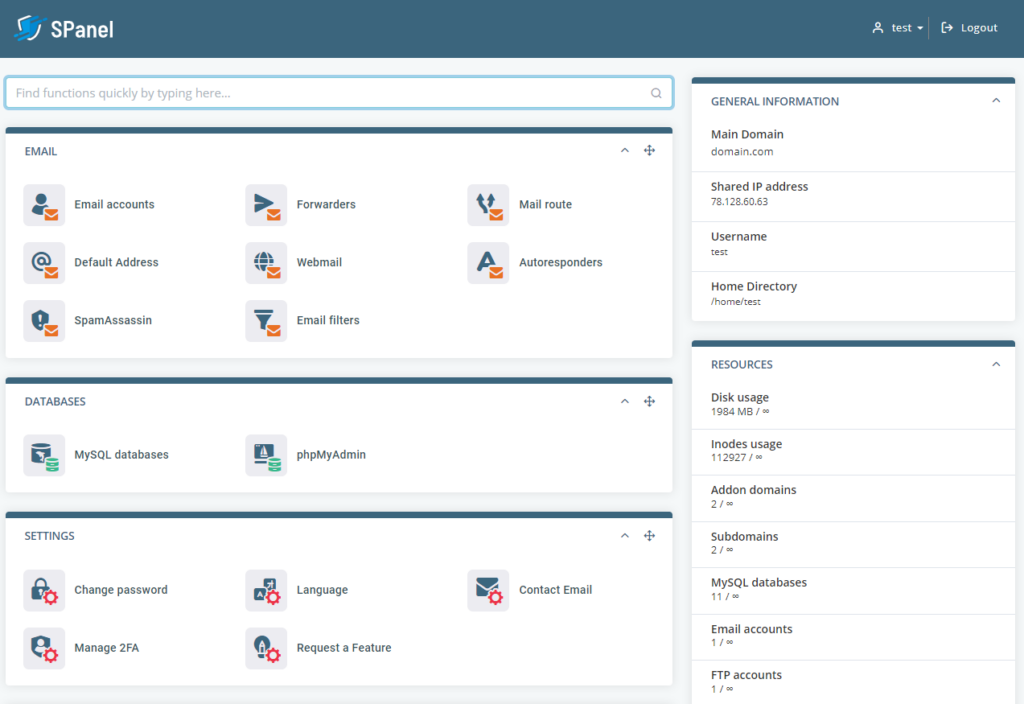
SPanel is extremely easy to use. It’s divided into two sections – the Admin Interface and the User Interface. You can use the Admin Interface to create user accounts and change certain settings related to your server. However, since you’ll be managing the website via the User Interface, this will be the one you work with the most.
SPanel’s tools are neatly organized into their own categories (e.g., Files, Databases, Emails, etc.). There are plenty of tooltips and helpboxes to explain what you need to do.
On the right side of the page are information displays that show basic information about your account. The upper box contains general information about your hosting plan, while the resources box shows your account resource usage.
Setting up Your Domain Name
In the welcome email you received, part of the information will pertain to nameservers. This information is needed for you to link your domain name to your web hosting account. To do this, log in your domain name dashboard and enter the nameserver information that was included in the email.
You only need to do this if you obtained your domain name from somewhere other than ScalaHosting. For those who have gotten their domain name from us, it is automatically linked to your hosting account already.
Installing WordPress Using SPanel

Note: The following instructions are intended for new installations of WordPress. If you’re migrating an existing WordPress site to ScalaHosting, contact our support team. We can assist you in the migration process.
SPanel comes with an automated management tool called SWordPress Manager. This allows you to not just quickly install and configure WordPress, but also to manage it once your site is up and running.
Clicking on this option will bring you to the installation display. Here, you will need to fill out the various fields in order to commence the installation.
This includes:
Domain/Path – Since web hosting accounts may have more than one domain name linked to it, you need to select which domain name to associate with this installation of WordPress, along with the folder where you want the files for your website to go (if you want to install it in the document root directory, simply leave the field blank).
Username – Choose a username to create for your WordPress installation. This will be used for you to access the WordPress dashboard later on.
Password – You can decide if you want to create a password on your own or have the installation manager generate one for you. If you’re choosing your own password, make sure it is a strong one of at least 8 characters comprising a mix of uppercase, lowercase, special characters, and digits.
Email Address – This will be the email address that your installation of WordPress will send updates to.
Once you’ve completed filling out the fields, click the ‘Install WordPress’ button, and wait for the process to complete.
The installation process should take no more than a few minutes. Once complete, the system will send an email to the email address you specified earlier.
Using SSL With Your WordPress Site
Secure Sockets Layer (SSL) certificates are important in this day and age since search engines now consider them a ranking factor. At the same time, if your site isn’t SSL-enabled, this will be indicated to visitors who visit your site.
All ScalaHosting plans – including WordPress Hosting – come with free SSL included so you do not have to worry about this. Once you point your domain to the correct nameservers, SPanel will automatically install a free Let’s Encrypt SSL certificate on it.
If you have a custom SSL certificate, you can install it yourself via the tool on SPanel’s homepage.

Creating and Using an Email Address with Your Domain Name

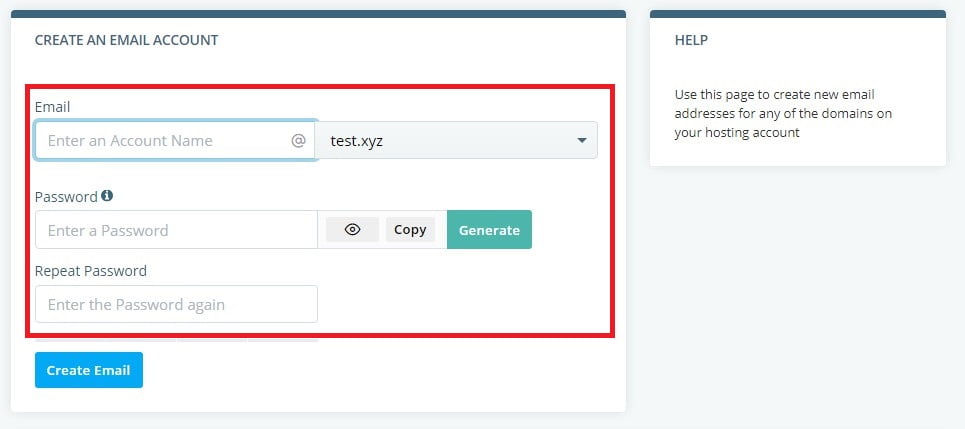
All ScalaHosting hosting accounts come with email handling. To create a custom email address for your domain name in SPanel, use the ‘Email Accounts’ option the User Interface’s homepage.
You need to type in the username and associate it with any of the domains you have linked to your account. Choose a password to go with it, then simply click the ‘Create Email’ button and you will be done.
To access your email account, click on the ‘Webmail’ option and you can then sign in using the username and password created. Alternatively, you can set the account up for access using an email application like Microsoft Outlook.
If You Need Assistance
Although setting up WordPress on a new account is relatively simple, it can be a bit intimidating for those new to web hosting. If at any point you feel you need assistance, get in touch with the technical support team.
The ScalaHosting operators are highly experienced and trained to handle all your needs effectively. Don’t worry about asking them anything you need to – they are friendly and ready to help you at all times.
