An MX record (mail exchanger) handles your domain’s incoming email by routing it through the appropriate email server.
The MX record always points to a domain, so when you use Scala Hosting’s name servers, your MX record points to your domain name, which has our server IP address, by default.
However, you can modify this record to point to a third-party email server, or add more MX records depending on your needs.
This guide will show you how to change the MX records of your domain name in SPanel.
Step by Step Guide to Change MX Records in SPanel
Use the following steps to change MX records in SPanel at any time.
Step 1: Sign in to Your SPanel Account
Log in to your SPanel dashboard using this URL: mydomain.com/spanel/login; where ‘mydomain” means your domain name.
 Enter your username or registered email address and password, then click Login.
Step 2: Navigate to Domains
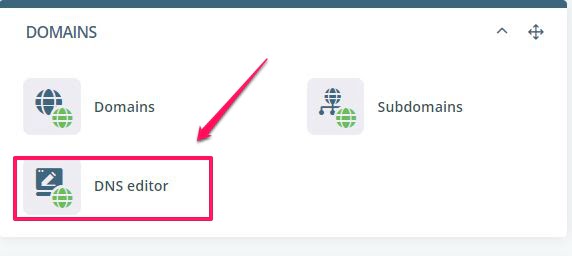
On the SPanel dashboard, head over to Domains, then click the DNS editor. The DNS editor lets you add, modify or delete zone files.

Choose a Domain to Edit by clicking the drop-down arrow if you have multiple domains associated with your hosting account.
Step 3: Change the Existing MX Record
Scroll down to the list of DNS zone files beneath the page, and look for the MX record. Click on the blue Edit action button by the right to change the existing MX record for that domain.

Fill in these parameters correctly:

- Name: Enter your domain address here.
- TTL: This stands for time to live and represents how long to keep a DNS record in seconds. You should leave it at the default value on SPanel (14400) if you’re not sure what to put.
- Type: Since you’re changing an existing MX record, you can’t alter this parameter.
- Value: Put in the mail server address you want the MX record to point to.
When you’ve filled in the correct values, click Save to save your new changes.
That’s how you change an existing MX Record for your domain. Now, let’s explore the steps to create a new MX Record on SPanel.
Step by Step Guide to Create an MX Record in SPanel
Use these steps to create an MX record for your domain.
Step 1: Sign in to SPanel
Log in to spaniel using this URL address, mydomain.com/spanel/login, where “mydomain” stands for your domain name.

Enter the right credentials and click Login.
Step 2: Go to Domains
On the SPanel dashboard, navigate to Domains and click DNS Editor.

Step 3: Add a New MX Record
Under Add a New Record, fill in these parameters correctly:

- Name: Enter your domain address here.
- TTL: This means time to live and signifies how long to keep the MX record in the cache in seconds. We recommend you leave the default value at 14400 if you’re not sure of the value to put.
- Type: Click the drop-down arrow and select “MX” for the DNS record type.
- Value: Enter the preferred email server address you want the MX record to point to.
After you’ve done that, hit the Add Record button to save the new MX record, and you’re golden.
Need Help?
If you encounter any issues with changing your MX records or creating a new one, please reach out to our technical support team to walk you through this guide.
