WordPress is all about customizations. The open-source CMS allows you to tinker with even the tiniest details of your web-building experience. Be it a native functionality or a handy plugin – users can easily play around with their user area, website navigation, menu structure, or design layout.
In this guide, we will focus more on our WordPress Dashboard – what is it, how it works, and how can we customize it to serve our needs better?
What Can You Do With Your WordPress Dashboard?
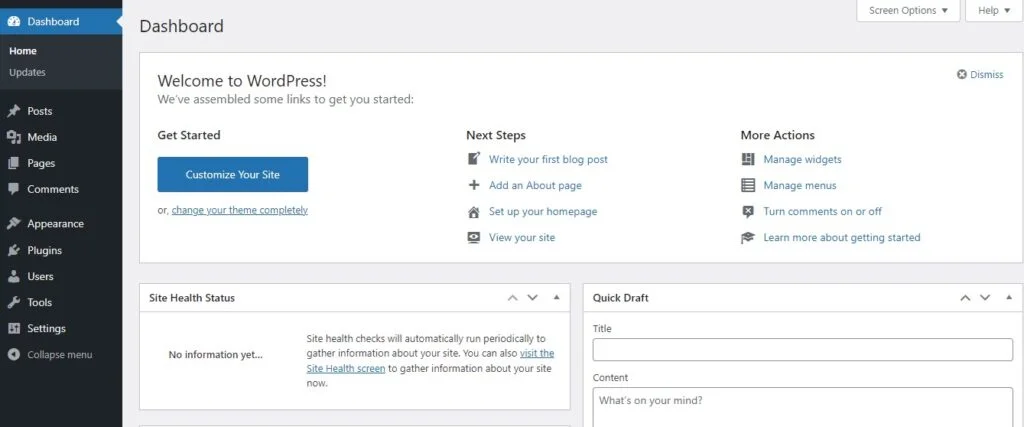
The WordPress Dashboard is your administrative area where you manage your WP website and perform most site-building actions and optimizations. It offers an overview of your online project and various menus to add content, set permissions, activate plugins, change site settings, and many more.

By default, you can access the WordPress admin dashboard by putting /wp-admin at the end of your website URL. But as this is a well-known fact, we strongly suggest you change the path for administrative access upon the WP installation to reduce the risks of unauthorized login.
When you first land in your admin panel, you will see a bunch of helpful widgets in the middle of the screen, things like site status, activity, and news. On the left side are your menus, containing various options and settings. This is where you’ll be spending most of your time customizing different aspects of your website.
But how about modifying the actual dashboard? What can we do to spruce up our administrative panel?
How to Customize Your WordPress Dashboard
Even though the WordPress dashboard is quite intuitive and straightforward, some users might want to simplify it further, rearrange it, or even change its overall design. Luckily, WordPress has got you covered.
Here are a few clever ways to customize your admin panel:
White-labeling the WordPress Dashboard
White-labeling every platform you utilize is a great way to keep your operations in tune with your brand strategy. Whether we are changing the panel logo, switching the admin color scheme, or adding custom design elements – WordPress can help you ensure everything looks as expected.
As with many actions on this list, the easiest way to go about customization is with the proper plugin. In our specific case, one of the best add-ons is called White Label CMS, installed on over 200,000 WP instances already.
With its help, you can:
- Completely customize the WP dashboard
- Add custom widgets to the default screen
- Modify the WordPress login page
- Hide menu items
- Integrate RSS feeds
Of course, this is just one of many solutions chosen mainly because of its versatility. If you are looking for more minor cosmetic changes – you can find an appropriate WP plugin that is closer to your requirements.
Customizing the WordPress Admin Menu Items
Admin Menu Editor is a wonderful plugin for customizing your WordPress dashboard. Over 300,000 active installations and hundreds of 5-star reviews are just some of the tell-tale signs that this add-on is as helpful and reliable as it says on the label.
Once installed and activated, the Admin Menu Editor will allow you to:
- Rearrange menu items via drag-and-drop
- Rename menus, URLs, CSS classes
- Change menu access permissions
- Create submenus
- Hide/Show menu items
Admin Menu Editor also offers a Pro version that lets you assign menu permissions per user role, change colors, and utilize a library of over 600 different icons. Prices start from $29.
Editing the Dashboard Widgets
The dashboard widgets are one of the first things you see on your screen when you log in to your WordPress admin panel. As such, you might want to adjust them to make the most advantage of the information they display.
Naturally, the easiest way to modify your widgets would be with an appropriate plugin. In this case, you can check out tools like Dashboards Widgets Suite or Custom Dashboard Widgets to easily customize your admin area and expand it with even more insightful info. Think of things like error logs, RSS feeds, social media platform integrations, the works.
Provided you have a bit of technical experience, you can add your custom widget to the mix as well.
Simply follow the steps:
- Log into your control panel.
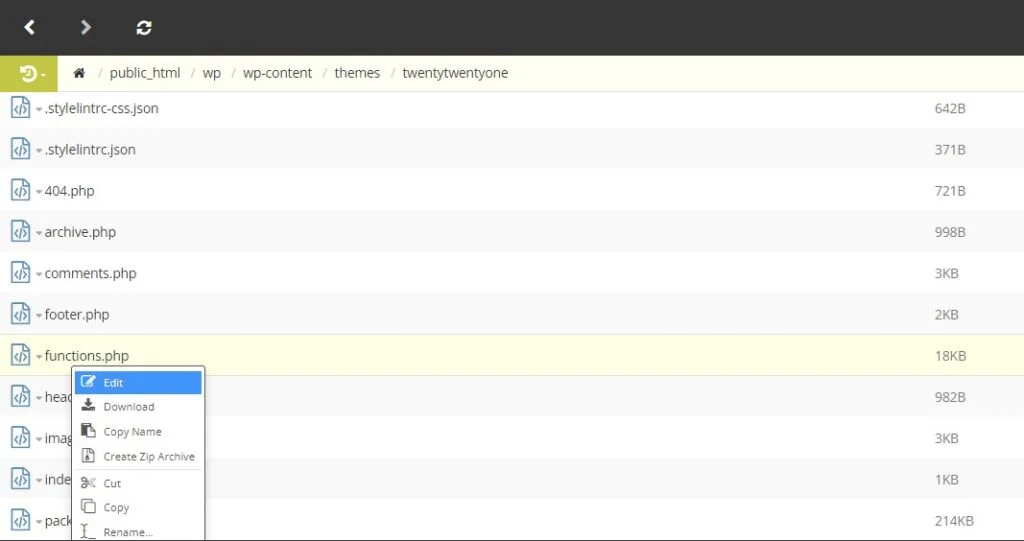
- Go to File Manager.
- Locate the file functions.php, which should be in your wp-content/themes folder.

- Edit the file by pasting your new widget code. Here is a good example:
/**
* Add a widget to the dashboard.
*
* This function is hooked into the ‘wp_dashboard_setup’ action below.
*/
function wpexplorer_add_dashboard_widgets() {
wp_add_dashboard_widget(
‘wpexplorer_dashboard_widget’, // Widget slug.
‘My Custom Dashboard Widget’, // Title.
‘wpexplorer_dashboard_widget_function’ // Display function.
);
}
add_action( ‘wp_dashboard_setup’, ‘wpexplorer_add_dashboard_widgets’ );
/**
* Create the function to output the contents of your Dashboard Widget.
*/
function wpexplorer_dashboard_widget_function() {
echo “Hello there, I’m a great Dashboard Widget. Edit me!”;
}
- Save the changes.
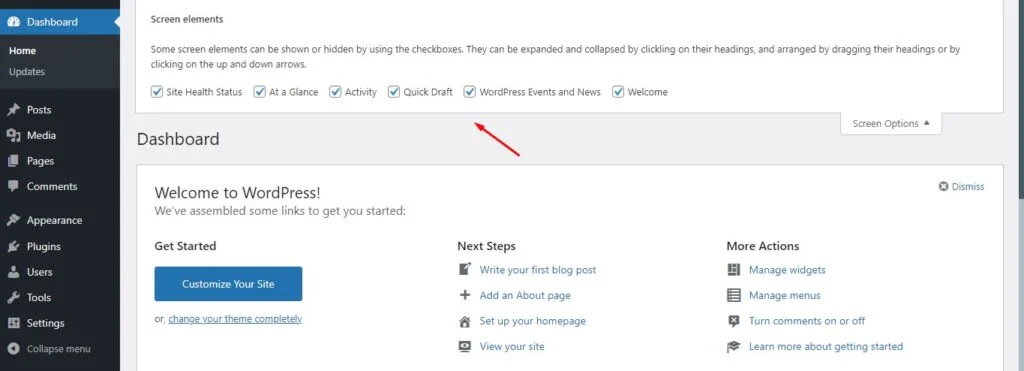
Additionally, if you go to Screen Options on the top right corner of your WordPress dashboard, you can select and rearrange the widgets to better serve your needs.
Adding New Columns to Your Post/Page List
When you go to the Posts or Pages menu, you will see a list of all items in that category. Each one is sorted by several factors – title, author, category, tag, date, etc. To modify the current look or possibly add a new column, you can head to the Screen Options tab in the top right corner.
A new menu will appear, allowing you to fine-tune your lists.

Naturally, you can achieve the same (and more) with the help of a WordPress plugin. Try custom-tailored solutions like Admin Columns and create an even more intuitive environment for your online project.
Changing the Admin Design Scheme
As an administrator, you can utilize admin theme plugins that help you bring more glamour to your WP dashboard. WordPress offers various solutions like Kodeo Admin UI, Aquila, and Fatty to avoid the bland old default aesthetics.
IMPORTANT: If you want to manually change your design layout, you can check out more tips in our guide on How To Change the Admin Color Scheme in WordPress.
Customizing the WordPress Login Page
Another handy modification you can do is to change the outlook of your WP login page. Apart from the obvious branding reasons, moving away from the traditional look shows your users that you are really serious about even the tiniest details of your business.
Starting with the choice of add-ons, you have the Colorlib Login Customizer, LoginPress, Feather Login Page Designer, and a number of other exciting options with stunning free templates and layouts. Each of these significantly expands your design choices and offers user-friendly customization management.
As for the code junkies, we have a little something for you as well. Let’s learn how to replace the WordPress logo on the login page with your own and link it to your business website.
You need to:
- Log into your server via the control panel or FTP.
- Upload your logo into the wp-content/themes/yourthemename/images folder. Make sure the logo is less than 80×80 pixels.
- Edit the file with the following code:
function wpexplorer_login_logo() { ?>
<style type=”text/css”>
body.login div#login h1 a {
background-image: url(<?php echo get_stylesheet_directory_uri(); ?>/images/logo.png );
padding-bottom: 30px;
}
</style>
<?php }
add_action( ‘login_enqueue_scripts’, ‘wpexplorer_login_logo’ );
Replace logo.png with your previously uploaded image.
- Our next step is redirecting the link to our WordPress website. An example code for that is:
function wpexplorer_login_logo_url() {
return esc_url( home_url( ‘/’ ) );
}
add_filter( ‘login_headerurl’, ‘wpexplorer_login_logo_url’ );
function wpexplorer_login_logo_url_title() {
return ‘Your Site Name and Info’;
}
add_filter( ‘login_headertitle’, ‘wpexplorer_login_logo_url_title’ );
Of course, there are lots of other customizations you can apply to the WordPress dashboard in the quest of making it more unique.
IMPORTANT: Keep in mind that any special modifications and additional plugins may cause performance problems and increase the risk of hacker breaches. It’s always recommended to follow numerous security guidelines when working with WordPress.
For more WP-related questions – contact the 24/7 Scala Support Team, and we will gladly solve all your queries.