When looking to establish an FTP connection to your hosting account, using an FTP client is your best bet. FTP clients have the increased flexibility, security measures that make it easy to transfer files without drawbacks.
If you are unfamiliar with FTP clients, they are a piece of software that can log into your FTP server and help you transfer files on your local computer or to external servers.
A number of them are available for use with similar features and user interface, while others have unique features.
In this guide, we’ll walk you through the easy process of establishing an FTP connection to your hosting account using three top FTP clients:
- Filezilla
- Cyberduck
- WINSCP
We will also show you some key points to consider before selecting an FTP client for this process.
Using FTP Clients to Establish a Connection to Your Hosting Account
You can establish an FTP connection in two steps. Let’s explore them.
Step 1: Set up an FTP account in your hosting account
To set up the FTP program, you will be required to set up a New FTP account first, if none is existing.
To do so:
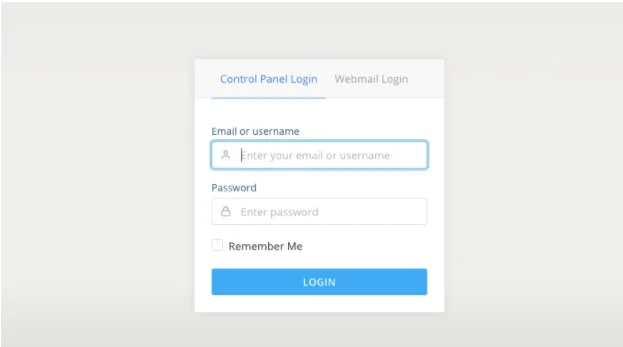
Login to your Spanel account using the default URL of your root domain. This is https://[yourdomain]/spanel.

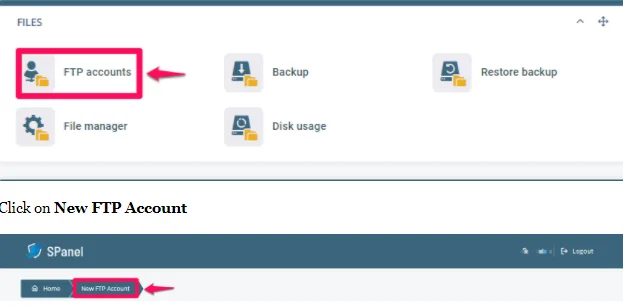
After logging in, select FTP Accounts under the Files section of your sPanel

Click on New FTP Account

You will be required to fill in the following credentials to complete the new account setup process:
- Username: Give your FTP account a username that easy to remember and will be used to access your account at any time
- Document root folder: This specifies the location where you will access your new FTP account. If left empty, the new FTP account will link to your account root directory.
- Password: Give your FTP account a strong password which will be required your new FTP account
- Repeat password: Re-enter the password created in the previous field

Click Create Account

After clicking on Create Account, a message will be displayed saying Successfully created FTP User [yourFTPusername]
Step 2: Connect Your FTP account to your FTP client
The overall process to connect your FTP account to any FTP client is quite similar, with minor differences.
After opening up your preferred FTP Client application, fill in the following login credentials:
- Host: This is your FTP IP address or domain name; write it as yourdomain.com or ftp.yourdomain.com
- Port: This refers to your data server port and has its default number as 21. This field is optional and can be left blank.
- User: Enter your FTP account username in this field
- Password: Type in your FTP account password here
- Logon: Select the type of logon option you would like to use. Select Normal
- Protocol: Here, you are required to select the protocol for transferring files across networks. Select FTP – File Transfer Protocol
- Encryption: At this point, select how you want your data to be encrypted. Choosing Only Use Plain FTP is an insecure connection but the simplest option because it does not require certificates and other configurations. However, at Scalahosting, we recommend selecting the most secure encryption method, which is the Use explicit FTP over TLS if available option.
FTP Connection Using FileZilla
In a previous article, we shared the steps to connect your FTP account to Filezilla.
FTP Connection Using Cyberduck
If you are using Cyberduck, open the Cyberduck application on your computer.
Click on Open Connection
Fill in the login credentials requested in the pop-up window.
Click on Connect to establish an FTP connection.
FTP Connection Using WINSCP
If you are using WINSCP, the process is quite similar too. Login to your WINSCP application, fill in your credentials, and click the Connect button.
Choosing Your FTP Client
When choosing an FTP client to establish a connection to your hosting account, here are a few points to consider:
- OS Compatibility: Choose a client that is compatible with your Operating System. It is also essential to check out the version of your OS that the FTP client supports.
- Security: Top of your list should also be security because file transfer requires an increased security measure
- Simplicity: Look out for an easy-to-use interface with a seamless functionality
- File upload size: You don’t want to select a client that does not support large files transfer.
Filezilla vs Cyberduck vs WINSCP
Let’s compare these FTP clients side by side, so you’ll know what’s best for your situation.
Filezilla
Filezilla is one of the top FTP clients available on the internet. It is compatible with Windows, Linux, and Mac operating systems. It is excellent for transferring files larger than 4GB with a side-by-side display functionality, which helps you locate your files seamlessly.
The interface, though outdated, also displays information on the status of your file transfer process at one glance.
Cyberduck
Cyberduck is another free to download FTP Client with a simple to use interface, making it easy to transfer from your local computers and external servers.
However, Cyberduck is not available for Linux OS users. Cyberduck is an excellent option if you are looking to sync with third-party cloud platforms like Dropbox, Google Drive, Microsoft Azure, etc.
WINSCP
This free file manager is only compatible with Windows, as the name depicts. It has excellent support and documentation resources for its users, which some other clients do not provide.
WINSCP also encrypts all files that are sent through it, giving it an increased level of security.
WINSCP is an excellent option for you if you are a Windows user and you are looking for a client with basic transfer functionalities.
Conclusion
Awesome! Now you know how to use FTP clients to connect to your hosting account.
We hope that our suggestions will help your decision process in choosing the FTP Client right for you. If you need more help or have questions leave us a comment or reach out to our happy-to-help support team.

