PuTTY is a very common terminal used for SSH connections for Windows. However, the native PuTTY application was designed to be lightweight and does not include the key generation feature needed to create the SSH key pair required.
To Generate an SSH key pair to be used with PuTTY, you will need to use PuTTYgen. This small application comes packaged with the PuTTY installer but needs to be accessed separately.
Generating SSH Key Pairs with PuTTYgen

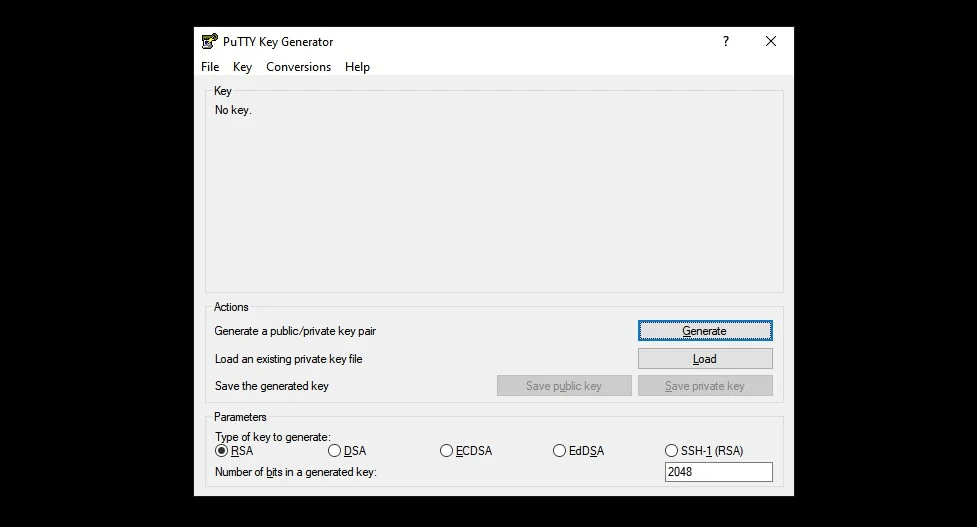
- Step 1. In your Windows search bar, look for PuTTYgen to see if you installed it with PuTTY. If it was not, you would need to download and install it separately. When done, launch PuTTYgen.
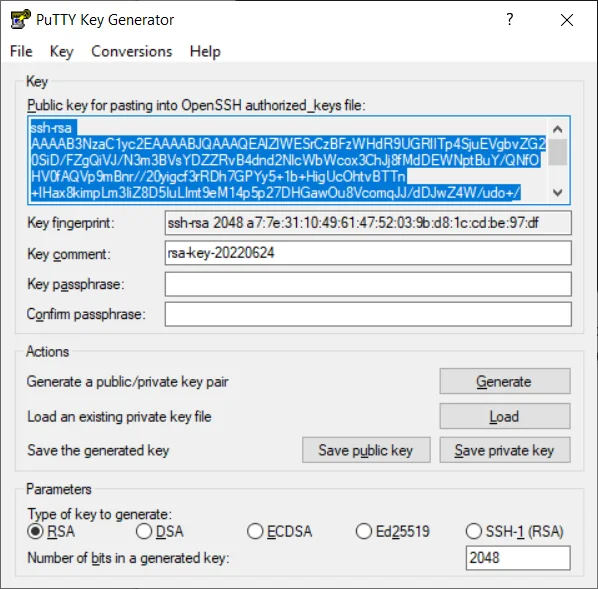
- Step 2. Under the “Parameters” label, select “RSA” as the type of key, then click the “Generate” button. You will be asked to move your mouse around randomly – remember to do this within the small blank area under the “Key” label.
Keep moving your mouse until the key information appears.
- Step 3. Type in the password you choose into the “Key Passphrase” field and again in the “Confirm passphrase” field. This passphrase will be needed when making the SSH connection later.
- Step 4. Save the private key on your computer. You can also save the public key, though it’s not really necessary because you can easily access it by loading the private one in PuTTYgen. If you’re going to configure your server to work with the key pair right now, it’s best to leave the PuTTYgen window open.
Using SSH Keys For Authentication on an SPanel Server
With the keys generated, you need to configure your server and your client to work with them. Here’s what you need to do if you use PuTTY to connect to an SPanel VPS.
- Step 1. Log in to your SPanel server using your username and password.

- Step 2. Public SSH keys used for authentication are stored in ~/.ssh/authorized_keys. If this is the first key you’re saving on your account, you’ll need to create the file yourself.
Here are the commands:
$ mkdir .ssh
and
$ touch .ssh/authorized_keys
NOTE: Make sure you run these commands from your account’s home directory. If you’re not sure whether you’re in the right place, you can use $cd ~ to navigate to it.
- Step 3. Set the file’s ownership and permissions. If you skip this step, your SSH client will be unable to access your public key and log you in. The commands you need to use are:
$ chmod 700 .ssh
$ chmod 600 .ssh/authorized_keys
$ chown $[your username]:[your username] .ssh -R

- Step 4. The next step is to paste your public key inside the authorized_keys file. You need to go back to the PuTTYgen window and copy your public key from the field at the top. Make sure you select every single character.

Now, go back to the command-line interpreter and enter the following command:
$ nano .ssh/authorized_keys
This opens the authorized_keys file in the GNU nano text editor. A simple right-click pastes your public key into the file. Press Ctrl+x and confirm that you want to save the changes.
If you want to add another public key, you need to paste it on a new line.
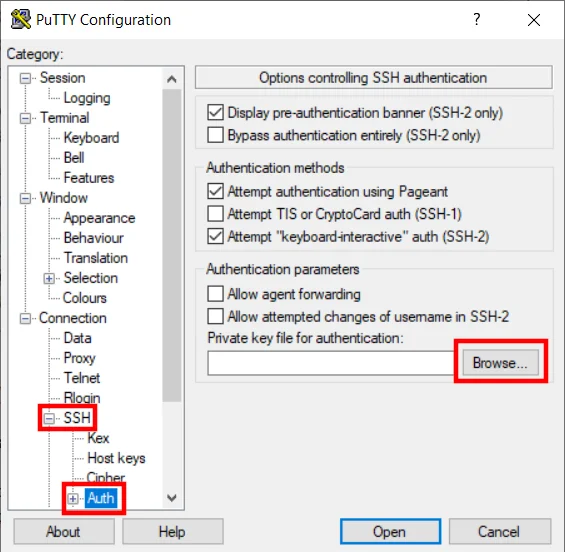
- Step 5. Finally, it’s time to configure PuTTY to work with the new key pair. Open the client and go to SSH > Auth. Click the Browse button and select your private key.

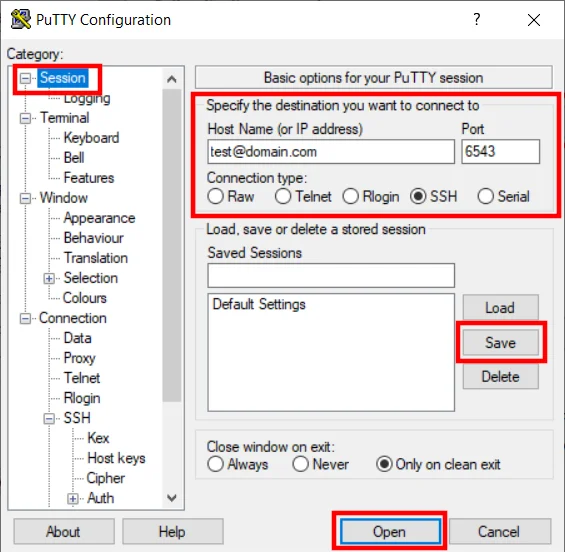
Next, you can go to the Session menu and make sure you’ve entered the correct details for the host. If you click Save, PuTTY will store the configuration, and you won’t need to select your private key every time you want to log in.

After you click Open, PuTTY will use your private key to establish a connection to the server. If you’ve configured your key pair to use a passphrase, you’ll need to enter it at this point.
