If you purchase a VPS hosting solution, you effectively get a server that you need to manage, and it is your job to ensure that all the projects hosted on it run smoothly. This may sound like an intimidating task, but it needn’t be.
With Scala Hosting’s managed VPS plans, you can create individual accounts for the different projects hosted on your virtual server, and you can control how much of the machine’s resources they are allowed to use. Best of all, you do all this through SPanel – a proprietary management system that comes with an easy-to-use interface and plenty of useful features.
What are the limitations that I can impose on accounts hosted on my VPS?
There are a couple of main aspects to ensuring that everything hosted on your virtual server performs well. First, you need to make sure that there’s enough disk space for all accounts running on the server, and you also need to take the necessary precautions to keep individual accounts’ resource usage at bay.
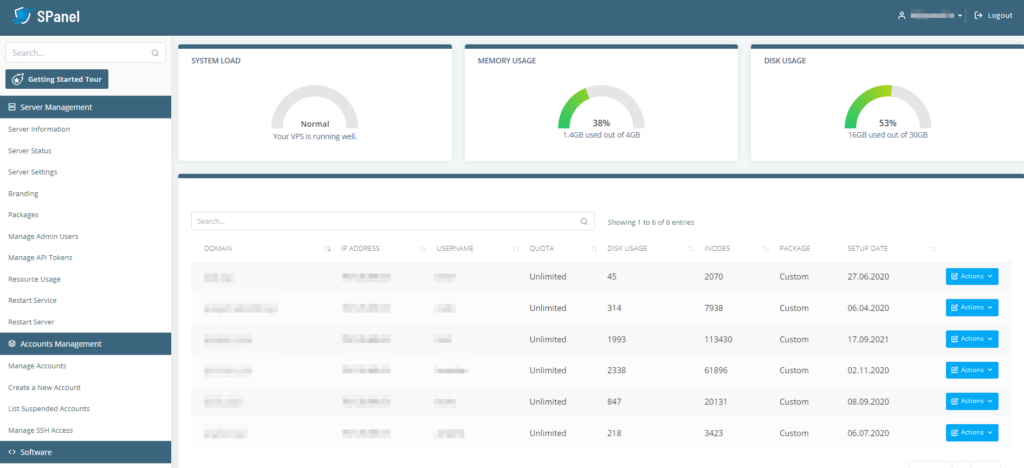
The SPanel that comes with your managed VPS hosting package gives you the tools to ensure that all projects can healthily co-exist on your virtual server. For every account you create, you can set a Disk Quota and an Inodes Quota.
You probably won’t have problems understanding the disk space limit. Every VPS has a finite amount of storage space, and if you have many accounts running on it, you need to distribute it and ensure that there’s enough of it for everyone.
Some of you may not be familiar with the term inode. It’s short for index node, and it’s a record that is kept in a table and contains information about every single file and folder stored on the account. The number of inodes equals the number of files and folders, and a limit is necessary because the more inodes a server needs to process, the more resources it’s going to use. Too many files and folders slow down the process of backing up and restoring data as well.
In addition to storage space and inodes, you can also limit the number of Addon domains, Emails accounts, and databases SPanel users can create.
Changing the disk and inodes quotas through SPanel
Modifying individual accounts’ quotas via SPanel is, like most tasks done through it, a quick and easy process. Here are the exact steps.
- Log into SPanel’s Admin Interface.
You manage all use accounts via SPanel’s Admin Interface, so this is where you need to start. The default login URL is https://[your server’s IP]/spanel.

- Open the Actions menu next to the account you want to modify and click Change Limits.
After you log in, you’ll see a list of all SPanel user accounts on your server. Locate the one you need to modify and select Change Limits from the Actions drop-down menu next to it.

- Set the limits and save the changes.
The popup that appears let you set the quotas for the account’s storage space, inodes, addon domains, email accounts, and MySQL databases. if you have preset packages already set up, you can use the drop-down at the top of the popup. You can also create a package with the limits you’ve set with the Create a Package button. Once you’re done, click Change to set the limits for the account.

How to Modify the Disk and Inodes Quota
