We all know that the future of your entire project could depend on search engine optimization. We also know that an XML sitemap is instrumental in ensuring search engine bots crawl and index your content.
WordPress users have access to plugins, so for them, creating an XML sitemap requires no advanced technical skills whatsoever. The same goes for submitting the sitemap to Google.
The process is straightforward, but there are a few things you need to bear in mind. We’ll now go through them.
Creating an XML Sitemap
It’s possible to create an XML sitemap manually. There are online tutorials showing you what you need to edit, and you can even find ready-made code that you can use.
However, this involves modifying your WP theme’s files. You need to be confident working with the theme editor in the WordPress dashboard, and understanding a bit of PHP syntax won’t go amiss. Even if you have the knowledge and skills, the chances of something going wrong are much more significant than they are if you leave the hard work to a plugin.
This is what most people do, and a large portion of them pick Yoast SEO as their add-on of choice. Hailed as the #1 WordPress SEO plugin, Yoast has over 5 million active installations and quite a few features, even in the free edition.
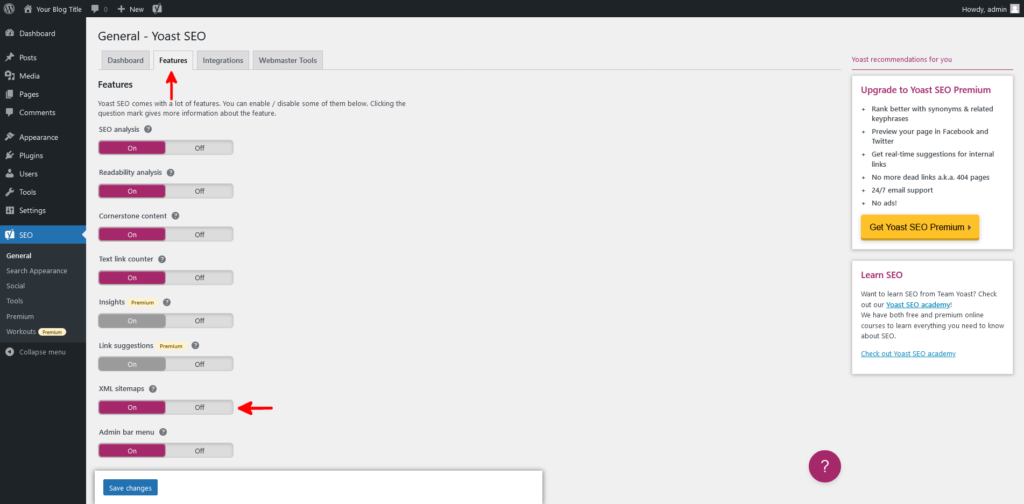
Yoast will create an XML sitemap upon installation. It’s among its core features, and it’s enabled by default. You can confirm that it’s on through the Features tab in Yoast’s menu inside your WordPress dashboard.

If you click the question mark tooltip above the toggle switch, you’ll also find a link leading you to the actual sitemap.

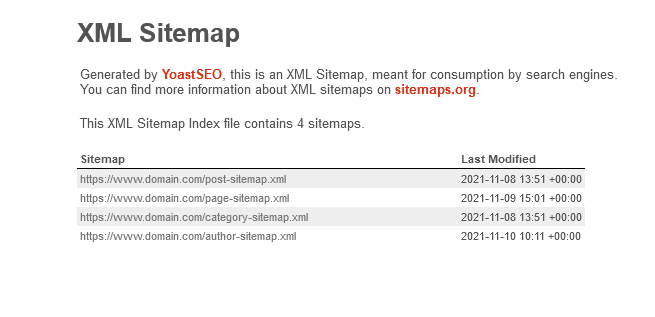
By default, the URL of your XML sitemap generated by Yoast SEO is https://[your domain name]/sitemap_index.xml.
It should look something like this.

Make sure you know the sitemap’s URL, as you’ll need to give it to Google in a minute. First, however, you need to verify that you own the website.
Verifying Ownership of Your WordPress Site With Google Search Console
Google lets you monitor your website’s indexing and visibility through the Google Search Console.
It’s a completely free service, and the only requirement for using it is an active Google account. Before you can add your website to the Google Search Console, you need to verify that you own it.
Yoast SEO can help you with that as well.
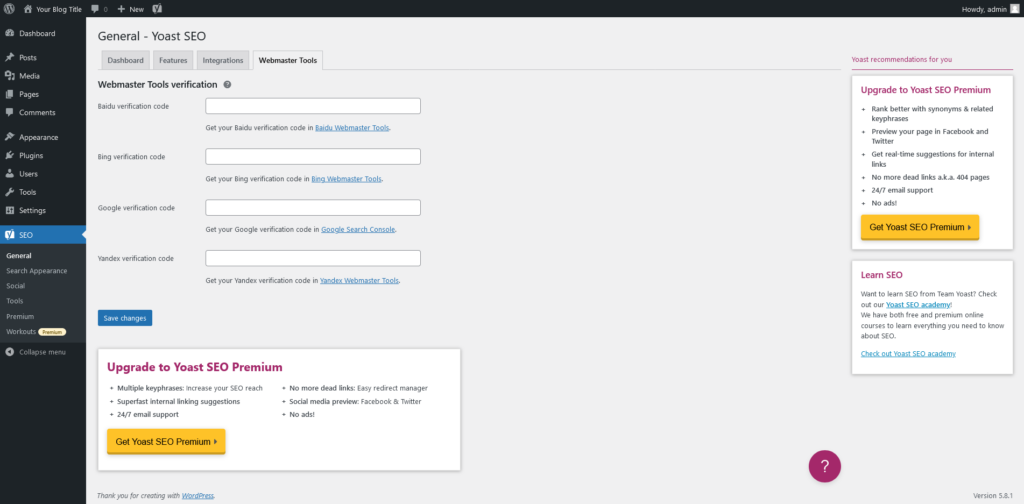
If you go to the Webmaster Tools tab in Yoast’s menu, you’ll find several options for integrating your site into the monitoring solutions offered by some of the world’s most popular search engines.

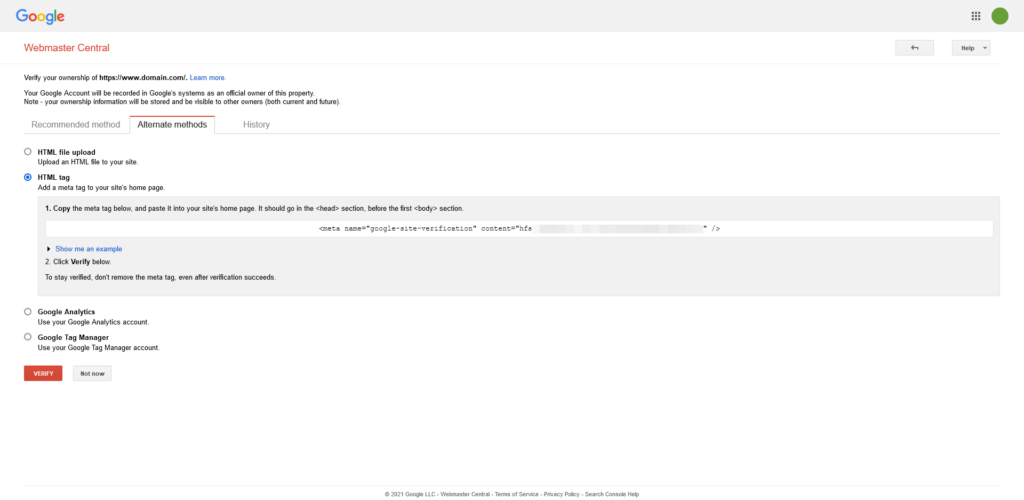
The Google Search Console will redirect you to a page showing you several different options for verifying the ownership of the domain. Select the HTML tag radio button.

Google will give you a meta tag that must be pasted between the <head> and <body> tags on your site’s homepage. You can do it on your own, but an easier option would be to let Yoast take care of it.
Copy Google’s code, go back to Yoast SEO’s menu, paste it in the Google Verification Code field, and click Save Changes.

Finally, go back to the Google Search Console and click Verify to complete the process.
Submitting Your WordPress XML Sitemap to Google Search Console
With the domain verified and added to your Google Search Console, it’s time to add the XML sitemap.
Log into your account and make sure you’ve selected the correct domain. Select the Sitemaps menu and make sure there are no invalid and outdated entries.
Enter the sitemap’s URL into the Add a new sitemap field and click Submit.
Why Do I Receive Email Alerts from Google Search Console?
By default, Google Search Console is configured to send you email notifications regarding important events surrounding your website. These events include:
- Signing up for the service as a site owner.
- Another user signing you up as a site owner.
- A provider automatically assigning you as a site owner.
Because users often don’t pay enough attention to their Search Console and Analytics reports, Google also sends notifications regarding things like dramatic drops in clicks and traffic.
Google also gives you an email preference page to control what sort of messages and notifications you receive.
Using Google Search Console to Detect Sitemap Problems With Your WordPress Site
Thanks to your XML sitemap, the search engines know the exact structure of your content, and they can crawl it more easily as a result. It’s essential to make sure they have constant access to it.
The Status column in the Sitemaps section of the Google Search Console tells you if the sitemap is reachable at the moment. If you see anything other than Success in this section, you need to start troubleshooting the problem.
If Google can’t reach your sitemap, the first thing you need to check is whether your site is up. If it is, you may need to verify that you’ve submitted the correct URL. Try loading the sitemap in your browser to make sure it’s accessible.
Sometimes, deleting the sitemap from the Google Search Console and resubmitting it solves the problem, and if it doesn’t, you need to check the XML file’s permissions and make sure search engine bots can read it.
Flushing the site’s cache and configuring your caching plugin not to cache the sitemap may work, as well.
Last but not least, you might want to check your hardware resources usage. If you have a large sitemap with lots of links, the crawlers could overload the server to the point where it will block them to prevent outages. If this happens, you will either need to exclude some posts and pages from your sitemap or look for a more powerful hosting solution.
