Your website’s DNS zone file is a file in text format that is stored in a DNS server i.e., nameserver, and they are defined by the RFC 1034 and 1035.
The DNS Zone file may contain your domain’s MX records, IP data, name data, and other records. They also house connecting data to communicate with external DNS servers.
Where and how you add, change, or delete your domain’s DNS records depends on where you host your DNS records. Ultimately, where your nameservers are pointing to determines how and where you can control your DNS zones files.
We’ll cover how to manage these files:
- A record
- CNAME
- MX record
- NS record
- SPF record
- Subdomain Records
- TXT record
Let’s dive in.
Where to Manage Your DNS Zone Files
You can manage your DNS zone files in three ways. Let’s explore them.
Option #1: Registered Your Domain Name on ScalaHosting
If you registered your domain with ScalaHosting and using the nameservers here, then you can manage your DNS zone files in your SPanel account.
Option #2: Using the ScalaHosting Nameserver but Not Registered on ScalaHosting
This option applies to you if you are using the Scalahosting nameserver but registered your domain name elsewhere. You’ll also manage your DNS zone files in your SPanel account. An example here would be if you’re hosting your website on ScalaHosting or using the DNS hosting here.
Option #3: Neither Your Nameserver Nor Domain Registration is on ScalaHosting
If you don’t have your nameserver or domain registration on ScalaHosting, then you wouldn’t need to manage your DNS zone files here as well. In this case, you’ll need to work with your DNS and/or website hosting company to manage your DNS zone files.
Manage Your DNS Zone Files at ScalaHosting
If you have your DNS at ScalaHosting, you can add, change, or remove DNS records in your DNS manager on the SPanel.
Follow these steps to access all your records. – and you can add, change, or remove records as you see the need.
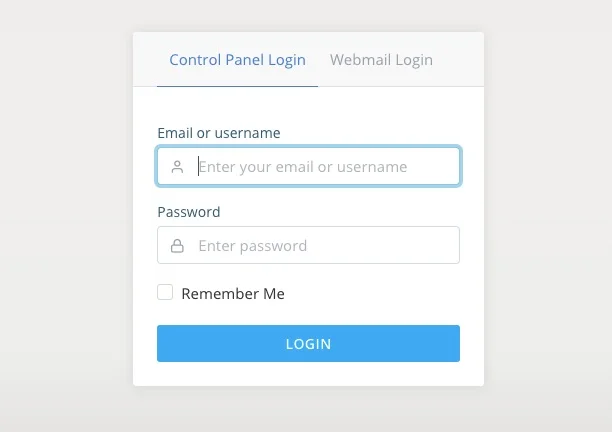
Login to SPanel’s User Interface.
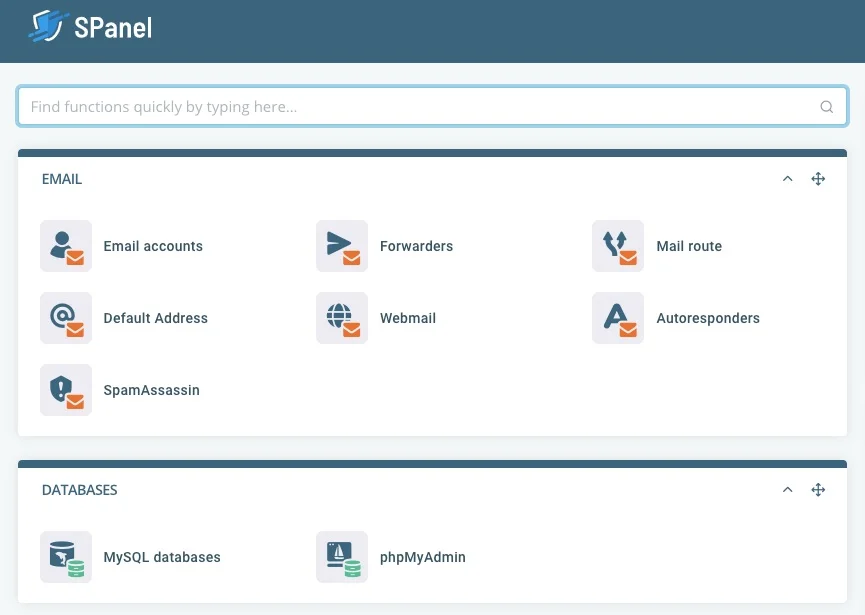
Search for and find the Domain selection. That’s where you’ll manage your DNS zone files.
A Record Management in SPanel
Your domain’s A record is a DNS record that’s useful for connecting your domain to an IP address that leads your domain visitors to a website.
How to Add an A Record in SPanel

In the Name, enter @ to redirect to your current domain or the domain name or subdomain you want to redirect to. If adding a domain name, make sure to add a period at the end of the domain name. For example, your yourdomain.com. with the period in the end.
You can also use other names like FTP if it’s an FTP record.
The TTL (time to live) is given in seconds automatically. Its default setting is 14400 seconds and you can change it to as short as 30 seconds if you wish.
Choose A from the dropdown of the types of records in your SPanel account.
In the Value box, enter the IP address you’re setting as the host destination.
How to Edit or Remove an A Record in SPanel
You can remove an A record by scrolling down the DNS editor page in your SPanel.

Once you’ve found the A record you want to change or delete, take these steps :
- Click the blue Edit button on the record you want to alter.

- There you can change the records as you want. And click Save when you’re done editing.

- If you want to delete the record, click Delete.

- And if you’ve made changes but don’t want them to apply, click Cancel.

CNAME Record Management in SPanel
The CNAME record adds a prefix to your domain name. It’s considered, at times, as a type of subdomain. The difference though, with the CNAME and the A records, is that the CNAME record can’t point to an IP address but can only point to another domain name or URL address.
For example, you can create a CNAME record for shop.yourdomain.com that points to a different URL, like Shopify, Amazon, or other storefronts.
How to Add a CNAME Record in SPanel

Add a name to the Name box. The TTL (time to live) is given in seconds automatically. Its default setting is 14400 seconds and you can change it to as short as 30 seconds if you wish.
Choose CNAME from the dropdown. Add the website you want to direct the domain name in the Name box to in the Value box.
Click Add Record.
How to Edit or Remove a CNAME Record in SPanel
You can edit or remove the records from the DNS editor when you scroll down the page.

Click the blue edit button.

You would edit or delete the CNAME record from there. And if you choose to not apply a change before you click delete or edit, you can click cancel.

MX Record Management in SPanel
MX records are unique to different email services. Your MX record is responsible for managing your email address and ensures your email message gets to your inbox.
In ScalaHosting, you get your free email service automatically and you can manage it from the SPanel.
How to Add an MX Record in SPanel

Add a name, the domain name of the email provider—for example—to the Name box. The TTL (time to live) is given in seconds automatically. Its default setting is 14400 seconds and you can change it to as short as 30 seconds if you wish.
Choose MX from the dropdown menu. Set the priority, note that the smaller the value the higher the priority. So 0 has a higher priority than 1, which has a higher priority than 2, and so on.
Put the value, like your mail server’s address. For example, smtp.yourmailserver.com. Always use a period at the end of the addresses you add to your site’s MX records.
How to Edit or Remove an MX Record in SPanel
To edit or remove an MX record from your DNS editor, scroll down the DNS zone.

Click on the blue Edit button.

You can edit or delete an MX record from there. If you choose to not apply any changes you’ve made before saving or deleting them, just click the Cancel button.

NS Record Management in SPanel
Your NS or nameserver record houses your nameserver information. Use the NS record to identify the nameservers that you should use if your domain name is not registered with ScalaHosting if you want to manage your nameserver with ScalaHosting. This is an advanced custom DNS record.
How to Add an NS Record in SPanel
You’ll need the domain editor to view and manage your domains. To find the domain editor, you can either scroll down the page or use the search function at the top of your SPanel to view your domains and edit them.
If you choose to use the search function, just enter “domains” in the search box to find it.
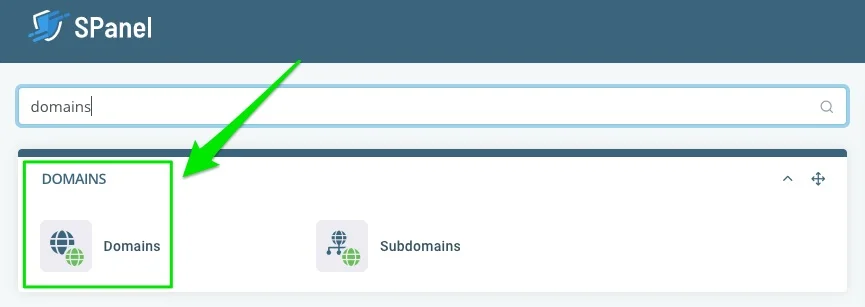
Alternatively, scroll down to find Domains on the page. Click on it.

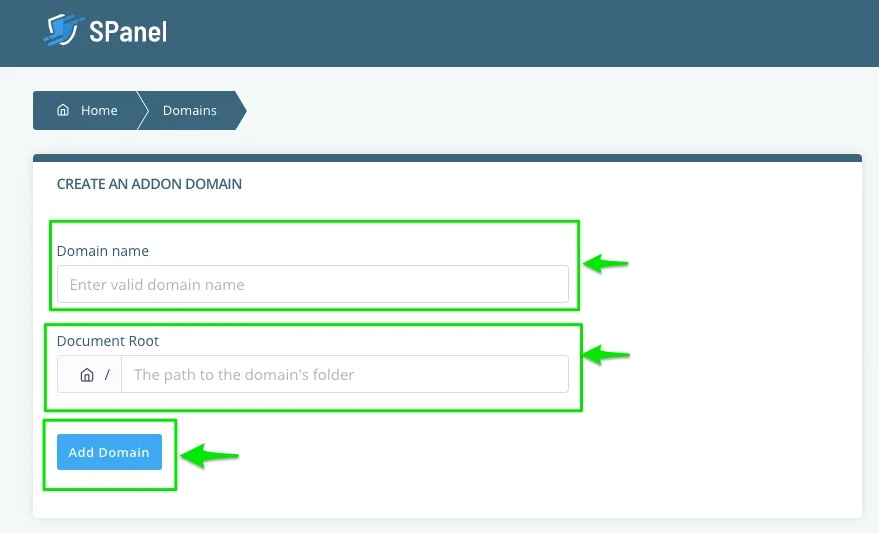
You can now create the addon domain by entering your domain name and the document root path. And then the “Add Domain” button.
How to Edit or Remove an NS Record in SPanel
You can modify an existing domain in your Domain area as well. Scroll down to “Modify Domain” and then make the changes you want, including deleting an existing domain.

SPF Records Management in SPanel
The Sender Policy Framework record, or SPF record for short, is a type of TXT record that lets you introduce and use email sender policies. It’s an advanced DNS record.
How to Add an SPF Record in SPanel

Add the name of your SPF record to the Name box. The TTL (time to live) is given in seconds automatically. Its default setting is 14400 seconds and you can change it to as short as 30 seconds if you wish.
Select TXT from the dropdown menu labeled Type. Enter your SPF value, for example, you can use v=spf1 mx -all to show that emails are allowed from your mail server only and no other server.
Click Add Record.
How to Edit or Remove an SPF Record in SPanel
Scroll down the DNS editor to find the SPF record you want to modify or delete.

Click the blue Edit button.

When you’re done making changes, click Save. Or click delete to remove the record. If you’ve made changes but do not want to save them, click cancel to retain the previous settings.

Subdomain Records Management in SPanel
Subdomain is any DNS record that is on a prefix of your domain name. For example, shop.yourdomain.com. You can create a subdomain with an A record, CNAME, or MX record. However, in the SPanel, you can create a subdomain record right in the dashboard.
How to Add a Subdomain Record in SPanel
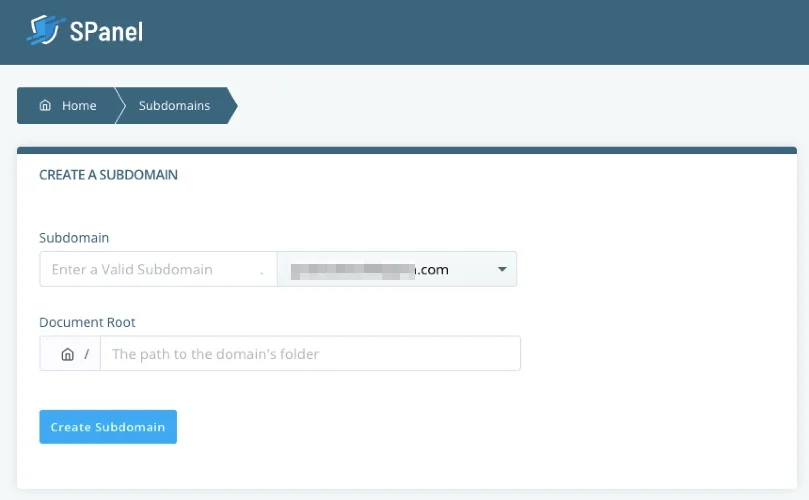
In your SPanel dashboard, search for Subdomain or scroll down to find it under Domains. Click Subdomains.

Add the subdomain prefix, enter the document root, and click create subdomain.
How to Edit or Remove a Subdomain Record in SPanel

Select the domain you wish to delete and remove click Delete Selected. Or change your subdomain setting by clicking the blue Action button and selecting the edit action you want to perform.
TXT Records Management in SPanel
TXT records allows you to insert email sender policies, verify domain ownership, or add other text-based content to your DNS records. You can use a TXT record for DKIM, SPF, DMARC, and site verification records.
Go to your SPanel and access the DNS editor, and follow the exact steps I explained in the SPF record section above. You’ll have to add a different value depending on the TXT record you are adding to your DNS zone file.

Some TXT records might require TTL changes while others don’t. Since the TXT record has varying uses, make sure to follow the one relevant to your use.
Need Help?
If you ever need help with managing your DNS zone files, reach out to our support. We are always available and happy to help.
