IMAP, which stands for Internet Message Access Protocol, is an internet protocol used by email clients to access and store messages on the mail server.
We recommend the use of IMAP whenever you want to access mails from different devices. With IMAP, emails are not downloaded directly to your device. Instead, you get them from your email service.
This means that your emails are not easily lost even if your device gets missing. They can be pulled from your email service into any device whenever you need them.
This article will show you how to add an email address to an email client using IMAP settings.
Requirements to Add An Email Address to an Email Client Using IMAP Settings
When it comes to adding an email address to any email client, most email clients use a similar process and might only differ in the instructions you apply.
To add an email address to any email client using IMAP, you will require the following configuration details:
- Full Name or Display Name: This is the name that will be displayed when you send an email
- IMAP Server name
- IMAP Server Encryption type
- IMAP Server Port
- Outgoing Mail (SMTP) Server name
- SMTP Encryption type
- SMTP Port
- The email address
- Password to the email address
You would usually find these configuration details in the settings section of your email client.
How To Add An Email Address to Gmail Using IMAP Settings
If you have a Gmail account, follow these steps to add your email address to any email client using IMAP settings:
Log into your Gmail account.
Click the Settings icon.

Click on See all settings.

Go to the Accounts & Import selection.

Select add a mail account.

A Gmailfy window will be opened. Enter the email address you would like to add to Gmail.

Click on Next.

Select Link accounts with Gmailify and click Next.

If your connection was successful, a success message will be displayed.

It is important to note that adding an email account to Gmail on an Android or iOS phone is quite different. This is where they will require your IMAP and SMTP details before linking your account. If you would like to learn more about it, check out this free resource.
How To Add An Email Address to Outlook.com Using IMAP Settings
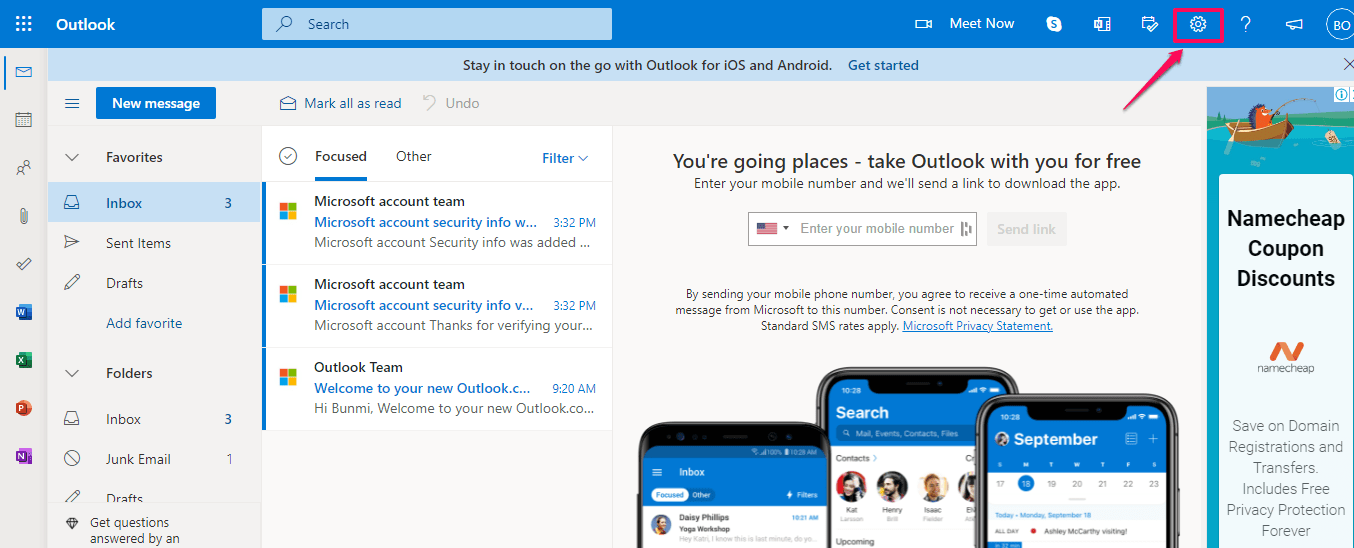
Log into your Outlook.com account.

Click the settings icon.

Click on View all outlook setting.

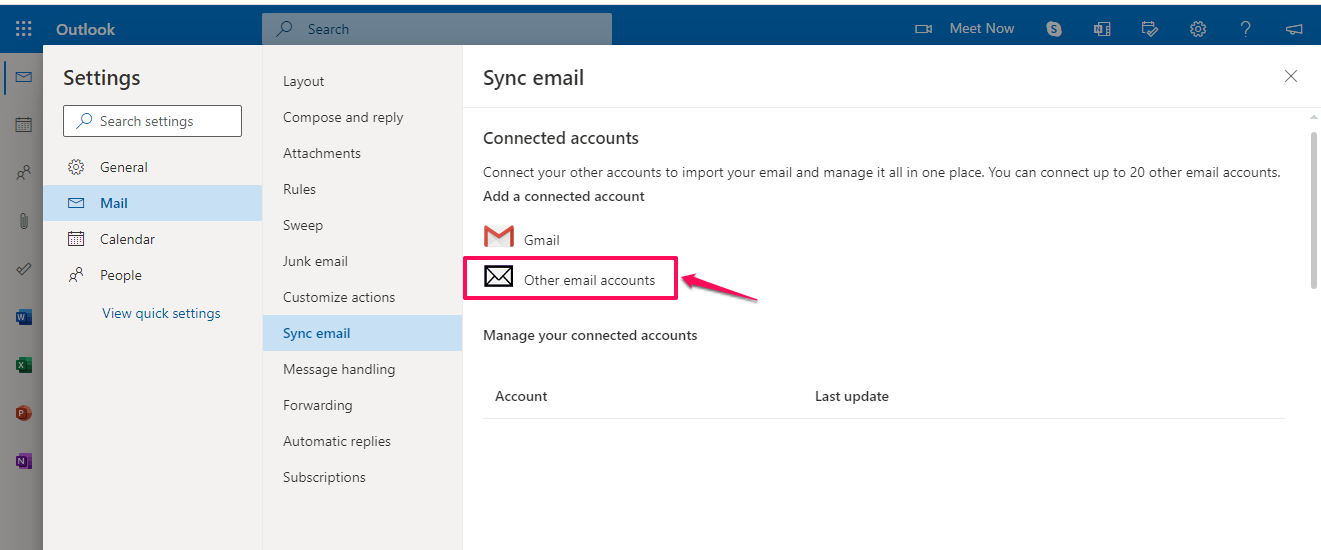
Click Sync email on the side panel

Click other email accounts under the connected accounts section.

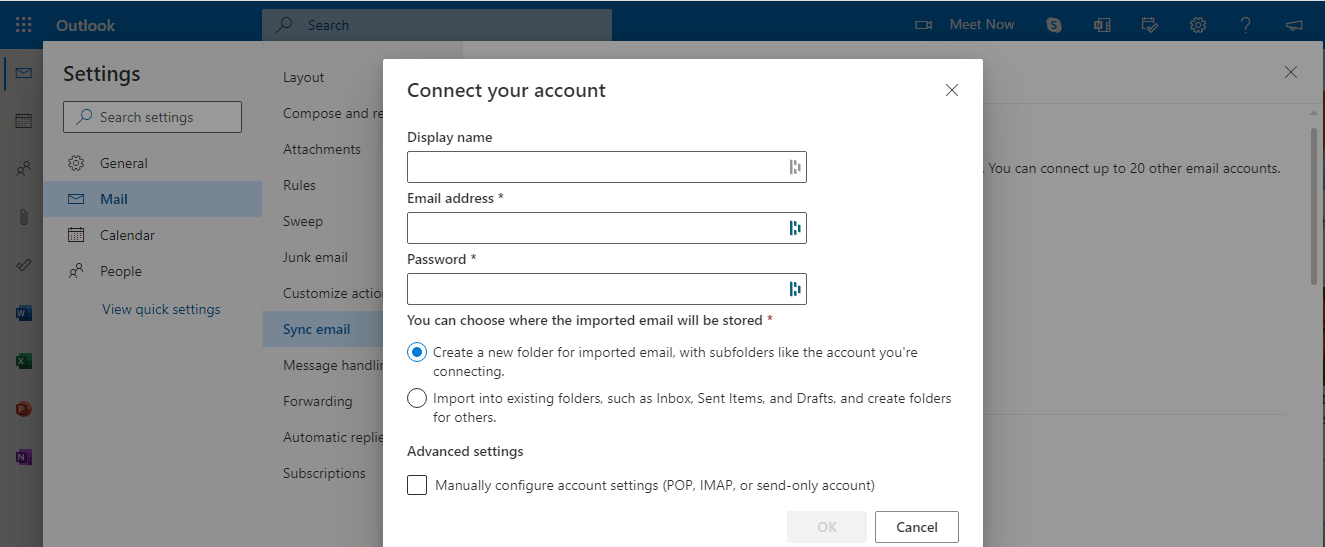
A connect your account dialog box will be displayed.

Type in your Display name in the box provided. The display name is what recipients will see when they receive an email message from you.

In the box provided, type the email address you want to connect to your Outlook.com account.

In the Password box, enter the password of the account you want to connect to your Outlook.com account.

Under the Advanced settings, click on Manually configure account settings.

Select a storage option for the imported messages

Select a connection type, IMAP

In the Incoming (IMAP) server, enter your Hosting server name.

The Incoming server port value will change automatically:
- For IMAP, the port is 993.
Check that the Authentication list box is Basic.
Check that the Encryption list box is on SSL
In the Outgoing (IMAP) server box, enter your Hosting server name. Use the same method as that of the incoming server.

The Outgoing server port value will also change automatically to 587
Click OK.
If your email account were connected successfully to Outlook.com, it would appear under Manage your connected accounts.
If the connection was unsuccessful, verify the information you initially provided
How to Add an Email Address in Your SPanel to an Email Client Using IMAP
- Log in to SPanel’s User Interface at yourdomain.com/spanel/login
- Create the email you want to add to your email client via IMAP if you haven’t created the email in the past.
- Or choose from the list of emails you have already added
- Click on the blue Action button of the email you want to connect to an email client

- Click Connect device from the dropdown menu.

- You’ll find the IMAP configuration details, save them and use them to add your email address to an email client.

Conclusion
As long as you have the correct configuration details and follow the steps shown in this article, adding an email address to any email client will be a walk in the park. If you encountered any challenge while setting this up or need tailored support for a particular email client, please leave feedback, and we would get in touch with you as soon as possible.
