The error 403 forbidden occurs when you try accessing a forbidden resource or page. It’s a server response code that signals you lack permission to access the page or resource. The server recognizes the connections and authenticates the user but stops the visitor from viewing the page or resource.
Some of the common causes of the error include:
- Incorrect file permission
- Incompatible WordPress plugins
- Corrupted .htaccess file or incorrect settings
- An IP address block
Resolving error 403 forbidden could be tricky unless you know the precise cause. But following these steps could help you troubleshoot and fix the error.
Troubleshoot Your .htaccess File
Corrupted or incorrect .htaccess file settings are one of the leading causes of the error. You could only find out if the file is the reason for the error by deleting it from your file manager. Then visit the website or page to check if deleting the file resolves the error. If it does, ten, the .htaccess is the culprit.
Now, log in to your WordPress backend to auto-generate a new file or create a new one manually from the file manager. Here’s how to run all these tasks from the SPanel—Scala Hosting’s all-in-one control panel.
Step 1: Log into SPanel’s User Interface.
Log in to your SPanel at www.domain.com/spanel/login (don’t forget to replace yourdomain.com with your actual domain).

Step 2: Open the File Manager
The file manager is an intuitive web-based interface for seamlessly managing files and folders. It lets them create, edit and permanently remove files and folders from their hosting accounts. They can also copy, move and rename files and folders, including the .htaccess file.
To open the file manager, scroll to the FILES section on the control panel and click File manager.

Select your website’s root directory. If you wish to edit the .htaccess file of your root domain, then choose the public_html from the list of folders.

If it’s for a subdomain, then open the folder for that subdomain.
Step 3: Delete the .htaccess File
Before deleting the file from your file manager, make sure to save a copy to your computer. Just scroll to the file, select the file by left-clicking it, then click the Download icon to download to your computer.

Now select Delete to remove permanently from the file manager.

Visit the page to check if it’s working fine now.
If yes, it means the .htaccess was corrupt. To generate a new fresh one, log in to your WordPress admin dashboard, click Settings > Permalinks. > Save Changes without making any changes on the page.

Click the Save button without making any changes to the text boxes to prompt WordPress to auto-create a fresh .htaccess file for the website.
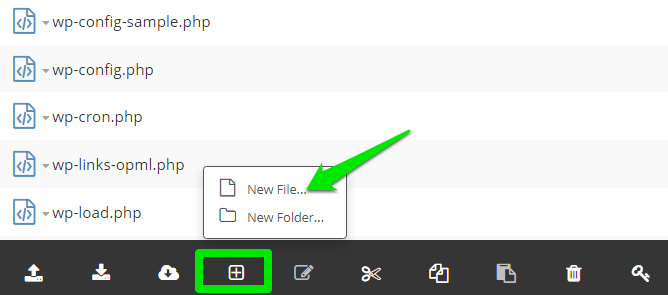
You could create the file manually via the file manager. To do that, open your domain folder; as already explained above, click the New File/Folders icon and select New File.

Name the new file .htaccess and save it.
If you have essential settings in your old .htaccess file, then carefully copy them into your new file without mixing up the codes, of course, ignoring the lines that might be responsible for the error. If this step doesn’t fix the error, consider the next step and ensure regenerating a fresh. htaccess before proceeding.
Reset File Permissions
Incorrect file permission settings could cause the page to return error 403. Each time you create a file, SPanel auto-assigns specific default permission. The file permission controls how people read, write and execute the file, including you, your team, and the public.
So, resetting the file permission could help resolve the issue. To get it done, log in to SPanel, open the file manager > domain’s folder. Please find the file that returns error 403 forbidden when visited and right-click it.
If it’s the homepage, locate the index file (index.html or index.php) and right-click it.

Click CHMOD from the menu, then set your file permissions.

Then click the OK button to save the changes. Revisit the page to confirm if this step resolved the error.
If it doesn’t, then an incompatible plugin is likely the cause. Proceed to the next step to disable the plugin.
Disable WordPress Plugins
If the first two steps fail to resolve the error, then disabling all your plugins should do the trick. So, deactivate them and visit the website to see if it works fine.
If the page loads fine, then a plugin is responsible for the error. But don’t freak out if your website now looks ugly—deactivating all plugins often wrecks a website.
Follow these steps to return your website to its original state and identify the incompatible plugin. But first, here’s how to deactivate all your plugins at once.
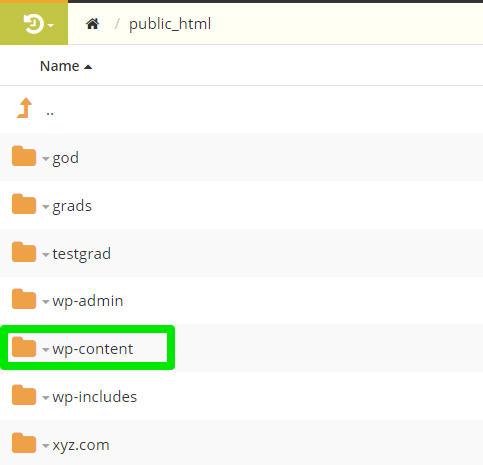
On your SPanel dashboard, locate the wp-content folder in your domain directory—that’s public_html for the root domain.

In the folder, locate the plugins folder, right-click it and select Rename.

Append .old or .disable at the end of the folder name, then save the renamed folder to deactivate all its plugins at once.

If deactivating all the plugins resolves the error, then reactivate the plugins by renaming the plugins folder to its default name to restore your website to its original state.
Then follow these steps to identify the problematic plugin:
- Open the plugins folder and rename the first plugin in the folder to deactivate it.
- Visit the page to confirm that it’s working fine.
- If disabling the plugin resolves the issue, then remove the plugin permanently by right-clicking and selecting Delete.
- But if it doesn’t, then reactivate the plugin and disable the next one.
- Do this until you find the plugin responsible for the error.
And when you do, delete the plugin and exit the SPanel.
What Next?
But if disabling all the plugins fails to resolve the error, then reactivate them and contact our support for quick assistance.